1998 OPEL FRONTERA change time
[x] Cancel search: change timePage 2281 of 6000
7A1–36
TRANSMISSION CONTROL SYSTEM (4L30–E)
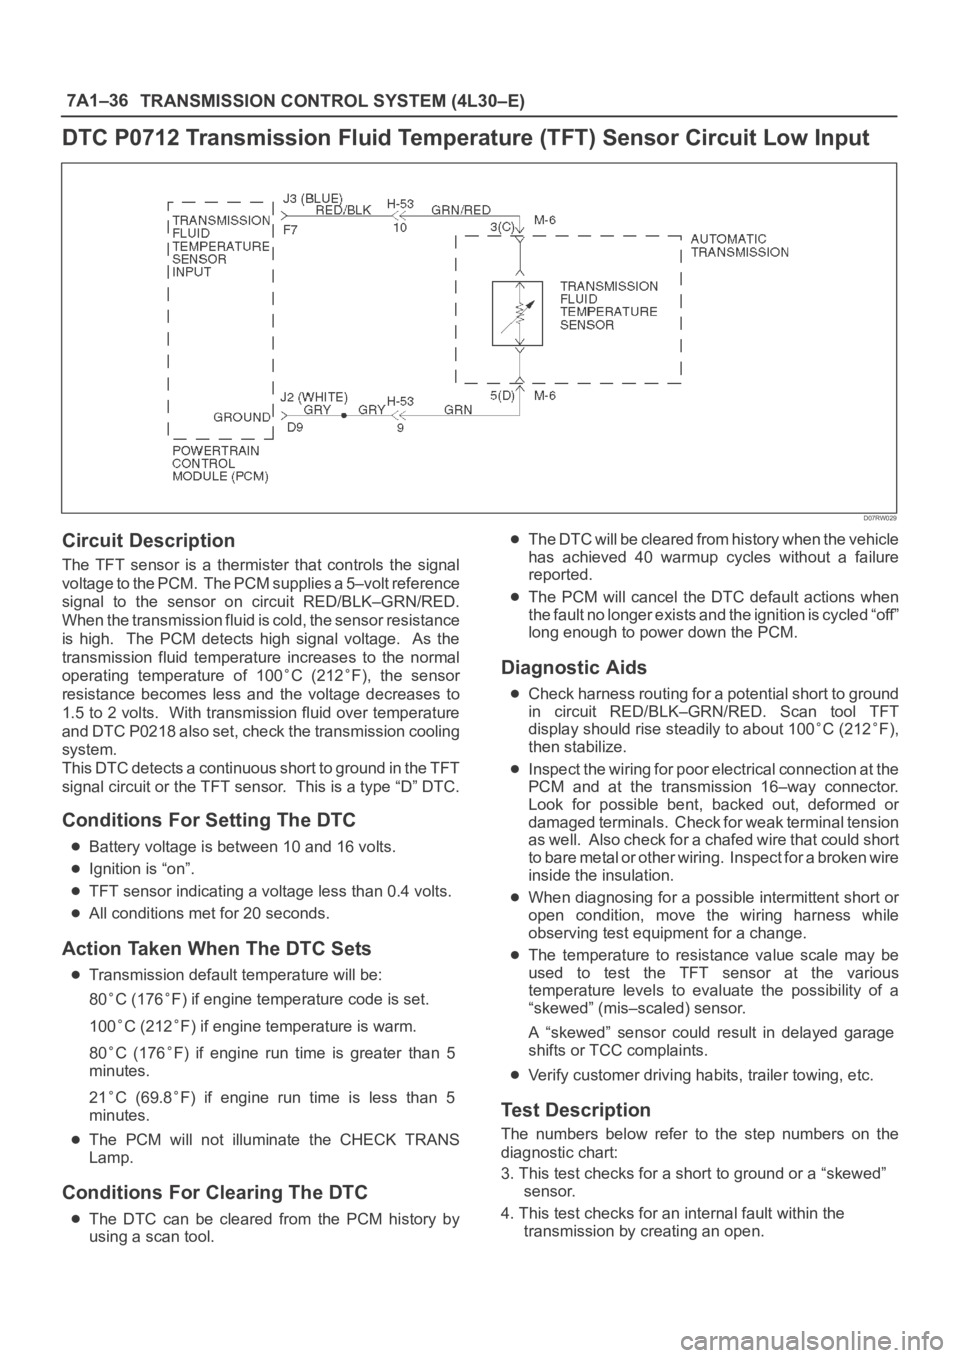
DTC P0712 Transmission Fluid Temperature (TFT) Sensor Circuit Low Input
D07RW029
Circuit Description
The TFT sensor is a thermister that controls the signal
voltage to the PCM. The PCM supplies a 5–volt reference
signal to the sensor on circuit RED/BLK–GRN/RED.
When the transmission fluid is cold, the sensor resistance
is high. The PCM detects high signal voltage. As the
transmission fluid temperature increases to the normal
operating temperature of 100
C (212F), the sensor
resistance becomes less and the voltage decreases to
1.5 to 2 volts. With transmission fluid over temperature
and DTC P0218 also set, check the transmission cooling
system.
This DTC detects a continuous short to ground in the TFT
signal circuit or the TFT sensor. This is a type “D” DTC.
Conditions For Setting The DTC
Battery voltage is between 10 and 16 volts.
Ignition is “on”.
TFT sensor indicating a voltage less than 0.4 volts.
All conditions met for 20 seconds.
Action Taken When The DTC Sets
Transmission default temperature will be:
80
C (176F) if engine temperature code is set.
100
C (212F) if engine temperature is warm.
80
C (176F) if engine run time is greater than 5
minutes.
21
C (69.8F) if engine run time is less than 5
minutes.
The PCM will not illuminate the CHECK TRANS
Lamp.
Conditions For Clearing The DTC
The DTC can be cleared from the PCM history by
using a scan tool.
The DTC will be cleared from history when the vehicle
has achieved 40 warmup cycles without a failure
reported.
The PCM will cancel the DTC default actions when
the fault no longer exists and the ignition is cycled “off”
long enough to power down the PCM.
Diagnostic Aids
Check harness routing for a potential short to ground
in circuit RED/BLK–GRN/RED. Scan tool TFT
display should rise steadily to about 100
C (212F),
then stabilize.
Inspect the wiring for poor electrical connection at the
PCM and at the transmission 16–way connector.
Look for possible bent, backed out, deformed or
damaged terminals. Check for weak terminal tension
as we ll. A lso ch eck fo r a ch af e d w ire th at cou l d s ho r t
to bare metal or other wiring. Inspect for a broken wire
inside the insulation.
When diagnosing for a possible intermittent short or
open condition, move the wiring harness while
observing test equipment for a change.
The temperature to resistance value scale may be
used to test the TFT sensor at the various
temperature levels to evaluate the possibility of a
“skewed” (mis–scaled) sensor.
A “skewed” sensor could result in delayed garage
shifts or TCC complaints.
Verify customer driving habits, trailer towing, etc.
Test Description
The numbers below refer to the step numbers on the
diagnostic chart:
3. This test checks for a short to ground or a “skewed”
sensor.
4. This test checks for an internal fault within the
transmission by creating an open.
Page 2284 of 6000
TRANSMISSION CONTROL SYSTEM (4L30–E)7A1–39
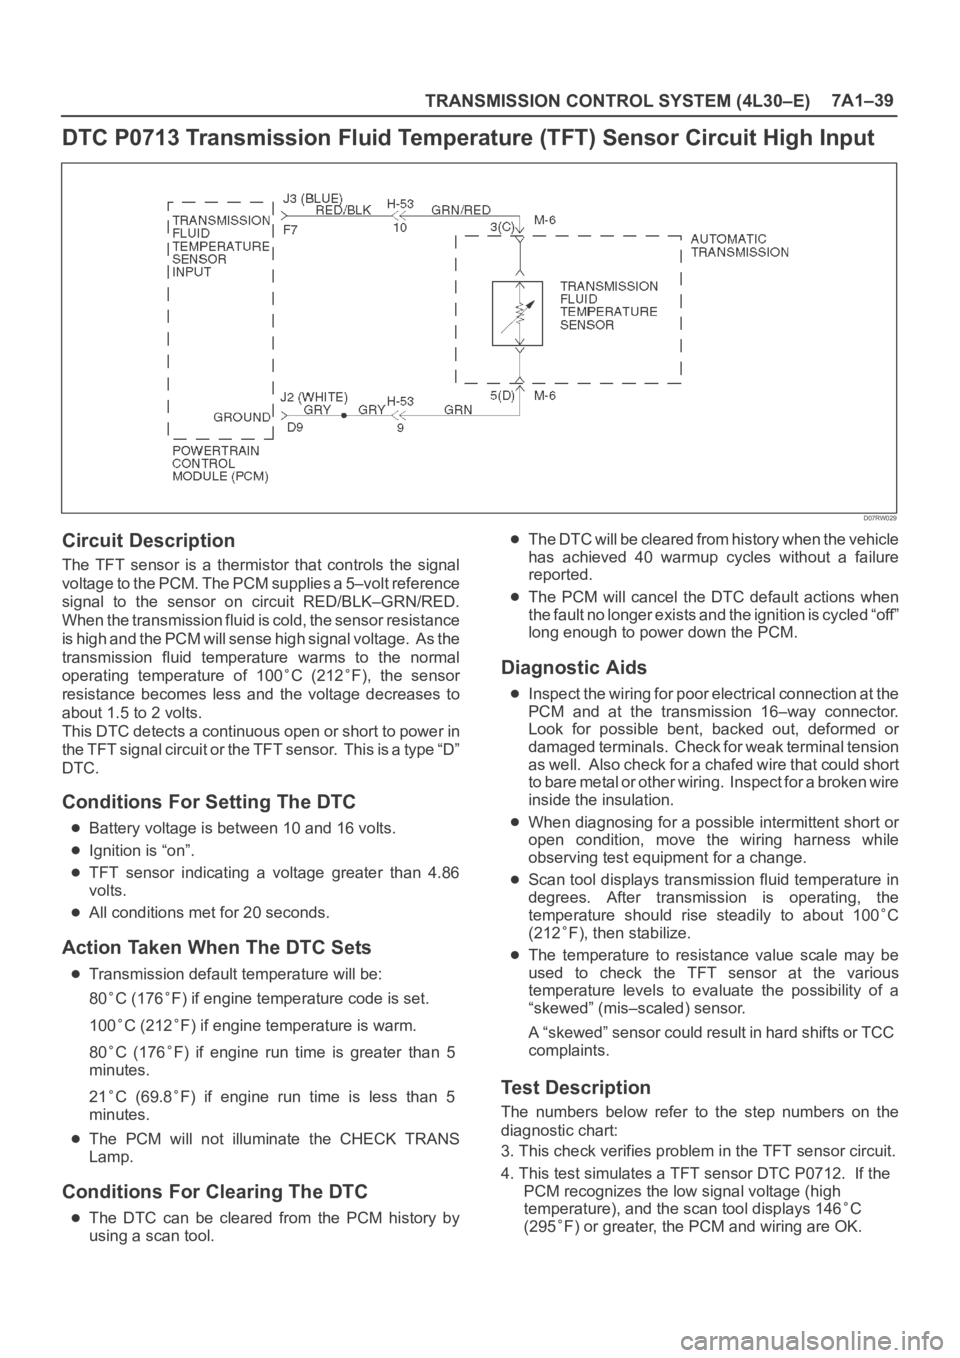
DTC P0713 Transmission Fluid Temperature (TFT) Sensor Circuit High Input
D07RW029
Circuit Description
The TFT sensor is a thermistor that controls the signal
voltage to the PCM. The PCM supplies a 5–volt reference
signal to the sensor on circuit RED/BLK–GRN/RED.
When the transmission fluid is cold, the sensor resistance
is high and the PCM will sense high signal voltage. As the
transmission fluid temperature warms to the normal
operating temperature of 100
C (212F), the sensor
resistance becomes less and the voltage decreases to
about 1.5 to 2 volts.
This DTC detects a continuous open or short to power in
the TFT signal circuit or the TFT sensor. This is a type “D”
DTC.
Conditions For Setting The DTC
Battery voltage is between 10 and 16 volts.
Ignition is “on”.
TFT sensor indicating a voltage greater than 4.86
volts.
All conditions met for 20 seconds.
Action Taken When The DTC Sets
Transmission default temperature will be:
80
C (176F) if engine temperature code is set.
100
C (212F) if engine temperature is warm.
80
C (176F) if engine run time is greater than 5
minutes.
21
C (69.8F) if engine run time is less than 5
minutes.
The PCM will not illuminate the CHECK TRANS
Lamp.
Conditions For Clearing The DTC
The DTC can be cleared from the PCM history by
using a scan tool.
The DTC will be cleared from history when the vehicle
has achieved 40 warmup cycles without a failure
reported.
The PCM will cancel the DTC default actions when
the fault no longer exists and the ignition is cycled “off”
long enough to power down the PCM.
Diagnostic Aids
Inspect the wiring for poor electrical connection at the
PCM and at the transmission 16–way connector.
Look for possible bent, backed out, deformed or
damaged terminals. Check for weak terminal tension
as we ll. A lso ch eck fo r a ch af e d w ire th at cou l d s ho r t
to bare metal or other wiring. Inspect for a broken wire
inside the insulation.
When diagnosing for a possible intermittent short or
open condition, move the wiring harness while
observing test equipment for a change.
Scan tool displays transmission fluid temperature in
degrees. After transmission is operating, the
temperature should rise steadily to about 100
C
(212
F), then stabilize.
The temperature to resistance value scale may be
used to check the TFT sensor at the various
temperature levels to evaluate the possibility of a
“skewed” (mis–scaled) sensor.
A “skewed” sensor could result in hard shifts or TCC
complaints.
Test Description
The numbers below refer to the step numbers on the
diagnostic chart:
3. This check verifies problem in the TFT sensor circuit.
4. This test simulates a TFT sensor DTC P0712. If the
PCM recognizes the low signal voltage (high
temperature), and the scan tool displays 146
C
(295
F) or greater, the PCM and wiring are OK.
Page 2287 of 6000
7A1–42
TRANSMISSION CONTROL SYSTEM (4L30–E)
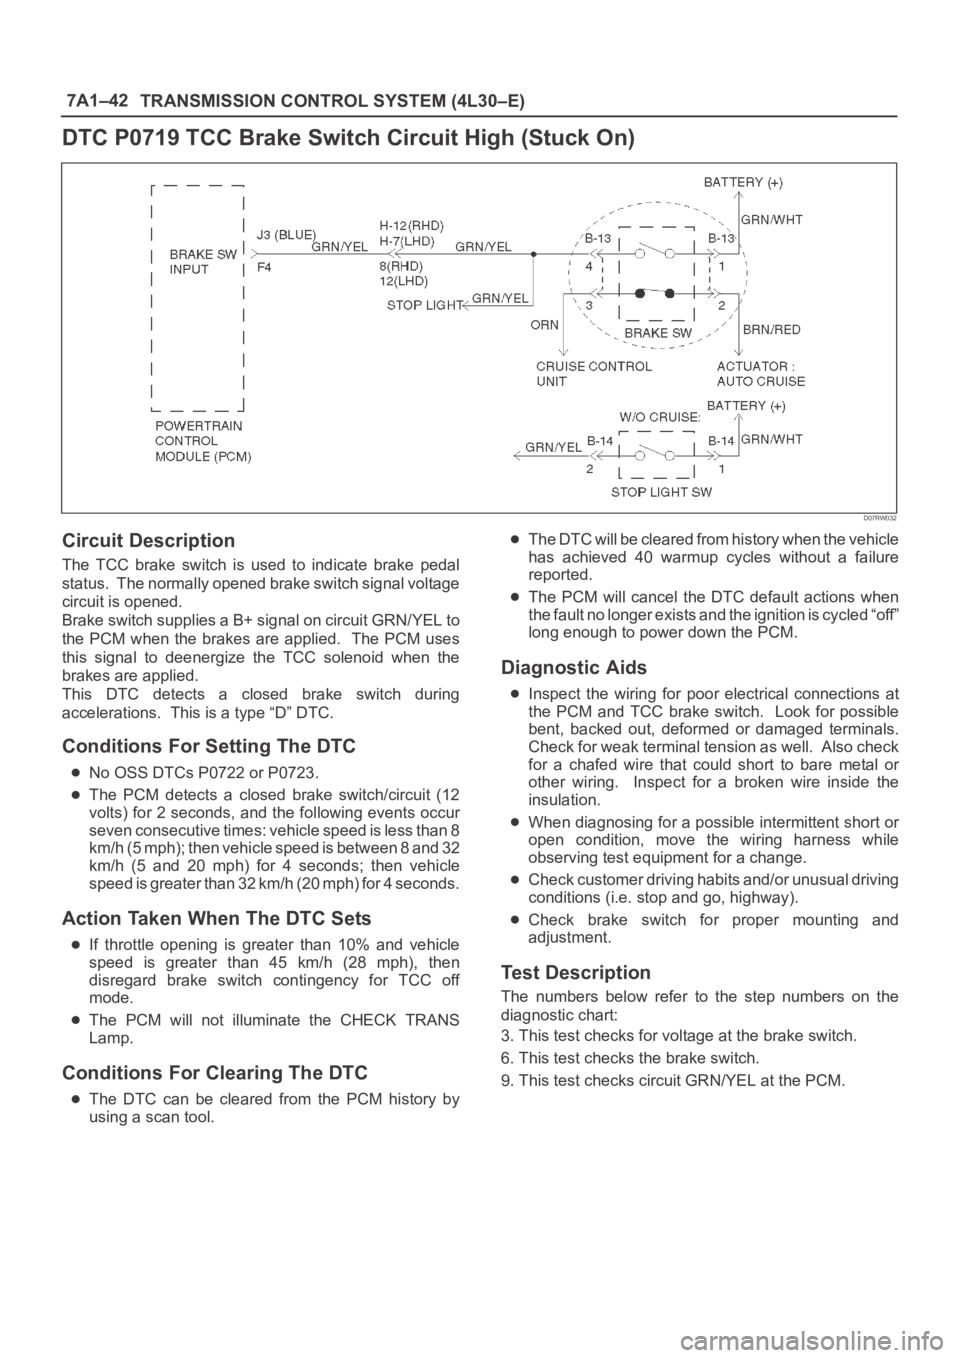
DTC P0719 TCC Brake Switch Circuit High (Stuck On)
D07RW032
Circuit Description
The TCC brake switch is used to indicate brake pedal
status. The normally opened brake switch signal voltage
circuit is opened.
Brake switch supplies a B+ signal on circuit GRN/YEL to
the PCM when the brakes are applied. The PCM uses
this signal to deenergize the TCC solenoid when the
brakes are applied.
This DTC detects a closed brake switch during
accelerations. This is a type “D” DTC.
Conditions For Setting The DTC
No OSS DTCs P0722 or P0723.
The PCM detects a closed brake switch/circuit (12
volts) for 2 seconds, and the following events occur
seven consecutive times: vehicle speed is less than 8
km/h (5 mph); then vehicle speed is between 8 and 32
km/h (5 and 20 mph) for 4 seconds; then vehicle
speed is greater than 32 km/h (20 mph) for 4 seconds.
Action Taken When The DTC Sets
If throttle opening is greater than 10% and vehicle
speed is greater than 45 km/h (28 mph), then
disregard brake switch contingency for TCC off
mode.
The PCM will not illuminate the CHECK TRANS
Lamp.
Conditions For Clearing The DTC
The DTC can be cleared from the PCM history by
using a scan tool.
The DTC will be cleared from history when the vehicle
has achieved 40 warmup cycles without a failure
reported.
The PCM will cancel the DTC default actions when
the fault no longer exists and the ignition is cycled “off”
long enough to power down the PCM.
Diagnostic Aids
Inspect the wiring for poor electrical connections at
the PCM and TCC brake switch. Look for possible
bent, backed out, deformed or damaged terminals.
Check for weak terminal tension as well. Also check
for a chafed wire that could short to bare metal or
other wiring. Inspect for a broken wire inside the
insulation.
When diagnosing for a possible intermittent short or
open condition, move the wiring harness while
observing test equipment for a change.
Check customer driving habits and/or unusual driving
conditions (i.e. stop and go, highway).
Check brake switch for proper mounting and
adjustment.
Test Description
The numbers below refer to the step numbers on the
diagnostic chart:
3. This test checks for voltage at the brake switch.
6. This test checks the brake switch.
9. This test checks circuit GRN/YEL at the PCM.
Page 2293 of 6000
7A1–48
TRANSMISSION CONTROL SYSTEM (4L30–E)
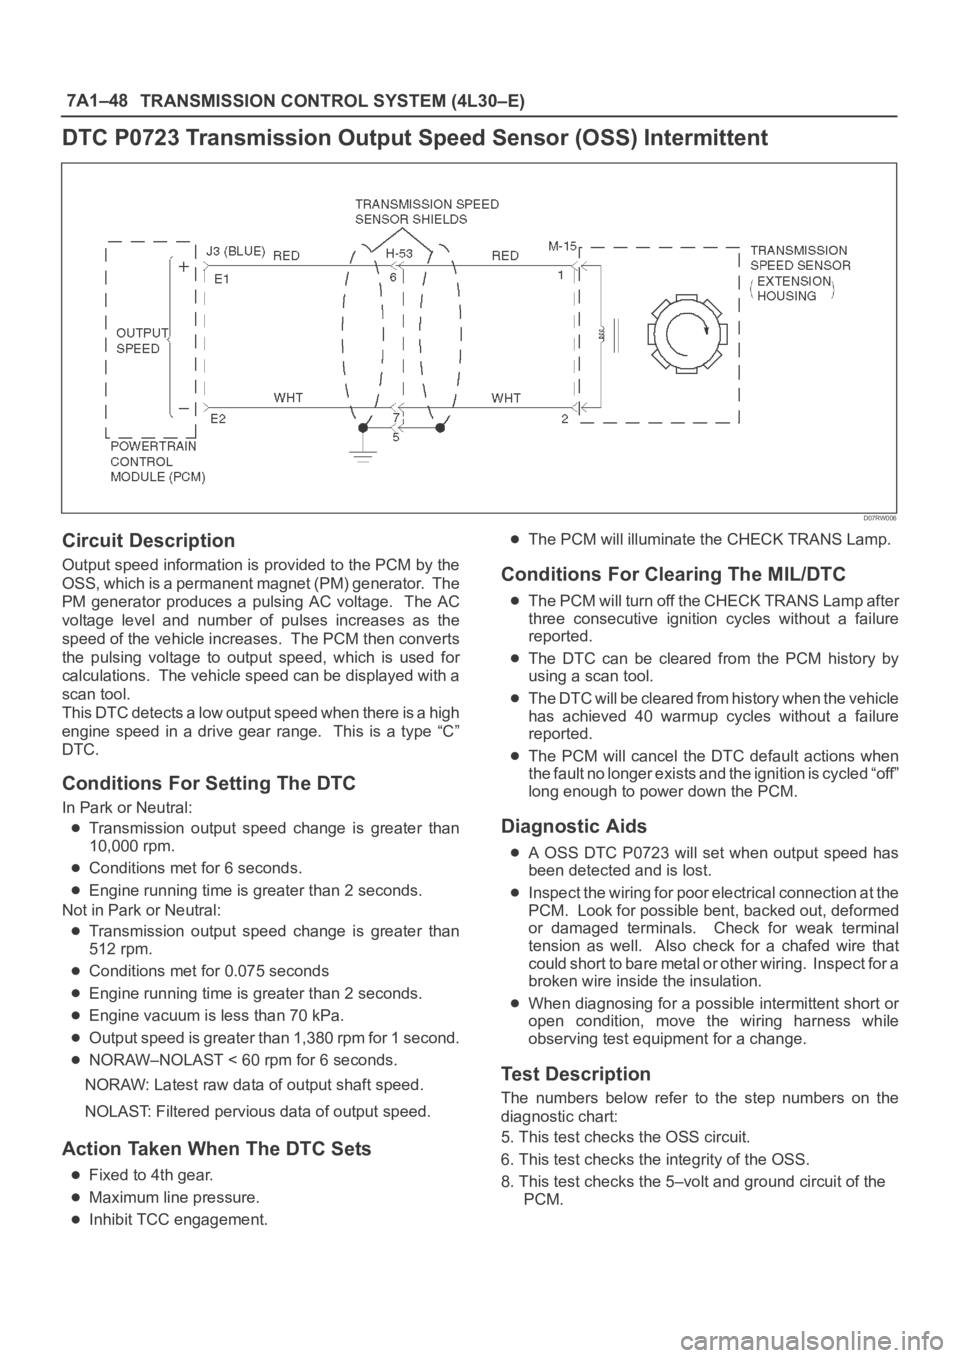
DTC P0723 Transmission Output Speed Sensor (OSS) Intermittent
D07RW006
Circuit Description
Output speed information is provided to the PCM by the
OSS, which is a permanent magnet (PM) generator. The
PM generator produces a pulsing AC voltage. The AC
voltage level and number of pulses increases as the
speed of the vehicle increases. The PCM then converts
the pulsing voltage to output speed, which is used for
calculations. The vehicle speed can be displayed with a
scan tool.
This DTC detects a low output speed when there is a high
engine speed in a drive gear range. This is a type “C”
DTC.
Conditions For Setting The DTC
In Park or Neutral:
Transmission output speed change is greater than
10,000 rpm.
Conditions met for 6 seconds.
Engine running time is greater than 2 seconds.
Not in Park or Neutral:
Transmission output speed change is greater than
512 rpm.
Conditions met for 0.075 seconds
Engine running time is greater than 2 seconds.
Engine vacuum is less than 70 kPa.
Output speed is greater than 1,380 rpm for 1 second.
NORAW–NOLAST < 60 rpm for 6 seconds.
NORAW: Latest raw data of output shaft speed.
NOLAST: Filtered pervious data of output speed.
Action Taken When The DTC Sets
Fixed to 4th gear.
Maximum line pressure.
Inhibit TCC engagement.
The PCM will illuminate the CHECK TRANS Lamp.
Conditions For Clearing The MIL/DTC
The PCM will turn off the CHECK TRANS Lamp after
three consecutive ignition cycles without a failure
reported.
The DTC can be cleared from the PCM history by
using a scan tool.
The DTC will be cleared from history when the vehicle
has achieved 40 warmup cycles without a failure
reported.
The PCM will cancel the DTC default actions when
the fault no longer exists and the ignition is cycled “off”
long enough to power down the PCM.
Diagnostic Aids
A OSS DTC P0723 will set when output speed has
been detected and is lost.
Inspect the wiring for poor electrical connection at the
PCM. Look for possible bent, backed out, deformed
or damaged terminals. Check for weak terminal
tension as well. Also check for a chafed wire that
could short to bare metal or other wiring. Inspect for a
broken wire inside the insulation.
When diagnosing for a possible intermittent short or
open condition, move the wiring harness while
observing test equipment for a change.
Test Description
The numbers below refer to the step numbers on the
diagnostic chart:
5. This test checks the OSS circuit.
6. This test checks the integrity of the OSS.
8. This test checks the 5–volt and ground circuit of the
PCM.
Page 2312 of 6000
TRANSMISSION CONTROL SYSTEM (4L30–E)7A1–67
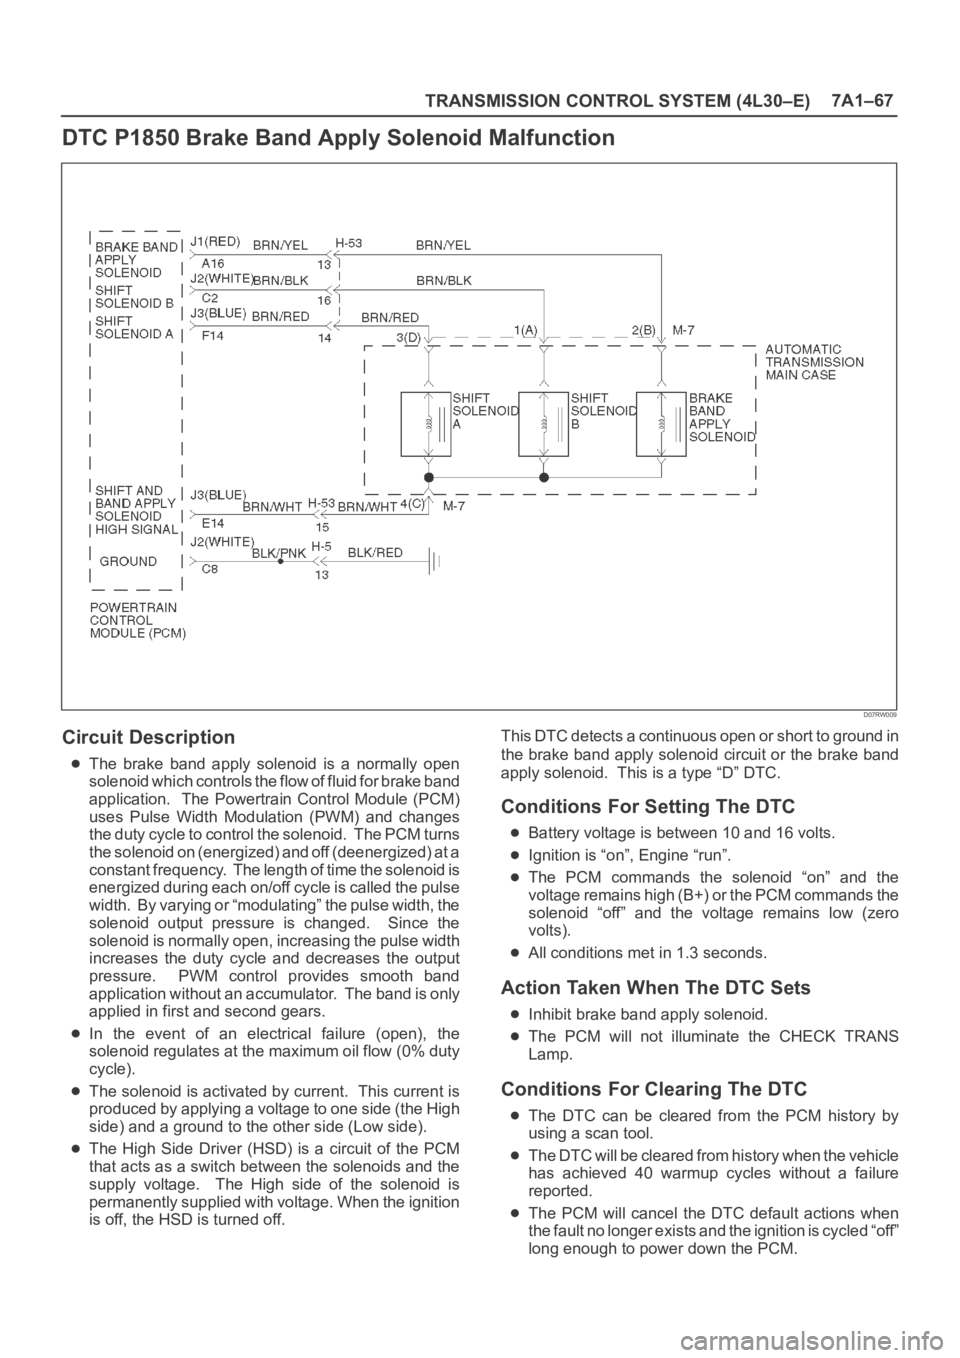
DTC P1850 Brake Band Apply Solenoid Malfunction
D07RW009
Circuit Description
The brake band apply solenoid is a normally open
solenoid which controls the flow of fluid for brake band
application. The Powertrain Control Module (PCM)
uses Pulse Width Modulation (PWM) and changes
the duty cycle to control the solenoid. The PCM turns
the solenoid on (energized) and off (deenergized) at a
constant frequency. The length of time the solenoid is
energized during each on/off cycle is called the pulse
width. By varying or “modulating” the pulse width, the
solenoid output pressure is changed. Since the
solenoid is normally open, increasing the pulse width
increases the duty cycle and decreases the output
pressure. PWM control provides smooth band
application without an accumulator. The band is only
applied in first and second gears.
In the event of an electrical failure (open), the
solenoid regulates at the maximum oil flow (0% duty
cycle).
The solenoid is activated by current. This current is
produced by applying a voltage to one side (the High
side) and a ground to the other side (Low side).
The High Side Driver (HSD) is a circuit of the PCM
that acts as a switch between the solenoids and the
supply voltage. The High side of the solenoid is
permanently supplied with voltage. When the ignition
is off, the HSD is turned off.This DTC detects a continuous open or short to ground in
the brake band apply solenoid circuit or the brake band
apply solenoid. This is a type “D” DTC.
Conditions For Setting The DTC
Battery voltage is between 10 and 16 volts.
Ignition is “on”, Engine “run”.
The PCM commands the solenoid “on” and the
voltage remains high (B+) or the PCM commands the
solenoid “off” and the voltage remains low (zero
volts).
All conditions met in 1.3 seconds.
Action Taken When The DTC Sets
Inhibit brake band apply solenoid.
The PCM will not illuminate the CHECK TRANS
Lamp.
Conditions For Clearing The DTC
The DTC can be cleared from the PCM history by
using a scan tool.
The DTC will be cleared from history when the vehicle
has achieved 40 warmup cycles without a failure
reported.
The PCM will cancel the DTC default actions when
the fault no longer exists and the ignition is cycled “off”
long enough to power down the PCM.
Page 2316 of 6000
TRANSMISSION CONTROL SYSTEM (4L30–E)7A1–71
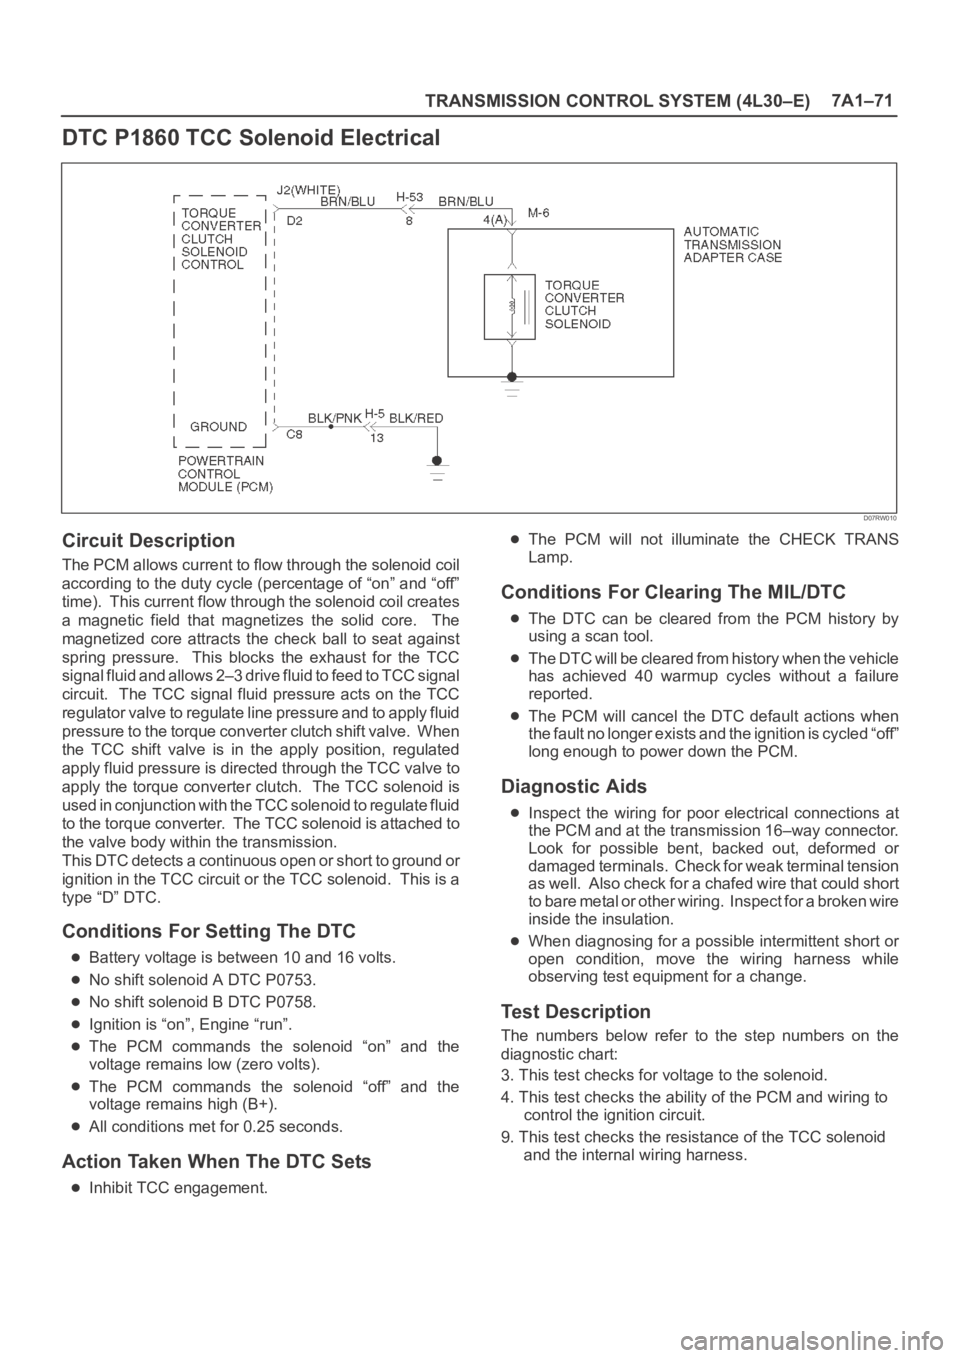
DTC P1860 TCC Solenoid Electrical
D07RW010
Circuit Description
The PCM allows current to flow through the solenoid coil
according to the duty cycle (percentage of “on” and “off”
time). This current flow through the solenoid coil creates
a magnetic field that magnetizes the solid core. The
magnetized core attracts the check ball to seat against
spring pressure. This blocks the exhaust for the TCC
signal fluid and allows 2–3 drive fluid to feed to TCC signal
circuit. The TCC signal fluid pressure acts on the TCC
regulator valve to regulate line pressure and to apply fluid
pressure to the torque converter clutch shift valve. When
the TCC shift valve is in the apply position, regulated
apply fluid pressure is directed through the TCC valve to
apply the torque converter clutch. The TCC solenoid is
used in conjunction with the TCC solenoid to regulate fluid
to the torque converter. The TCC solenoid is attached to
the valve body within the transmission.
This DTC detects a continuous open or short to ground or
ignition in the TCC circuit or the TCC solenoid. This is a
type “D” DTC.
Conditions For Setting The DTC
Battery voltage is between 10 and 16 volts.
No shift solenoid A DTC P0753.
No shift solenoid B DTC P0758.
Ignition is “on”, Engine “run”.
The PCM commands the solenoid “on” and the
voltage remains low (zero volts).
The PCM commands the solenoid “off” and the
voltage remains high (B+).
All conditions met for 0.25 seconds.
Action Taken When The DTC Sets
Inhibit TCC engagement.
The PCM will not illuminate the CHECK TRANS
Lamp.
Conditions For Clearing The MIL/DTC
The DTC can be cleared from the PCM history by
using a scan tool.
The DTC will be cleared from history when the vehicle
has achieved 40 warmup cycles without a failure
reported.
The PCM will cancel the DTC default actions when
the fault no longer exists and the ignition is cycled “off”
long enough to power down the PCM.
Diagnostic Aids
Inspect the wiring for poor electrical connections at
the PCM and at the transmission 16–way connector.
Look for possible bent, backed out, deformed or
damaged terminals. Check for weak terminal tension
as we ll. A lso ch eck fo r a ch af e d w ire th at cou l d s ho r t
to bare metal or other wiring. Inspect for a broken wire
inside the insulation.
When diagnosing for a possible intermittent short or
open condition, move the wiring harness while
observing test equipment for a change.
Test Description
The numbers below refer to the step numbers on the
diagnostic chart:
3. This test checks for voltage to the solenoid.
4. This test checks the ability of the PCM and wiring to
control the ignition circuit.
9. This test checks the resistance of the TCC solenoid
and the internal wiring harness.
Page 3001 of 6000

8D–408 WIRING SYSTEM
Step Action Yes No
The control unit makes lock/unlock response once with interval of
one second.
Is the response complete?
The control unit makes lock/unlock response three times with
interval of one second.
Is the response complete? 12
13Finished
Finished—
—
Step Action Yes No
1. Open the driver’s side door.
2. Turn the starter switch off.
Is the action complete?
Turn the starter switch to ACC position and then off three times
within five seconds after step 1.
Is the action complete within five seconds?
Close the door and then open it two times within ten seconds after
step 2.
Is the action complete within ten seconds?
1. Turn the starter switch to ACC position and then off.
2. Close the door and then open it.
NOTE: This step must be performed within ten seconds after step
3.
Is the action complete?
The control unit makes lock/unlock response twice as many the
number of registered ID code with interval of two seconds. (In case
of no registered code, the response is made ten times.)
Is the response complete? 1
2
3
4
5Go to Step 2
Go to Step 3
Go to Step 4
Go to Step 5
Finished—
Finished
Finished
Finished
—
This procedure checks how many kinds of ID code are
registered.
Step Action Yes No
Open the driver’s side door.
Is the action complete?
Lock the door and then unlock it three times within ten seconds
after step 1.
Is the action complete within five seconds?
Close the door and then open it two times within ten seconds after
step 2.
Is the action complete within ten seconds? 1
2
3Go to Step 2
Go to Step 3
Go to Step 4—
Finished
Finished Anti–theft horn, as an answer back function for the
transmitter operation, changes from available into
unavailing or from unavailing into available by this
procedure.
Page 3002 of 6000

WIRING SYSTEM 8D–409
Step Action Yes No
1. Lock the door and unlock it three times.
2. Close the door and then open it.
NOTE: This step must be performed within ten seconds after step
3.
Is the action complete?
Answer back mode changes.
Is this step complete?
The control unit makes lock/unlock response once with interval of
one second.
Is the response complete?
The control unit makes lock/unlock response three times with
interval of one second.
Is the response complete? 4
5
6
7Go to Step 5
Go to Step 6
Finished
FinishedFinished
Go to Step 7
—
—
1. Remove and install the control unit.
Refer to Anti–theft & Keyless Entry Control Unit
Removal and Installation in this section.
2. Register ID code.
Refer to ID Code Registration in this section.
3. Check that the keyless entry system works normally.
1. Prepare a new transmitter.
2. Register ID code.
Refer to ID Code Registration in this section.
3. Check that the keyless entry system works normally.
1. Remove a screw to remove the cover.
2. Remove the batteries.
3. Set the new batteries into the transmitter.
4. Install the cover to the transmitter.
5. Check that the keyless entry system works normally.