1998 OPEL FRONTERA display
[x] Cancel search: displayPage 5550 of 6000
6E–121 4JX1–TC ENGINE DRIVEABILITY AND EMISSIONS
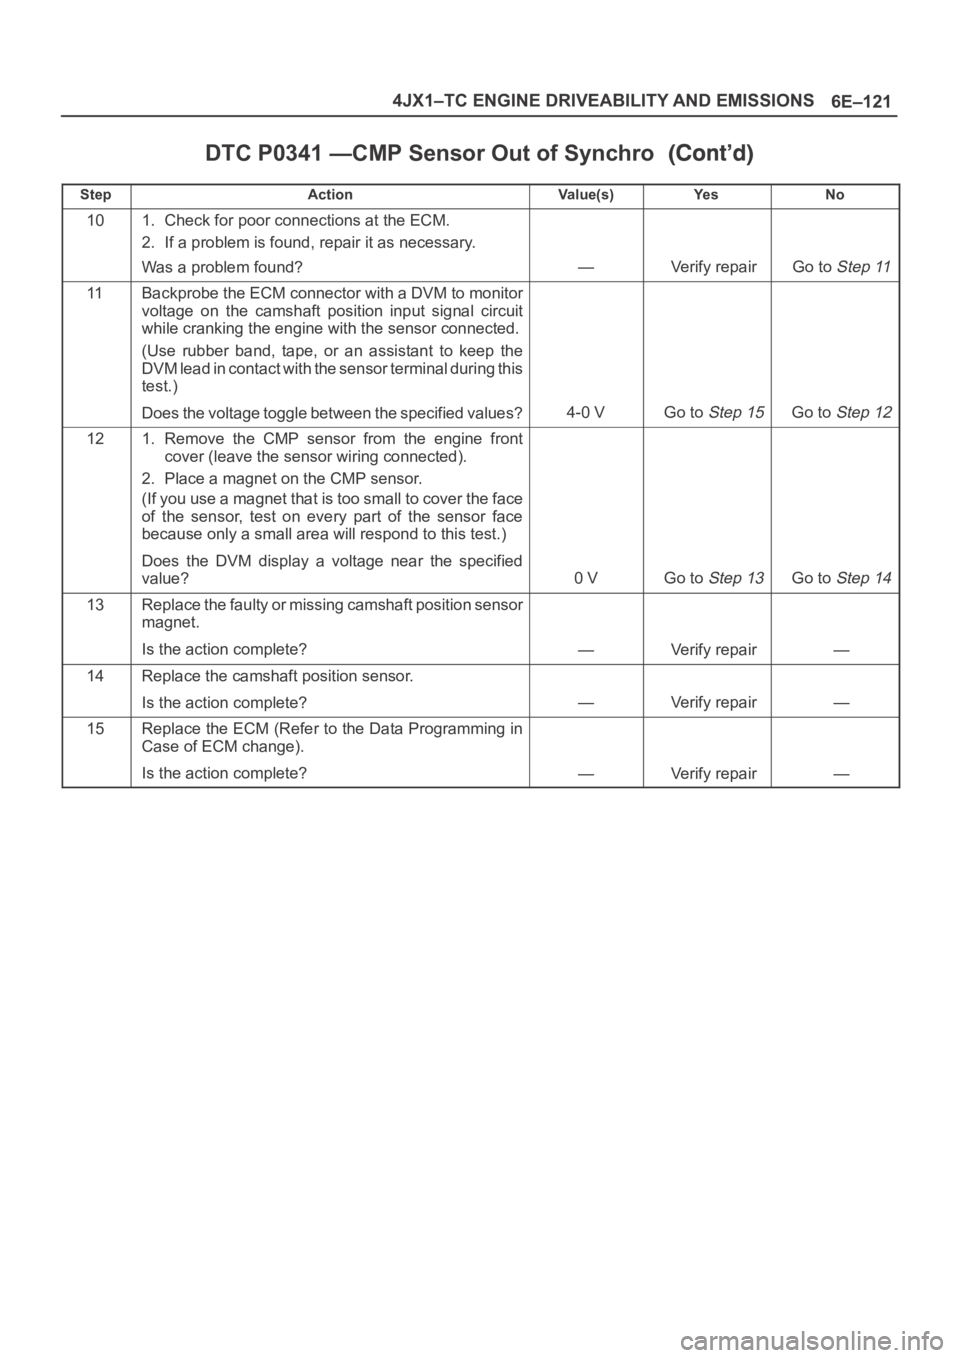
DTC P0341 —CMP Sensor Out of Synchro
StepNo Ye s Va l u e ( s ) Action
101. Check for poor connections at the ECM.
2. If a problem is found, repair it as necessary.
Was a problem found?
—Verify repairGo to Step 11
11Backprobe the ECM connector with a DVM to monitor
voltage on the camshaft position input signal circuit
while cranking the engine with the sensor connected.
(Use rubber band, tape, or an assistant to keep the
DVM lead in contact with the sensor terminal during this
test.)
Does the voltage toggle between the specified values?
4-0 VGo to Step 15Go to Step 12
121. Remove the CMP sensor from the engine front
cover (leave the sensor wiring connected).
2. Place a magnet on the CMP sensor.
(If you use a magnet that is too small to cover the face
of the sensor, test on every part of the sensor face
because only a small area will respond to this test.)
Does the DVM display a voltage near the specified
value?
0 VGo to Step 13Go to Step 14
13Replace the faulty or missing camshaft position sensor
magnet.
Is the action complete?
—Verify repair—
14Replace the camshaft position sensor.
Is the action complete?
—Verify repair—
15Replace the ECM (Refer to the Data Programming in
Case of ECM change).
Is the action complete?
—Verify repair—
Page 5553 of 6000
6E–124
4JX1–TC ENGINE DRIVEABILITY AND EMISSIONS
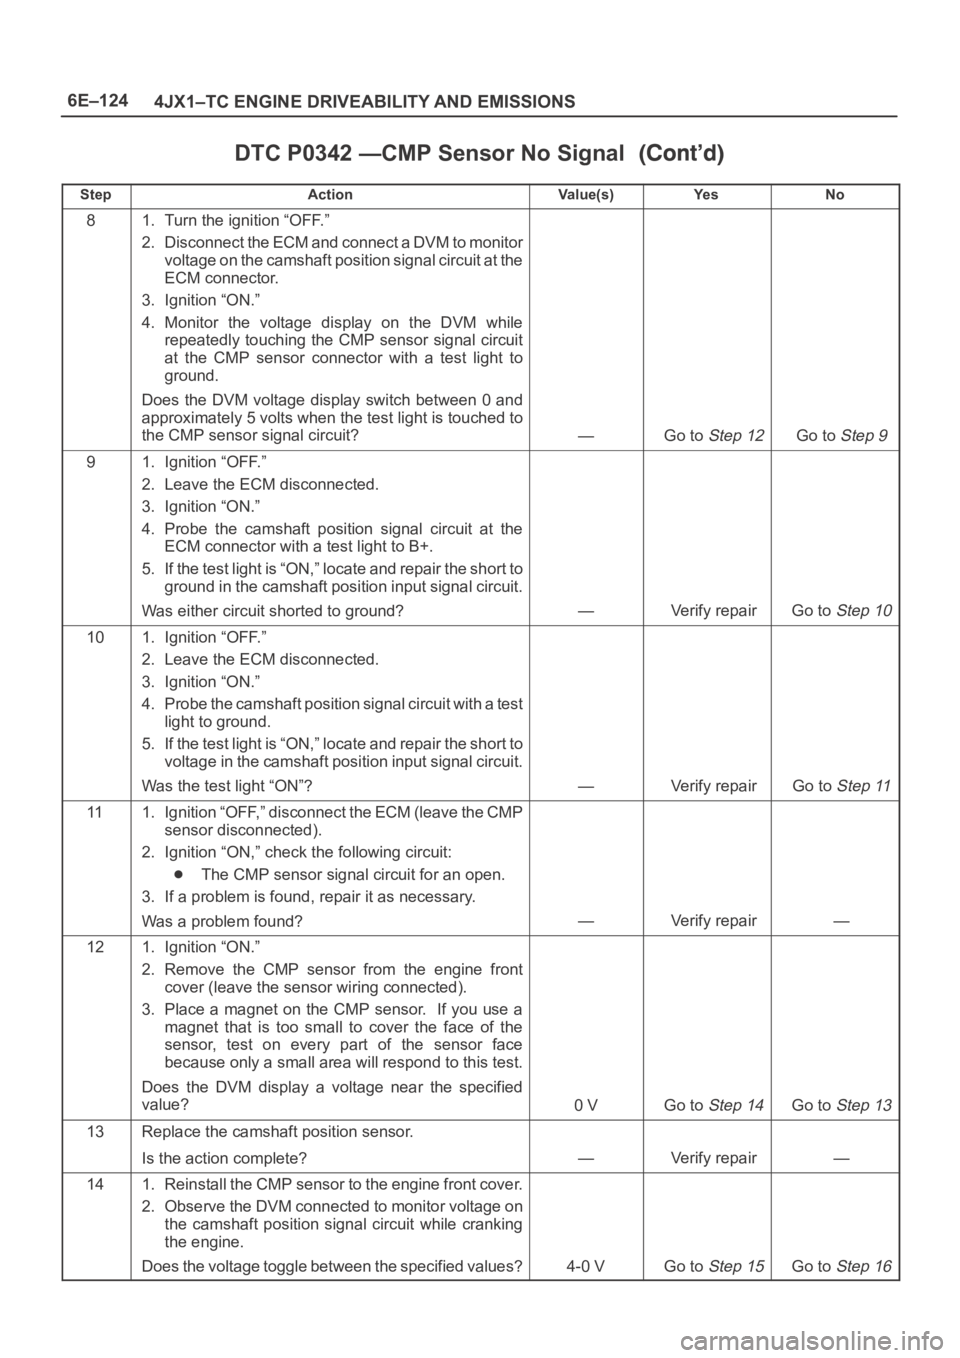
DTC P0342 —CMP Sensor No Signal
StepNo Ye s Va l u e ( s ) Action
81. Turn the ignition “OFF.”
2. Disconnect the ECM and connect a DVM to monitor
voltage on the camshaft position signal circuit at the
ECM connector.
3. Ignition “ON.”
4. Monitor the voltage display on the DVM while
repeatedly touching the CMP sensor signal circuit
at the CMP sensor connector with a test light to
ground.
Does the DVM voltage display switch between 0 and
approximately 5 volts when the test light is touched to
the CMP sensor signal circuit?
—Go to Step 12Go to Step 9
91. Ignition “OFF.”
2. Leave the ECM disconnected.
3. Ignition “ON.”
4. Probe the camshaft position signal circuit at the
ECM connector with a test light to B+.
5. If the test light is “ON,” locate and repair the short to
ground in the camshaft position input signal circuit.
Was either circuit shorted to ground?
—Verify repairGo to Step 10
101. Ignition “OFF.”
2. Leave the ECM disconnected.
3. Ignition “ON.”
4. Probe the camshaft position signal circuit with a test
light to ground.
5. If the test light is “ON,” locate and repair the short to
voltage in the camshaft position input signal circuit.
Was the test light “ON”?
—Verify repairGo to Step 11
111. Ignition “OFF,” disconnect the ECM (leave the CMP
sensor disconnected).
2. Ignition “ON,” check the following circuit:
The CMP sensor signal circuit for an open.
3. If a problem is found, repair it as necessary.
Was a problem found?
—Verify repair—
121. Ignition “ON.”
2. Remove the CMP sensor from the engine front
cover (leave the sensor wiring connected).
3. Place a magnet on the CMP sensor. If you use a
magnet that is too small to cover the face of the
sensor, test on every part of the sensor face
because only a small area will respond to this test.
Does the DVM display a voltage near the specified
value?
0 VGo to Step 14Go to Step 13
13Replace the camshaft position sensor.
Is the action complete?
—Verify repair—
141. Reinstall the CMP sensor to the engine front cover.
2. Observe the DVM connected to monitor voltage on
the camshaft position signal circuit while cranking
the engine.
Does the voltage toggle between the specified values?
4-0 VGo to Step 15Go to Step 16
Page 5563 of 6000
6E–134
4JX1–TC ENGINE DRIVEABILITY AND EMISSIONS
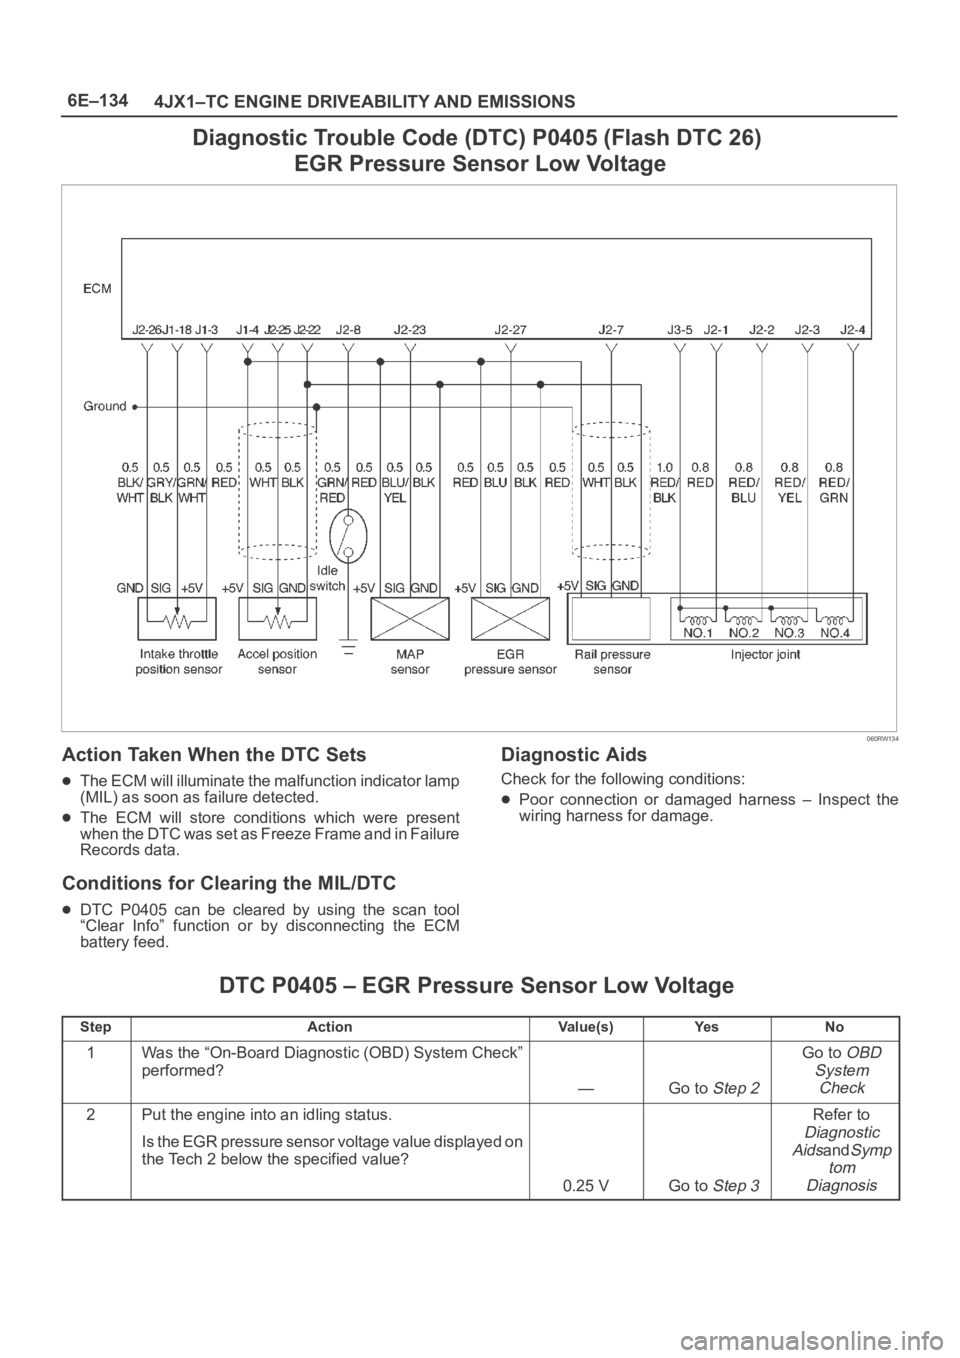
Diagnostic Trouble Code (DTC) P0405 (Flash DTC 26)
EGR Pressure Sensor Low Voltage
060RW134
Action Taken When the DTC Sets
The ECM will illuminate the malfunction indicator lamp
(MIL) as soon as failure detected.
The ECM will store conditions which were present
w h e n t h e D T C w a s s e t a s F r e e z e F r a m e a n d i n F a i l u r e
Records data.
Conditions for Clearing the MIL/DTC
DTC P0405 can be cleared by using the scan tool
“Clear Info” function or by disconnecting the ECM
battery feed.
Diagnostic Aids
Check for the following conditions:
Poor connection or damaged harness – Inspect the
wiring harness for damage.
DTC P0405 – EGR Pressure Sensor Low Voltage
StepActionVa l u e ( s )Ye sNo
1Was the “On-Board Diagnostic (OBD) System Check”
performed?
—Go to Step 2
Go to OBD
System
Check
2Put the engine into an idling status.
Is the EGR pressure sensor voltage value displayed on
the Tech 2 below the specified value?
0.25 VGo to Step 3
Refer to
Diagnostic
Aids
andSymp
tom
Diagnosis
Page 5564 of 6000
6E–135 4JX1–TC ENGINE DRIVEABILITY AND EMISSIONS
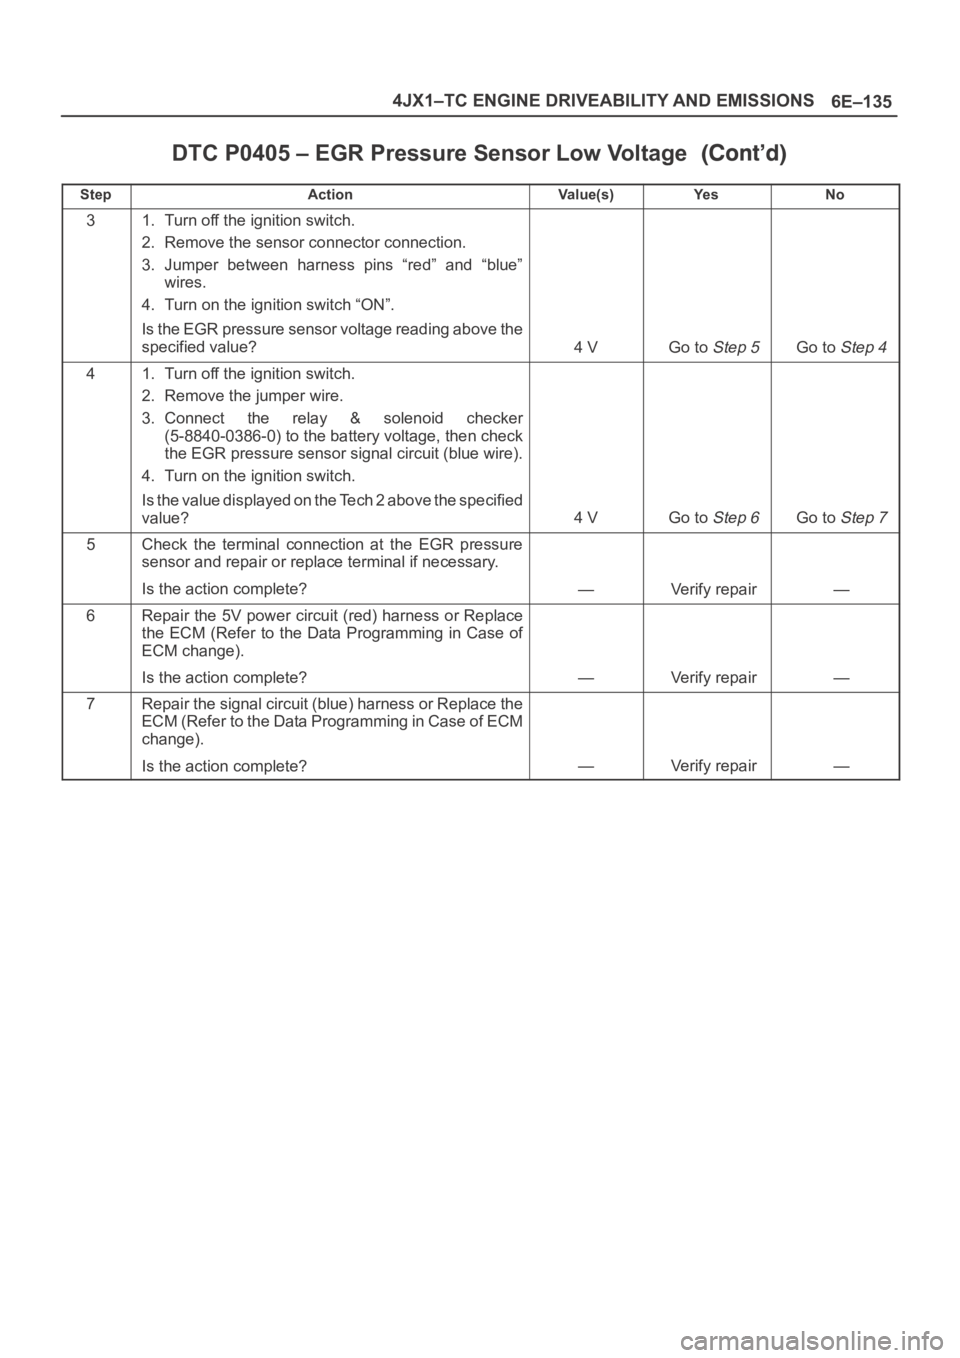
DTC P0405 – EGR Pressure Sensor Low Voltage
StepNo Ye s Va l u e ( s ) Action
31. Turn off the ignition switch.
2. Remove the sensor connector connection.
3. Jumper between harness pins “red” and “blue”
wires.
4. Turn on the ignition switch “ON”.
Is the EGR pressure sensor voltage reading above the
specified value?
4 VGo to Step 5Go to Step 4
41. Turn off the ignition switch.
2. Remove the jumper wire.
3. Connect the relay & solenoid checker
(5-8840-0386-0) to the battery voltage, then check
the EGR pressure sensor signal circuit (blue wire).
4. Turn on the ignition switch.
Is the value displayed on the Tech 2 above the specified
value?
4 VGo to Step 6Go to Step 7
5Check the terminal connection at the EGR pressure
sensor and repair or replace terminal if necessary.
Is the action complete?
—Verify repair—
6Repair the 5V power circuit (red) harness or Replace
the ECM (Refer to the Data Programming in Case of
ECM change).
Is the action complete?
—Verify repair—
7Repair the signal circuit (blue) harness or Replace the
ECM (Refer to the Data Programming in Case of ECM
change).
Is the action complete?
—Verify repair—
Page 5567 of 6000
6E–138
4JX1–TC ENGINE DRIVEABILITY AND EMISSIONS
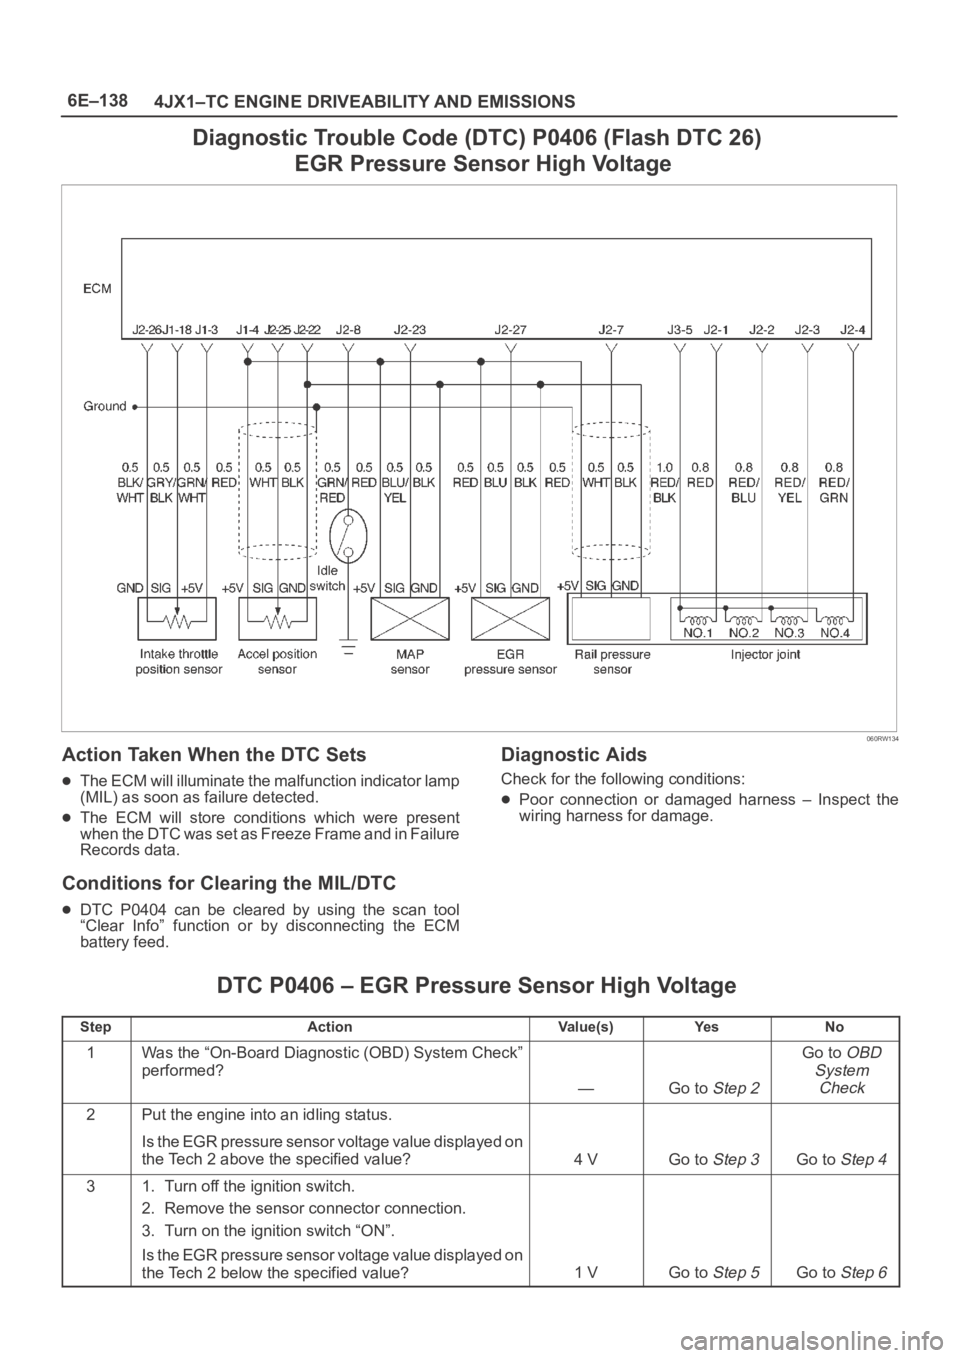
Diagnostic Trouble Code (DTC) P0406 (Flash DTC 26)
EGR Pressure Sensor High Voltage
060RW134
Action Taken When the DTC Sets
The ECM will illuminate the malfunction indicator lamp
(MIL) as soon as failure detected.
The ECM will store conditions which were present
w h e n t h e D T C w a s s e t a s F r e e z e F r a m e a n d i n F a i l u r e
Records data.
Conditions for Clearing the MIL/DTC
DTC P0404 can be cleared by using the scan tool
“Clear Info” function or by disconnecting the ECM
battery feed.
Diagnostic Aids
Check for the following conditions:
Poor connection or damaged harness – Inspect the
wiring harness for damage.
DTC P0406 – EGR Pressure Sensor High Voltage
StepActionVa l u e ( s )Ye sNo
1Was the “On-Board Diagnostic (OBD) System Check”
performed?
—Go to Step 2
Go to OBD
System
Check
2Put the engine into an idling status.
Is the EGR pressure sensor voltage value displayed on
the Tech 2 above the specified value?
4 VGo to Step 3Go to Step 4
31. Turn off the ignition switch.
2. Remove the sensor connector connection.
3. Turn on the ignition switch “ON”.
Is the EGR pressure sensor voltage value displayed on
the Tech 2 below the specified value?
1 VGo to Step 5Go to Step 6
Page 5568 of 6000
6E–139 4JX1–TC ENGINE DRIVEABILITY AND EMISSIONS
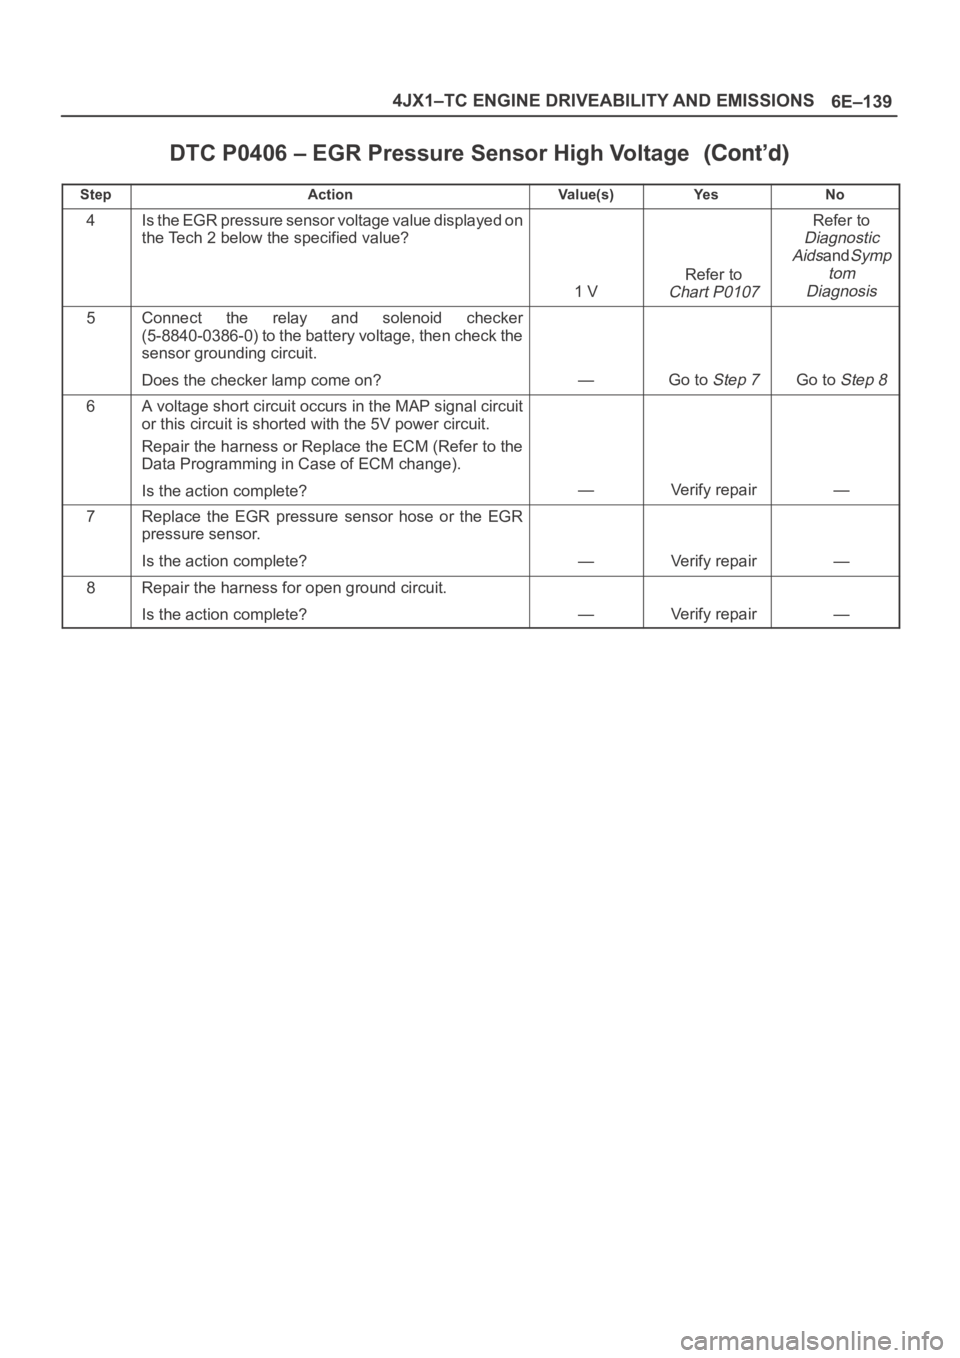
DTC P0406 – EGR Pressure Sensor High Voltage
StepNo Ye s Va l u e ( s ) Action
4Is the EGR pressure sensor voltage value displayed on
the Tech 2 below the specified value?
1 V
Refer to
Chart P0107
Refer to
Diagnostic
Aids
andSymp
tom
Diagnosis
5Connect the relay and solenoid checker
(5-8840-0386-0) to the battery voltage, then check the
sensor grounding circuit.
Does the checker lamp come on?
—Go to Step 7Go to Step 8
6A voltage short circuit occurs in the MAP signal circuit
or this circuit is shorted with the 5V power circuit.
Repair the harness or Replace the ECM (Refer to the
Data Programming in Case of ECM change).
Is the action complete?
—Verify repair—
7Replace the EGR pressure sensor hose or the EGR
pressure sensor.
Is the action complete?
—Verify repair—
8Repair the harness for open ground circuit.
Is the action complete?
—Verify repair—
Page 5573 of 6000
6E–144
4JX1–TC ENGINE DRIVEABILITY AND EMISSIONS
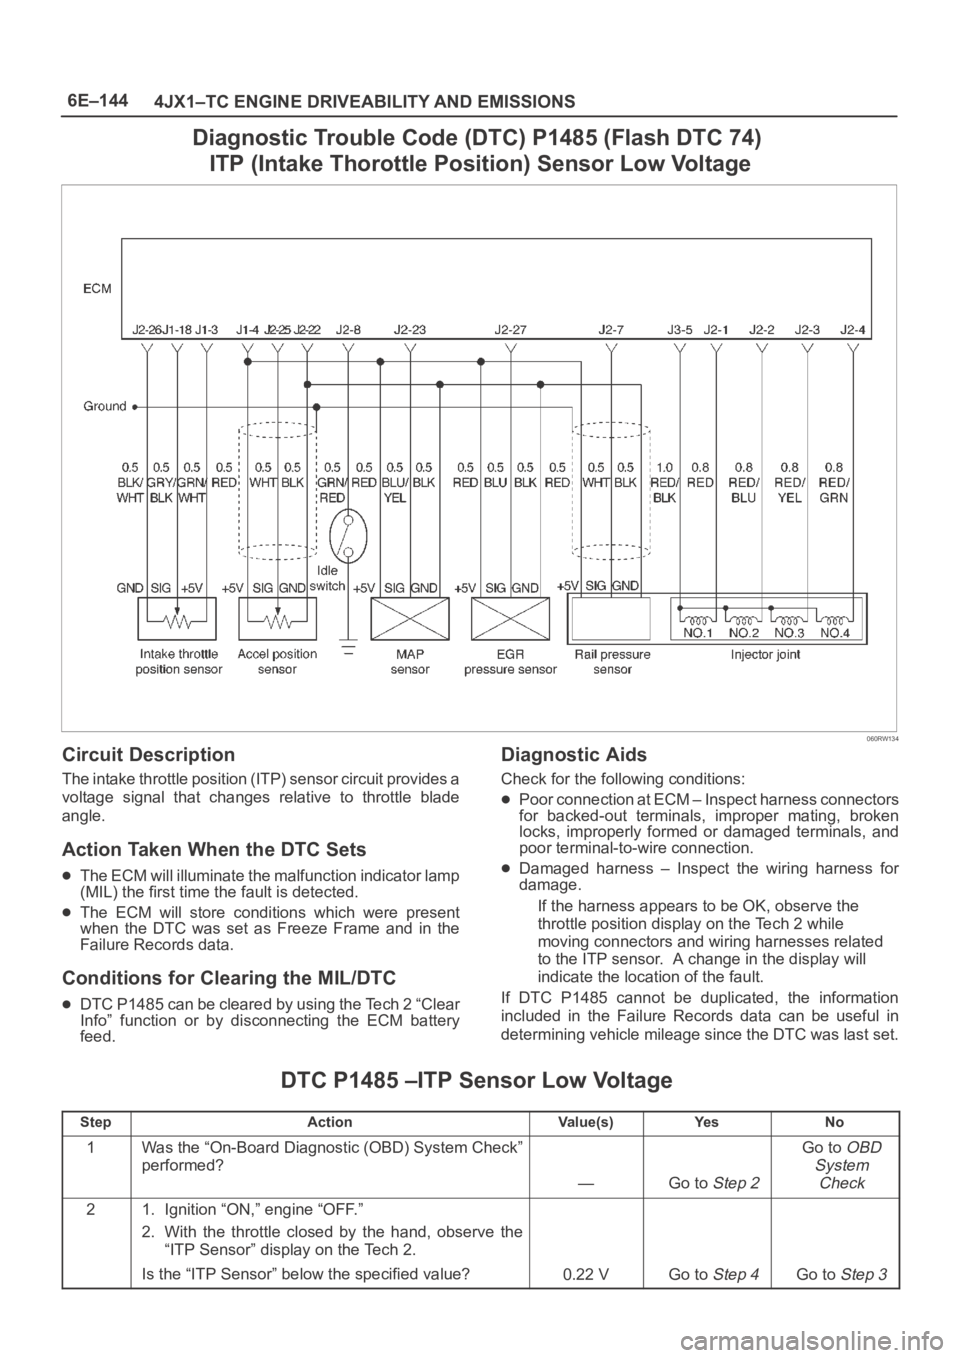
Diagnostic Trouble Code (DTC) P1485 (Flash DTC 74)
ITP (Intake Thorottle Position) Sensor Low Voltage
060RW134
Circuit Description
The intake throttle position (ITP) sensor circuit provides a
voltage signal that changes relative to throttle blade
angle.
Action Taken When the DTC Sets
The ECM will illuminate the malfunction indicator lamp
(MIL) the first time the fault is detected.
The ECM will store conditions which were present
when the DTC was set as Freeze Frame and in the
Failure Records data.
Conditions for Clearing the MIL/DTC
DTC P1485 can be cleared by using the Tech 2 “Clear
Info” function or by disconnecting the ECM battery
feed.
Diagnostic Aids
Check for the following conditions:
Poor connection at ECM – Inspect harness connectors
for backed-out terminals, improper mating, broken
locks, improperly formed or damaged terminals, and
poor terminal-to-wire connection.
Damaged harness – Inspect the wiring harness for
damage.
If the harness appears to be OK, observe the
throttle position display on the Tech 2 while
moving connectors and wiring harnesses related
to the ITP sensor. A change in the display will
indicate the location of the fault.
If DTC P1485 cannot be duplicated, the information
included in the Failure Records data can be useful in
determining vehicle mileage since the DTC was last set.
DTC P1485 –ITP Sensor Low Voltage
StepActionVa l u e ( s )Ye sNo
1Was the “On-Board Diagnostic (OBD) System Check”
performed?
—Go to Step 2
Go to OBD
System
Check
21. Ignition “ON,” engine “OFF.”
2. With the throttle closed by the hand, observe the
“ITP Sensor” display on the Tech 2.
Is the “ITP Sensor” below the specified value?
0.22 VGo to Step 4Go to Step 3
Page 5575 of 6000
6E–146
4JX1–TC ENGINE DRIVEABILITY AND EMISSIONS
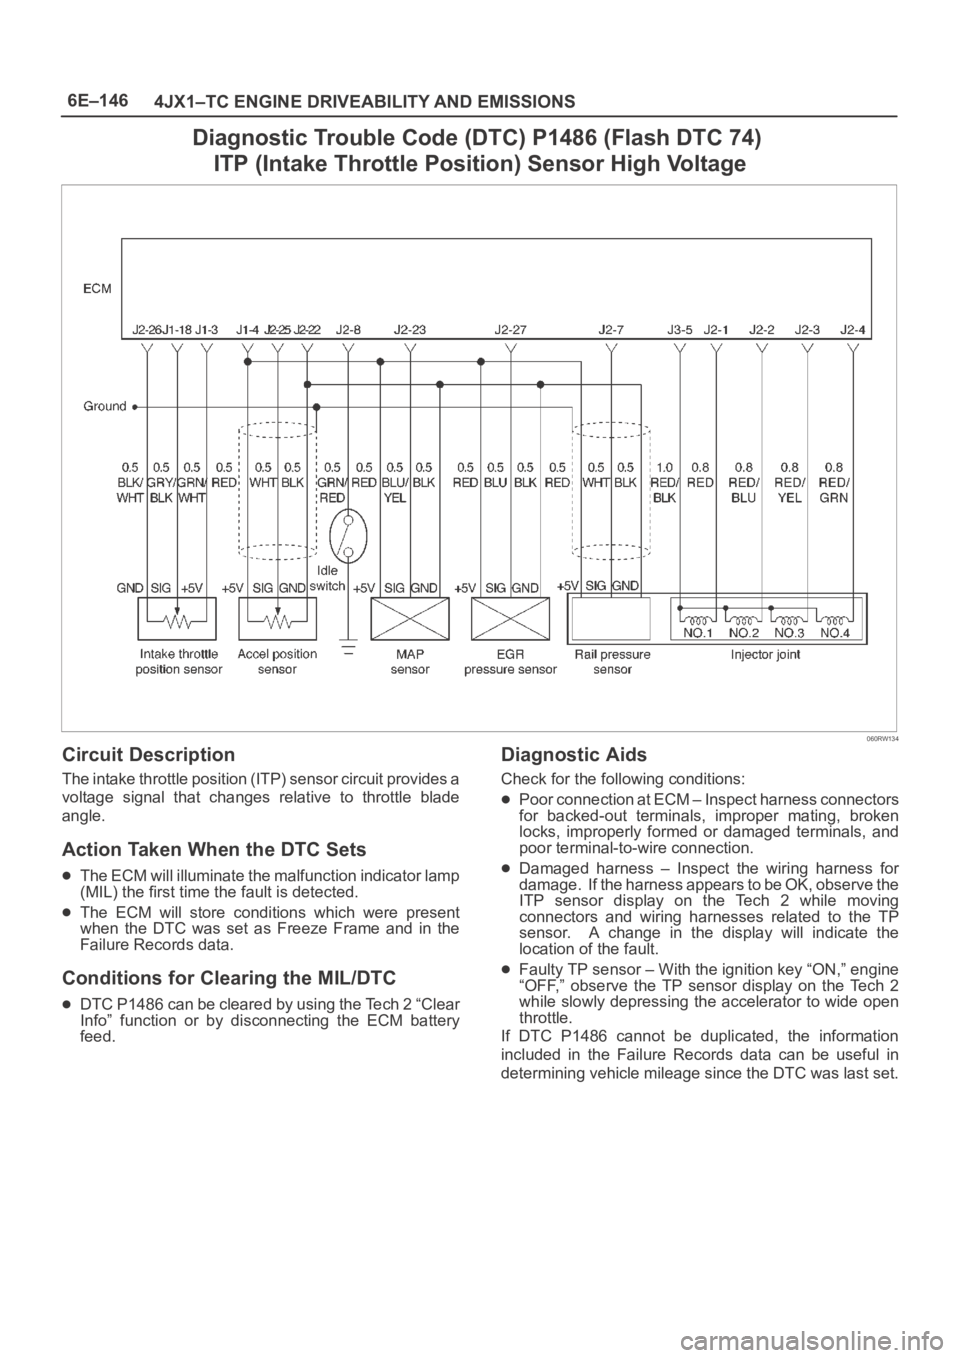
Diagnostic Trouble Code (DTC) P1486 (Flash DTC 74)
ITP (Intake Throttle Position) Sensor High Voltage
060RW134
Circuit Description
The intake throttle position (ITP) sensor circuit provides a
voltage signal that changes relative to throttle blade
angle.
Action Taken When the DTC Sets
The ECM will illuminate the malfunction indicator lamp
(MIL) the first time the fault is detected.
The ECM will store conditions which were present
when the DTC was set as Freeze Frame and in the
Failure Records data.
Conditions for Clearing the MIL/DTC
DTC P1486 can be cleared by using the Tech 2 “Clear
Info” function or by disconnecting the ECM battery
feed.
Diagnostic Aids
Check for the following conditions:
Poor connection at ECM – Inspect harness connectors
for backed-out terminals, improper mating, broken
locks, improperly formed or damaged terminals, and
poor terminal-to-wire connection.
Damaged harness – Inspect the wiring harness for
damage. If the harness appears to be OK, observe the
ITP sensor display on the Tech 2 while moving
connectors and wiring harnesses related to the TP
sensor. A change in the display will indicate the
location of the fault.
Faulty TP sensor – With the ignition key “ON,” engine
“OFF,” observe the TP sensor display on the Tech 2
while slowly depressing the accelerator to wide open
throttle.
If DTC P1486 cannot be duplicated, the information
included in the Failure Records data can be useful in
determining vehicle mileage since the DTC was last set.