Page 4191 of 6000
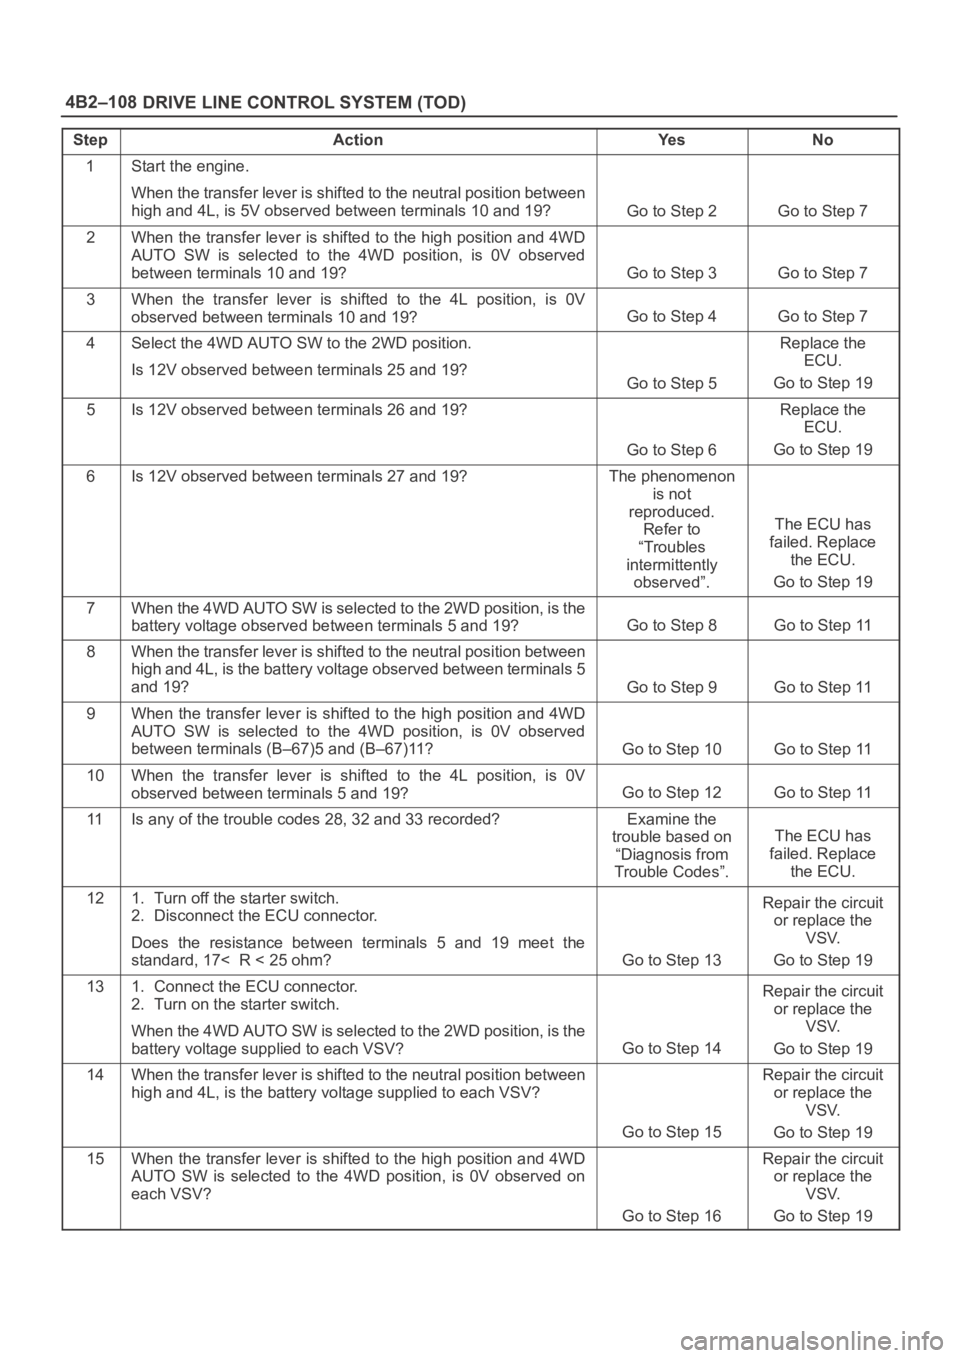
DRIVE LINE CONTROL SYSTEM (TOD) 4B2–108
StepActionYe sNo
1Start the engine.
When the transfer lever is shifted to the neutral position between
high and 4L, is 5V observed between terminals 10 and 19?
Go to Step 2Go to Step 7
2When the transfer lever is shifted to the high position and 4WD
AUTO SW is selected to the 4WD position, is 0V observed
between terminals 10 and 19?
Go to Step 3Go to Step 7
3When the transfer lever is shifted to the 4L position, is 0V
observed between terminals 10 and 19?
Go to Step 4Go to Step 7
4Select the 4WD AUTO SW to the 2WD position.
Is 12V observed between terminals 25 and 19?
Go to Step 5
Replace the
ECU.
Go to Step 19
5Is 12V observed between terminals 26 and 19?
Go to Step 6
Replace the
ECU.
Go to Step 19
6Is 12V observed between terminals 27 and 19?The phenomenon
is not
reproduced.
Refer to
“Troubles
intermittently
observed”.
The ECU has
failed. Replace
the ECU.
Go to Step 19
7When the 4WD AUTO SW is selected to the 2WD position, is the
battery voltage observed between terminals 5 and 19?
Go to Step 8Go to Step 11
8When the transfer lever is shifted to the neutral position between
high and 4L, is the battery voltage observed between terminals 5
and 19?
Go to Step 9Go to Step 11
9When the transfer lever is shifted to the high position and 4WD
AUTO SW is selected to the 4WD position, is 0V observed
between terminals (B–67)5 and (B–67)11?
Go to Step 10Go to Step 11
10When the transfer lever is shifted to the 4L position, is 0V
observed between terminals 5 and 19?
Go to Step 12Go to Step 11
11Is any of the trouble codes 28, 32 and 33 recorded?Examine the
trouble based on
“Diagnosis from
Trouble Codes”.
The ECU has
failed. Replace
the ECU.
121. Turn off the starter switch.
2. Disconnect the ECU connector.
Does the resistance between terminals 5 and 19 meet the
standard, 17< R < 25 ohm?
Go to Step 13
Repair the circuit
or replace the
VSV.
Go to Step 19
131. Connect the ECU connector.
2. Turn on the starter switch.
When the 4WD AUTO SW is selected to the 2WD position, is the
battery voltage supplied to each VSV?
Go to Step 14
Repair the circuit
or replace the
VSV.
Go to Step 19
14When the transfer lever is shifted to the neutral position between
high and 4L, is the battery voltage supplied to each VSV?
Go to Step 15
Repair the circuit
or replace the
VSV.
Go to Step 19
15When the transfer lever is shifted to the high position and 4WD
AUTO SW is selected to the 4WD position, is 0V observed on
each VSV?
Go to Step 16
Repair the circuit
or replace the
VSV.
Go to Step 19
Page 4194 of 6000
4B2–111 DRIVE LINE CONTROL SYSTEM (TOD)
D04RY00072
StepActionYe sNo
1Disconnect the ECU connector from ECU.
Is the continuity established between terminals (B–68)8 and
(B–67)11?
Go to Step 2
The ECU has
failed. Replace
the ECU.
Go to Step 3
2Is the self-diagnostic connector short-circuited?
Go to Step 3
Repair the
self-diagnostic
connector circuit.
Go to Step 3
31. Check that all the parts are mounted.
2. Clear the trouble codes.
Is this step complete?
Repeat the
“Diagnosis Flow”.
Return to Step 3
Page 4196 of 6000
4B2–113 DRIVE LINE CONTROL SYSTEM (TOD)
StepActionYe sNo
11. Disconnect ECU connector.
2. Turn on the starter switch.
Is battery voltage observed between ECU terminals (B–68)1 and
(B–67)11?
Go to Step 2
Wirers are broken
lighting SW
circuit. Repair
the circuit.
Go to Step 4
2Turn lighting SW “ON”.
Is 0 V observed between ECU terminal (B–68)1 and (B–67)11?
Go to Step 3
Lighting SW
circuit battery
short. Repair the
circuit.
Go to Step 4
3Connect ECU terminal.
While the lighting switch is pressed on and off, does the
brightness of the indicator change?The phenomenon
is not
reproduced.
Refer to
“Troubles
intermittently
observed”
The ECU has
failed. Replace
the ECU.
Go to Step 4
4Check that all the parts are mounted.
Is this step complete?Repeat the
“Diagnosis Flow”.
Return to Step 4
Page 4199 of 6000
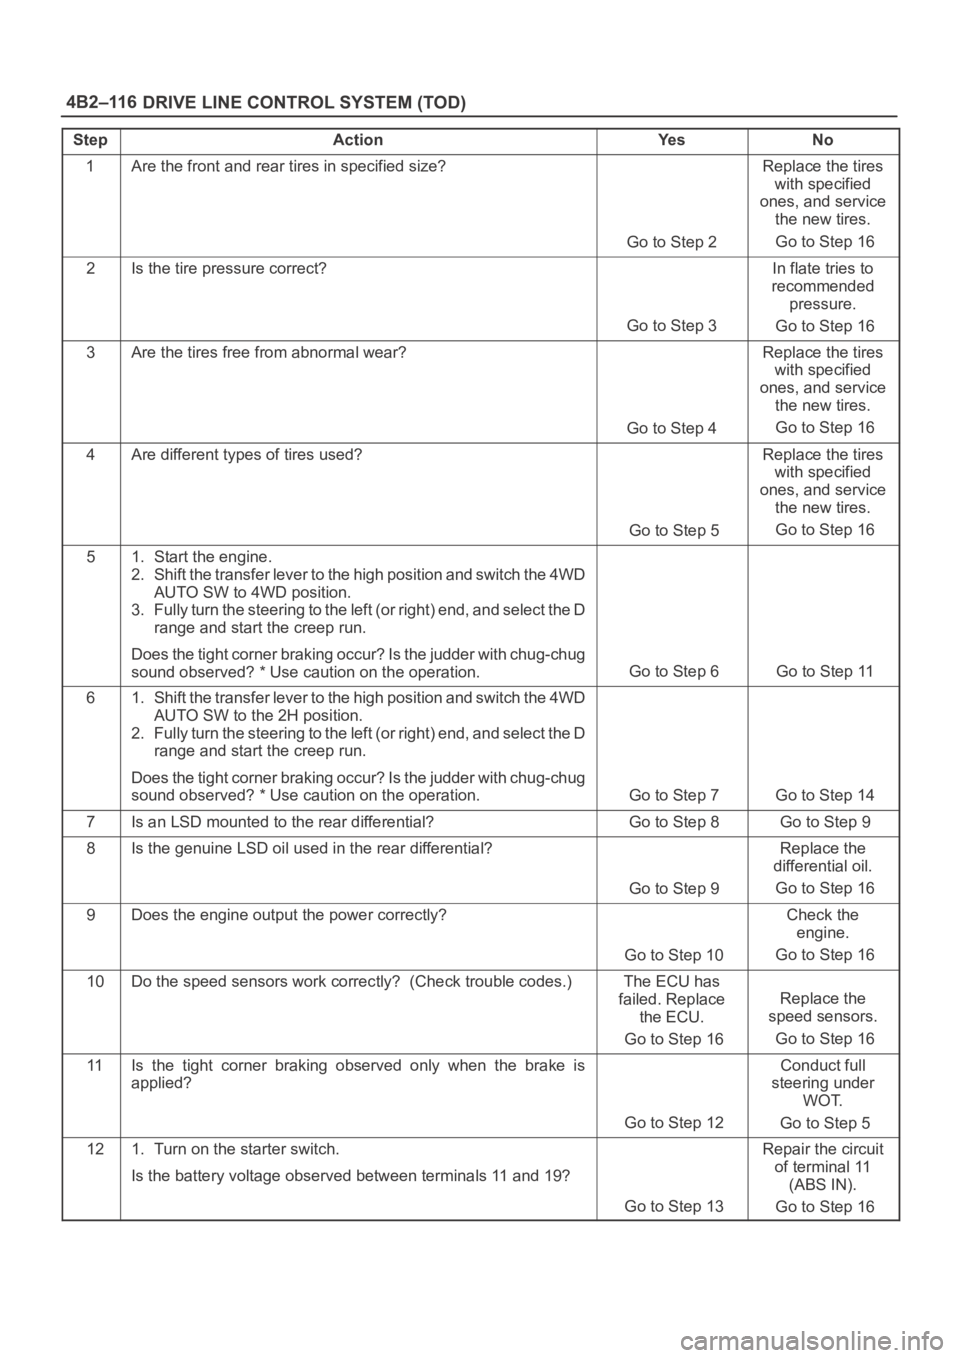
DRIVE LINE CONTROL SYSTEM (TOD) 4B2–116
StepActionYe sNo
1Are the front and rear tires in specified size?
Go to Step 2
Replace the tires
with specified
ones, and service
the new tires.
Go to Step 16
2Is the tire pressure correct?
Go to Step 3
In flate tries to
recommended
pressure.
Go to Step 16
3Are the tires free from abnormal wear?
Go to Step 4
Replace the tires
with specified
ones, and service
the new tires.
Go to Step 16
4Are different types of tires used?
Go to Step 5
Replace the tires
with specified
ones, and service
the new tires.
Go to Step 16
51. Start the engine.
2. Shift the transfer lever to the high position and switch the 4WD
AUTO SW to 4WD position.
3. Fully turn the steering to the left (or right) end, and select the D
range and start the creep run.
Does the tight corner braking occur? Is the judder with chug-chug
sound observed? * Use caution on the operation.
Go to Step 6 Go to Step 11
61. Shift the transfer lever to the high position and switch the 4WD
AUTO SW to the 2H position.
2. Fully turn the steering to the left (or right) end, and select the D
range and start the creep run.
Does the tight corner braking occur? Is the judder with chug-chug
sound observed? * Use caution on the operation.
Go to Step 7 Go to Step 14
7Is an LSD mounted to the rear differential? Go to Step 8 Go to Step 9
8Is the genuine LSD oil used in the rear differential?
Go to Step 9
Replace the
differential oil.
Go to Step 16
9Does the engine output the power correctly?
Go to Step 10
Check the
engine.
Go to Step 16
10Do the speed sensors work correctly? (Check trouble codes.)The ECU has
failed. Replace
the ECU.
Go to Step 16
Replace the
speed sensors.
Go to Step 16
11Is the tight corner braking observed only when the brake is
applied?
Go to Step 12
Conduct full
steering under
WOT.
Go to Step 5
121. Turn on the starter switch.
Is the battery voltage observed between terminals 11 and 19?
Go to Step 13
Repair the circuit
of terminal 11
(ABS IN).
Go to Step 16
Page 4200 of 6000
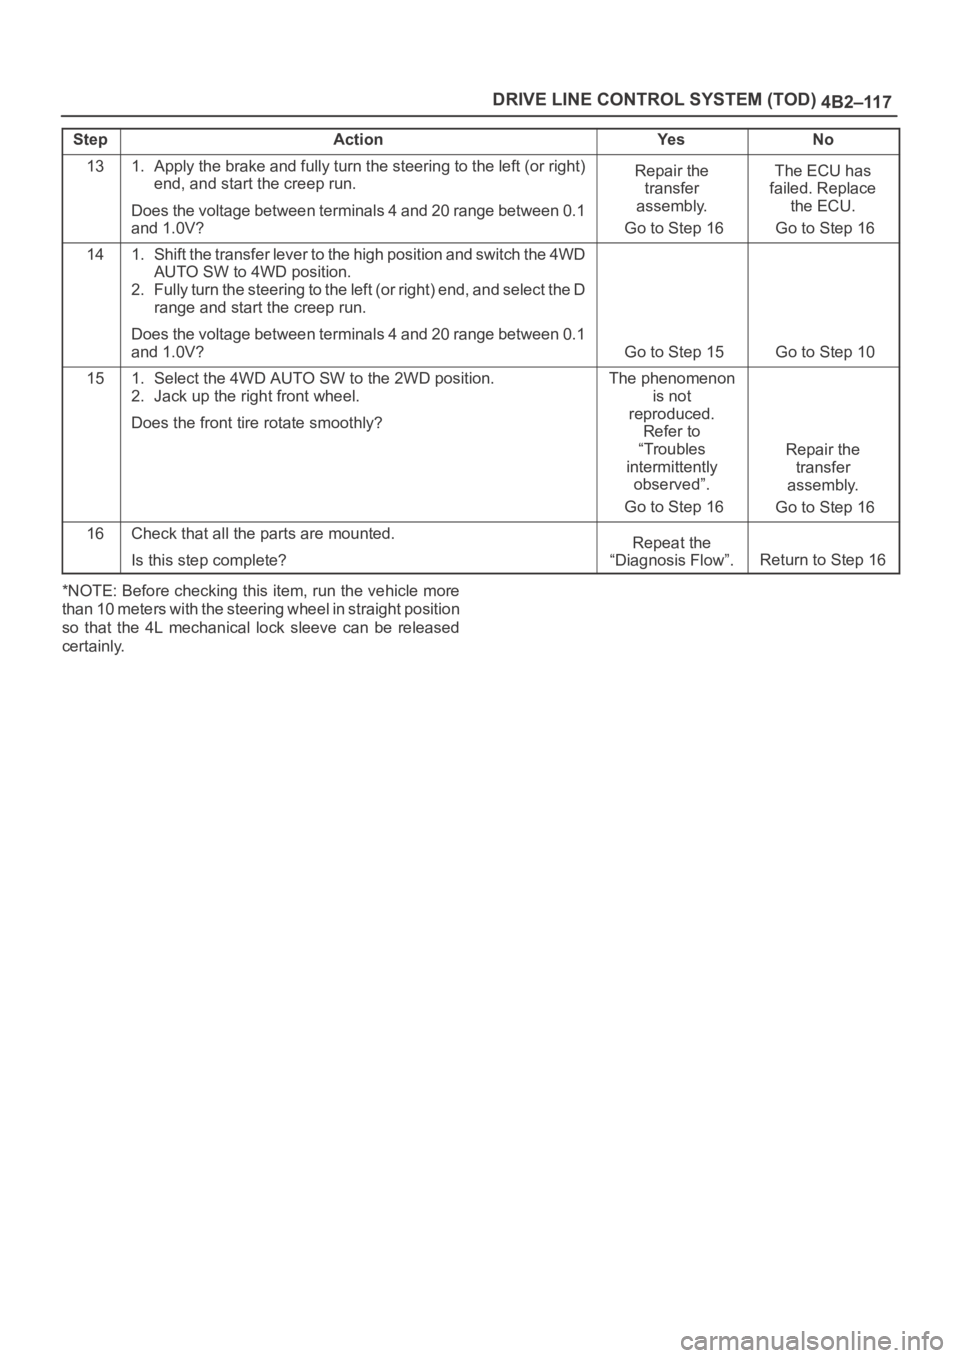
4B2–117 DRIVE LINE CONTROL SYSTEM (TOD)
StepNo Ye s Action
131. Apply the brake and fully turn the steering to the left (or right)
end, and start the creep run.
Does the voltage between terminals 4 and 20 range between 0.1
and 1.0V?Repair the
transfer
assembly.
Go to Step 16The ECU has
failed. Replace
the ECU.
Go to Step 16
141. Shift the transfer lever to the high position and switch the 4WD
AUTO SW to 4WD position.
2. Fully turn the steering to the left (or right) end, and select the D
range and start the creep run.
Does the voltage between terminals 4 and 20 range between 0.1
and 1.0V?
Go to Step 15 Go to Step 10
151. Select the 4WD AUTO SW to the 2WD position.
2. Jack up the right front wheel.
Does the front tire rotate smoothly?The phenomenon
is not
reproduced.
Refer to
“Troubles
intermittently
observed”.
Go to Step 16
Repair the
transfer
assembly.
Go to Step 16
16Check that all the parts are mounted.
Is this step complete?Repeat the
“Diagnosis Flow”.
Return to Step 16
*NOTE: Before checking this item, run the vehicle more
than 10 meters with the steering wheel in straight position
so that the 4L mechanical lock sleeve can be released
certainly.
Page 4202 of 6000
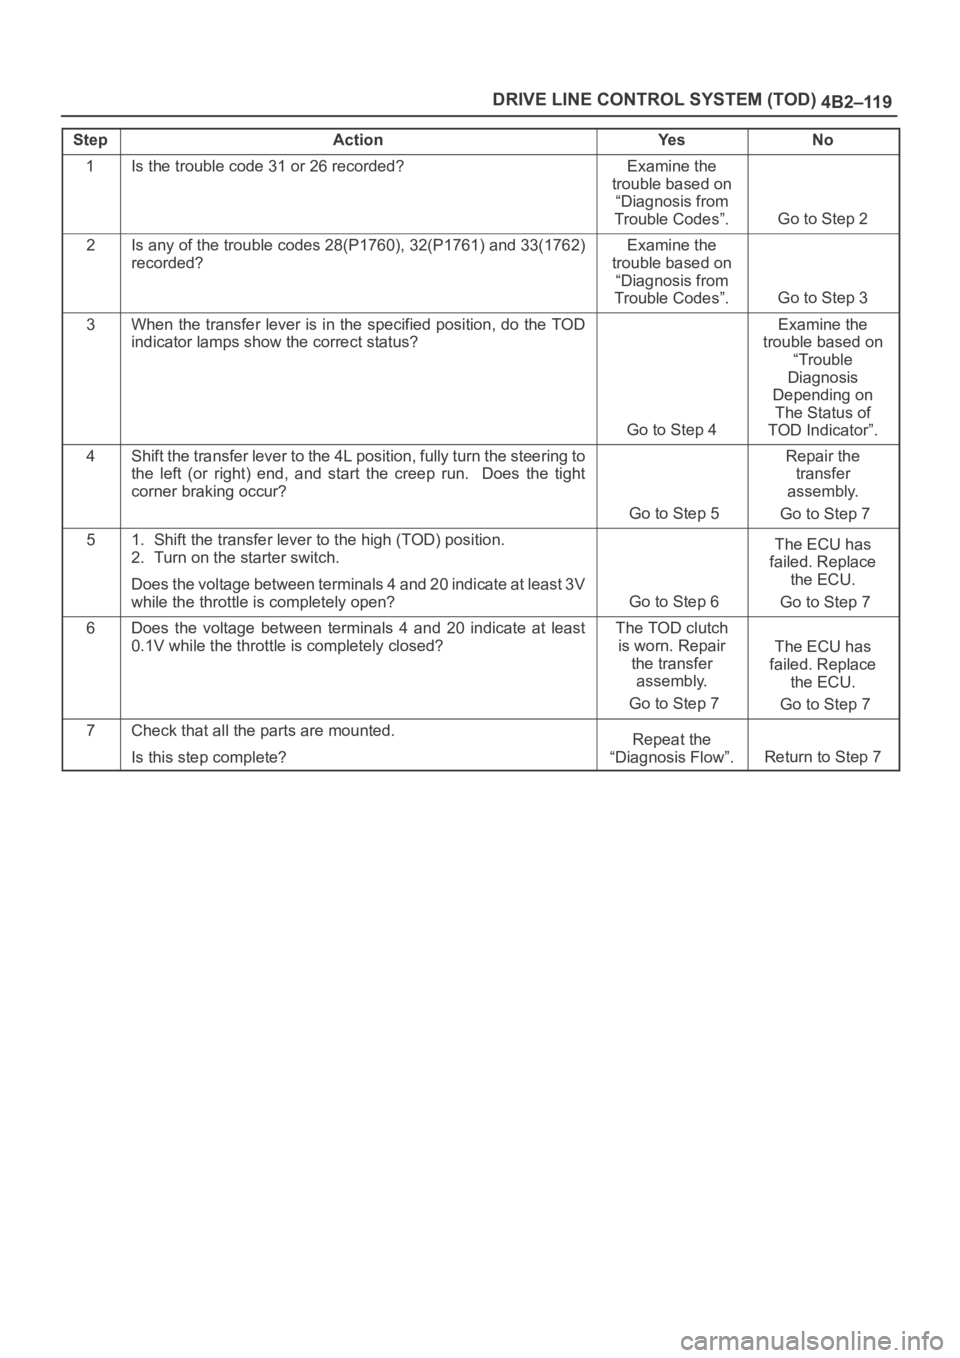
4B2–119 DRIVE LINE CONTROL SYSTEM (TOD)
StepActionYe sNo
1Is the trouble code 31 or 26 recorded?Examine the
trouble based on
“Diagnosis from
Trouble Codes”.
Go to Step 2
2Is any of the trouble codes 28(P1760), 32(P1761) and 33(1762)
recorded?Examine the
trouble based on
“Diagnosis from
Trouble Codes”.
Go to Step 3
3When the transfer lever is in the specified position, do the TOD
indicator lamps show the correct status?
Go to Step 4
Examine the
trouble based on
“Trouble
Diagnosis
Depending on
The Status of
TOD Indicator”.
4Shift the transfer lever to the 4L position, fully turn the steering to
the left (or right) end, and start the creep run. Does the tight
corner braking occur?
Go to Step 5
Repair the
transfer
assembly.
Go to Step 7
51. Shift the transfer lever to the high (TOD) position.
2. Turn on the starter switch.
Does the voltage between terminals 4 and 20 indicate at least 3V
while the throttle is completely open?
Go to Step 6
The ECU has
failed. Replace
the ECU.
Go to Step 7
6Does the voltage between terminals 4 and 20 indicate at least
0.1V while the throttle is completely closed?The TOD clutch
is worn. Repair
the transfer
assembly.
Go to Step 7
The ECU has
failed. Replace
the ECU.
Go to Step 7
7Check that all the parts are mounted.
Is this step complete?Repeat the
“Diagnosis Flow”.
Return to Step 7
Page 4206 of 6000
DRIVE LINE CONTROL SYSTEM (TOD) 4B2–123
Step Action Yes No
1 Are the brake and ABS systems healthy?
Go to Step 2Repair the
brake and ABS.
Refer to
section 5A.
2 Turn on the star ter switch.
Is the battery voltage observed between terminals 1 and 20?
Go to Step 3Repair the
battery system.
Go to Step 4
3 1. Select the 4WD AUTO SW to the 2WD position.
2. The voltage between terminals 3 and 19 range between 7.5
and 16V (0.12 seconds make a cycle)
Does the voltage within the range specified? Go to Step 4The ECU has
failed. Replace
the ECU.
Go to Step 4
4 Check that all the par ts are mounted.
Is this step complete?Repeat the
“Diagnosis Flow". Return to Step 4
Page 4232 of 6000
4C–26
DRIVE SHAFT SYSTEM
Reassembly
1. Install DOJ case to bracket.
2. Install oil seal and fix snap ring.
3. Install bearing and fix snap ring.
4. Install bracket to axle case. Tighten the bracket bolt to
the specified torque.
Torque: 116 Nꞏm (11.8 kgꞏm/85 lb ft)
5. Apply 150g of the specified grease in BJ .
6. Install dust seal .
7. Apply a thin coat of grease to the shaft for smooth
installation then install bellows.
8. Install band. Note the setting direction. After
installation, check that the bellows is free from
distortion.
412RS017
9. Install another bellows and fix band.
10. Install the ball guide with the smaller diameter side
ahead onto the shaft.
11. Install ball retainer.
12. Using snap ring pliers, install the snap ring (1)
securing the ball retainer to the shaft.
412RS013
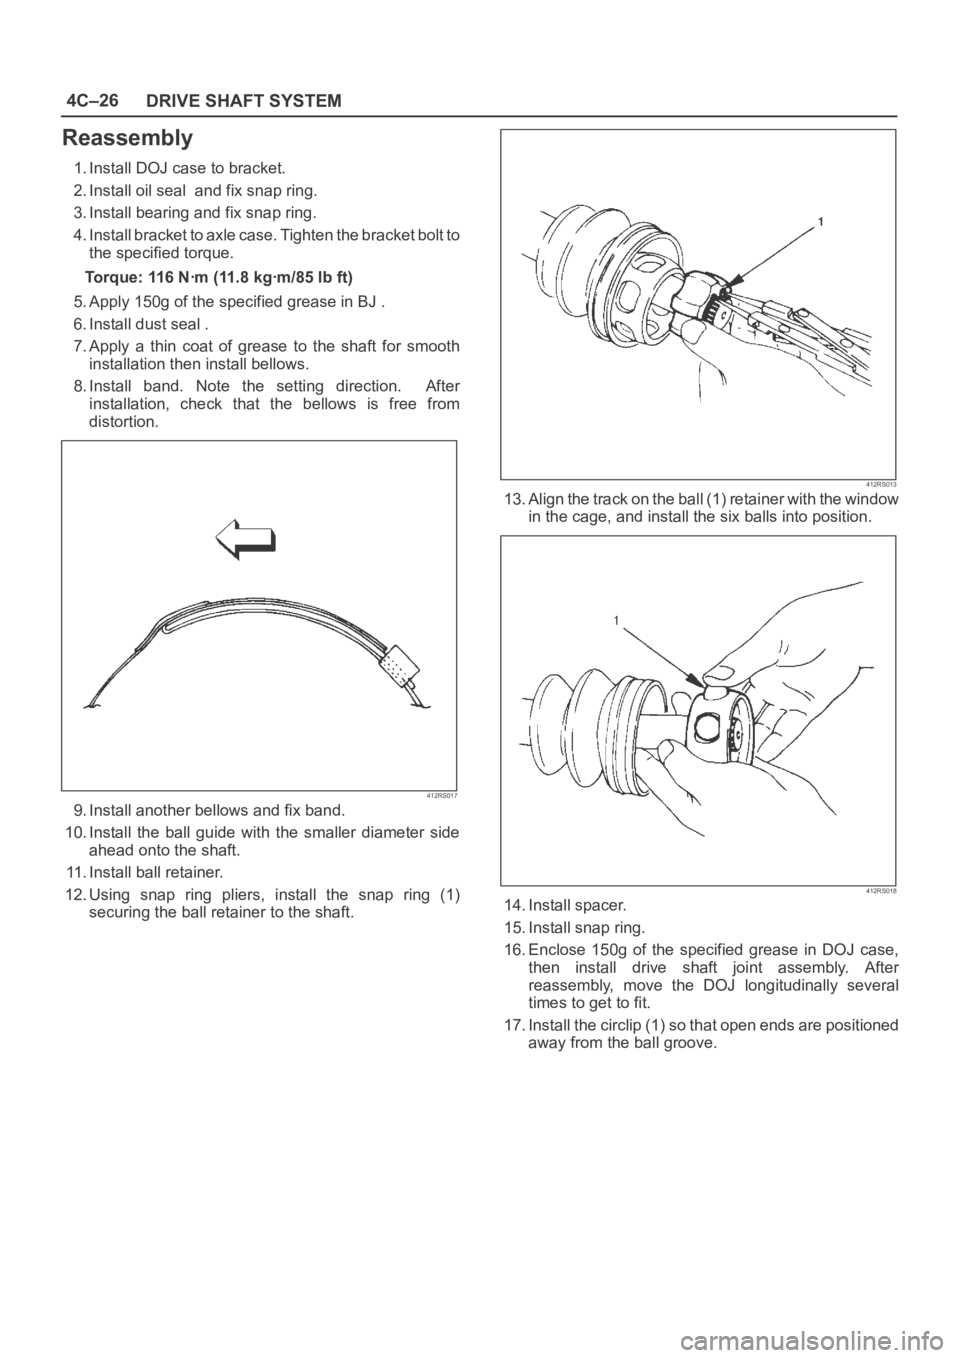
13. Align the track on the ball (1) retainer with the window
in the cage, and install the six balls into position.
412RS018
14. Install spacer.
15. Install snap ring.
16. Enclose 150g of the specified grease in DOJ case,
then install drive shaft joint assembly. After
reassembly, move the DOJ longitudinally several
times to get to fit.
17. Install the circlip (1) so that open ends are positioned
away from the ball groove.