Page 445 of 6000

DIFFERENTIAL (FRONT) 4A1–8
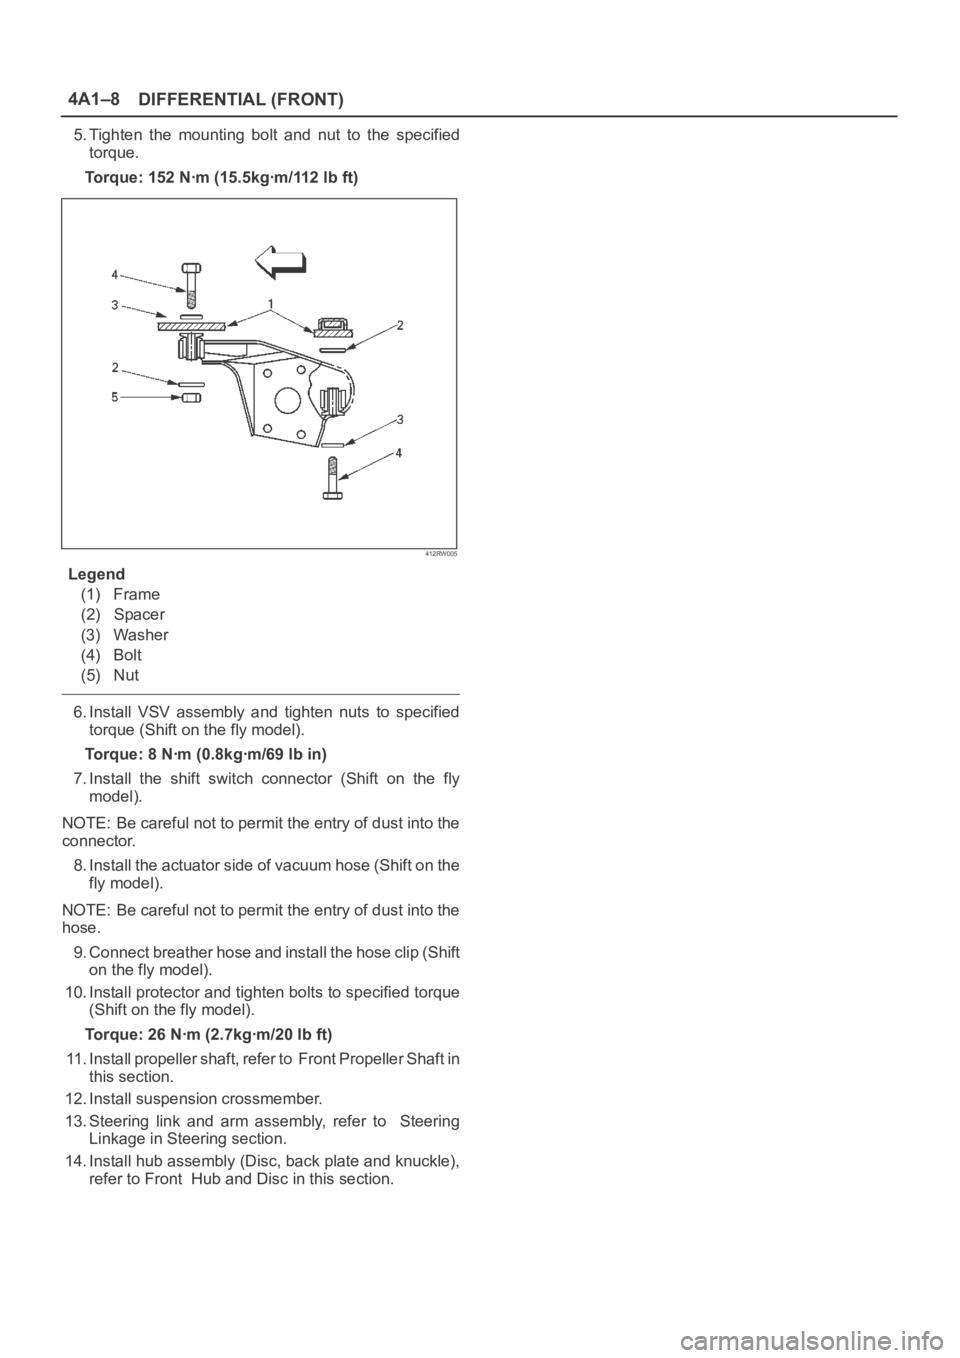
5. Tighten the mounting bolt and nut to the specified
torque.
Torque: 152 Nꞏm (15.5kgꞏm/112 lb ft)
412RW005
Legend
(1) Frame
(2) Spacer
(3) Washer
(4) Bolt
(5) Nut
6. Install VSV assembly and tighten nuts to specified
torque (Shift on the fly model).
Torque: 8 Nꞏm (0.8kgꞏm/69 lb in)
7. Install the shift switch connector (Shift on the fly
model).
NOTE: Be careful not to permit the entry of dust into the
connector.
8. Install the actuator side of vacuum hose (Shift on the
fly model).
NOTE: Be careful not to permit the entry of dust into the
hose.
9. Connect breather hose and install the hose clip (Shift
on the fly model).
10. Install protector and tighten bolts to specified torque
(Shift on the fly model).
Torque: 26 Nꞏm (2.7kgꞏm/20 lb ft)
11. Install propeller shaft, refer to Front Propeller Shaft in
this section.
12. Install suspension crossmember.
13. Steering link and arm assembly, refer to Steering
Linkage in Steering section.
14. Install hub assembly (Disc, back plate and knuckle),
refer to Front Hub and Disc in this section.
Page 446 of 6000
4A1–9 DIFFERENTIAL (FRONT)
Differential Assembly
Disassembled View
415RW001
Legend
(1) Differential Assembly
(2) Flange Nut
(3) Flange
(4) Dust Cover
(5) Oil Seal
(6) Outer Bearing
(7) Outer Bearing Outer Race
(8) Damper
(9) Bracket
(10) Differential Carrier
(11) Bearing Cap(12) Bolt
(13) Inner Bearing Outer Race
(14) Collapsible Spacer
(15) Pinion Gear
(16) Inner Bearing
(17) Adjust Shim
(18) Diff Cage Assembly
(19) Side Bearing Outer Race
(20) Side Bearing
(21) Adjust Shim
(22) Bolt
(23) Axle Case
Disassembly
1. Remove differential carrier fixing bolt.2. Remove differential assembly.
Page 447 of 6000
DIFFERENTIAL (FRONT) 4A1–10
3. Using holding fixture 5–8840–0275–0 and holding
fixture base 5–8840–0003–0, fix the differential
assembly to the bench.
425RW046
4. Remove bearing cap bolt.
5. Apply a setting mark to the side bearing cap and the
differential carrier then remove bearing cap.
425RS009
6. Remove differential cage assembly.
7. Remove side bearing outer race, after removal, keep
the right and left hand side bearing assemblies
separate to maintain inner and outer race
combinations.8. Remove side bearing, using remover
5–8840–0013–0, 5–8840–0014–0 and adapter
9–8521–1743–0.
415RW023
9. Remove adjust shim, note the thickness and position
of the shims removed.
10. Remove the flange nut using holding wrench
5–8840–2157–0 after raising up its staked parts
completely.
425RW047
11. Remove flange.
12. Remove dust cover.
Page 448 of 6000
4A1–11 DIFFERENTIAL (FRONT)
13. Remove the drive pinion assembly using a soft metal
rod and a hammer.
425RW041
14. Remove collapsible spacer.
15. Remove the inner bearing using a separator
5–8840–0015–0 and a press.
415RW033
16. Remove adjust shim.
17. Remove inner bearing outer race.
18. Remove oil seal.
19. Remove outer bearing.20. Remove the inner bearing outer race (1) and the outer
bearing outer race (2) by using a brass bar and a
hammer.
425RS014
425RS015
Page 449 of 6000
DIFFERENTIAL (FRONT) 4A1–12
21. Remove damper and bracket.
425RW042
Reassembly
1. Using installer 9–8522–1141–0 and grip
5–8840–0007–0, install outer bearing outer race.
415RW018
2. Using installer 9–8522–1274–0 and grip
5–8840–0007–0, install Inner bearing outer race.
415RW017
3. Install adjust shim and adjust drive pinion mounting
distance
1. Apply gear oil to the inner and outer drive pinion
bearing.
Clean the pinion setting gauge set.
Then install the gauge set together with the inner
and outer bearings.
2. Tighten the nut to the specified torque.
Torque: 2.3 Nꞏm (0.23kgꞏm/20 lb in)
415RS009
Legend
(1) Pilot : 5–8840–2085–0
(2) Nut and Bolt : 5–8840–2089–0
(3) Gauge Plate : 5–8840–2087–0
Page 450 of 6000

4A1–13 DIFFERENTIAL (FRONT)
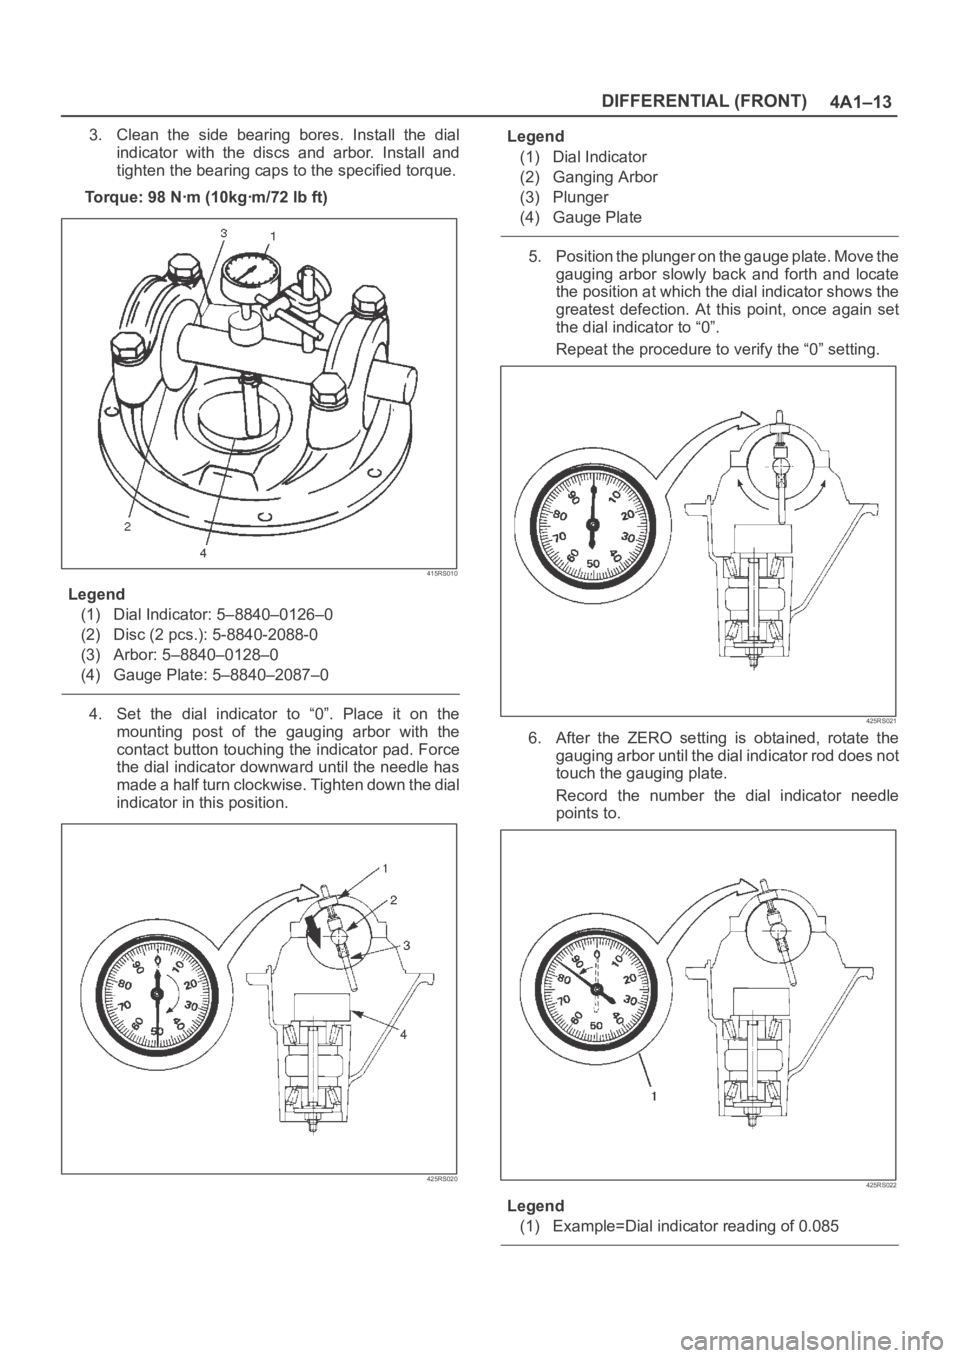
3. Clean the side bearing bores. Install the dial
indicator with the discs and arbor. Install and
tighten the bearing caps to the specified torque.
To r q u e : 9 8 N ꞏm ( 1 0 k g ꞏm / 7 2 l b f t )
415RS010
Legend
(1) Dial Indicator: 5–8840–0126–0
(2) Disc (2 pcs.): 5-8840-2088-0
(3) Arbor: 5–8840–0128–0
(4) Gauge Plate: 5–8840–2087–0
4. Set the dial indicator to “0”. Place it on the
mounting post of the gauging arbor with the
contact button touching the indicator pad. Force
the dial indicator downward until the needle has
made a half turn clockwise. Tighten down the dial
indicator in this position.
425RS020
Legend
(1) Dial Indicator
(2) Ganging Arbor
(3) Plunger
(4) Gauge Plate
5. Position the plunger on the gauge plate. Move the
gauging arbor slowly back and forth and locate
the position at which the dial indicator shows the
greatest defection. At this point, once again set
the dial indicator to “0”.
Repeat the procedure to verify the “0” setting.
425RS021
6. After the ZERO setting is obtained, rotate the
gauging arbor until the dial indicator rod does not
touch the gauging plate.
Record the number the dial indicator needle
points to.
425RS022
Legend
(1) Example=Dial indicator reading of 0.085
Page 451 of 6000
DIFFERENTIAL (FRONT) 4A1–14
7. Record the pinion depth code on the head of the
drive pinion.
The number indicates a necessary change in the
pinion mounting distance. A plus number indi-
cates the need for a greater mounting distance
(which can be achieved by decreasing the shim
thickness). A minus number indicates the need
for a smaller mounting distance (which can be
achieved by increasing the shim thickness). If ex-
amination reveals pinion depth code “0”, the pin-
ion is “nominal”.
425RS023
Page 452 of 6000

4A1–15 DIFFERENTIAL (FRONT)
8. Select the shim using the chart;
Pinion marking+10+8+6+4+20–2–4–6–8–10
Dial indicator
reading
(Inches)mm
(Inches)mm
(Inches)mm
(Inches)mm
(Inches)mm
(Inches)mm
(Inches)mm
(Inches)mm
(Inches)mm
(Inches)mm
(Inches)mm
(Inches)
0.0812.18
(0.0858)
0.0822.18
(0.0858)2.20
(0.0866)
0.0832.18
(0.0858)2.20
(0.0866)2.23
(0.0882)
0.0842.18
(0.0858)2.20
(0.0866)2.24
(0.0882)2.26
(0.0890)
0.0852.18
(0.0858)2.20
(0.0866)2.24
(0.0882)2.26
(0.0890)2.28
(0.0898)
0.0862.18
(0.0858)2.20
(0.0866)2.24
(0.0882)2.26
(0.0890)2.28
(0.0898)2.32
(0.0914)
0.0872.18
(0.0858)2.20
(0.0866)2.24
(0.0882)2.26
(0.0890)2.28
(0.0898)2.32
(0.0914)2.34
(0.0921)
0.0882.18
(0.0858)2.20
(0.0866)2.24
(0.0882)2.26
(0.0890)2.28
(0.0898)2.32
(0.0914)2.34
(0.0921)2.36
(0.0929)
0.0892.18
(0.0858)2.20
(0.0866)2.24
(0.0882)2.26
(0.0890)2.28
(0.0898)2.32
(0.0914)2.34
(0.0921)2.36
(0.0929)2.38
(0.0937)
0.0902.18
(0.0858)2.20
(0.0866)2.24
(0.0882)2.26
(0.0890)2.28
(0.0898)2.32
(0.0914)2.34
(0.0921)2.36
(0.0929)2.38
(0.0937)2.42
(0.0953)
0.0912.18
(0.0858)2.20
(0.0866)2.24
(0.0882)2.26
(0.0890)2.28
(0.0898)2.32
(0.0914)2.34
(0.0921)2.36
(0.0929)2.38
(0.0937)2.42
(0.0953)2.44
(0.0961)
0.0922.20
(0.0866)2.24
(0.0882)2.26
(0.0890)2.28
(0.0898)2.32
(0.0914)2.34
(0.0921)2.36
(0.0929)2.38
(0.0937)2.42
(0.0953)2.44
(0.0961)2.46
(0.0969)
0.0932.24
(0.0882)2.26
(0.0890)2.28
(0.0898)2.32
(0.0914)2.34
(0.0921)2.36
(0.0929)2.38
(0.0937)2.42
(0.0953)2.44
(0.0961)2.46
(0.0969)2.48
(0.0977)
0.0942.26
(0.0890)2.28
(0.0898)2.32
(0.0914)2.34
(0.0921)2.36
(0.0929)2.38
(0.0937)2.42
(0.0953)2.44
(0.0961)2.46
(0.0969)2.48
(0.0977)2.52
(0.0992)
0.0952.28
(0.0898)2.32
(0.0914)2.34
(0.0921)2.36
(0.0929)2.38
(0.0937)2.42
(0.0953)2.44
(0.0961)2.46
(0.0969)2.48
(0.0977)2.52
(0.0992)2.54
(0.1000)
0.0962.32
(0.0914)2.34
(0.0921)2.36
(0.0929)2.38
(0.0937)2.42
(0.0953)2.44
(0.0961)2.46
(0.0969)2.48
(0.0977)2.52
(0.0992)2.54
(0.1000)2.56
(0.1008)
0.0972.34
(0.0921)2.36
(0.0929)2.38
(0.0937)2.42
(0.0953)2.44
(0.0961)2.46
(0.0969)2.48
(0.0977)2.52
(0.0992)2.54
(0.1000)2.56
(0.1008)
0.0982.36
(0.0929)2.38
(0.0937)2.42
(0.0953)2.44
(0.0961)2.46
(0.0969)2.48
(0.0977)2.52
(0.0992)2.54
(0.1000)2.56
(0.1008)
0.0992.38
(0.0937)2.42
(0.0953)2.44
(0.0961)2.46
(0.0969)2.48
(0.0977)2.52
(0.0992)2.54
(0.1000)2.56
(0.1008)
02.42
(0.0953)2.44
(0.0961)2.46
(0.0969)2.48
(0.0977)2.52
(0.0992)2.54
(0.1000)2.56
(0.1008)
0.0012.44
(0.0961)2.46
(0.0969)2.48
(0.0977)2.52
(0.0992)2.54
(0.1000)2.56
(0.1008)
0.0022.46
(0.0969)2.48
(0.0977)2.52
(0.0992)2.54
(0.1000)2.56
(0.1008)
0.0032.48
(0.0977)2.52
(0.0992)2.54
(0.1000)2.56
(0.1008)
0.0042.52
(0.0992)2.54
(0.1000)2.56
(0.1008)
0.0052.54
(0.1000)2.56
(0.1008)
0.0062.56
(0.1008)
NOTE: When ordering shims, find the part number in the
parts catalog by using the thickness of shims listed in the
above table.4. Place the shim on the drive pinion, with the chamfered
side turned towards the pinion head then install the
inner bearing onto the pinion using an installer
9–8522–1165–0 and a press.