1998 OPEL FRONTERA automatic transmission
[x] Cancel search: automatic transmissionPage 2295 of 6000
7A1–50
TRANSMISSION CONTROL SYSTEM (4L30–E)
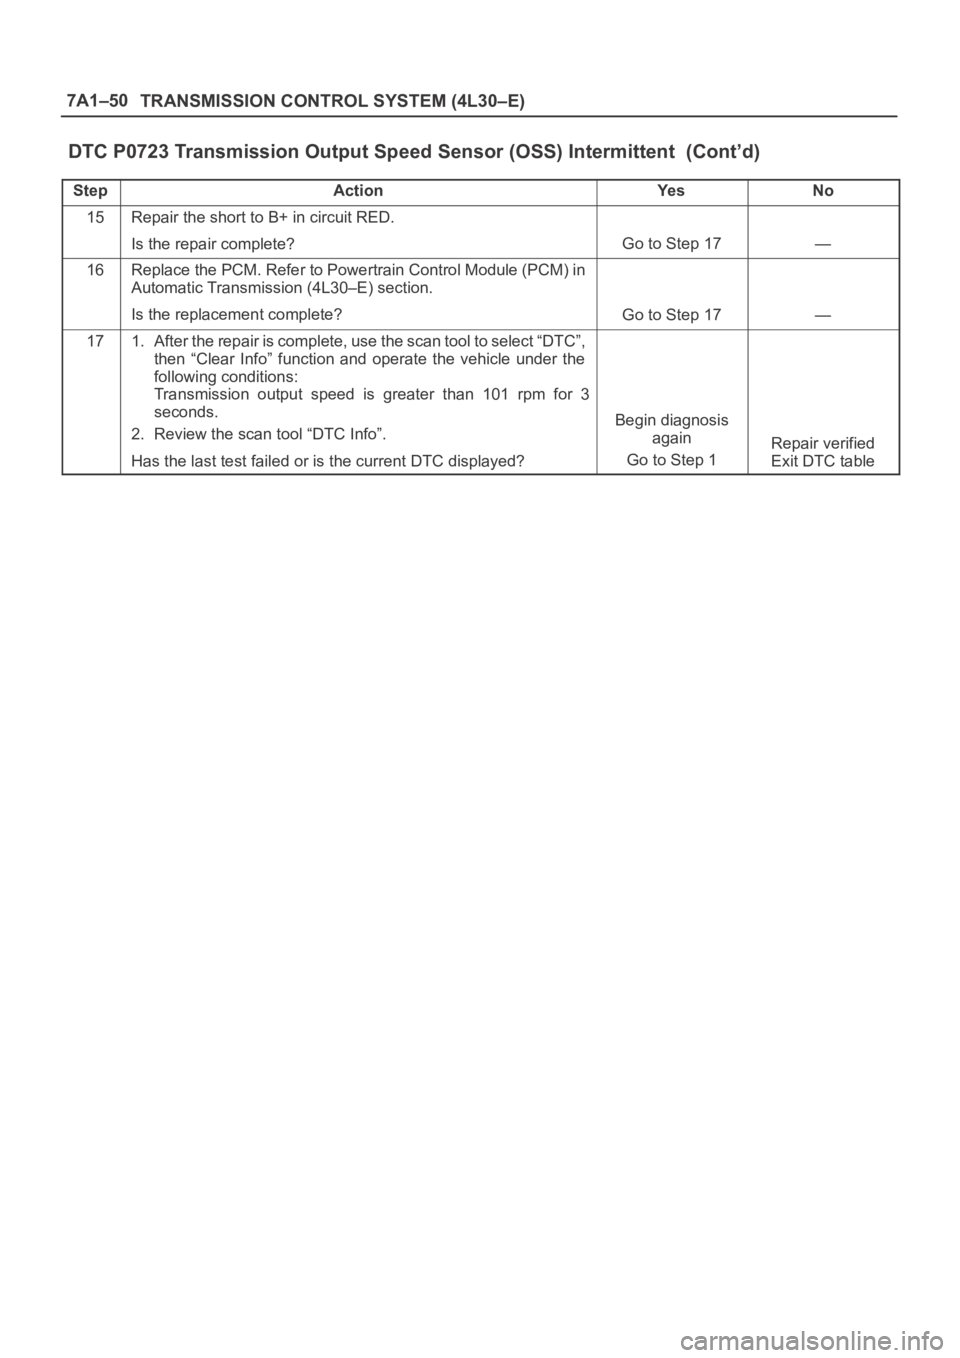
DTC P0723 Transmission Output Speed Sensor (OSS) Intermittent (Cont’d)
StepNo Ye s Action
15Repair the short to B+ in circuit RED.
Is the repair complete?
Go to Step 17—
16Replace the PCM. Refer to Powertrain Control Module (PCM) in
Automatic Transmission (4L30–E) section.
Is the replacement complete?
Go to Step 17—
171. After the repair is complete, use the scan tool to select “DTC”,
then “Clear Info” function and operate the vehicle under the
following conditions:
Transmission output speed is greater than 101 rpm for 3
seconds.
2. Review the scan tool “DTC Info”.
Has the last test failed or is the current DTC displayed?
Begin diagnosis
again
Go to Step 1
Repair verified
Exit DTC table
Page 2297 of 6000
7A1–52
TRANSMISSION CONTROL SYSTEM (4L30–E)
Conditions For Clearing The DTC/CHECK
TRANS Lamp
The PCM will turn “off” the CHECK TRANS Lamp
after three consecutive ignition cycles without a
failure reported.
The DTC can be cleared from PCM memory by using
a scan tool.
The DTC can also be cleared from memory when the
vehicle has made 40 warmup cycles without a failure
reported.
The PCM will cancel the DTC Actions Taken items
when the fault conditions no longer exist and the
ignition is cycles “off” long enough to power down the
PCM.
Diagnostic Aids
Check for intermittent output speed sensor circuit
problems.
Check for possible incorrect calibration. (PCM part
No., tire specification, and rear axle ratio)
Test Description
The numbers below refer to the step numbers on the
diagnostic chart:
3. This step checks for possible low fluid level causing
slipping resulting in an undefined gear ratio.
4. This step checks for correct gear ratios for
commanded gears.
5. This step checks for low line pressure.
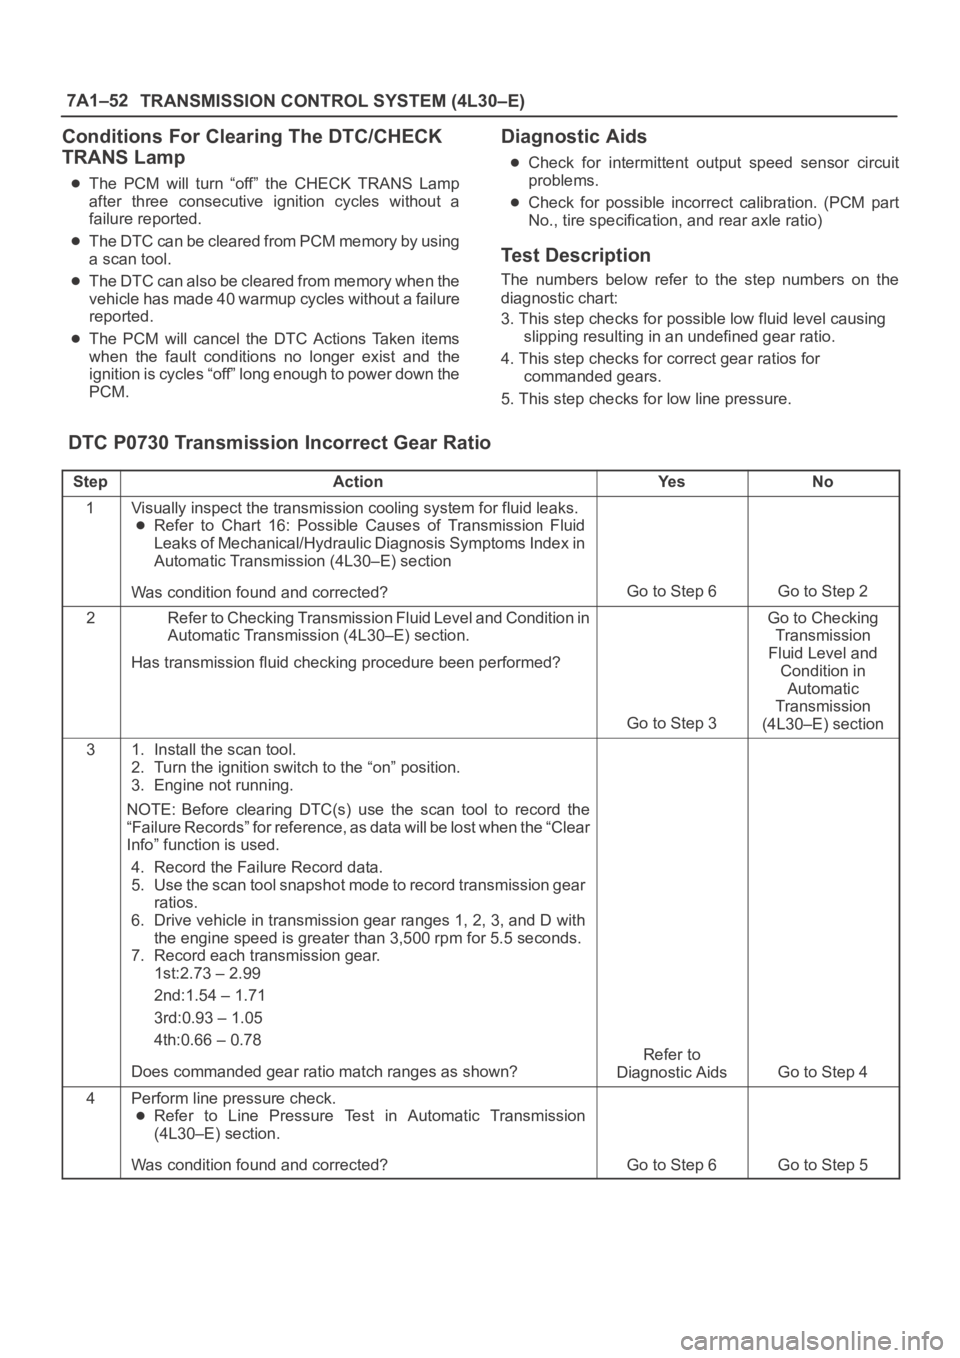
DTC P0730 Transmission Incorrect Gear Ratio
StepActionYe sNo
1Visually inspect the transmission cooling system for fluid leaks.
Refer to Chart 16: Possible Causes of Transmission Fluid
Leaks of Mechanical/Hydraulic Diagnosis Symptoms Index in
Automatic Transmission (4L30–E) section
Was condition found and corrected?
Go to Step 6Go to Step 2
2Refer to Checking Transmission Fluid Level and Condition in
Automatic Transmission (4L30–E) section.
Has transmission fluid checking procedure been performed?
Go to Step 3
Go to Checking
Transmission
Fluid Level and
Condition in
Automatic
Transmission
(4L30–E) section
31. Install the scan tool.
2. Turn the ignition switch to the “on” position.
3. Engine not running.
NOTE: Before clearing DTC(s) use the scan tool to record the
“Failure Records” for reference, as data will be lost when the “Clear
Info” function is used.
4. Record the Failure Record data.
5. Use the scan tool snapshot mode to record transmission gear
ratios.
6. Drive vehicle in transmission gear ranges 1, 2, 3, and D with
the engine speed is greater than 3,500 rpm for 5.5 seconds.
7. Record each transmission gear.
1st:2.73 – 2.99
2nd:1.54 – 1.71
3rd:0.93 – 1.05
4th:0.66 – 0.78
Does commanded gear ratio match ranges as shown?
Refer to
Diagnostic Aids
Go to Step 4
4Perform line pressure check.
Refer to Line Pressure Test in Automatic Transmission
(4L30–E) section.
Was condition found and corrected?
Go to Step 6Go to Step 5
Page 2298 of 6000
TRANSMISSION CONTROL SYSTEM (4L30–E)7A1–53
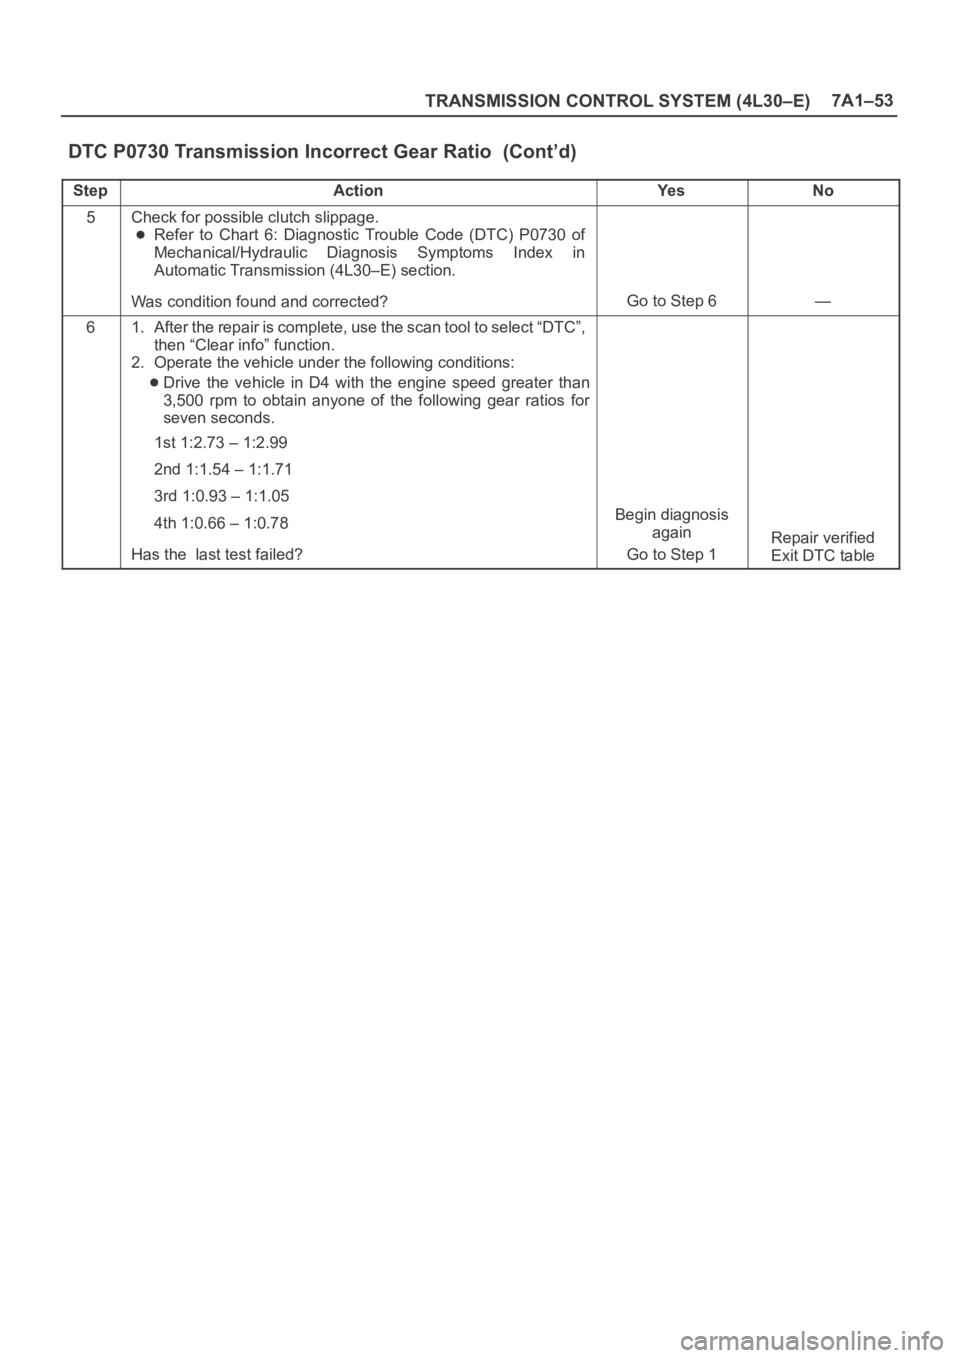
DTC P0730 Transmission Incorrect Gear Ratio (Cont’d)
StepNo Ye s Action
5Check for possible clutch slippage.
Refer to Chart 6: Diagnostic Trouble Code (DTC) P0730 of
Mechanical/Hydraulic Diagnosis Symptoms Index in
Automatic Transmission (4L30–E) section.
Was condition found and corrected?
Go to Step 6—
61. After the repair is complete, use the scan tool to select “DTC”,
then “Clear info” function.
2. Operate the vehicle under the following conditions:
Drive the vehicle in D4 with the engine speed greater than
3,500 rpm to obtain anyone of the following gear ratios for
seven seconds.
1st 1:2.73 – 1:2.99
2nd 1:1.54 – 1:1.71
3rd 1:0.93 – 1:1.05
4th 1:0.66 – 1:0.78
Has the last test failed?
Begin diagnosis
again
Go to Step 1
Repair verified
Exit DTC table
Page 2300 of 6000
TRANSMISSION CONTROL SYSTEM (4L30–E)7A1–55
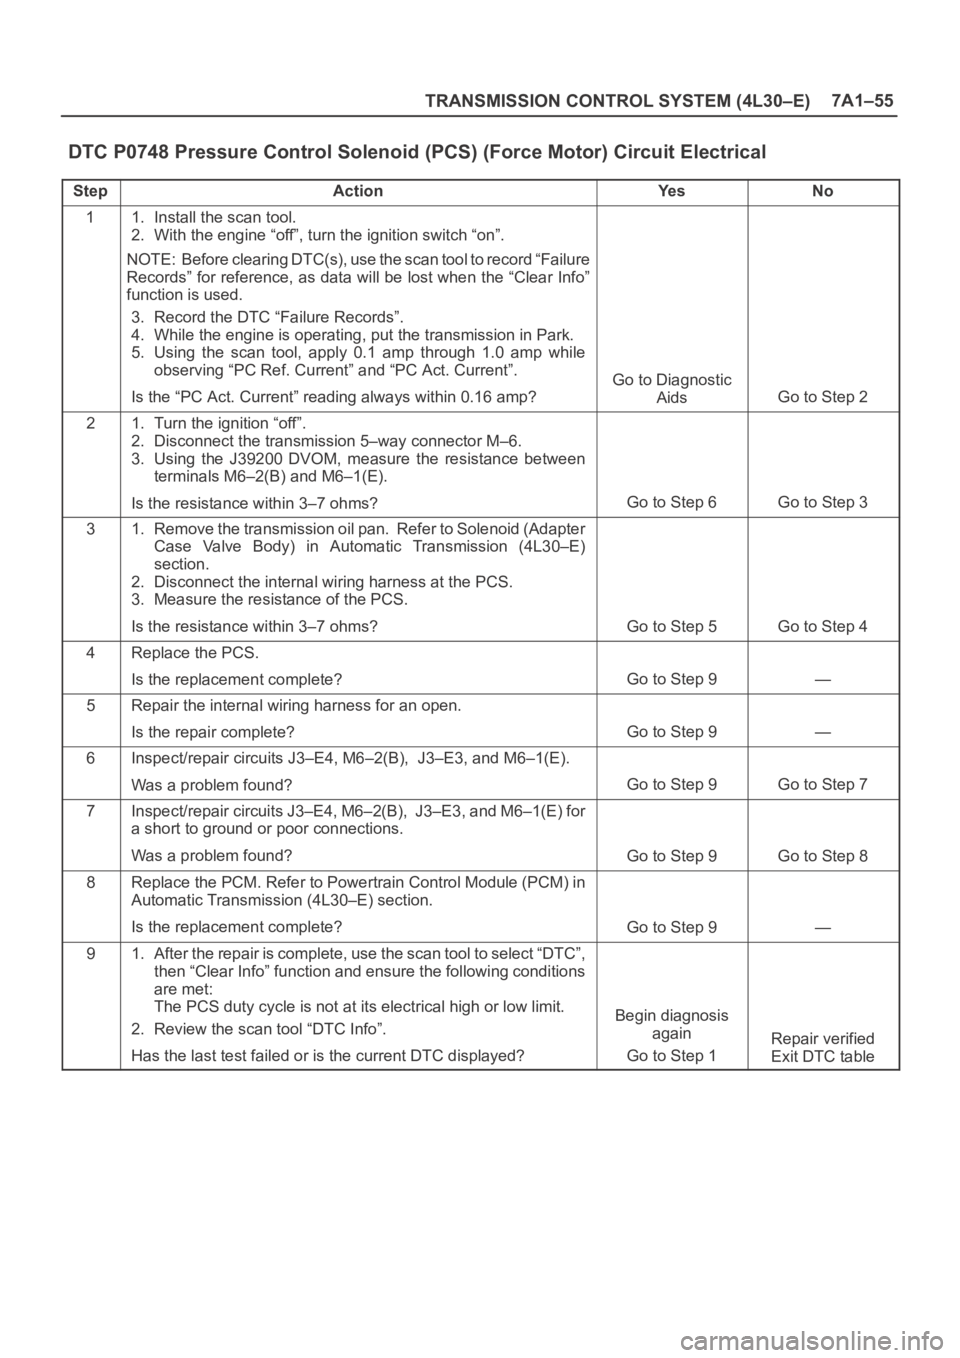
DTC P0748 Pressure Control Solenoid (PCS) (Force Motor) Circuit Electrical
StepActionYe sNo
11. Install the scan tool.
2. With the engine “off”, turn the ignition switch “on”.
NOTE: Before clearing DTC(s), use the scan tool to record “Failure
Records” for reference, as data will be lost when the “Clear Info”
function is used.
3. Record the DTC “Failure Records”.
4. While the engine is operating, put the transmission in Park.
5. Using the scan tool, apply 0.1 amp through 1.0 amp while
observing “PC Ref. Current” and “PC Act. Current”.
Is the “PC Act. Current” reading always within 0.16 amp?
Go to Diagnostic
Aids
Go to Step 2
21. Turn the ignition “off”.
2. Disconnect the transmission 5–way connector M–6.
3. Using the J39200 DVOM, measure the resistance between
terminals M6–2(B) and M6–1(E).
Is the resistance within 3–7 ohms?
Go to Step 6Go to Step 3
31. Remove the transmission oil pan. Refer to Solenoid (Adapter
Case Valve Body) in Automatic Transmission (4L30–E)
section.
2. Disconnect the internal wiring harness at the PCS.
3. Measure the resistance of the PCS.
Is the resistance within 3–7 ohms?
Go to Step 5Go to Step 4
4Replace the PCS.
Is the replacement complete?
Go to Step 9—
5Repair the internal wiring harness for an open.
Is the repair complete?
Go to Step 9—
6Inspect/repair circuits J3–E4, M6–2(B), J3–E3, and M6–1(E).
Was a problem found?
Go to Step 9Go to Step 7
7Inspect/repair circuits J3–E4, M6–2(B), J3–E3, and M6–1(E) for
a short to ground or poor connections.
Was a problem found?
Go to Step 9Go to Step 8
8Replace the PCM. Refer to Powertrain Control Module (PCM) in
Automatic Transmission (4L30–E) section.
Is the replacement complete?
Go to Step 9—
91. After the repair is complete, use the scan tool to select “DTC”,
then “Clear Info” function and ensure the following conditions
are met:
The PCS duty cycle is not at its electrical high or low limit.
2. Review the scan tool “DTC Info”.
Has the last test failed or is the current DTC displayed?
Begin diagnosis
again
Go to Step 1
Repair verified
Exit DTC table
Page 2303 of 6000
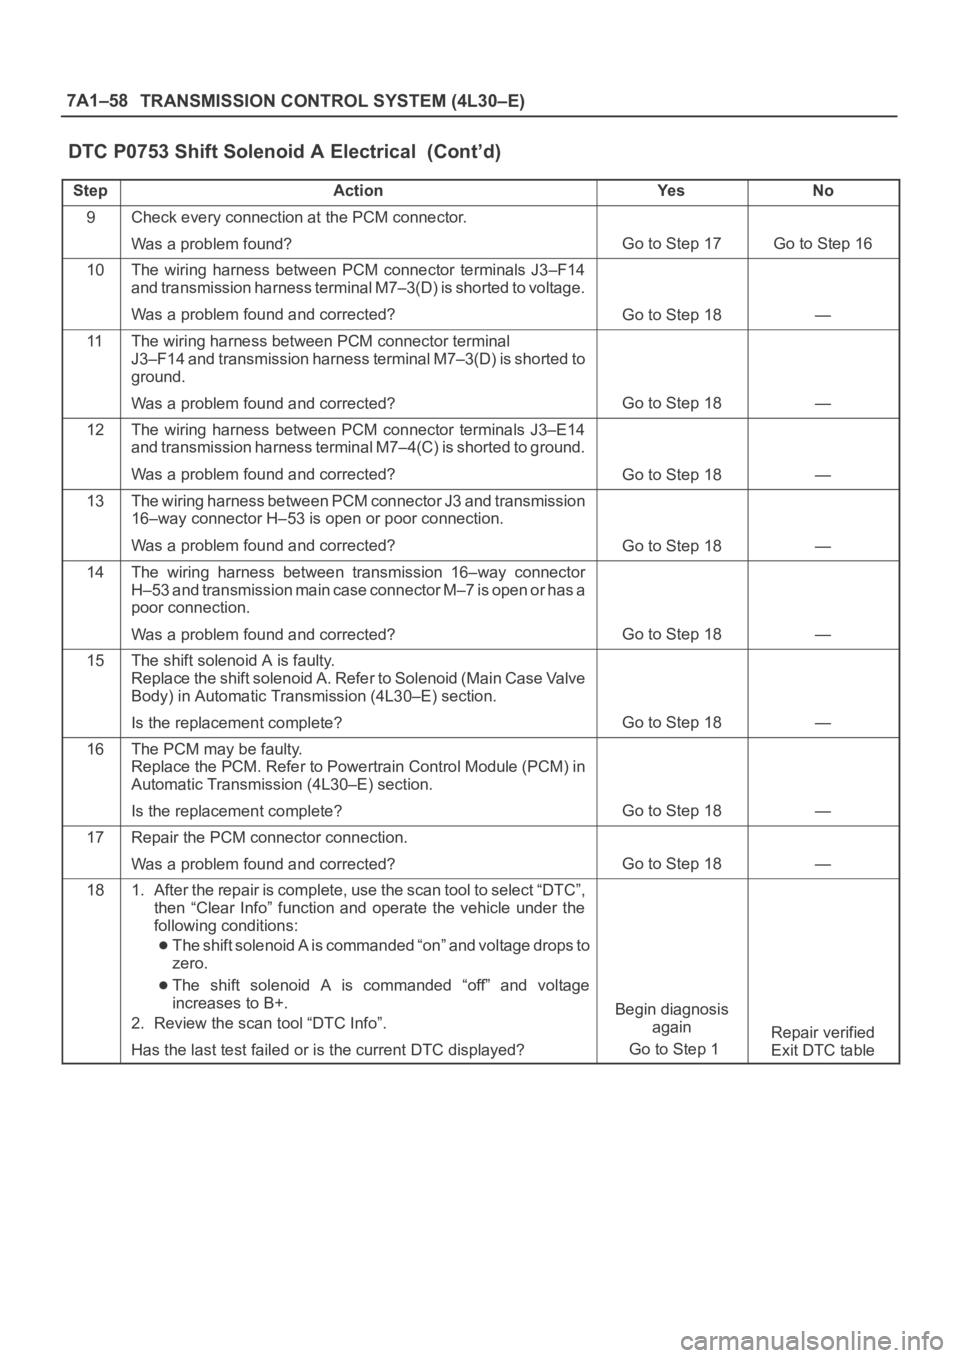
7A1–58
TRANSMISSION CONTROL SYSTEM (4L30–E)
DTC P0753 Shift Solenoid A Electrical (Cont’d)
StepNo Ye s Action
9Check every connection at the PCM connector.
Was a problem found?
Go to Step 17Go to Step 16
10The wiring harness between PCM connector terminals J3–F14
and transmission harness terminal M7–3(D) is shorted to voltage.
Was a problem found and corrected?
Go to Step 18—
11The wiring harness between PCM connector terminal
J3–F14 and transmission harness terminal M7–3(D) is shorted to
ground.
Was a problem found and corrected?
Go to Step 18—
12The wiring harness between PCM connector terminals J3–E14
and transmission harness terminal M7–4(C) is shorted to ground.
Was a problem found and corrected?
Go to Step 18—
13The wiring harness between PCM connector J3 and transmission
16–way connector H–53 is open or poor connection.
Was a problem found and corrected?
Go to Step 18—
14The wiring harness between transmission 16–way connector
H–53 and transmission main case connector M–7 is open or has a
poor connection.
Was a problem found and corrected?
Go to Step 18—
15The shift solenoid A is faulty.
Replace the shift solenoid A. Refer to Solenoid (Main Case Valve
Body) in Automatic Transmission (4L30–E) section.
Is the replacement complete?
Go to Step 18—
16The PCM may be faulty.
Replace the PCM. Refer to Powertrain Control Module (PCM) in
Automatic Transmission (4L30–E) section.
Is the replacement complete?
Go to Step 18—
17Repair the PCM connector connection.
Was a problem found and corrected?
Go to Step 18—
181. After the repair is complete, use the scan tool to select “DTC”,
then “Clear Info” function and operate the vehicle under the
following conditions:
The shift solenoid A is commanded “on” and voltage drops to
zero.
The shift solenoid A is commanded “off” and voltage
increases to B+.
2. Review the scan tool “DTC Info”.
Has the last test failed or is the current DTC displayed?
Begin diagnosis
again
Go to Step 1
Repair verified
Exit DTC table
Page 2306 of 6000
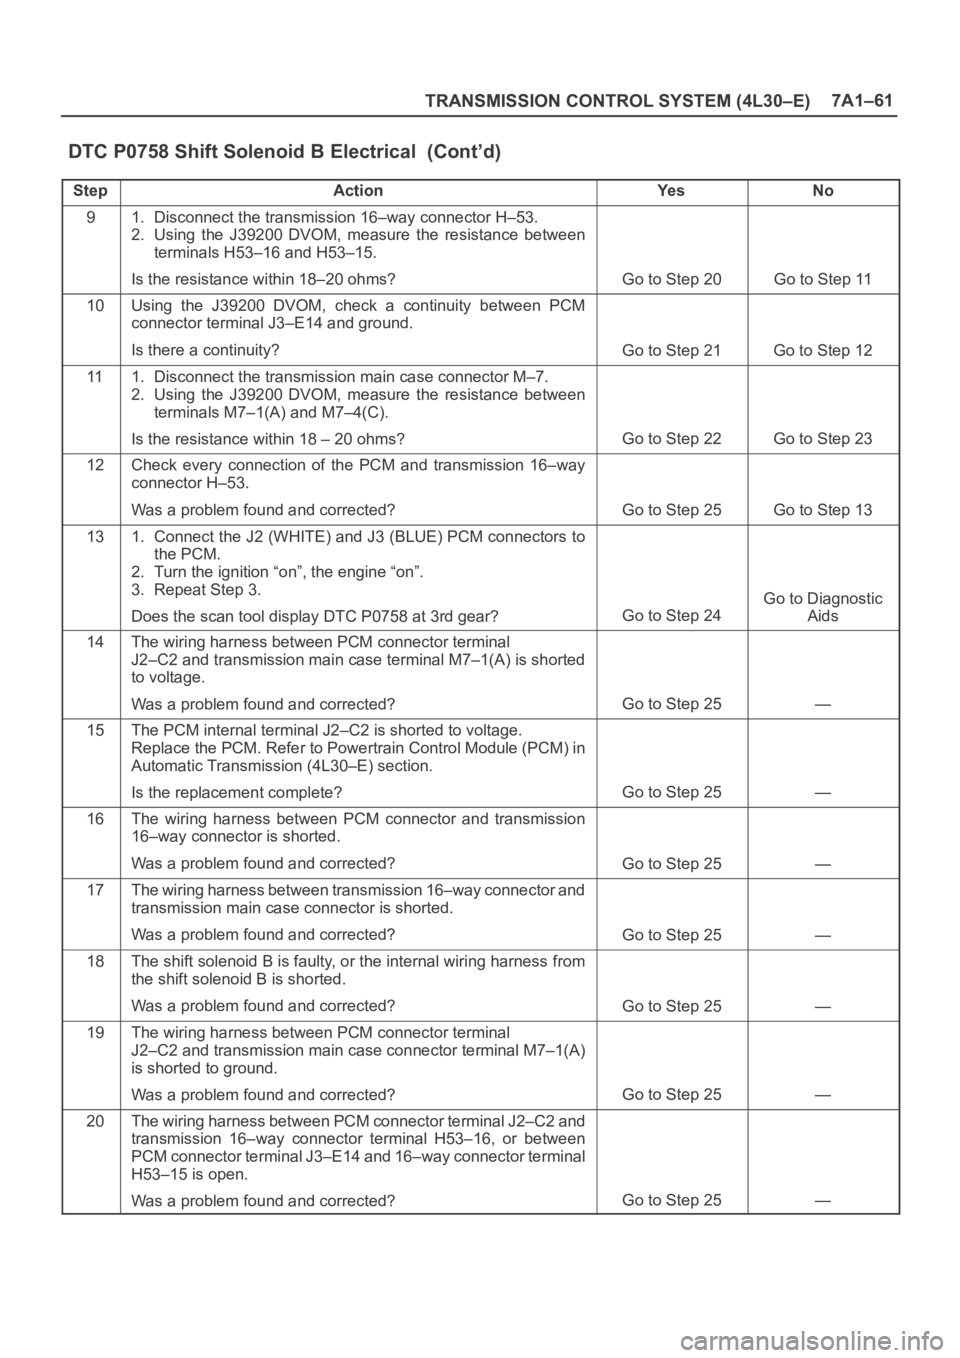
TRANSMISSION CONTROL SYSTEM (4L30–E)7A1–61
DTC P0758 Shift Solenoid B Electrical (Cont’d)
StepNo Ye s Action
91. Disconnect the transmission 16–way connector H–53.
2. Using the J39200 DVOM, measure the resistance between
terminals H53–16 and H53–15.
Is the resistance within 18–20 ohms?
Go to Step 20Go to Step 11
10Using the J39200 DVOM, check a continuity between PCM
connector terminal J3–E14 and ground.
Is there a continuity?
Go to Step 21Go to Step 12
111. Disconnect the transmission main case connector M–7.
2. Using the J39200 DVOM, measure the resistance between
terminals M7–1(A) and M7–4(C).
Is the resistance within 18 – 20 ohms?
Go to Step 22Go to Step 23
12Check every connection of the PCM and transmission 16–way
connector H–53.
Was a problem found and corrected?
Go to Step 25Go to Step 13
131. Connect the J2 (WHITE) and J3 (BLUE) PCM connectors to
the PCM.
2. Turn the ignition “on”, the engine “on”.
3. Repeat Step 3.
Does the scan tool display DTC P0758 at 3rd gear?
Go to Step 24
Go to Diagnostic
Aids
14The wiring harness between PCM connector terminal
J2–C2 and transmission main case terminal M7–1(A) is shorted
to voltage.
Was a problem found and corrected?
Go to Step 25—
15The PCM internal terminal J2–C2 is shorted to voltage.
Replace the PCM. Refer to Powertrain Control Module (PCM) in
Automatic Transmission (4L30–E) section.
Is the replacement complete?
Go to Step 25—
16The wiring harness between PCM connector and transmission
16–way connector is shorted.
Was a problem found and corrected?
Go to Step 25—
17The wiring harness between transmission 16–way connector and
transmission main case connector is shorted.
Was a problem found and corrected?
Go to Step 25—
18The shift solenoid B is faulty, or the internal wiring harness from
the shift solenoid B is shorted.
Was a problem found and corrected?
Go to Step 25—
19The wiring harness between PCM connector terminal
J2–C2 and transmission main case connector terminal M7–1(A)
is shorted to ground.
Was a problem found and corrected?
Go to Step 25—
20The wiring harness between PCM connector terminal J2–C2 and
transmission 16–way connector terminal H53–16, or between
PCM connector terminal J3–E14 and 16–way connector terminal
H53–15 is open.
Was a problem found and corrected?
Go to Step 25—
Page 2308 of 6000
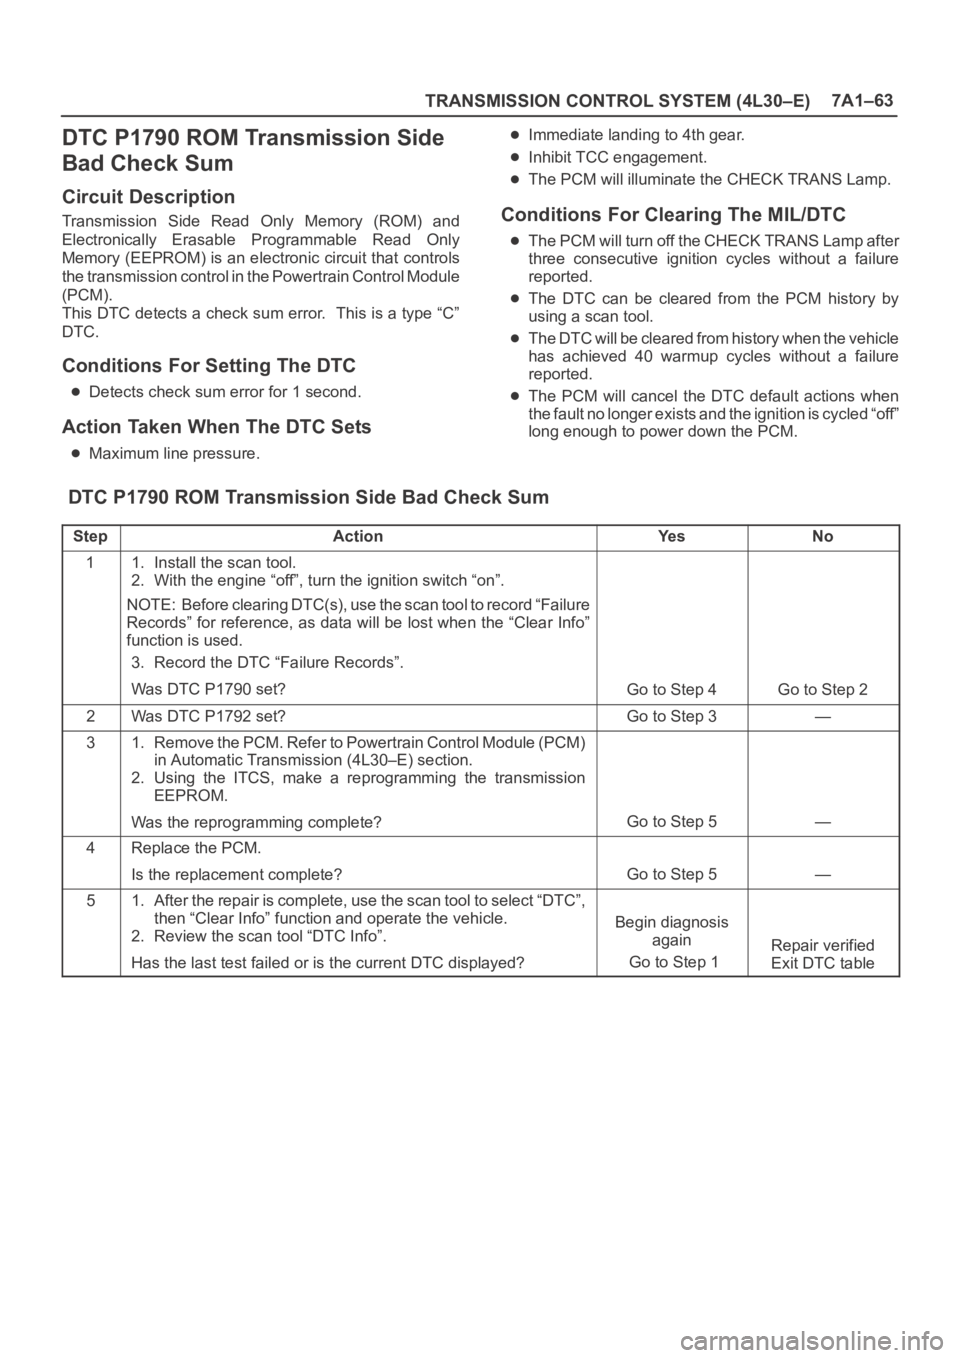
TRANSMISSION CONTROL SYSTEM (4L30–E)7A1–63
DTC P1790 ROM Transmission Side
Bad Check Sum
Circuit Description
Transmission Side Read Only Memory (ROM) and
Electronically Erasable Programmable Read Only
Memory (EEPROM) is an electronic circuit that controls
the transmission control in the Powertrain Control Module
(PCM).
This DTC detects a check sum error. This is a type “C”
DTC.
Conditions For Setting The DTC
Detects check sum error for 1 second.
Action Taken When The DTC Sets
Maximum line pressure.
Immediate landing to 4th gear.
Inhibit TCC engagement.
The PCM will illuminate the CHECK TRANS Lamp.
Conditions For Clearing The MIL/DTC
The PCM will turn off the CHECK TRANS Lamp after
three consecutive ignition cycles without a failure
reported.
The DTC can be cleared from the PCM history by
using a scan tool.
The DTC will be cleared from history when the vehicle
has achieved 40 warmup cycles without a failure
reported.
The PCM will cancel the DTC default actions when
the fault no longer exists and the ignition is cycled “off”
long enough to power down the PCM.
DTC P1790 ROM Transmission Side Bad Check Sum
StepActionYe sNo
11. Install the scan tool.
2. With the engine “off”, turn the ignition switch “on”.
NOTE: Before clearing DTC(s), use the scan tool to record “Failure
Records” for reference, as data will be lost when the “Clear Info”
function is used.
3. Record the DTC “Failure Records”.
Was DTC P1790 set?
Go to Step 4Go to Step 2
2Was DTC P1792 set?Go to Step 3—
31. Remove the PCM. Refer to Powertrain Control Module (PCM)
in Automatic Transmission (4L30–E) section.
2. Using the ITCS, make a reprogramming the transmission
EEPROM.
Was the reprogramming complete?
Go to Step 5—
4Replace the PCM.
Is the replacement complete?
Go to Step 5—
51. After the repair is complete, use the scan tool to select “DTC”,
then “Clear Info” function and operate the vehicle.
2. Review the scan tool “DTC Info”.
Has the last test failed or is the current DTC displayed?
Begin diagnosis
again
Go to Step 1
Repair verified
Exit DTC table
Page 2309 of 6000
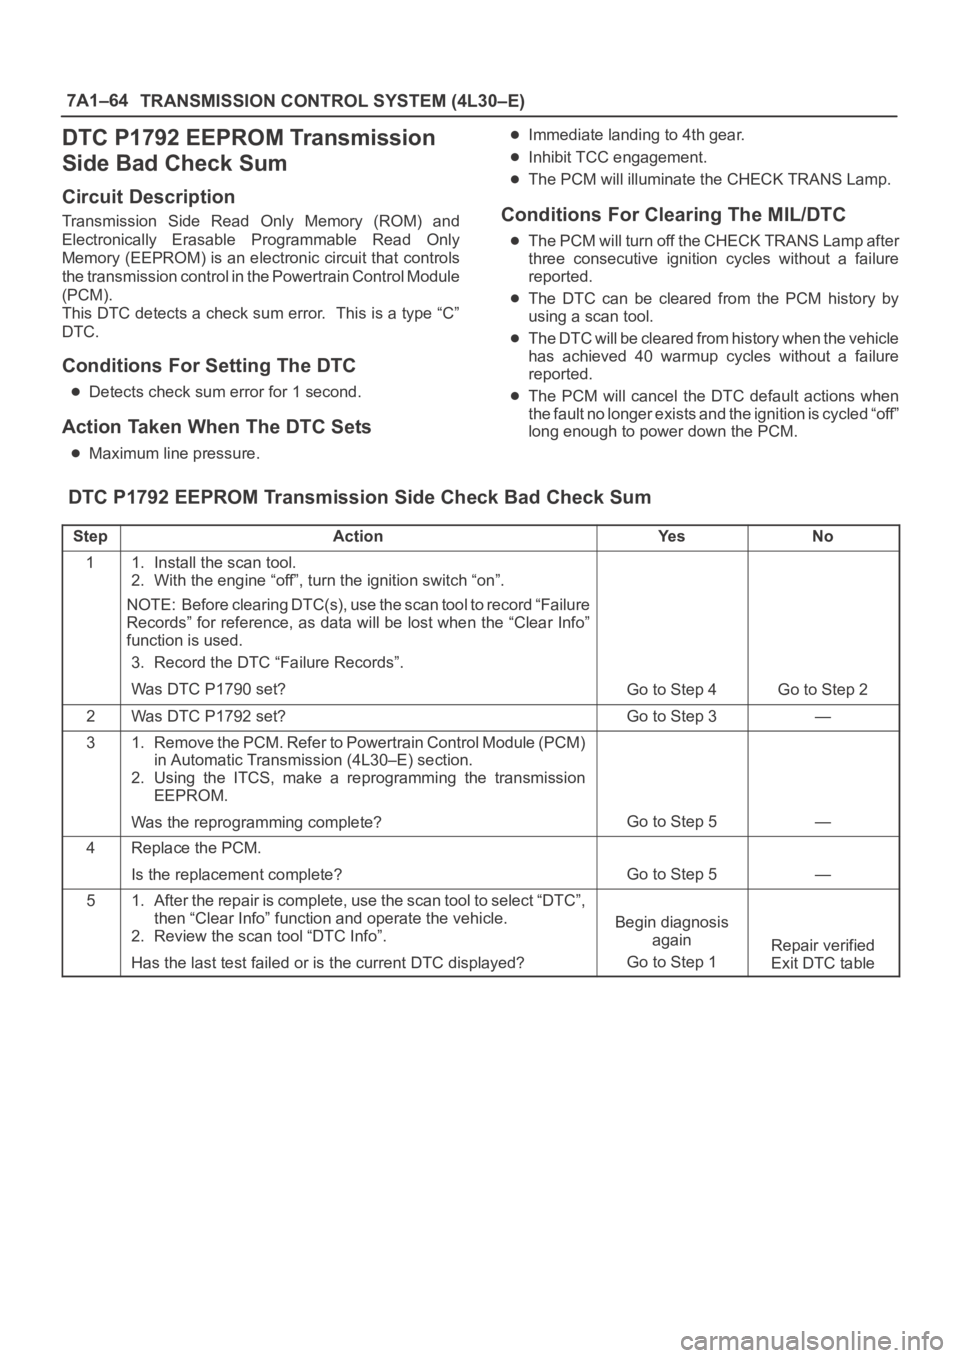
7A1–64
TRANSMISSION CONTROL SYSTEM (4L30–E)
DTC P1792 EEPROM Transmission
Side Bad Check Sum
Circuit Description
Transmission Side Read Only Memory (ROM) and
Electronically Erasable Programmable Read Only
Memory (EEPROM) is an electronic circuit that controls
the transmission control in the Powertrain Control Module
(PCM).
This DTC detects a check sum error. This is a type “C”
DTC.
Conditions For Setting The DTC
Detects check sum error for 1 second.
Action Taken When The DTC Sets
Maximum line pressure.
Immediate landing to 4th gear.
Inhibit TCC engagement.
The PCM will illuminate the CHECK TRANS Lamp.
Conditions For Clearing The MIL/DTC
The PCM will turn off the CHECK TRANS Lamp after
three consecutive ignition cycles without a failure
reported.
The DTC can be cleared from the PCM history by
using a scan tool.
The DTC will be cleared from history when the vehicle
has achieved 40 warmup cycles without a failure
reported.
The PCM will cancel the DTC default actions when
the fault no longer exists and the ignition is cycled “off”
long enough to power down the PCM.
DTC P1792 EEPROM Transmission Side Check Bad Check Sum
StepActionYe sNo
11. Install the scan tool.
2. With the engine “off”, turn the ignition switch “on”.
NOTE: Before clearing DTC(s), use the scan tool to record “Failure
Records” for reference, as data will be lost when the “Clear Info”
function is used.
3. Record the DTC “Failure Records”.
Was DTC P1790 set?
Go to Step 4Go to Step 2
2Was DTC P1792 set?Go to Step 3—
31. Remove the PCM. Refer to Powertrain Control Module (PCM)
in Automatic Transmission (4L30–E) section.
2. Using the ITCS, make a reprogramming the transmission
EEPROM.
Was the reprogramming complete?
Go to Step 5—
4Replace the PCM.
Is the replacement complete?
Go to Step 5—
51. After the repair is complete, use the scan tool to select “DTC”,
then “Clear Info” function and operate the vehicle.
2. Review the scan tool “DTC Info”.
Has the last test failed or is the current DTC displayed?
Begin diagnosis
again
Go to Step 1
Repair verified
Exit DTC table