1998 OPEL FRONTERA cooling
[x] Cancel search: coolingPage 2133 of 6000
6G – 2 ENGINE LUBRICATION
GENERAL DESCRIPTION
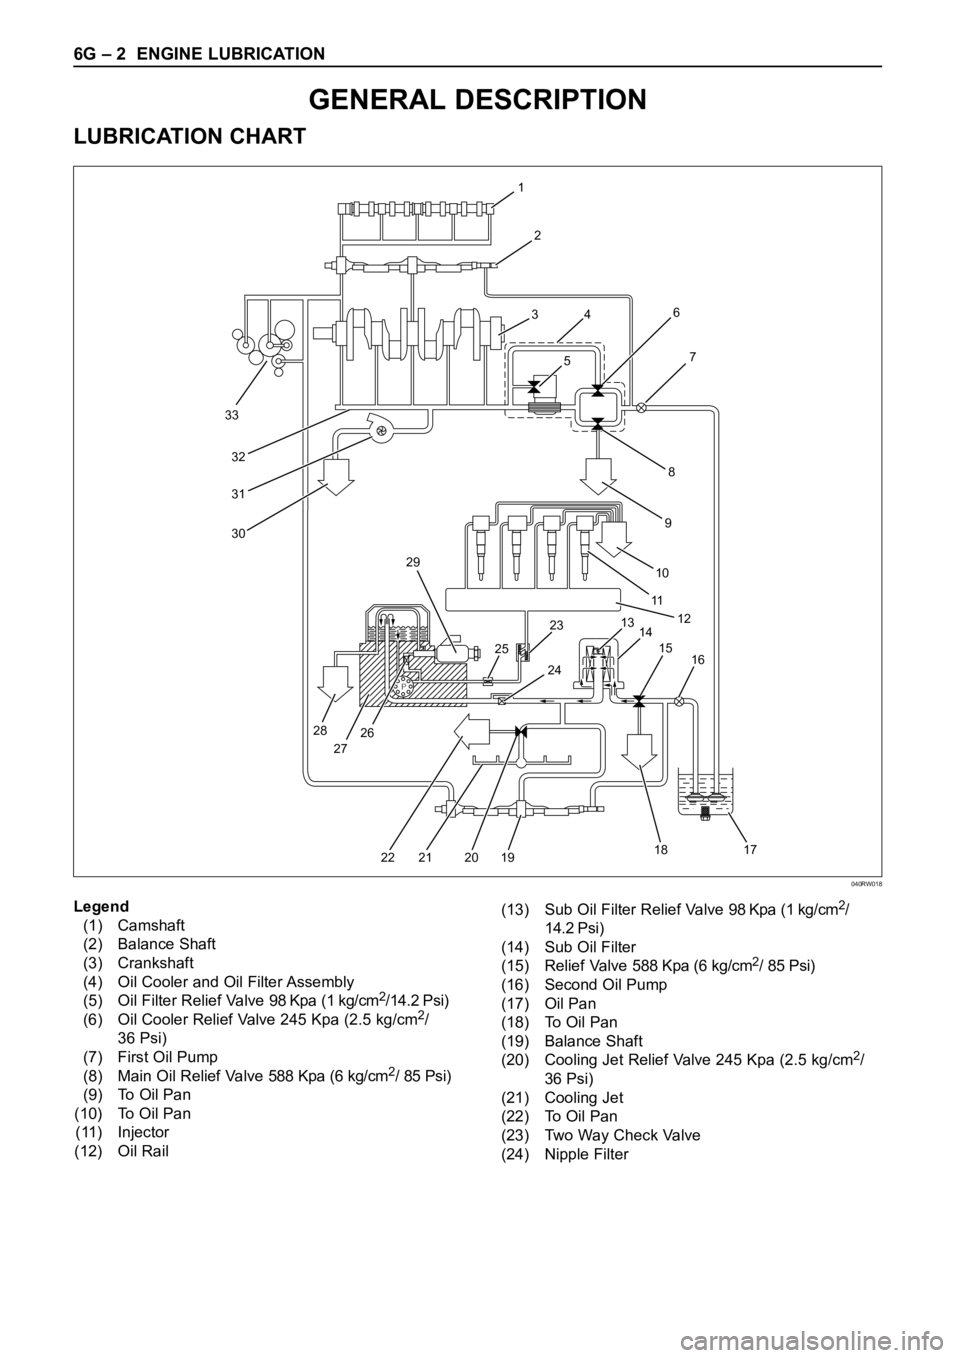
LUBRICATION CHART
P
33
32
31
30
1
2
3
4
56
8
97
10
11
12
13
14 23 29
25
28
27262415
16
17 18
19 20 21 22
Legend
(1) Camshaft
(2) Balance Shaft
(3) Crankshaft
(4) Oil Cooler and Oil Filter Assembly
(5) Oil Filter Relief Valve 98 Kpa (1 kg/cm
2/14.2 Psi)
(6) Oil Cooler Relief Valve 245 Kpa (2.5 kg/cm2/
36 Psi)
(7) First Oil Pump
(8) Main Oil Relief Valve 588 Kpa (6 kg/cm
2/ 85 Psi)
(9) To Oil Pan
(10) To Oil Pan
(11) Injector
(12) Oil Rail(13) Sub Oil Filter Relief Valve 98 Kpa (1 kg/cm
2/
14.2 Psi)
(14) Sub Oil Filter
(15) Relief Valve 588 Kpa (6 kg/cm
2/ 85 Psi)
(16) Second Oil Pump
(17) Oil Pan
(18) To Oil Pan
(19) Balance Shaft
(20) Cooling Jet Relief Valve 245 Kpa (2.5 kg/cm
2/
36 Psi)
(21) Cooling Jet
(22) To Oil Pan
(23) Two Way Check Valve
(24) Nipple Filter
040RW018
Page 2281 of 6000
7A1–36
TRANSMISSION CONTROL SYSTEM (4L30–E)
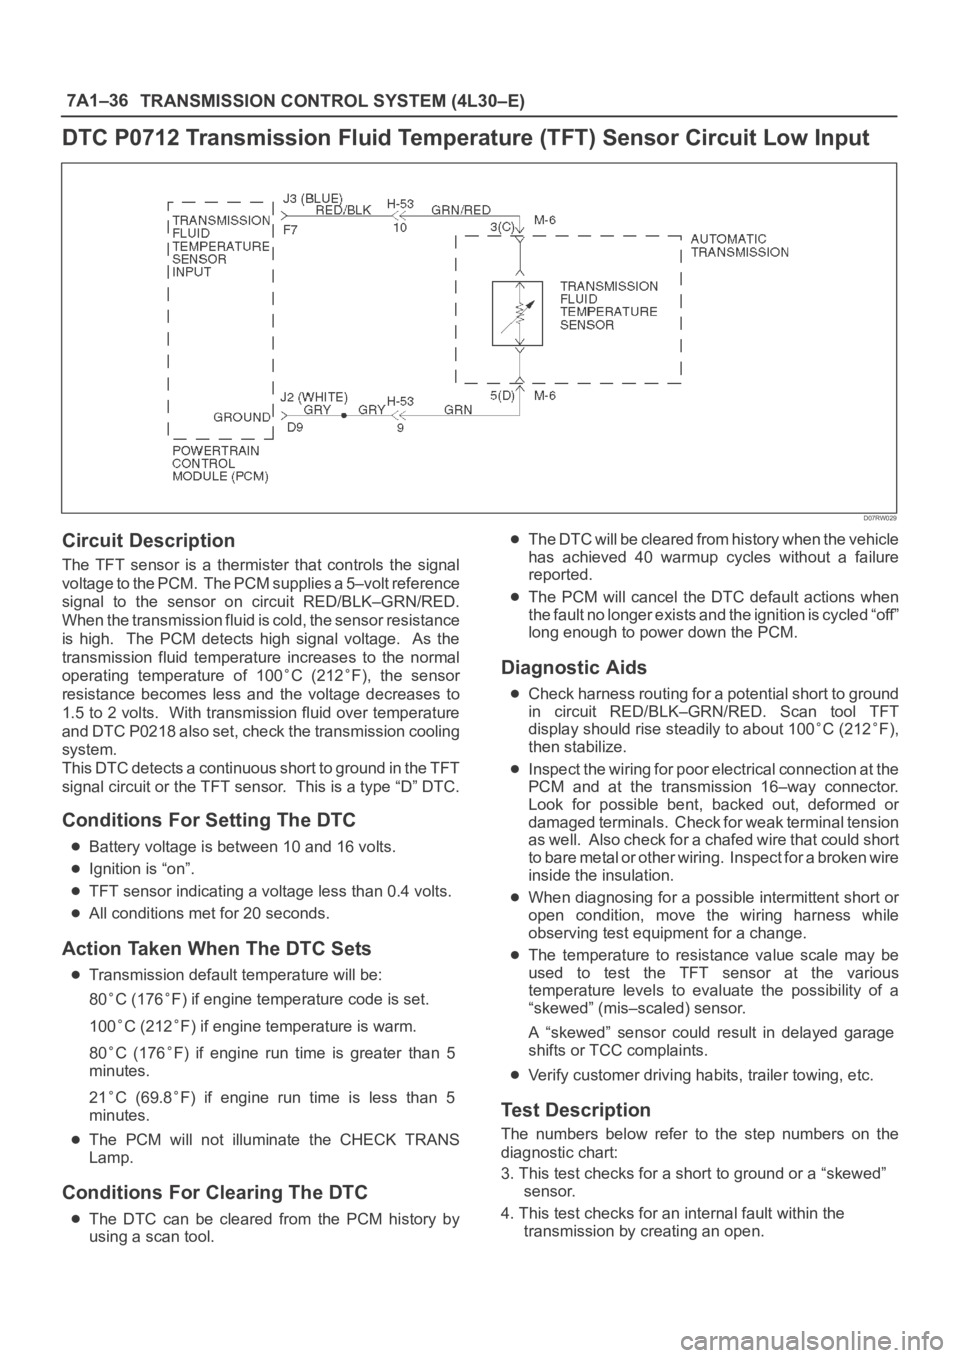
DTC P0712 Transmission Fluid Temperature (TFT) Sensor Circuit Low Input
D07RW029
Circuit Description
The TFT sensor is a thermister that controls the signal
voltage to the PCM. The PCM supplies a 5–volt reference
signal to the sensor on circuit RED/BLK–GRN/RED.
When the transmission fluid is cold, the sensor resistance
is high. The PCM detects high signal voltage. As the
transmission fluid temperature increases to the normal
operating temperature of 100
C (212F), the sensor
resistance becomes less and the voltage decreases to
1.5 to 2 volts. With transmission fluid over temperature
and DTC P0218 also set, check the transmission cooling
system.
This DTC detects a continuous short to ground in the TFT
signal circuit or the TFT sensor. This is a type “D” DTC.
Conditions For Setting The DTC
Battery voltage is between 10 and 16 volts.
Ignition is “on”.
TFT sensor indicating a voltage less than 0.4 volts.
All conditions met for 20 seconds.
Action Taken When The DTC Sets
Transmission default temperature will be:
80
C (176F) if engine temperature code is set.
100
C (212F) if engine temperature is warm.
80
C (176F) if engine run time is greater than 5
minutes.
21
C (69.8F) if engine run time is less than 5
minutes.
The PCM will not illuminate the CHECK TRANS
Lamp.
Conditions For Clearing The DTC
The DTC can be cleared from the PCM history by
using a scan tool.
The DTC will be cleared from history when the vehicle
has achieved 40 warmup cycles without a failure
reported.
The PCM will cancel the DTC default actions when
the fault no longer exists and the ignition is cycled “off”
long enough to power down the PCM.
Diagnostic Aids
Check harness routing for a potential short to ground
in circuit RED/BLK–GRN/RED. Scan tool TFT
display should rise steadily to about 100
C (212F),
then stabilize.
Inspect the wiring for poor electrical connection at the
PCM and at the transmission 16–way connector.
Look for possible bent, backed out, deformed or
damaged terminals. Check for weak terminal tension
as we ll. A lso ch eck fo r a ch af e d w ire th at cou l d s ho r t
to bare metal or other wiring. Inspect for a broken wire
inside the insulation.
When diagnosing for a possible intermittent short or
open condition, move the wiring harness while
observing test equipment for a change.
The temperature to resistance value scale may be
used to test the TFT sensor at the various
temperature levels to evaluate the possibility of a
“skewed” (mis–scaled) sensor.
A “skewed” sensor could result in delayed garage
shifts or TCC complaints.
Verify customer driving habits, trailer towing, etc.
Test Description
The numbers below refer to the step numbers on the
diagnostic chart:
3. This test checks for a short to ground or a “skewed”
sensor.
4. This test checks for an internal fault within the
transmission by creating an open.
Page 2297 of 6000
7A1–52
TRANSMISSION CONTROL SYSTEM (4L30–E)
Conditions For Clearing The DTC/CHECK
TRANS Lamp
The PCM will turn “off” the CHECK TRANS Lamp
after three consecutive ignition cycles without a
failure reported.
The DTC can be cleared from PCM memory by using
a scan tool.
The DTC can also be cleared from memory when the
vehicle has made 40 warmup cycles without a failure
reported.
The PCM will cancel the DTC Actions Taken items
when the fault conditions no longer exist and the
ignition is cycles “off” long enough to power down the
PCM.
Diagnostic Aids
Check for intermittent output speed sensor circuit
problems.
Check for possible incorrect calibration. (PCM part
No., tire specification, and rear axle ratio)
Test Description
The numbers below refer to the step numbers on the
diagnostic chart:
3. This step checks for possible low fluid level causing
slipping resulting in an undefined gear ratio.
4. This step checks for correct gear ratios for
commanded gears.
5. This step checks for low line pressure.
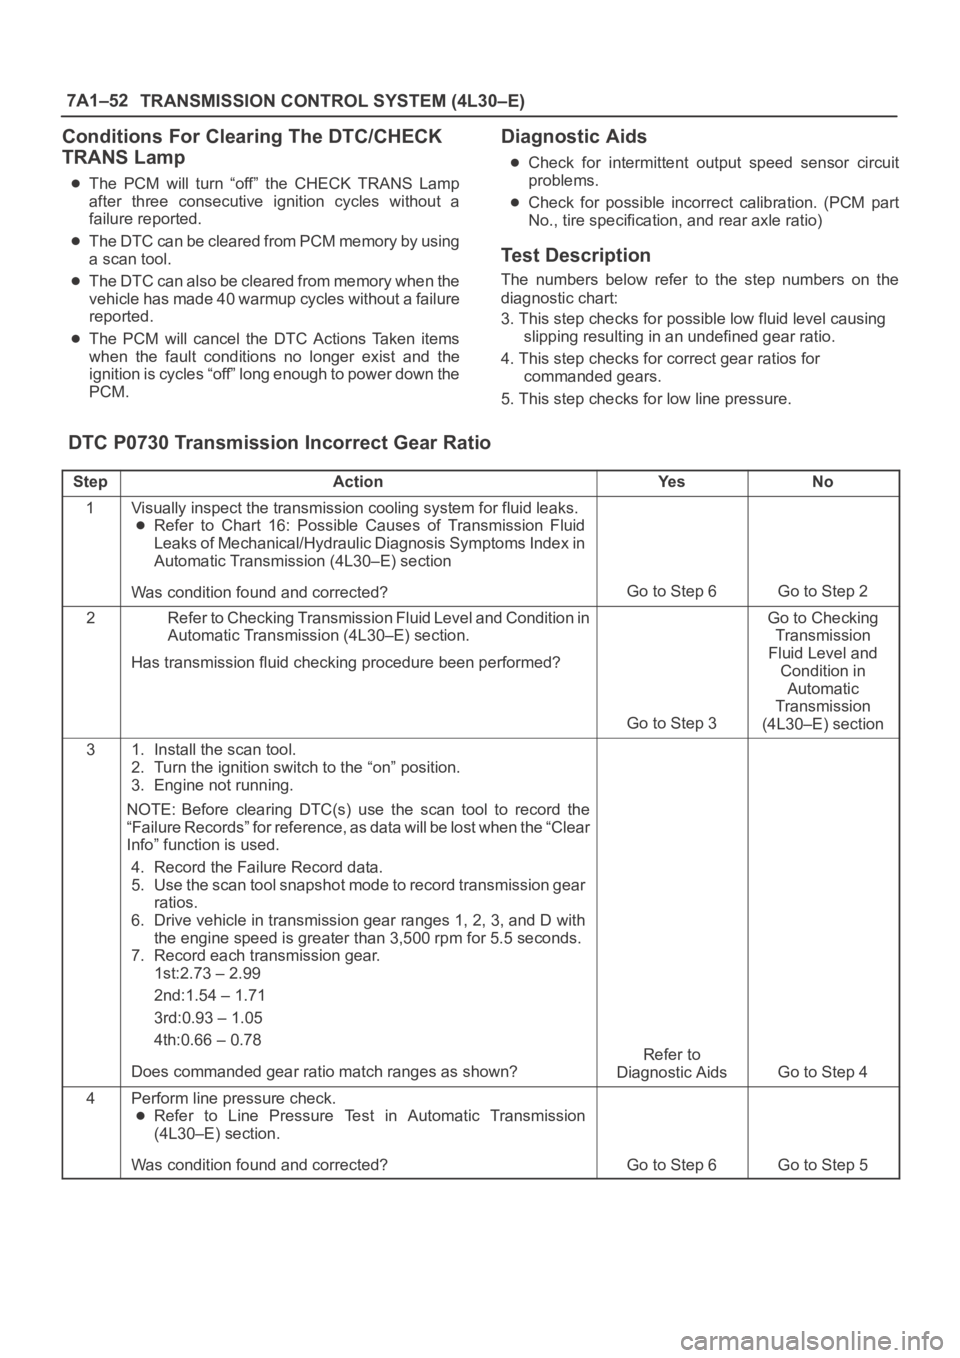
DTC P0730 Transmission Incorrect Gear Ratio
StepActionYe sNo
1Visually inspect the transmission cooling system for fluid leaks.
Refer to Chart 16: Possible Causes of Transmission Fluid
Leaks of Mechanical/Hydraulic Diagnosis Symptoms Index in
Automatic Transmission (4L30–E) section
Was condition found and corrected?
Go to Step 6Go to Step 2
2Refer to Checking Transmission Fluid Level and Condition in
Automatic Transmission (4L30–E) section.
Has transmission fluid checking procedure been performed?
Go to Step 3
Go to Checking
Transmission
Fluid Level and
Condition in
Automatic
Transmission
(4L30–E) section
31. Install the scan tool.
2. Turn the ignition switch to the “on” position.
3. Engine not running.
NOTE: Before clearing DTC(s) use the scan tool to record the
“Failure Records” for reference, as data will be lost when the “Clear
Info” function is used.
4. Record the Failure Record data.
5. Use the scan tool snapshot mode to record transmission gear
ratios.
6. Drive vehicle in transmission gear ranges 1, 2, 3, and D with
the engine speed is greater than 3,500 rpm for 5.5 seconds.
7. Record each transmission gear.
1st:2.73 – 2.99
2nd:1.54 – 1.71
3rd:0.93 – 1.05
4th:0.66 – 0.78
Does commanded gear ratio match ranges as shown?
Refer to
Diagnostic Aids
Go to Step 4
4Perform line pressure check.
Refer to Line Pressure Test in Automatic Transmission
(4L30–E) section.
Was condition found and corrected?
Go to Step 6Go to Step 5
Page 3566 of 6000
PAGE BACK PAGE NEXT
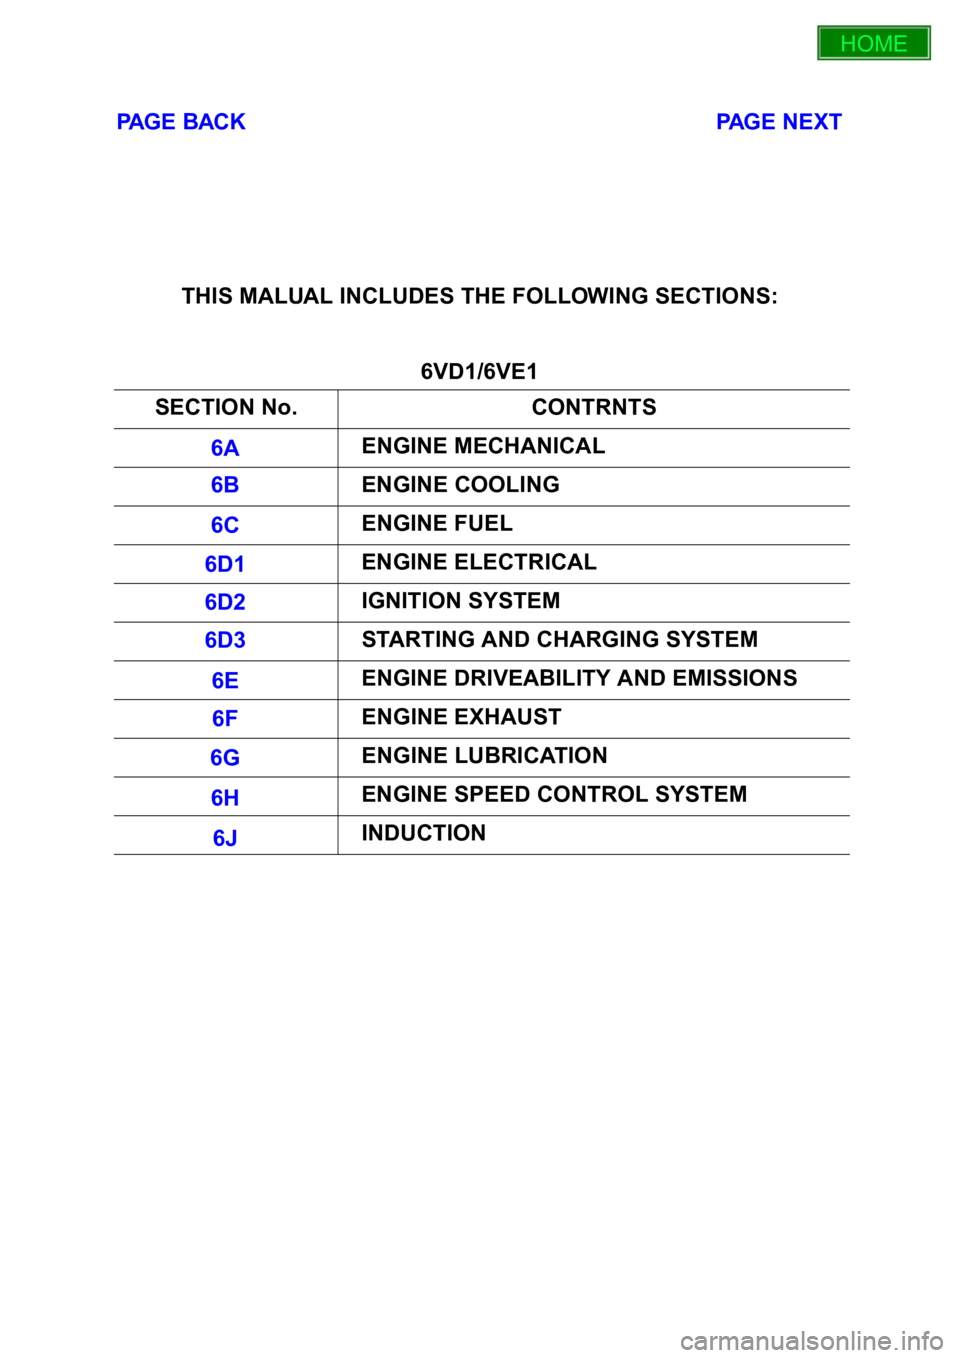
THIS MALUAL INCLUDES THE FOLLOWING SECTIONS:
6VD1/6VE1
SECTION No. CONTRNTS
6A ENGINE MECHANICAL
6B ENGINE COOLING
6C ENGINE FUEL
6D1 ENGINE ELECTRICAL
6D2 IGNITION SYSTEM
6D3 STARTING AND CHARGING SYSTEM
6E ENGINE DRIVEABILITY AND EMISSIONS
6F ENGINE EXHAUST
6G ENGINE LUBRICATION
6H ENGINE SPEED CONTROL SYSTEM
6J INDUCTION
HOME
6A
6B
6C
6D1
6D2
6D3
6E
6F
6G
6H
6J
Page 3567 of 6000
PAGE BACK PAGE NEXT
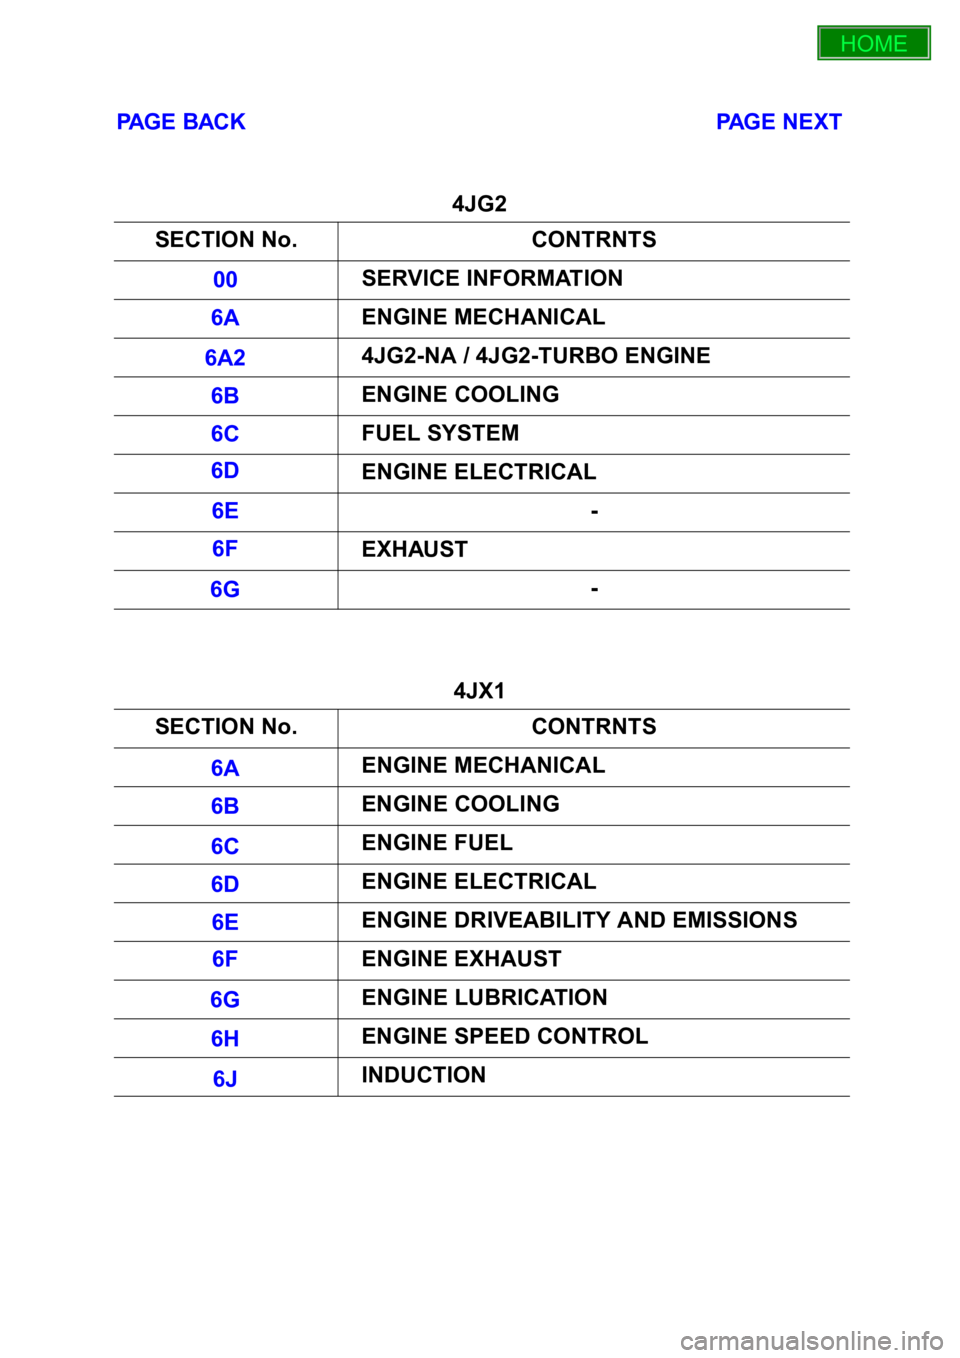
4JG2
4JX1 SECTION No. CONTRNTS
00 SERVICE INFORMATION
6A ENGINE MECHANICAL
6A2 4JG2-NA / 4JG2-TURBO ENGINE
6B ENGINE COOLING
6C FUEL SYSTEM
6D ENGINE ELECTRICAL
6E -
6F EXHAUST
6G -
SECTION No. CONTRNTS
6A ENGINE MECHANICAL
6B ENGINE COOLING
6C ENGINE FUEL
6D ENGINE ELECTRICAL
6E ENGINE DRIVEABILITY AND EMISSIONS
6F ENGINE EXHAUST
6G ENGINE LUBRICATION
6H ENGINE SPEED CONTROL
6J INDUCTION
HOME
00
6A
6A2
6B
6C
6D
6E
6F
6G
6A
6B
6C
6D
6E
6F
6G
6H
6J
Page 3720 of 6000

Ignition swich
"ON"
Time
Blower voltage to turn
on the cooling
7 SEC maximum3 SEC
100%
(MAX HI)
33.5%
(LO)5.32%/S
C06RY00001
33.5%
(LO)
2.63%/S
Mode
DEF
Auto
Mode
100%
(MAX HI)
Ignition
switch "ON"
Thermo Unit 58¡C(Gasoline)
52¡C(Diesel) Time
840RY00009
Page 3721 of 6000

Occurrence of a trouble
Refer to the check list for
the inspection.Locate the failed location.
Check the failed part.
Correction
Correction
Correction
Troubleshooting by the
self-diagnosis function.Reference the "Check
Procedure by Failed
Location" for the inspection.
Reference the "Check
Procedure by Failed
Location" for the inspection.Correction
Check the cooling / heating
cycles.
End OK OK OK OKNG
NG
NG
NG
NG OK
Check if the automatic
heater / air conditioner
control unit indicator LED
is turned on.Check the power supply and
circuit on the automatic
heater / air conditioner control
unit.
Troubleshooting not relying
on the self-diagnosis
function(troubleshooting
by failure type).
F01RX009
Page 4497 of 6000
6A–1
ENGINE MECHANICAL
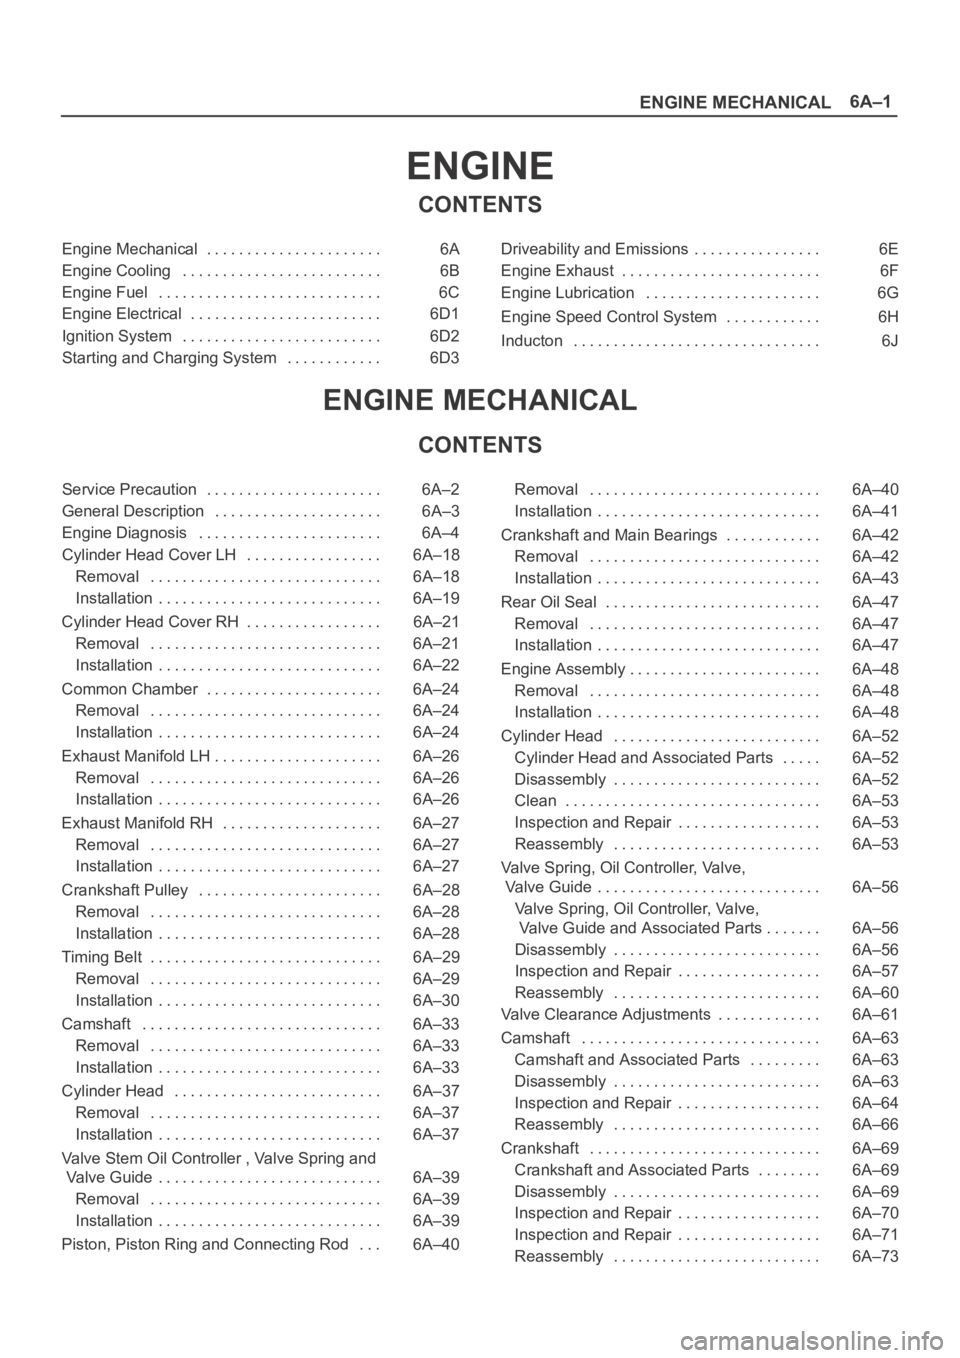
ENGINE
CONTENTS
Engine Mechanical 6A. . . . . . . . . . . . . . . . . . . . . .
Engine Cooling 6B. . . . . . . . . . . . . . . . . . . . . . . . .
Engine Fuel 6C. . . . . . . . . . . . . . . . . . . . . . . . . . . .
Engine Electrical 6D1. . . . . . . . . . . . . . . . . . . . . . . .
Ignition System 6D2. . . . . . . . . . . . . . . . . . . . . . . . .
Starting and Charging System 6D3. . . . . . . . . . . . Driveability and Emissions 6E. . . . . . . . . . . . . . . .
Engine Exhaust 6F. . . . . . . . . . . . . . . . . . . . . . . . .
Engine Lubrication 6G. . . . . . . . . . . . . . . . . . . . . .
Engine Speed Control System 6H. . . . . . . . . . . .
Inducton 6J. . . . . . . . . . . . . . . . . . . . . . . . . . . . . . .
ENGINE MECHANICAL
CONTENTS
Service Precaution 6A–2. . . . . . . . . . . . . . . . . . . . . .
General Description 6A–3. . . . . . . . . . . . . . . . . . . . .
Engine Diagnosis 6A–4. . . . . . . . . . . . . . . . . . . . . . .
Cylinder Head Cover LH 6A–18. . . . . . . . . . . . . . . . .
Removal 6A–18. . . . . . . . . . . . . . . . . . . . . . . . . . . . .
Installation 6A–19. . . . . . . . . . . . . . . . . . . . . . . . . . . .
Cylinder Head Cover RH 6A–21. . . . . . . . . . . . . . . . .
Removal 6A–21. . . . . . . . . . . . . . . . . . . . . . . . . . . . .
Installation 6A–22. . . . . . . . . . . . . . . . . . . . . . . . . . . .
Common Chamber 6A–24. . . . . . . . . . . . . . . . . . . . . .
Removal 6A–24. . . . . . . . . . . . . . . . . . . . . . . . . . . . .
Installation 6A–24. . . . . . . . . . . . . . . . . . . . . . . . . . . .
Exhaust Manifold LH 6A–26. . . . . . . . . . . . . . . . . . . . .
Removal 6A–26. . . . . . . . . . . . . . . . . . . . . . . . . . . . .
Installation 6A–26. . . . . . . . . . . . . . . . . . . . . . . . . . . .
Exhaust Manifold RH 6A–27. . . . . . . . . . . . . . . . . . . .
Removal 6A–27. . . . . . . . . . . . . . . . . . . . . . . . . . . . .
Installation 6A–27. . . . . . . . . . . . . . . . . . . . . . . . . . . .
Crankshaft Pulley 6A–28. . . . . . . . . . . . . . . . . . . . . . .
Removal 6A–28. . . . . . . . . . . . . . . . . . . . . . . . . . . . .
Installation 6A–28. . . . . . . . . . . . . . . . . . . . . . . . . . . .
Timing Belt 6A–29. . . . . . . . . . . . . . . . . . . . . . . . . . . . .
Removal 6A–29. . . . . . . . . . . . . . . . . . . . . . . . . . . . .
Installation 6A–30. . . . . . . . . . . . . . . . . . . . . . . . . . . .
Camshaft 6A–33. . . . . . . . . . . . . . . . . . . . . . . . . . . . . .
Removal 6A–33. . . . . . . . . . . . . . . . . . . . . . . . . . . . .
Installation 6A–33. . . . . . . . . . . . . . . . . . . . . . . . . . . .
Cylinder Head 6A–37. . . . . . . . . . . . . . . . . . . . . . . . . .
Removal 6A–37. . . . . . . . . . . . . . . . . . . . . . . . . . . . .
Installation 6A–37. . . . . . . . . . . . . . . . . . . . . . . . . . . .
Valve Stem Oil Controller , Valve Spring and
Valve Guide 6A–39. . . . . . . . . . . . . . . . . . . . . . . . . . . .
Removal 6A–39. . . . . . . . . . . . . . . . . . . . . . . . . . . . .
Installation 6A–39. . . . . . . . . . . . . . . . . . . . . . . . . . . .
Piston, Piston Ring and Connecting Rod 6A–40. . . Removal 6A–40. . . . . . . . . . . . . . . . . . . . . . . . . . . . .
Installation 6A–41. . . . . . . . . . . . . . . . . . . . . . . . . . . .
Crankshaft and Main Bearings 6A–42. . . . . . . . . . . .
Removal 6A–42. . . . . . . . . . . . . . . . . . . . . . . . . . . . .
Installation 6A–43. . . . . . . . . . . . . . . . . . . . . . . . . . . .
Rear Oil Seal 6A–47. . . . . . . . . . . . . . . . . . . . . . . . . . .
Removal 6A–47. . . . . . . . . . . . . . . . . . . . . . . . . . . . .
Installation 6A–47. . . . . . . . . . . . . . . . . . . . . . . . . . . .
Engine Assembly 6A–48. . . . . . . . . . . . . . . . . . . . . . . .
Removal 6A–48. . . . . . . . . . . . . . . . . . . . . . . . . . . . .
Installation 6A–48. . . . . . . . . . . . . . . . . . . . . . . . . . . .
Cylinder Head 6A–52. . . . . . . . . . . . . . . . . . . . . . . . . .
Cylinder Head and Associated Parts 6A–52. . . . .
Disassembly 6A–52. . . . . . . . . . . . . . . . . . . . . . . . . .
Clean 6A–53. . . . . . . . . . . . . . . . . . . . . . . . . . . . . . . .
Inspection and Repair 6A–53
. . . . . . . . . . . . . . . . . .
Reassembly 6A–53. . . . . . . . . . . . . . . . . . . . . . . . . .
Valve Spring, Oil Controller, Valve,
Valve Guide 6A–56. . . . . . . . . . . . . . . . . . . . . . . . . . . .
Valve Spring, Oil Controller, Valve,
Valve Guide and Associated Parts 6A–56. . . . . . .
Disassembly 6A–56. . . . . . . . . . . . . . . . . . . . . . . . . .
Inspection and Repair 6A–57. . . . . . . . . . . . . . . . . .
Reassembly 6A–60. . . . . . . . . . . . . . . . . . . . . . . . . .
Valve Clearance Adjustments 6A–61. . . . . . . . . . . . .
Camshaft 6A–63. . . . . . . . . . . . . . . . . . . . . . . . . . . . . .
Camshaft and Associated Parts 6A–63. . . . . . . . .
Disassembly 6A–63. . . . . . . . . . . . . . . . . . . . . . . . . .
Inspection and Repair 6A–64. . . . . . . . . . . . . . . . . .
Reassembly 6A–66. . . . . . . . . . . . . . . . . . . . . . . . . .
Crankshaft 6A–69. . . . . . . . . . . . . . . . . . . . . . . . . . . . .
Crankshaft and Associated Parts 6A–69. . . . . . . .
Disassembly 6A–69. . . . . . . . . . . . . . . . . . . . . . . . . .
Inspection and Repair 6A–70. . . . . . . . . . . . . . . . . .
Inspection and Repair 6A–71. . . . . . . . . . . . . . . . . .
Reassembly 6A–73. . . . . . . . . . . . . . . . . . . . . . . . . .