Page 3190 of 6000
METER AND GAUGE8E–13
Meter Assembly–Diesel–2
Connector No. I–9
Te r m i n a lFunction
1—
2Seat belt warning light
3—
4Brake warning light
5—
6Charge warning light
7Cigarette lighter illumination light
8Illumination controller
9Tachometer
10—
11—
12—
13—
14—
15Starter switch
16—
17—
184WD indicator light
19Ground (Gauge)
20—
21—
22Oil pressure warning light
23Water sedimenter
24Air bag warning light
25—
26Glow indicator light
27—
28Turn signal indicator light (Left)
29—
30Ground
Connector No. I–10
Te r m i n a lFunction
1Turn signal indicator light (Right)
2—
3—
4Engine coolant temperature gauge
5Speedometer
6—
7—
8Battery (+)
9—
10—
11—
12—
13—
14High-beam indicator light (–)
15High-beam indicator light (+)
16ABS indicator light
17—
18Fuel warning light
19Oil pressure gauge
20Fuel gauge
21—
22—
Page 3314 of 6000
8G–2SEATS
Front Seat Assembly
Front Seat Assembly and Associated Parts
750RX016
Legend
(1) Rear Cover
(2) Front Seat Assembly
(3) Seat Belt Warning Connector/Pretensioner
Harness Connector
(4) Rear Seat Foot Rest (LꞏWꞏB)(5) Seat Rail Cover (SꞏWꞏB)
(6) Door Sill Plate
(7) Riser Cover (LꞏWꞏB)
(8) Seat Slide Cover (SꞏWꞏB)
(9) Front Cover
(10) Seat Rail Cover and Hole Cover (SꞏWꞏB)
Removal
1. Disconnect the battery ground cable.
2. Remove the front cover.
3. Remove the rear cover.
Remove the cover fixing screw from the rear inner
cover, if this model is equipped with the power
seats.
4. Remove the door sill plate.5. Remove the rear seat foot rest.
Refer to the Rear Seat Foot Rest in this section.
6. Remove the riser cover.
7. Remove the seat belt warning connector (Driver’s
side only) or pretensioner harness connector.
8. Remove the front seat assembly.
Disconnect the power seat connector, if this model
is equipped with the power seats.
Page 3315 of 6000
SEATS8G–3
Installation
To install, follow the removal steps in the reverse order,
noting the following points:1. Tighten the front seat assembly fixing bolts to the
specified torque.
Torque: 40 Nꞏm (4.1 kgꞏm/30 lb ft)
2. Install the longest bolt to the rear inner side fixing
location, if this model is equipped with power seats.
Disassembled View (Long Wheel Base)
750RX017
Legend
(1) Head Rest
(2) Seat Back Assembly
(3) Back Board Assembly
(4) Guide Holder
(5) Trim Cover
(6) Pad & Frame Assembly
(7) Seat Heater Assembly
(8) Reclining Device
(9) Slide Cover
(10) Reclining Knob
(11) Dial (W/Height Adjuster)
(12) Frame Assembly(13) Seat Heater Assembly
(14) Pad Assembly
(15) Trim Cover
(16) Spacer (W/O Height Adjuster)
(17) Release Wire
(18) Seat Adjuster/Seat Adjuster (W/Pretensioner)
(19) Seat Belt Buckle Assembly
(20) Height Adjuster
(21) Seat Cushion Assembly
(22) Hinge Cover
(23) Pad & Frame Assembly
(24) Trim Cover
(25) Armrest Assembly
Page 3317 of 6000

SEATS8G–5
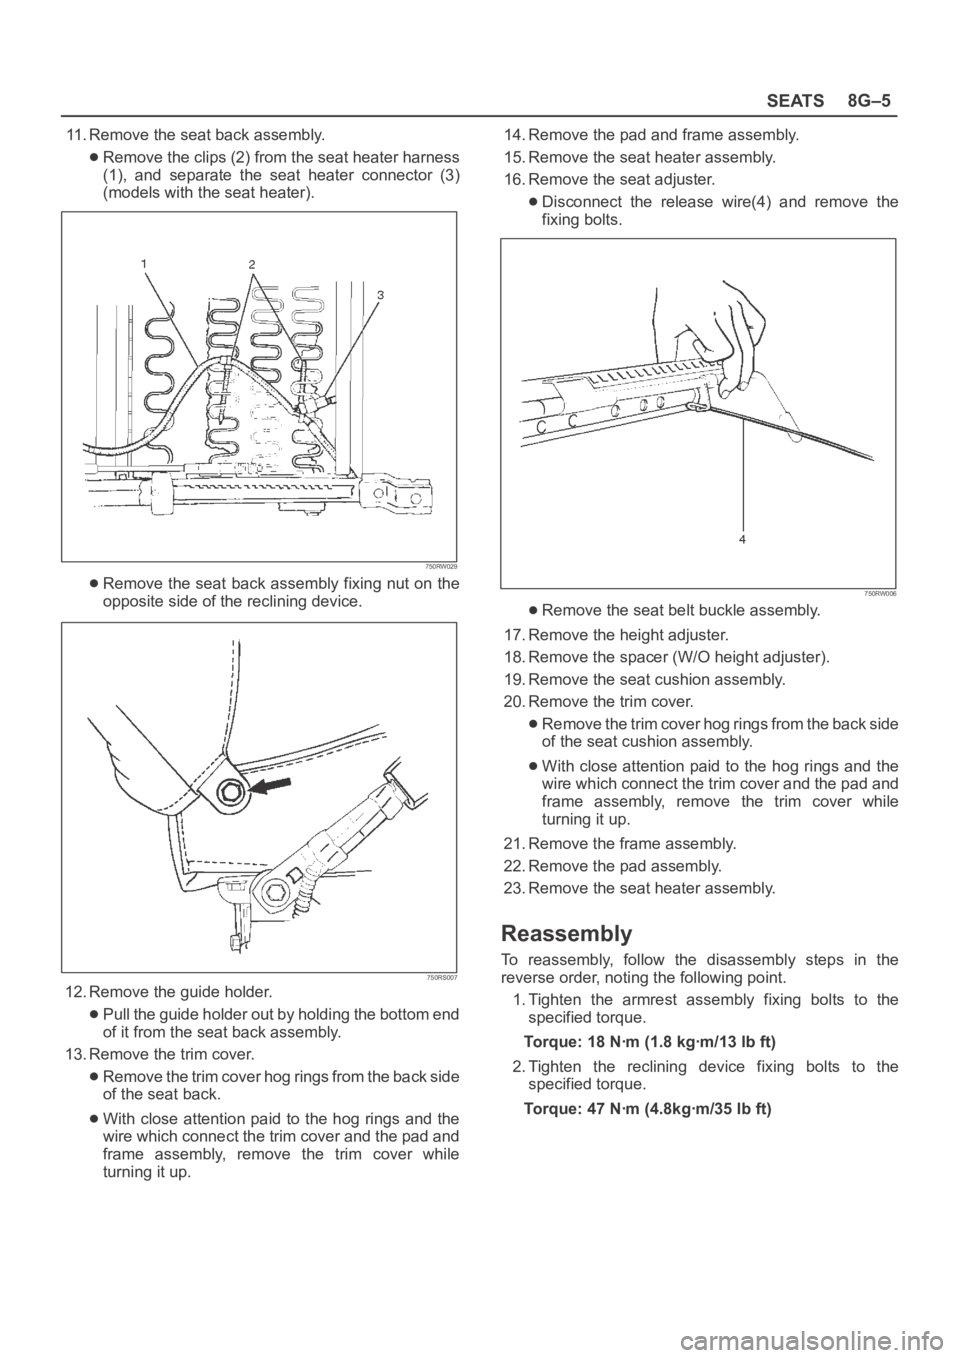
11. Remove the seat back assembly.
Remove the clips (2) from the seat heater harness
(1), and separate the seat heater connector (3)
(models with the seat heater).
750RW029
Remove the seat back assembly fixing nut on the
opposite side of the reclining device.
750RS007
12. Remove the guide holder.
Pull the guide holder out by holding the bottom end
of it from the seat back assembly.
13. Remove the trim cover.
Remove the trim cover hog rings from the back side
of the seat back.
With close attention paid to the hog rings and the
wire which connect the trim cover and the pad and
frame assembly, remove the trim cover while
turning it up.14. Remove the pad and frame assembly.
15. Remove the seat heater assembly.
16. Remove the seat adjuster.
Disconnect the release wire(4) and remove the
fixing bolts.
750RW006
Remove the seat belt buckle assembly.
17. Remove the height adjuster.
18. Remove the spacer (W/O height adjuster).
19. Remove the seat cushion assembly.
20. Remove the trim cover.
Remove the trim cover hog rings from the back side
of the seat cushion assembly.
With close attention paid to the hog rings and the
wire which connect the trim cover and the pad and
frame assembly, remove the trim cover while
turning it up.
21. Remove the frame assembly.
22. Remove the pad assembly.
23. Remove the seat heater assembly.
Reassembly
To reassembly, follow the disassembly steps in the
reverse order, noting the following point.
1. Tighten the armrest assembly fixing bolts to the
specified torque.
Torque: 18 Nꞏm (1.8 kgꞏm/13 lb ft)
2. Tighten the reclining device fixing bolts to the
specified torque.
Torque: 47 Nꞏm (4.8kgꞏm/35 lb ft)
Page 3318 of 6000
8G–6SEATS
Disassembled View (Short Wheel Base)
750RX018
Legend
(1) Head Rest
(2) Seat Back Assembly
(3) Back Board Assembly
(4) Pad & Frame Assembly
(5) Trim Cover
(6) Guide Holder
(7) Reclining Device
(8) Slide Cover
(9) Reclining Knob
(10) Frame Assembly(11) Pad Assembly
(12) Trim Cover
(13) Walk–in Cover
(14) Walk–in Assembly
(15) Seat Adjuster/Seat Adjuster (W/Pretensioner)
(16) Release Wire
(17) Seat Belt Buckle Assembly
(18) Spacer
(19) Seat Cushion Assembly
(20) Hinge Cover
Disassembly
1. Remove the head rest.
2. Remove the reclining knob.
3. Remove the side cover.
4. Remove the hinge cover.5. Remove the back board assembly.Pull out the back board while prying the clip of the
back board free from the seat back assembly.
Page 3319 of 6000
SEATS8G–7
6. Remove the reclining device.
Trun up the seat back trim cover in order to remove
the reclining device fixing bolts.
750RS006
Remove the push nut (2) and disconnect walk-in
cable (3) from reclining device (1).
750RW034
7. Remove the seat back assembly.
Remove the seat back assembly fixing nut on the
opposite side of the reclining device.
750RS007
8. Remove the guide holder.
Pull the guide holder out by holding the bottom end
of it from the seat back assembly.
9. Remove the trim cover.
Remove the trim cover hog rings from the back side
of the seat back.
With close attention paid to the hog rings and the
wire which connect the trim cover and the pad and
frame assembly, remove the trim cover while
turning it up.
10. Remove the pad and frame assembly.
11. Remove the walk-in cover.
12. Remove the seat adjuster.
Disconnect the release wire (4) and remove the
fixing bolts.
750RW006
Remove the seat belt buckle assembly.
Page 3328 of 6000
8G–16SEATS
Disassembled View (Split Type)
755RW056
Legend
(1) Free Hinge Cover
(2) Back Board
(3) Seat Back Assembly
(4) Armrest Assembly
(5) Bush
(6) Armrest Set Bracket
(7) Clip
(8) Armrest Board
(9) Pillow Assembly
(10) Band Hook Cover
(11) Trim Cover
(12) Pad & Frame Assembly
(13) Release Knob
(14) Connecting Shaft
(15) Release Rod(16) Linkage Bush
(17) Device Cover
(18) Trim Cover
(19) Seat Lock Cover
(20) Rear Seat Belt Buckle and Lock Assembly
(21) Frame Assembly
(22) Stopper Rubber
(23) Spring Collar
(24) Return Spring
(25) Mounting Bracket
(26) Pad Assembly
(27) Reclining Device
(28) Seat Cushion Assembly
(29) Linkage Bush
(30) Bush
Page 3329 of 6000

SEATS8G–17
Disassembly (Split Type)
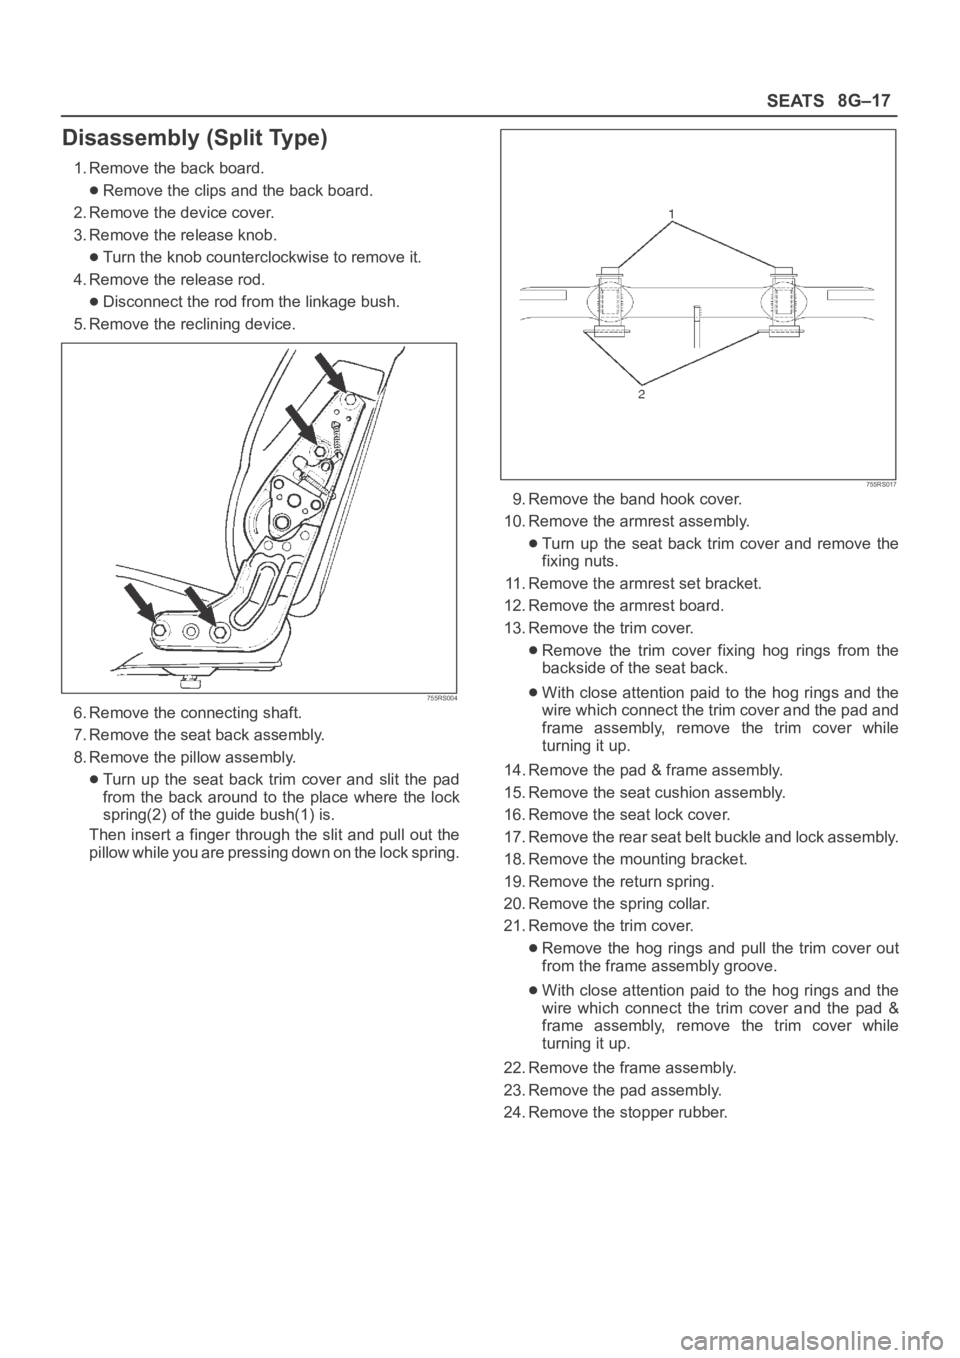
1. Remove the back board.
Remove the clips and the back board.
2. Remove the device cover.
3. Remove the release knob.
Turn the knob counterclockwise to remove it.
4. Remove the release rod.
Disconnect the rod from the linkage bush.
5. Remove the reclining device.
755RS004
6. Remove the connecting shaft.
7. Remove the seat back assembly.
8. Remove the pillow assembly.
Turn up the seat back trim cover and slit the pad
from the back around to the place where the lock
spring(2) of the guide bush(1) is.
Then insert a finger through the slit and pull out the
pillow while you are pressing down on the lock spring.
755RS017
9. Remove the band hook cover.
10. Remove the armrest assembly.
Turn up the seat back trim cover and remove the
fixing nuts.
11. Remove the armrest set bracket.
12. Remove the armrest board.
13. Remove the trim cover.
Remove the trim cover fixing hog rings from the
backside of the seat back.
With close attention paid to the hog rings and the
wire which connect the trim cover and the pad and
frame assembly, remove the trim cover while
turning it up.
14. Remove the pad & frame assembly.
15. Remove the seat cushion assembly.
16. Remove the seat lock cover.
17. Remove the rear seat belt buckle and lock assembly.
18. Remove the mounting bracket.
19. Remove the return spring.
20. Remove the spring collar.
21. Remove the trim cover.
Remove the hog rings and pull the trim cover out
from the frame assembly groove.
With close attention paid to the hog rings and the
wire which connect the trim cover and the pad &
frame assembly, remove the trim cover while
turning it up.
22. Remove the frame assembly.
23. Remove the pad assembly.
24. Remove the stopper rubber.