1998 NISSAN SENTRA warning
[x] Cancel search: warningPage 75 of 216
Tilt operation
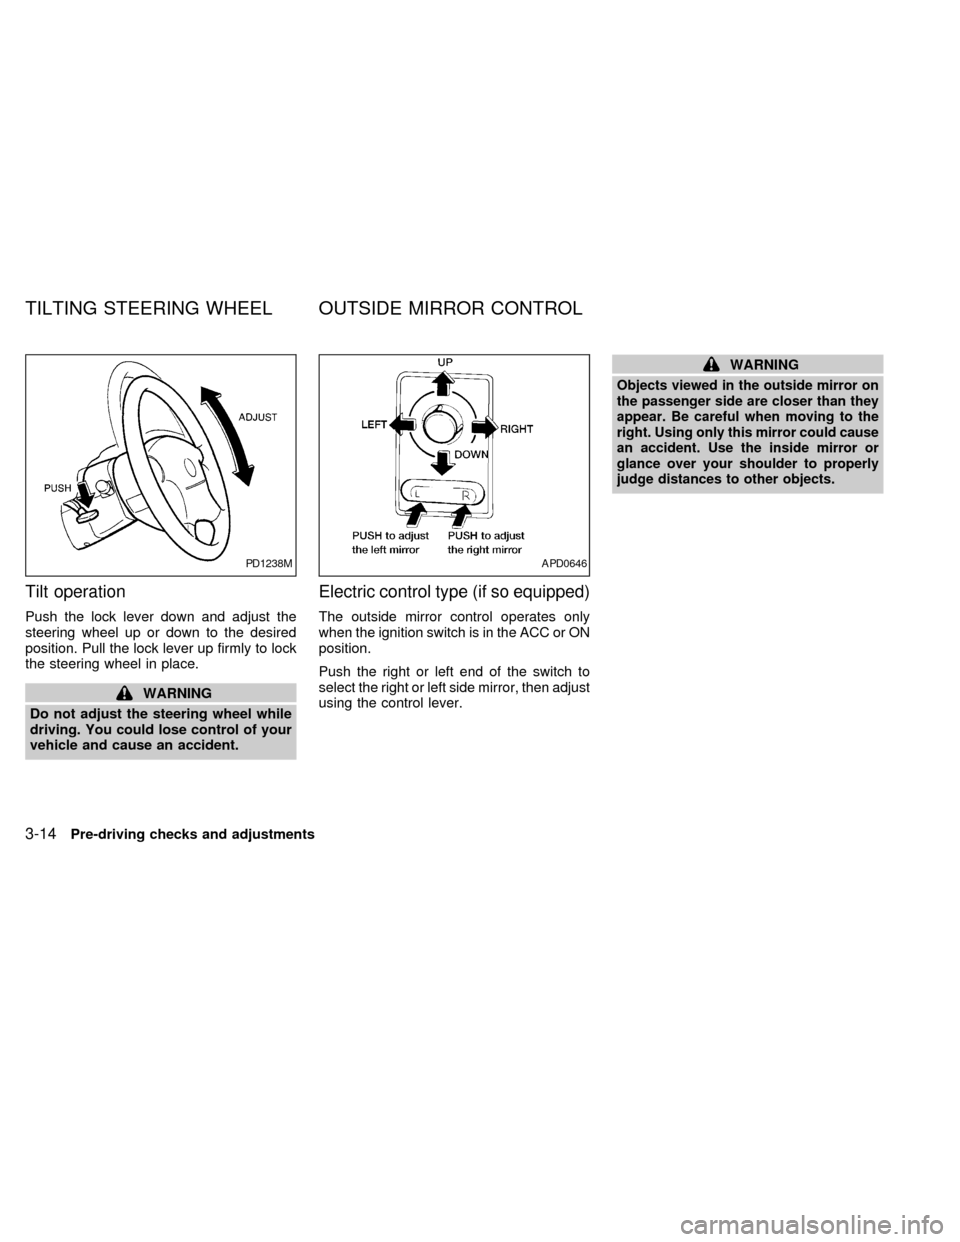
Push the lock lever down and adjust the
steering wheel up or down to the desired
position. Pull the lock lever up firmly to lock
the steering wheel in place.
WARNING
Do not adjust the steering wheel while
driving. You could lose control of your
vehicle and cause an accident.
Electric control type (if so equipped)
The outside mirror control operates only
when the ignition switch is in the ACC or ON
position.
Push the right or left end of the switch to
select the right or left side mirror, then adjust
using the control lever.
WARNING
Objects viewed in the outside mirror on
the passenger side are closer than they
appear. Be careful when moving to the
right. Using only this mirror could cause
an accident. Use the inside mirror or
glance over your shoulder to properly
judge distances to other objects.
PD1238MAPD0646
TILTING STEERING WHEEL OUTSIDE MIRROR CONTROL
3-14Pre-driving checks and adjustments
ZX
Page 76 of 216
Manual control type
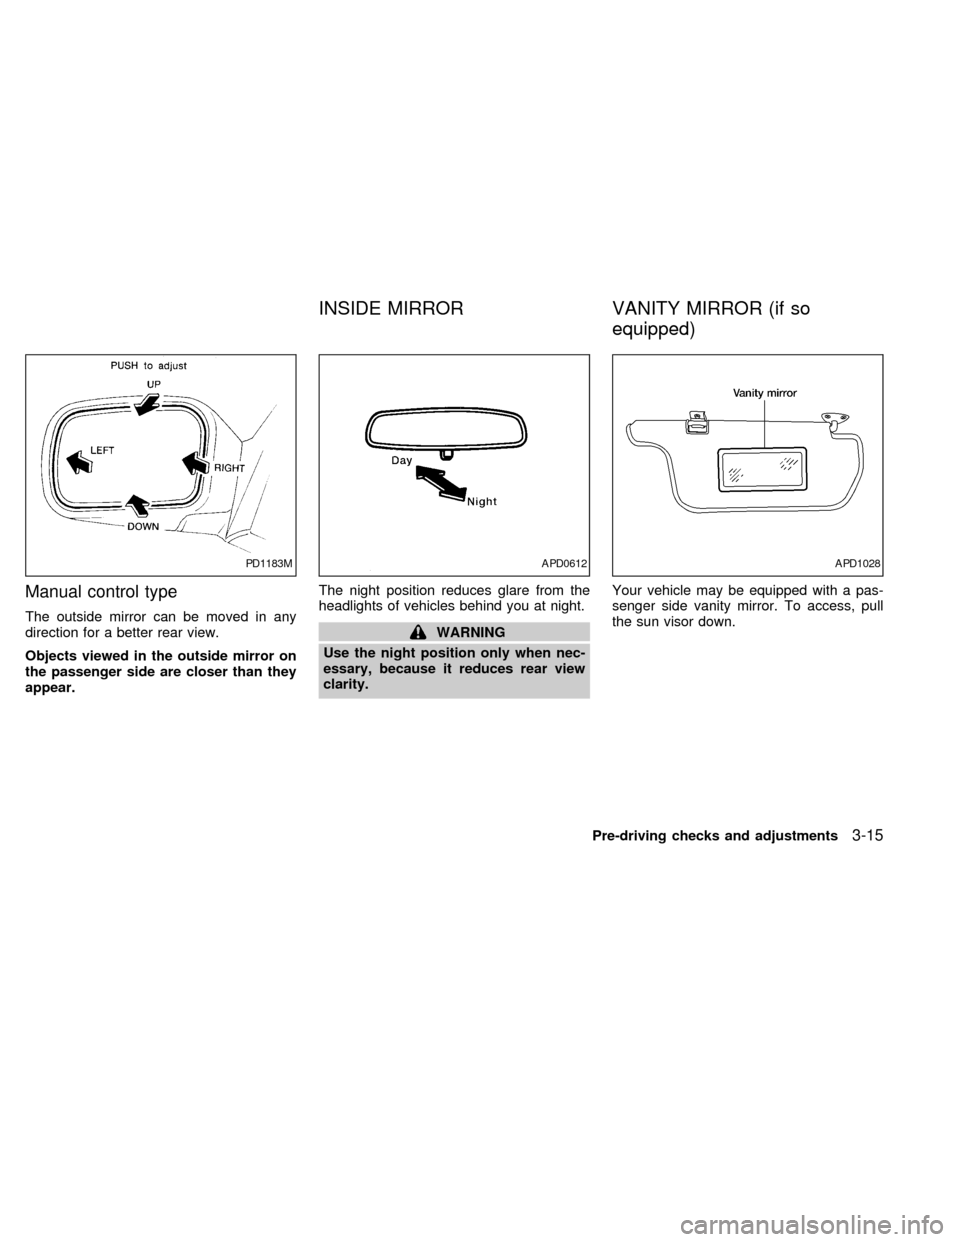
The outside mirror can be moved in any
direction for a better rear view.
Objects viewed in the outside mirror on
the passenger side are closer than they
appear.The night position reduces glare from the
headlights of vehicles behind you at night.WARNING
Use the night position only when nec-
essary, because it reduces rear view
clarity.Your vehicle may be equipped with a pas-
senger side vanity mirror. To access, pull
the sun visor down.
PD1183MAPD0612APD1028
INSIDE MIRROR VANITY MIRROR (if so
equipped)
Pre-driving checks and adjustments3-15
ZX
Page 80 of 216
WARNING
cThe air conditioner cooling function
operates only when the engine is
running.
cDo not leave children, unreliable
adults, or pets alone in your vehicle.
On hot, sunny days, temperatures in
a closed vehicle could quickly be-
come high enough to cause severe
or possibly fatal injuries to people or
animals.
cDo not use the recirculation mode
for long periods as it may cause the
interior air to become stale and the
windows to fog up.
cPositioning of the heater and air con-
ditioner controls should not be done
while driving, in order that full atten-
tion may be given to the driving
operation.
CONTROLS
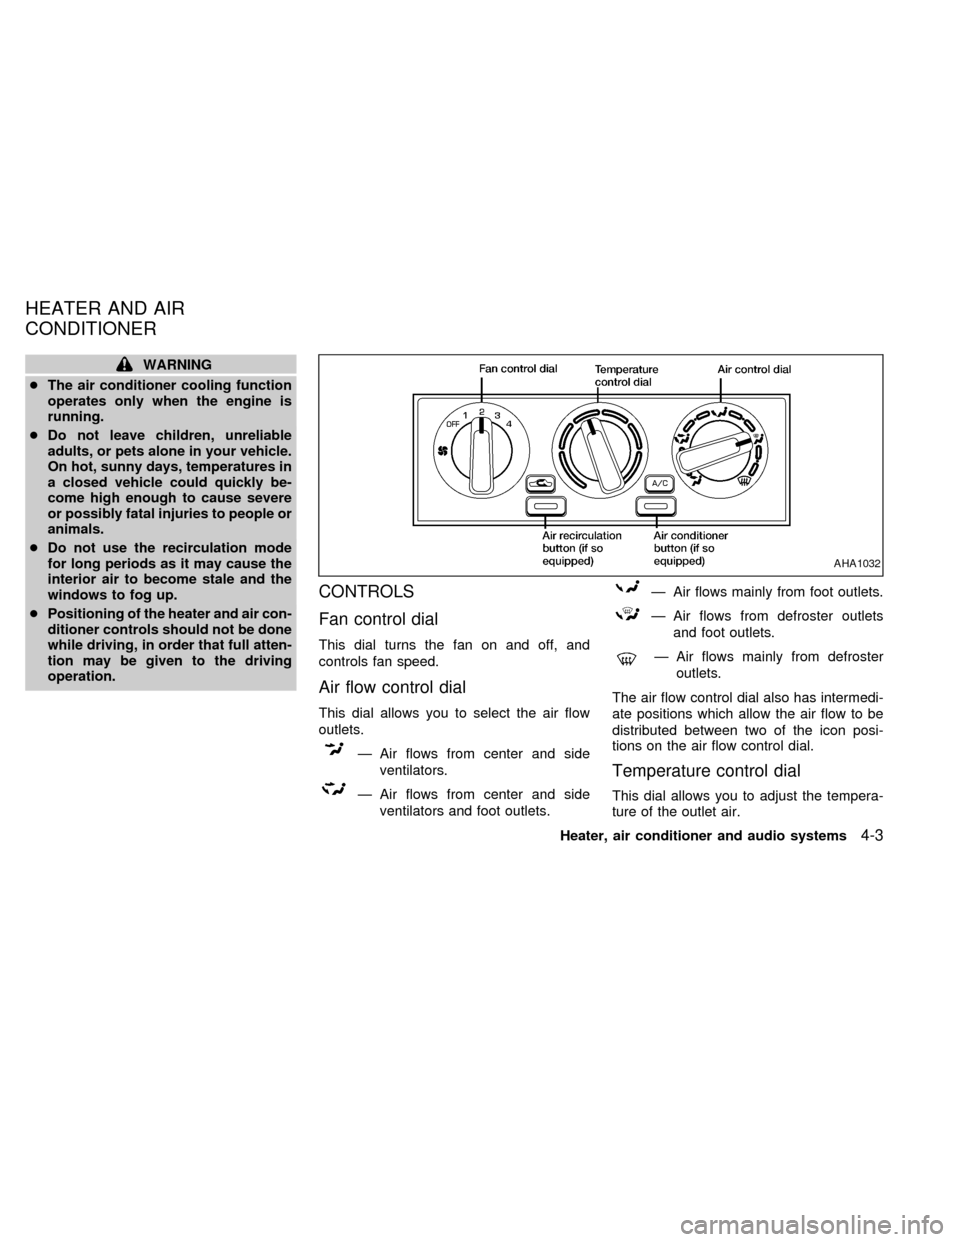
Fan control dial
This dial turns the fan on and off, and
controls fan speed.
Air flow control dial
This dial allows you to select the air flow
outlets.
Ð Air flows from center and side
ventilators.
Ð Air flows from center and side
ventilators and foot outlets.
Ð Air flows mainly from foot outlets.
Ð Air flows from defroster outlets
and foot outlets.
Ð Air flows mainly from defroster
outlets.
The air flow control dial also has intermedi-
ate positions which allow the air flow to be
distributed between two of the icon posi-
tions on the air flow control dial.
Temperature control dial
This dial allows you to adjust the tempera-
ture of the outlet air.
AHA1032
HEATER AND AIR
CONDITIONER
Heater, air conditioner and audio systems4-3
ZX
Page 86 of 216
Servicing air conditioner
The air conditioner system in your NISSAN
is charged with a refrigerant designed with
the environment in mind.
This refrigerant does not harm the
earth's ozone layer.
Special charging equipment and lubricant is
required when servicing your NISSAN air
conditioner. Using improper refrigerants or
lubricants causes severe damage to your
air conditioner system. See ``Air conditioner
system refrigerant and lubricant recommen-
dations'' in the ``Technical and consumer
information'' section of this manual.
An authorized NISSAN dealer will be able to
service your environmentally ``friendly'' air
conditioner system.
WARNING
The air conditioner system contains
refrigerant under high pressure. To
avoid personal injury, any air condi-
tioner service should be done only by
an experienced technician with proper
equipment.
Heater, air conditioner and audio systems
4-9
ZX
Page 88 of 216
Clock operation
Pressing the CLOCK button alternates the
clock and the radio/cassette tape options in
the display.
Clock set
Depressing the CLOCK and thebuttons
together sets hours. Depressing the CLOCK
and
buttons together sets minutes.
Clock priority mode
In this mode the clock is shown in the
display. If any radio or cassette tape func-
tions are activated, the radio (or cassette
tape) display illuminates for 10 seconds
then returns to the clock mode.
NOTE:
After clock adjustment, the radio is in the
clock priority mode.
Radio/Cassette tape priority mode
In this mode, the radio station illuminates in
the display during radio operation. During
cassette tape operation, TAPE illuminates
in the display.
Selecting the desired band
Push thebutton to change from AM
to FM reception.
The FM stereo indicator, ST, illuminates
during FM stereo reception. When the ste-
reo broadcast signal is weak, the radio au-
tomatically changes from stereo to monaural
reception.
TUNE buttons
WARNING
The radio should not be tuned while
driving in order that full attention may
be given to the driving operation.
Use the
andbuttons for
manual tuning. To move quickly through the
channels, hold either of the tune buttons
down for more than 1.5 seconds.
SEEK tuning
Push thetuning buttonfor less
than 1.5 seconds. SEEK tuning begins from
low to high frequencies and stops at the next
broadcasting station. Pushing the button
again continues the SEEK function. Once the
highest broadcasting station is reached, theradio continues in the SEEK mode at the
lowest broadcast station.
SCAN tuning
Push thetuning buttonfor more
than 1.5 seconds. SCAN illuminates in the
display. SCAN tuning begins from low to high
frequencies and stops at each broadcasting
station for five seconds. Pushing the button
again during this five second period stops
SCAN tuning and the radio remains tuned to
that station.
Heater, air conditioner and audio systems4-11
ZX
Page 93 of 216
Clock operation
Pressing the clock button alternates the
clock and the radio/CD player options in the
display.
Clock set
Depressing the clock andbuttons to-
gether sets hours. Depressing the clock and
buttons together sets minutes.
Clock priority mode
In this mode the clock is shown in the
display. If any radio or CD functions are
activated, the radio or CD display illumi-
nates for 10 seconds then returns to the
clock mode.
NOTE:
After clock adjustment, the radio is in the
clock priority mode.
FM/AM band select button
Push thebutton to change from AM
to FM reception.
The FM stereo indicator, ST, illuminates
during FM stereo reception. When the ste-
reo broadcast signal is weak, the radioautomatically changes from stereo to mon-
aural reception.
TUNE buttons
WARNING
The radio should not be tuned while
driving in order that full attention may
be given to the driving operation.
Use the
andbuttons for manual
tuning. To move quickly through the chan-
nels, hold either of the tune buttons down
for more than 1.5 seconds.
SEEK/SCAN buttons
SEEK tuning
Push the SEEK/SCAN tuning button
or
for less than 1.5 seconds. SEEK tuning
begins from high to low frequencies or low
to high frequencies, depending on which
button is pressed, and stops at the next
broadcasting station. Once the highest
broadcasting station is reached, the radio
continues in the SEEK mode at the lowest
broadcasting station. If using the
button, once the lowest broadcasting
station is reached, the radio continues in theSEEK mode at the highest broadcasting
station.
SCAN tuning
Push the SEEK/SCAN tuning button
orfor more than 1.5 seconds. SCAN illu-
minates in the display. SCAN tuning begins
from high to low frequencies or low to high
frequencies, depending on which button is
pressed. SCAN tuning stops at each broad-
casting station for five seconds. Pushing the
button again during this five second period
stops SCAN tuning and the radio remains
tuned to that station.
4-16Heater, air conditioner and audio systems
ZX
Page 98 of 216
playing immediately before the system was
turned off resumes playing. When no CD or
tape is loaded, the radio comes on. Pushing
the ONzOFF/VOL control knob button again
turns the system off.
Turn the ONzOFF/VOL control knob to ad-
just the volume.
Clock operation
Pressing the clock button alternates the
clock and the radio/cassette/CD player op-
tions in the display.
Clock set
Depressing the clock andbuttons to-
gether sets hours. Depressing the clock and
buttons together sets minutes.
Clock priority mode
In this mode, the clock is shown in the
display. If any radio, cassette or CD func-
tions are activated, the radio, cassette or
CD display illuminates for 10 seconds then
returns to the clock mode.
NOTE:
After clock adjustment, the radio is in the
clock priority mode.
FM-AM band select button
Pushing thebutton changes the band.
The FM stereo indicator, ST, illuminates
during FM stereo reception. When the ste-
reo broadcast signal is weak, the radio
automatically changes from stereo to mon-
aural reception.
TUNE/DISC buttons
WARNING
The radio should not be tuned while
driving in order that full attention may
be given to the driving operation.
Use the
andbuttons for manual
tuning. To move quickly through the chan-
nels, hold either of the tuning buttons down
for more than 1.5 seconds.
SEEK/SCAN buttons
SEEK tuning
Push the SEEK/SCAN tuning button
orfor less than 1.5 seconds. SEEK tuning
begins from low to high frequencies or high
to low frequencies, depending on which
button is pressed, and stops at the next
broadcasting station. Once the highestbroadcasting station is reached, the radio
continues in the SEEK mode at the lowest
broadcasting station. If using the
button, once the lowest broadcasting
station is reached, the radio continues in the
SEEK mode at the highest broadcasting
station.
SCAN tuning
Push the SEEK/SCAN tuning button
orfor more than 1.5 seconds. SCAN illu-
minates in the display, and the radio station
blinks. SCAN tuning begins from low to high
frequencies or high to low frequencies, de-
pending on which button is pressed. SCAN
tuning stops at each broadcasting station
for five seconds. Pushing the button again
during this five second period stops SCAN
tuning and the radio remains tuned to that
station.
Heater, air conditioner and audio systems
4-21
ZX
Page 107 of 216
WARNING
Do not leave children, unreliable
adults, or pets alone in your vehicle.
They could accidentally injure them-
selves or others through inadvertent
operation of the vehicle. Also, on hot,
sunny days, temperatures in a closed
vehicle could quickly become high
enough to cause severe or possibly
fatal injuries to people or animals.
EXHAUST GAS (carbon monoxide)
WARNING
Do not breathe exhaust gases; they
contain colorless and odorless carbon
monoxide. Carbon monoxide is dan-
gerous. It can cause unconsciousness
or death.
cIf you suspect that exhaust fumes
are entering the vehicle, drive with
all windows fully open, and have the
vehicle inspected immediately.
cDo not run the engine in a closed
space such as a garage.cDo not park the vehicle with the
engine running for any extended
length of time.
cKeep the trunk lid closed while driv-
ing, otherwise exhaust gases could
be drawn into the passenger com-
partment. If you must drive in this
manner for some reason, take the
following steps:
1. Open all the windows.
2. Set the air recirculation button (if
so equipped) off and the fan con-
trol dial to four (high) to circulate
the air.
3.
Be sure the rear seats are secured
and latched in the upright position.
cIf electrical wiring or other cable
connections must pass to a trailer
through the seal on the trunk lid or
the body, follow the manufacturer's
recommendation to prevent carbon
monoxide entry into the vehicle.
cThe exhaust system and body
should be inspected by a qualified
mechanic whenever:a. The vehicle is raised for service.
b. You suspect that exhaust fumes
are entering into the passenger
compartment.
c. You notice a change in the sound
of the exhaust system.
d.
You have had an accident involv-
ing damage to the exhaust system,
underbody, or rear of the vehicle.
THREE WAY CATALYST
The three way catalyst is an emission con-
trol device installed in the exhaust system.
Exhaust gases in the three way catalyst are
burned at high temperatures to help reduce
pollutants.
WARNING
c
The exhaust gas and the exhaust sys-
tem are very hot. Keep people or flam-
mable materials away from the ex-
haust pipe.
cDo not stop or park the vehicle over
flammable materials such as dry
grass, waste paper or rags. They
may ignite and cause a fire.
PRECAUTIONS WHEN
STARTING AND DRIVING
5-2Starting and driving
ZX