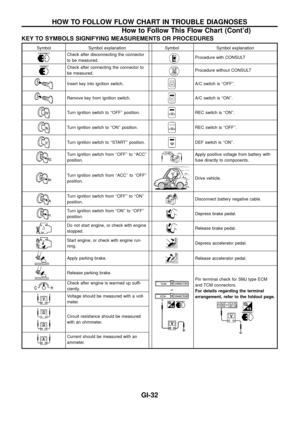
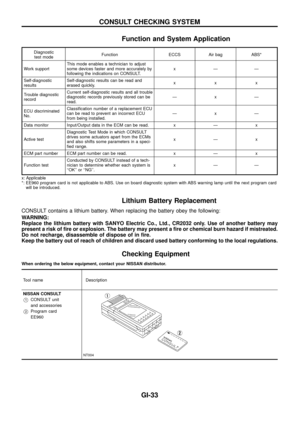
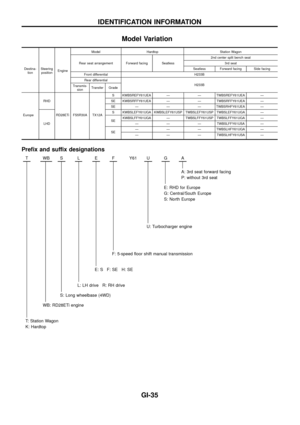
Page 17 of 47
FOLDOUT PAGE
The foldout page should be opened when reading wiring diagram.
Super multiple junction (SMJ)
In wiring diagram, connectors consisting of terminals having terminal numbers with an alphabet (1B, 0D, etc.)
are SMJ connectors.
If connector numbers are shown in Reference Area, these connector symbols are not shown in Connector
Area. For terminal arrangement of these connectors, refer to the foldout page at the end of this manual.
Joint connector
Joint connector symbols are shown in Connector Area in the wiring diagram concerned. Foldout page also
carries inside wiring layout together with such joint connector symbols.
SGI943
HOW TO READ WIRING DIAGRAMS
Description (Cont'd)
GI-16
Page 18 of 47
 may not corre")
How to Probe Connectors
Connector damage and an intermittent connection can result from
improperly probing of the connector during circuit checks.
The probe of a digital multimeter (DMM) may not correctly ®t the
connector cavity. To correctly probe the connector, follow the pro-
cedures below using a ``T'' pin. For the best contact grasp the ``T''
pin using an alligator clip.
PROBING FROM HARNESS SIDE
Standard type (not waterproof type) connector should be probed
from harness side with ``T'' pin.
+If the connector has a rear cover such as a ECM connector,
remove the rear cover before probing the terminal.
+Do not probe waterproof connector from harness side.
Damage to the seal between wire and connector may
result.
PROBING FROM TERMINAL SIDE
Female terminal
+There is a small notch above each female terminal. Probe each
terminal with the ``T'' pin through the notch.
Do not insert any object other than the same type male termi-
nal into female terminal.
+Some connectors do not have a notch above each terminal. To
probe each terminal, remove the connector retainer to make
contact space for probing.
Male terminal
Carefully probe the contact surface of each terminal using a ``T''
pin.
Do not bend terminal.
SGI841
SEL265V
SEL266V
SEL267V
HOW TO CHECK TERMINAL
GI-17
Page 19 of 47
How to Check Enlarged Contact Spring of
Terminal
An enlarged contact spring of a terminal may create intermittent
signals in the circuit.
If the intermittent open circuit occurs, follow the procedure below to
inspect for open wires and enlarged contact spring of female ter-
minal.
1. Assemble a male terminal and approx. 10 cm (3.9 in) of wire.
Use a male terminal which matches the female terminal.
2. Disconnect the suspected faulty connector and hold it terminal
side up.
3. While holding the wire of the male terminal, try to insert the
male terminal into the female terminal.
Do not force the male terminal into the female terminal with
your hands.
4. While moving the connector, check whether the male terminal
can be easily inserted or not.
+If the male terminal can be easily inserted into the female
terminal, replace the female terminal.
SEL270V
SEL271V
SEL272V
SEL273V
HOW TO CHECK TERMINAL
GI-18
Page 20 of 47
Waterproof Connector Inspection
If water enters the connector, it can short interior circuits. This may
lead to intermittent problems.
Check the following items to maintain the original waterproof char-
acteristics.
RUBBER SEAL INSPECTION
+Most waterproof connectors are provided with a rubber seal
between the male and female connectors. If the seal is missing,
the waterproof performance may not meet speci®cations.
+The rubber seal may come off when connectors are discon-
nected. Whenever connectors are reconnected, make sure the
rubber seal is properly installed on either side of male or female
connector.
WIRE SEAL INSPECTION
The wire seal must be installed on the wire insertion area of a
waterproof connector. Be sure that the seal is installed properly.
Terminal Lock Inspection
Check for unlocked terminals by pulling wire at the end of connec-
tor. An unlocked terminal may create intermittent signals in the cir-
cuit.
SEL275V
SEL330V
HOW TO CHECK TERMINAL
GI-19
Page 21 of 47

Work Flow
STEP DESCRIPTION
STEP 1 Get detailed information about the conditions and the environment when the incident occurred.
The following are key pieces of information required to make a good analysis:
WHATVehicle Model, Engine, Transmission and the System (i.e. Radio).
WHENDate, Time of Day, Weather Conditions, Frequency.
WHERERoad Conditions, Altitude and Traffic Situation.
HOWSystem Symptoms, Operating Conditions (Other Components Interaction).
Service History and if any After Market Accessories have been installed.
STEP 2 Operate the system, road test if necessary.
Verify the parameter of the incident.
If the problem can not be duplicated, refer to ``Incident Simulation Tests'' next page.
STEP 3 Get the proper diagnosis materials together including:
POWER SUPPLY ROUTING
System Operation Descriptions
Applicable Service Manual Sections
Check for any Service Bulletin.
Identify where to begin diagnosis based upon your knowledge of the system operation and the customer comments.
STEP 4 Inspect the system for mechanical binding, loose connectors or wiring damage.
Determine which circuits and components are involved and diagnose using the Power Supply Routing and Harness
Layouts.
STEP 5 Repair or replace the incident circuit or component.
STEP 6 Operate the system in all modes. Verify the system works properly under all conditions. Make sure you have not inad-
vertently created a new incident during your diagnosis or repair steps.
SGI838
HOW TO PERFORM EFFICIENT DIAGNOSIS FOR AN ELECTRICAL INCIDENT
GI-20
Page 22 of 47

Incident Simulation Tests
INTRODUCTION
Sometimes the symptom is not present when the vehicle is brought in for service. If possible, re-create the
conditions present at the time of the incident. Doing so may help avoid a No Trouble Found Diagnosis. The
following section illustrates ways to simulate the conditions/environment under which the owner experiences
an electrical incident.
The section is broken into the six following topics:
+Vehicle vibration
+Heat sensitive
+Freezing
+Water intrusion
+Electrical load
+Cold or hot start up
Get a thorough description of the incident from the customer. It is important for simulating the conditions of
the problem.
VEHICLE VIBRATION
The problem may occur or become worse while driving on a rough road or when engine is vibrating (idle with
A/C on). In such a case, you will want to check for a vibration related condition. Refer to the illustration below.
Connectors & harness
Determine which connectors and wiring harness would affect the electrical system you are inspecting.Gen-
tlyshake each connector and harness while monitoring the system for the incident you are trying to dupli-
cate. This test may indicate a loose or poor electrical connection.
Hint
Connectors can be exposed to moisture. It is possible to get a thin ®lm of corrosion on the connector termi-
nals. A visual inspection may not reveal this without disconnecting the connector. If the problem occurs
intermittently, perhaps the problem is caused by corrosion. It is a good idea to disconnect, inspect and clean
the terminals on related connectors in the system.
Sensors & relays
Gentlyapply a slight vibration to sensors and relays in the system you are inspecting.
This test may indicate a loose or poorly mounted sensor or relay.
SGI839
HOW TO PERFORM EFFICIENT DIAGNOSIS FOR AN ELECTRICAL INCIDENT
GI-21
Page 23 of 47

Engine compartment
There are several reasons a vehicle or engine vibration could
cause an electrical complaint. Some of the things to check for are:
+Connectors not fully seated.
+Wiring harness not long enough and is being stressed due to
engine vibrations or rocking.
+Wires laying across brackets or moving components.
+Loose, dirty or corroded ground wires.
+Wires routed too close to hot components.
To inspect components under the hood, start by verifying the integ-
rity of ground connections. (Refer to GROUND INSPECTION
described later.) First check that the system is properly grounded.
Then check for loose connection bygently shakingthe wiring or
components as previously explained. Using the wiring diagrams
inspect the wiring for continuity.
Behind the instrument panel
An improperly routed or improperly clamped harness can become
pinched during accessory installation. Vehicle vibration can aggra-
vate a harness which is routed along a bracket or near a screw.
Under seating areas
An unclamped or loose harness can cause wiring to be pinched by
seat components (such as slide guides) during vehicle vibration. If
the wiring runs under seating areas, inspect wire routing for pos-
sible damage or pinching.
HEAT SENSITIVE
The owner's problem may occur during hot weather or after car has
sat for a short time. In such cases you will want to check for a heat
sensitive condition.
To determine if an electrical component is heat sensitive, heat the
component with a heat gun or equivalent.
Do not heat components above 60ÉC (140ÉF).If incident occurs
while heating the unit, either replace or properly insulate the com-
ponent.
SGI842
HOW TO PERFORM EFFICIENT DIAGNOSIS FOR AN ELECTRICAL INCIDENT
Incident Simulation Tests (Cont'd)
GI-22
Page 24 of 47
. The cause could be related to water freez-
ing somewhere in the wiring/electrical system.
There are two")
FREEZING
The customer may indicate the incident goes away after the car
warms up (winter time). The cause could be related to water freez-
ing somewhere in the wiring/electrical system.
There are two methods to check for this. The ®rst is to arrange for
the owner to leave his car overnight. Make sure it will get cold
enough to demonstrate his complaint. Leave the car parked outside
overnight. In the morning, do a quick and thorough diagnosis of
those electrical components which could be affected.
The second method is to put the suspect component into a freezer
long enough for any water to freeze. Reinstall the part into the car
and check for the reoccurrence of the incident. If it occurs, repair
or replace the component.
WATER INTRUSION
The incident may occur only during high humidity or in rainy/snowy
weather. In such cases the incident could be caused by water
intrusion on an electrical part. This can be simulated by soaking the
car or running it through a car wash.
Do not spray water directly on any electrical components.
ELECTRICAL LOAD
The incident may be electrical load sensitive. Perform diagnosis
with all accessories (including A/C, rear window defogger, radio, fog
lamps) turned on.
COLD OR HOT START UP
On some occasions an electrical incident may occur only when the
car is started cold. Or it may occur when the car is restarted hot
shortly after being turned off. In these cases you may have to keep
the car overnight to make a proper diagnosis.
SGI843
SGI844
SGI845
HOW TO PERFORM EFFICIENT DIAGNOSIS FOR AN ELECTRICAL INCIDENT
Incident Simulation Tests (Cont'd)
GI-23


In wiring diagram, connectors consisting of terminals having terminal numbers with an alphabet")

