Page 185 of 396

FRONT AXLE – Axle Hub and Knuckle26-4
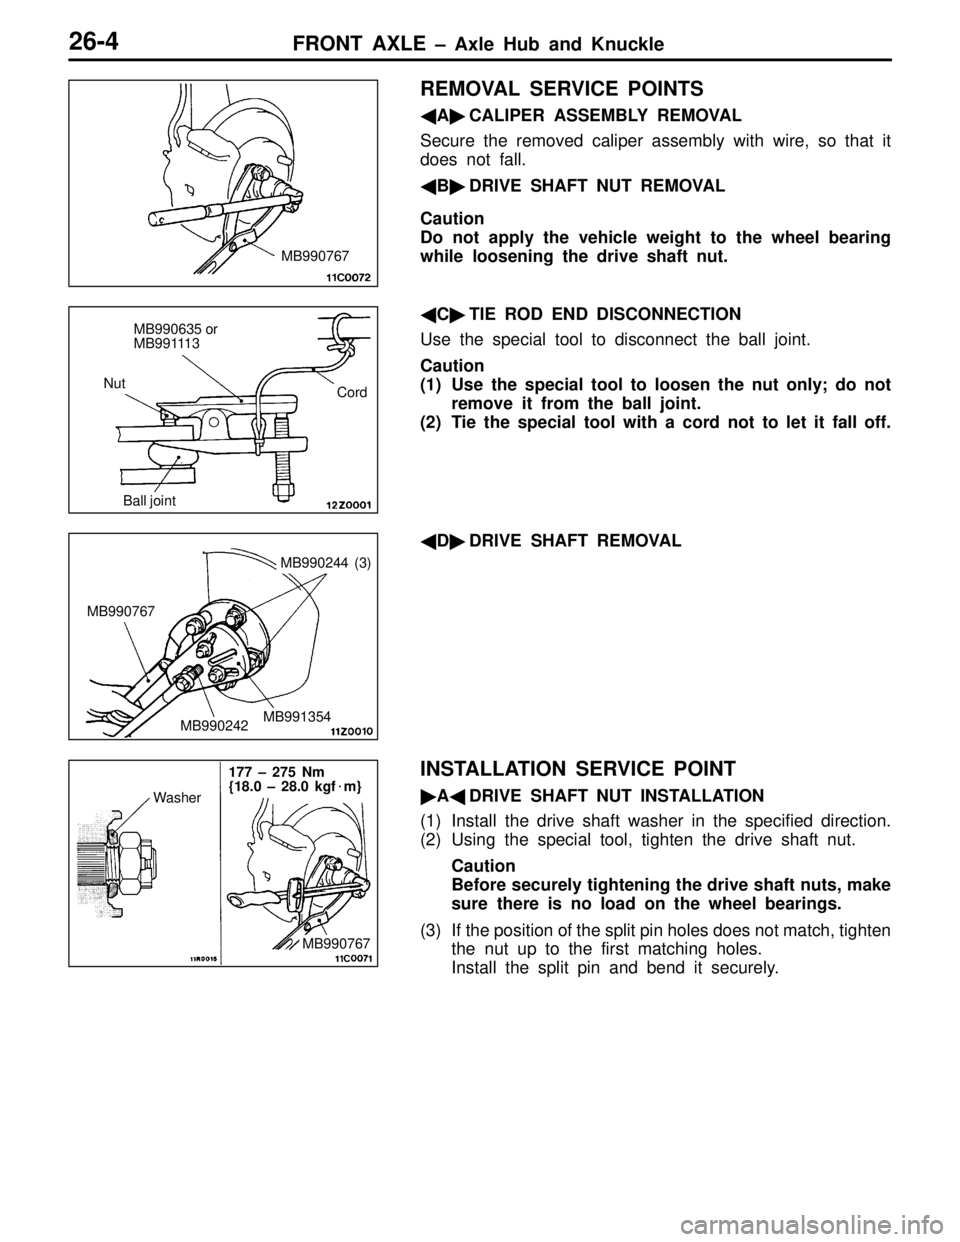
REMOVAL SERVICE POINTS
�A�CALIPER ASSEMBLY REMOVAL
Secure the removed caliper assembly with wire, so that it
does not fall.
�B�DRIVE SHAFT NUT REMOVAL
Caution
Do not apply the vehicle weight to the wheel bearing
while loosening the drive shaft nut.
�C�TIE ROD END DISCONNECTION
Use the special tool to disconnect the ball joint.
Caution
(1) Use the special tool to loosen the nut only; do not
remove it from the ball joint.
(2) Tie the special tool with a cord not to let it fall off.
�D�DRIVE SHAFT REMOVAL
INSTALLATION SERVICE POINT
�A�DRIVE SHAFT NUT INSTALLATION
(1) Install the drive shaft washer in the specified direction.
(2) Using the special tool, tighten the drive shaft nut.
Caution
Before securely tightening the drive shaft nuts, make
sure there is no load on the wheel bearings.
(3) If the position of the split pin holes does not match, tighten
the nut up to the first matching holes.
Install the split pin and bend it securely.
MB990767
MB990635 or
MB991113
Ball joint
CordNut
MB990767
MB990242MB991354
MB990244 (3)
177 – 275 Nm
{18.0 – 28.0 kgf�m}
Washer
MB990767
Page 188 of 396

REAR AXLE – Service Specifications / Lubricant / Sealant27-2
SERVICE SPECIFICATIONS
ItemsStandard valueLimit
Rear axle total backlash mm–5
Pressure generated by hydraulic unit MPa {kgf/cm2}0 – 1.6 {10.0 – 16.0}–
Wheel bearing axial play mm–0.05
Wheel bearing rotation starting torque Nm {kgf�cm}–1.0 {10.5} or less
ItemsStandard valueLimit
Right-to-left difference in combined thickness of friction plate and fric-
tion disc mm0 – 0.05–
Clearance between spring plate and differential case mm0.06 – 0.25–
LSD differential torque
Nm {kgf�m}
When new clutch plate is installed5 – 19 {0.5 – 1.9}–
Nm {kgf�m}
When existing clutch plate is installed2 – 19 {0.2 – 1.9}–
Distortion of friction plate and friction disc mm–0.08
Difference in thickness between friction plate, friction disc, and spring
plate mm–0.1
LUBRICANT
ItemsSpecified lubricantCapacity
Gear oilTorque
transfer
differential
DifferentialMITSUBISHI GENUINE DIA QUEEN SUPER
HYPOID GEAR OIL (GL-5)0.41 ± 0.02 dm3
{0.41 ± 0.02 �}
differentialTorque transfer
mechanismMITSUBISHI GENUINE DIA QUEEN AYC FLUID0.70�0
�0.05dm3
{0.70�0
�0.05�}
Hydraulic piping fluidMITSUBISHI GENUINE DIA QUEEN ATF-SPII1 dm3 {1 �}
Torque transfer mechanism oil seal lipsVaselineAs required
SEALANT
ItemsSpecified sealant
Torque transfer differential vent plugSemi-drying sealant: THREEBOND 1281B (460 g)
Torque transfer mechanism cover
Page 190 of 396
REAR AXLE – Special Tools27-4
Tool UseName Number
AB
MB990241
A: MB990242
B: MB990244Rear axle shaft
puller
A: Puller shaft
B: Puller bar�Removal of drive shaft
�Removal of rear hub assembly
MB991354Puller body
A: MB991017
B: MB990998
C: MB991000A, B: Front hub
remover &
installer
C: Spacer�Temporary fixing of unit bearing
�Measurement of wheel bearing rotation
starting torque
�Measurement of wheel bearing axial play
Use MB991000 (component
of MB990998) for the spacer.
MB990326Preload socket�Measurement of wheel bearing rotation
starting torque
�Measurement of drive pinion preload
MB991406,
MB990635, or
MB991113Steering linkage
puller�Disconnection of ball joint
�Removal of hub bolt
MB991460PlugPrevention of differential oil from being dis-
charged and entry of foreign matter
tial>
MB990988Side gear holding
tool setMeasurement of clutch plate preload
without AYC>
MB990850End yoke holderRemoval and installation of companion flange
Page 191 of 396

REAR AXLE – Special Tools / Troubleshooting 27-5
MB990988NumberNameO.D. mm
1MB990551Box–
2MB990989Base–
3(MB990990)Tool A25
(MB990991)Tool B28
(MB990992)Tool C31
MB990925
Brass bar
Bar (one-touch type)Toolbox
Installer adapter
Tool number (MB990925)O.D. mmTool number (MB990925)O.D. mm
AMB99092639.0AMB99093363.5
MB99092745.0MB99093467.5
MB99092849.5MB99093571.5
MB99092951.0MB99093675.5
MB99093054.0MB99093779.0
MB99093157.0BMB990938–
MB99093261.0CMB990939–
TROUBLESHOOTING
1. BASIC TROUBLESHOOTING CONDITIONS
Before starting the troubleshooting procedure, make sure that the following items have been checked
okay.
�The correct steering wheel has been properly installed in the neutral position of the steering column
shaft.
�Tire and wheel sizes are correct with correct specifications. Inflation pressure, balance, and wear
conditions are okay.
�Wheel alignment is correct.
�The engine, suspension, and other parts have not been remodeled so as to affect the AYC system.
2. DIAGNOSIS FUNCTION
READING THE DIAGNOSIS CODE
Read the diagnosis code using AYC warning lamp.
Page 192 of 396

REAR AXLE – Troubleshooting 27-6
3. INSPECTION CHART FOR DIAGNOSIS CODE
Diagnosis
code No.Diagnosis itemsRef. page
12Power supply voltage (valve power supply) system (open- or short-circuit)27-7
21FR wheel speed sensor system (open- or short-circuit)27-7
22FL wheel speed sensor system (open- or short-circuit)27-7
23RR wheel speed sensor system (open- or short-circuit)27-7
24RL wheel speed sensor system (open- or short-circuit)27-7
25Wrong-diameter tire27-9
26Faulty wheel speed sensor27-10
31Steer sensor (ST-1, ST-2, ST-N) system (open-circuit)27-11
32Steer sensor (ST-N) system (short-circuit)27-11
33Steer sensor (ST-N) system27-12
34Steer sensor (ST-1, ST-2) system (short-circuit)27-12
41TPS system (open- or short-circuit)27-13
51Longitudinal acceleration sensor system (open- or short-circuit)27-13
52Longitudinal acceleration sensor27-14
56Lateral acceleration sensor system (open- or short-circuit)27-13
61Stop lamp switch system (open-circuit)27-14
65ABS monitor system (open-circuit or defective ABS)27-15
71Proportioning valve system (open- or short-circuit)27-15
72Directional control valve (right) system (open- or short-circuit)27-16
73Directional control valve (left) system (open- or short-circuit)27-17
81AYC relay system (open- or short-circuit)27-18
82Electric pump system27-19
83Electric pump system27-20
Page 193 of 396

REAR AXLE – Troubleshooting 27-7
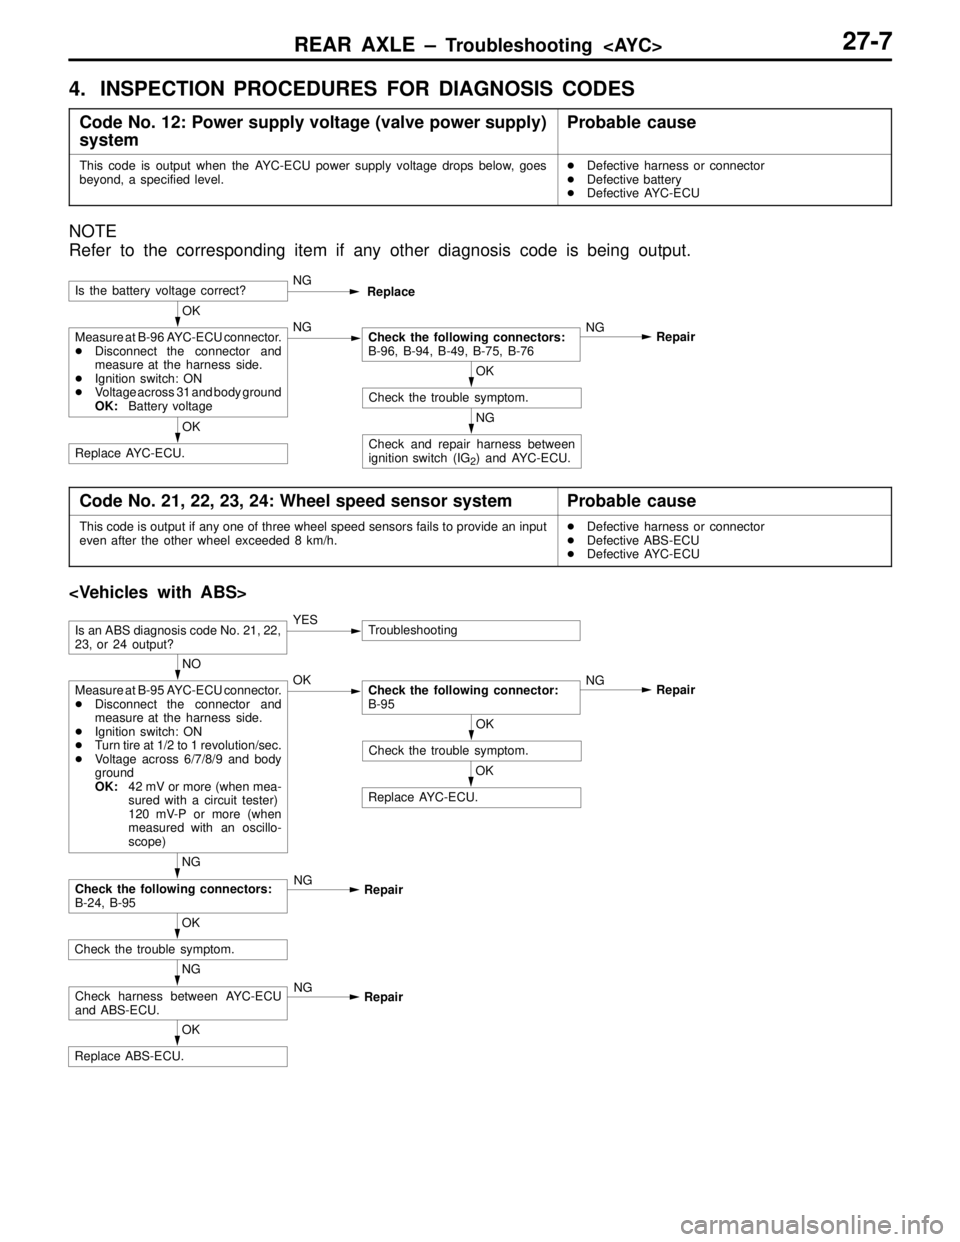
4. INSPECTION PROCEDURES FOR DIAGNOSIS CODES
Code No. 12: Power supply voltage (valve power supply)
systemProbable cause
This code is output when the AYC-ECU power supply voltage drops below, goes
beyond, a specified level.�Defective harness or connector
�Defective battery
�Defective AYC-ECU
NOTE
Refer to the corresponding item if any other diagnosis code is being output.
Is the battery voltage correct?NG
Replace
OK
Measure at B-96 AYC-ECU connector.
�Disconnect the connector and
measure at the harness side.
�Ignition switch: ON
�Voltage across 31 and body ground
OK:Battery voltageNGCheck the following connectors:
B-96, B-94, B-49, B-75, B-76
OK
Check the trouble symptom.
NG
Check and repair harness between
ignition switch (IG
2) and AYC-ECU. OKReplace AYC-ECU.NG
Repair
Code No. 21, 22, 23, 24: Wheel speed sensor systemProbable cause
This code is output if any one of three wheel speed sensors fails to provide an input
even after the other wheel exceeded 8 km/h.�Defective harness or connector
�Defective ABS-ECU
�Defective AYC-ECU
OK
Replace AYC-ECU.
OK
Replace ABS-ECU.
NG
Check harness between AYC-ECU
and ABS-ECU.NG
Repair
OK
Check the trouble symptom.
Is an ABS diagnosis code No. 21, 22,
23, or 24 output?YESTroubleshooting
NO
Measure at B-95 AYC-ECU connector.
�Disconnect the connector and
measure at the harness side.
�Ignition switch: ON
�Turn tire at 1/2 to 1 revolution/sec.
�Voltage across 6/7/8/9 and body
ground
OK:42 mV or more (when mea-
sured with a circuit tester)
120 mV-P or more (when
measured with an oscillo-
scope)OKCheck the following connector:
B-95
OK
Check the trouble symptom.
NG
Check the following connectors:
B-24, B-95NG
RepairNG
Repair
Page 194 of 396
REAR AXLE – Troubleshooting 27-8
OK
Check the wheel bearing.
NG
Check and repair the harness between
speed sensor and AYC-ECU.
NG
Replace AYC-ECU.
OK
Check the trouble symptom.
OK
Check the following connector:
B-95NG
Repair
OK
Check the trouble symptom.
OK
Check the following connectors:
B-95, B-52, B-17, A-26, A-50, D-04,
D-14, D-19NG
Repair
OK
Measure at B-95 AYC-ECU connector.
�Disconnect the connector and
measure at the harness side.
�Resistance across 7-20 (front, LH),
6-19 (front, RH), 9-22 (rear, LH),
and 8-21 (rear, RH).
OK:1.4 – 1.8 kΩ.NGCheck the speed sensor.
Check the installation of speed sensor.NG
Repair
OK
Check the speed sensor output volt-
age. (Refer to P.27-31.)NGCheck the speed sensor and rotor.NG
Replace
NG
Replace
Page 195 of 396

REAR AXLE – Troubleshooting 27-9
Code No. 25: Wrong-diameter tireProbable cause
This code is output if the speed of any one of the four wheels exceeds a specified
level with respect to the average of the four wheel speed sensor outputs when the
steering wheel is in the straight-ahead position and the vehicle speed exceeds 20
km/h. At this time, the warning lamp does not light up.�Defective harness or connector
�Defective AYC-ECU
�Defective ABS-ECU
OK
Replace ABS-ECU.
NG
Check harness between AYC-ECU
and ABS-ECU.NG
Repair
NG
Replace AYC-ECU.
OK
Check the trouble symptom.
NG
Check the following connectors:
B-24, B-95NG
Repair
OK
Check the trouble symptom.
NO
Measure at B-95 AYC-ECU connector.
�Disconnect the connector and
measure at the harness side.
�Ignition switch: OK
�Turn tire at 1/2 to 1 revolution/sec.
�Voltage across 6/7/8/9 and body
ground.
OK:42 mV or more (when mea-
sured with a circuit tester)
120 mV-P or more (when
measured with an oscillo-
scope)OKCheck the following connector:
B-95
YES
Is ABS diagnosis code No. 15 output?YESTroubleshooting
Are correct tires mounted on all four
wheels?NO
Repair
NG
Repair
NG
Check and repair the harness between
speed sensor and AYC-ECU.
OK
Check the trouble symptom.
OK
Check the following connectors:
B-95, B-52, B-17, A-26, A-50, D-04,
D-14, D-19NG
Repair
OK
Check wheel bearing.NG
Replace
NG
Replace AYC-ECU.
OK
Check the trouble symptom.
OK
Check the following connector:
B-95NG
Repair
OK
Check speed sensor output voltage.
(Refer to p. 27-31.)NGCheck speed sensor and rotor.
YES
Check speed sensor for installation.NG
Repair
Are correct tires mounted on all four
wheels?NO
Repair
NG
Replace