1998 LINCOLN CONTINENTAL tow
[x] Cancel search: towPage 139 of 176

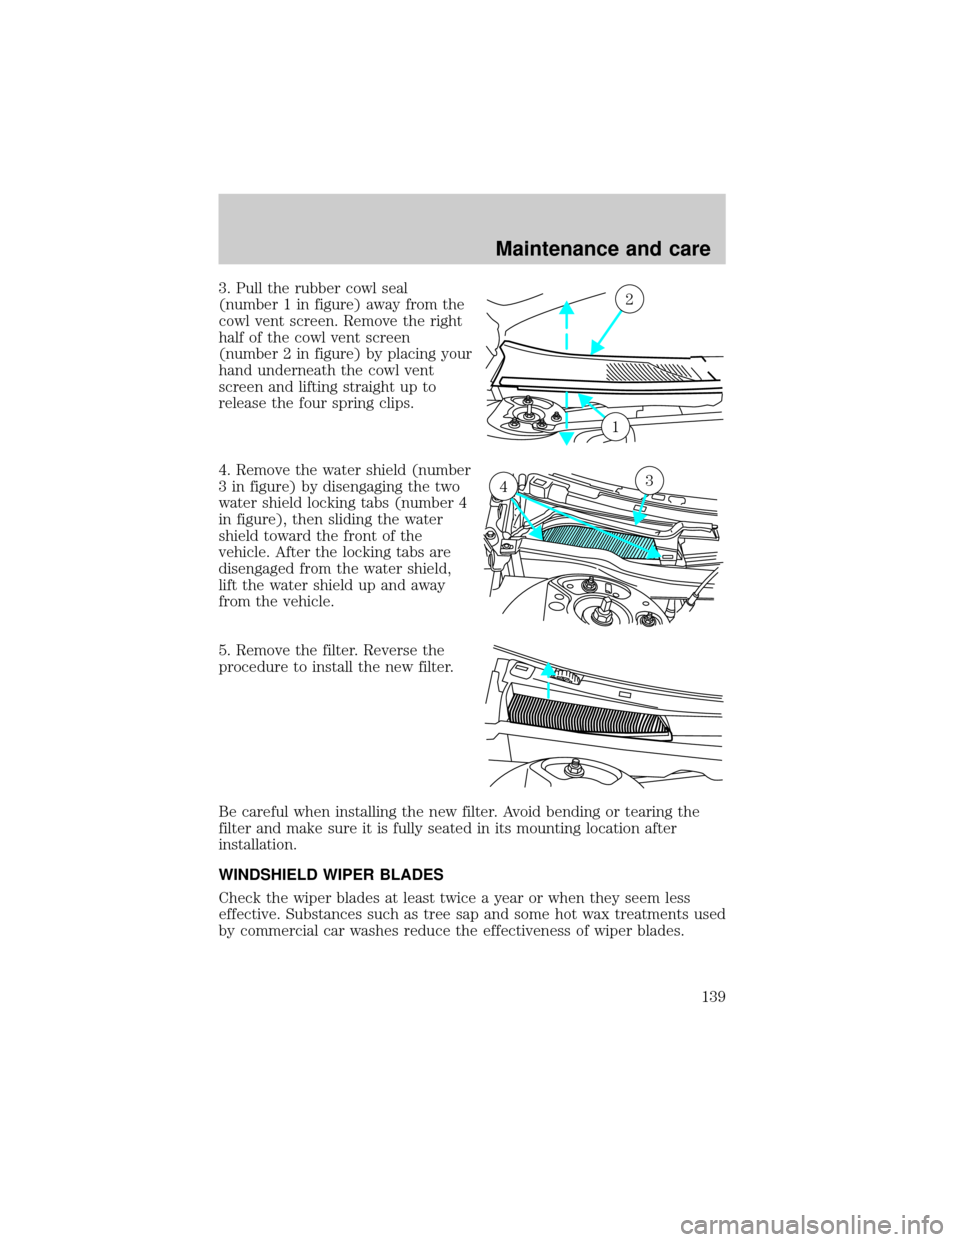
3. Pull the rubber cowl seal
(number 1 in figure) away from the
cowl vent screen. Remove the right
half of the cowl vent screen
(number 2 in figure) by placing your
hand underneath the cowl vent
screen and lifting straight up to
release the four spring clips.
4. Remove the water shield (number
3 in figure) by disengaging the two
water shield locking tabs (number 4
in figure), then sliding the water
shield toward the front of the
vehicle. After the locking tabs are
disengaged from the water shield,
lift the water shield up and away
from the vehicle.
5. Remove the filter. Reverse the
procedure to install the new filter.
Be careful when installing the new filter. Avoid bending or tearing the
filter and make sure it is fully seated in its mounting location after
installation.
WINDSHIELD WIPER BLADES
Check the wiper blades at least twice a year or when they seem less
effective. Substances such as tree sap and some hot wax treatments used
by commercial car washes reduce the effectiveness of wiper blades.2
1
34
Maintenance and care
139
Page 140 of 176

Checking the wiper blades
If the wiper blades do not wipe properly, clean both the windshield and
wiper blades using undiluted windshield wiper solution or a mild
detergent. Rinse thoroughly with clean water. To avoid damaging the
blades, do not use fuel, kerosene, paint thinner or other solvents.
Changing the wiper blades
When replacing wiper blade assemblies, always use a Motorcraft part or
equivalent. To make replacing the wipers easy, turn the ignition to ACC,
then turn the wipers on. When the wipers reach the vertical position,
turn the ignition to LOCK.
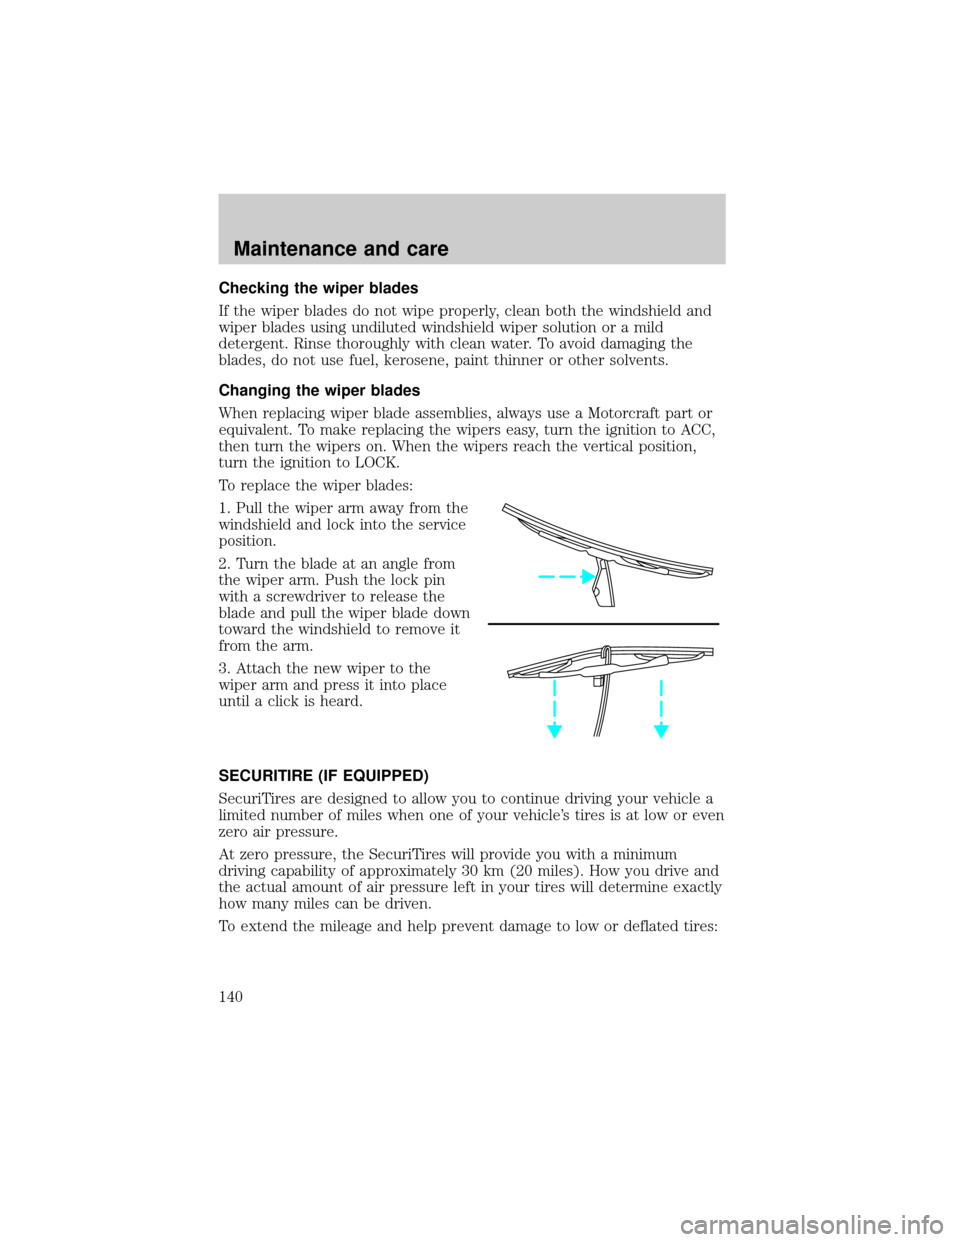
To replace the wiper blades:
1. Pull the wiper arm away from the
windshield and lock into the service
position.
2. Turn the blade at an angle from
the wiper arm. Push the lock pin
with a screwdriver to release the
blade and pull the wiper blade down
toward the windshield to remove it
from the arm.
3. Attach the new wiper to the
wiper arm and press it into place
until a click is heard.
SECURITIRE (IF EQUIPPED)
SecuriTires are designed to allow you to continue driving your vehicle a
limited number of miles when one of your vehicle's tires is at low or even
zero air pressure.
At zero pressure, the SecuriTires will provide you with a minimum
driving capability of approximately 30 km (20 miles). How you drive and
the actual amount of air pressure left in your tires will determine exactly
how many miles can be driven.
To extend the mileage and help prevent damage to low or deflated tires:
Maintenance and care
140
Page 150 of 176

the Vehicle Emission Control Information Decal located on or near the
engine. This decal identifies engine displacement and gives some tune up
specifications.
Please consult your ªWarranty Guideº for complete emission warranty
information.
Readiness for inspection/maintenance (I/M) testing
In some localities, it may be a legal requirement to pass an I/M test of
the on-board diagnostic (OBD-II) system. If your ªcheck engine/service
engine soonº light is on, reference the applicable light description in the
Warning Lights and Chimessection of your owners guide. Your vehicle
may not pass the I/M test with the ªcheck engine/service engine soonº
light on.
If the vehicle's powertrain system or its battery has just been serviced,
the OBD-II system is reset to a ªnot ready for I/M testº condition. To
ready the OBD-II system for I/M testing, a minimum of 30 minutes of city
and highway driving is necessary as described below:
²First, at least 10 minutes of driving on an expressway or highway.
²Next, at least 20 minutes driving in stop and go, city type traffic with
at least four idle periods.
Allow the vehicle to sit for at least eight hours without starting the
engine. Then, start the engine and complete the above driving cycle. The
engine must warm up to its normal operating temperature. Once started,
do not turn off the engine until the above driving cycle is complete.
EXTERIOR BULBS
Replacing headlamp bulbs
Handle a halogen headlamp bulb carefully and keep out of
children's reach. Grasp the bulb only by its plastic base and do
not touch the glass. The oil from your hand could cause the bulb to
break the next time the headlamps are operated.
To remove the headlamp bulb:
1. Make sure headlamp switch is in OFF position.
2. Lift the hood and remove the plastic sight shield covering the back of
the headlamps by lifting up on the rear corners to release the velcro
attachments. Lift the shield and pull towards the windshield.
Maintenance and care
150
Page 157 of 176

²Never wash or rinse the engine while it is running; water in the
running engine may cause internal damage.
Cleaning plastic exterior parts
Use vinyl cleaner for routine cleaning. Clean with a tar remover if
necessary. Do not clean plastic parts with thinners, solvents or
petroleum-based cleaners.
Cleaning the exterior lamps
Wash with the same detergent as the exterior of your vehicle. Use glass
cleaner or tar remover if necessary.
To avoid scratching the lamps, do not use a dry paper towel, chemical
solvents or abrasive cleaners.
Cleaning the wiper blades
If the wiper blades do not wipe properly, clean the windshield and wiper
blades with undiluted windshield wiper solution or a mild detergent.
Rinse thoroughly with clean water. To avoid damaging the blades, do not
use fuel, kerosene, paint thinner or other solvents.
Cleaning the instrument panel
Clean with a damp cloth, then dry with a dry cloth.
Avoid cleaner or polish that increases the gloss of the upper portion of
the instrument panel. The dull finish in this area helps protect the driver
from undesirable windshield reflection.
Cleaning and maintaining the safety belts
Clean the safety belts with a mild soap solution recommended for
cleaning upholstery or carpets. Do not bleach or dye the belts, because
these actions may weaken the belt webbing.
Check the safety belt system periodically to make sure there are no
nicks, wear or cuts. If your vehicle has been involved in an accident,
refer to theSafety belt maintenancesection in theSeating and safety
restraintschapter.
Underbody
Flush the complete underside of vehicle frequently. Keep body drain
holes unplugged. Inspect for road damage.
Maintenance and care
157
Page 164 of 176

IDENTIFYING YOUR VEHICLE
Safety compliance label
The National Highway Traffic Safety
Administration Regulations require
that a Safety Compliance
Certification Label be affixed to a
vehicle and prescribe where the
Safety Compliance Certification
Label may be located. The Safety
Compliance Certification Label is
located on the front door latch pillar
on the driver's side.
5
3
2
MFD. BY FORD MOTOR CO. IN U.S.A.
EXT PNT: XXXXXX XXXXXX RC: XX DSO: XXXX F0000
BAR INT TR TP/PS R AXLE TR SPR T0000
X XX XXX X XX X XXXX
UTC
ÑFOHT-15294A10-GA
MAXIMUM LOAD=OCCUPANTS + LUGGAGE=XXXKG/XXXXLB
OCCUPANTS: X TOTAL X FR X 2ND X RR OCCUPANTS LUGGAGE
XX XXXKG/XXXXLB
TIRE: XXXX/XXXXX XXX X XXXKG/XXXXLB
PRESSURE (FR) XXX kPa/33 PSI COLD
PRESSURE (RR) XXX kPa/33 PSI COLD
TRAILER TOWING - SEE OWNER GUIDE
DATE: XXXXX GVWR:XXXXX LB/ XXXXX KG
VIN: XXXXXXXXXXXXXXXXX TYPE: XXXXXXXXXXXXXXX FGAWR: XXXXXX/XXXXXXX RGAWR: XXXXXXX/XXXXXXX
THIS VEHICLE CONFORMS TO ALL APPLICABLE FEDERAL
MOTOR VEHICLE SAFETY STANDARDS IN EFFECT ON THE
DATE OF MANUFACTURE SHOWN ABOVE.
Capacities and specifications
164
Page 169 of 176

Speed control ..............................36
canceling a set speed ...............39
resuming a set speed ...............39
tap up/tap down .......................38
turning off .................................37
Speedometer ...............................10
Starting your vehicle .............90,92
Sunvisor .......................................52
Tachometer
mechanical cluster ...................11
Tilt steering wheel ......................40
Tires ....................................142,144
changing ..................................119
checking the pressure ............144
replacing ..................................145
rotating ....................................144
snow tires and chains ............145
treadwear ................................143
Traction control
off light ........................................9
Trailer towing ............................105
tips ...........................................107
Transaxle .....................................99
automatic operation .......100,101,
102,103
Transmission .............................134
fluid, checking and adding
(automatic) .............................134
Trunk
using the remote entry
system to open .........................66
Turn signal
lever ...........................................35
Universal transmitter ..................52
erasing channels .......................55
operating ...................................54
programming .............................53
Vehicle dimensions ...................163
Vehicle headlamp aiming
device (VHAD) .........................152
Vehicle Identification Number
(VIN) ..........................................165Vehicle loading ..........................104
Ventilating your vehicle .............94
Warning chimes .............................6
Wheels
anti-theft lug nuts ..................121
Windows
accessory delay .........................60
power windows, operating .......59
Windshield washer fluid and
wipers
checking and adding fluid .....131
checking and replacing wiper
blades ......................................139
operation ...................................34
Wrecker towing .........................124
Index
169