Page 625 of 2490

d
ownpipe catalyst.
39
.
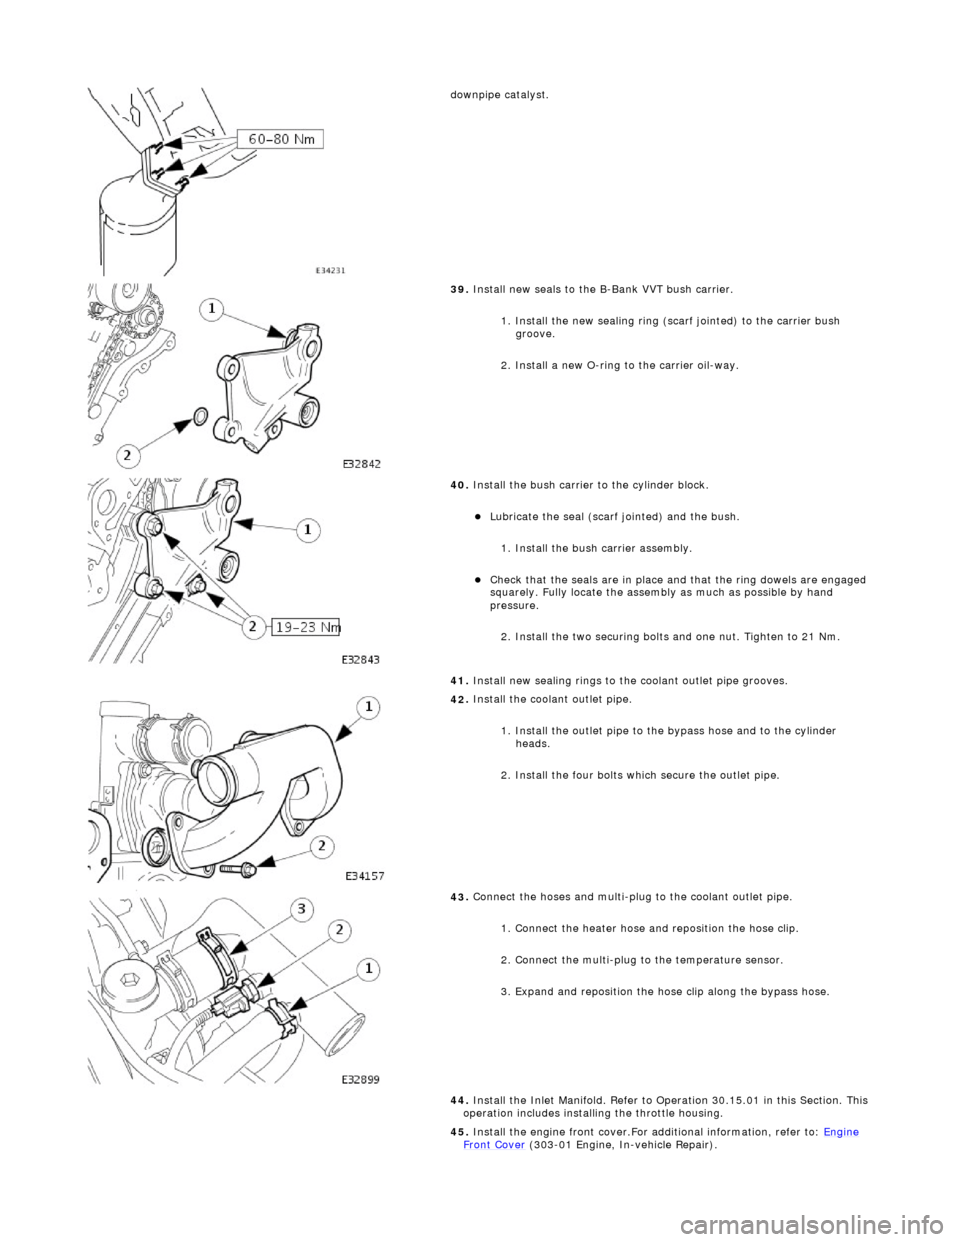
Install new seals to the B-Bank VVT bush carrier.
1. Install the new sealing ring (scarf jointed) to the carrier bush groove.
2. Install a new O-ring to the carrier oil-way.
40
.
Install the bush carrier to the cylinder block.
Lu
bricate the seal (scarf
jointed) and the bush.
1. Install the bush carrier assembly.
Chec
k that the seals are
in place and that the ri ng dowels are engaged
squarely. Fully locate the assembly as much as possible by hand
pressure.
2. Install the two securing bolts and one nut. Tighten to 21 Nm.
41. Install new sealing rings to the coolant outlet pipe grooves.
42
.
Install the coolant outlet pipe.
1. Install the outlet pipe to the bypass hose and to the cylinder heads.
2. Install the four bolts which secure the outlet pipe.
43
.
Connect the hoses and multi-plug to the coolant outlet pipe.
1. Connect the heater hose and reposition the hose clip.
2. Connect the multi-plug to the temperature sensor.
3. Expand and reposition the hose clip along the bypass hose.
44. Install the Inlet Manifold. Refer to Operation 30.15.01 in this Section. This
operation includes installing the throttle housing.
45. Install the engine front cover.For additional information, refer to: Engine
Front Cover (303-01 Engi
ne, In-vehicle Repair).
Page 627 of 2490

E
ngine - Cylinder Head RH
In-ve
hicle Repair
Remova
l
CAU
TION: If a replacement cylinder head is to be installed to a
vehicle with variable camshaft timing (VCT) the cylinder head m ust have the
oil gallery blind rivet removed before installation.
Spe
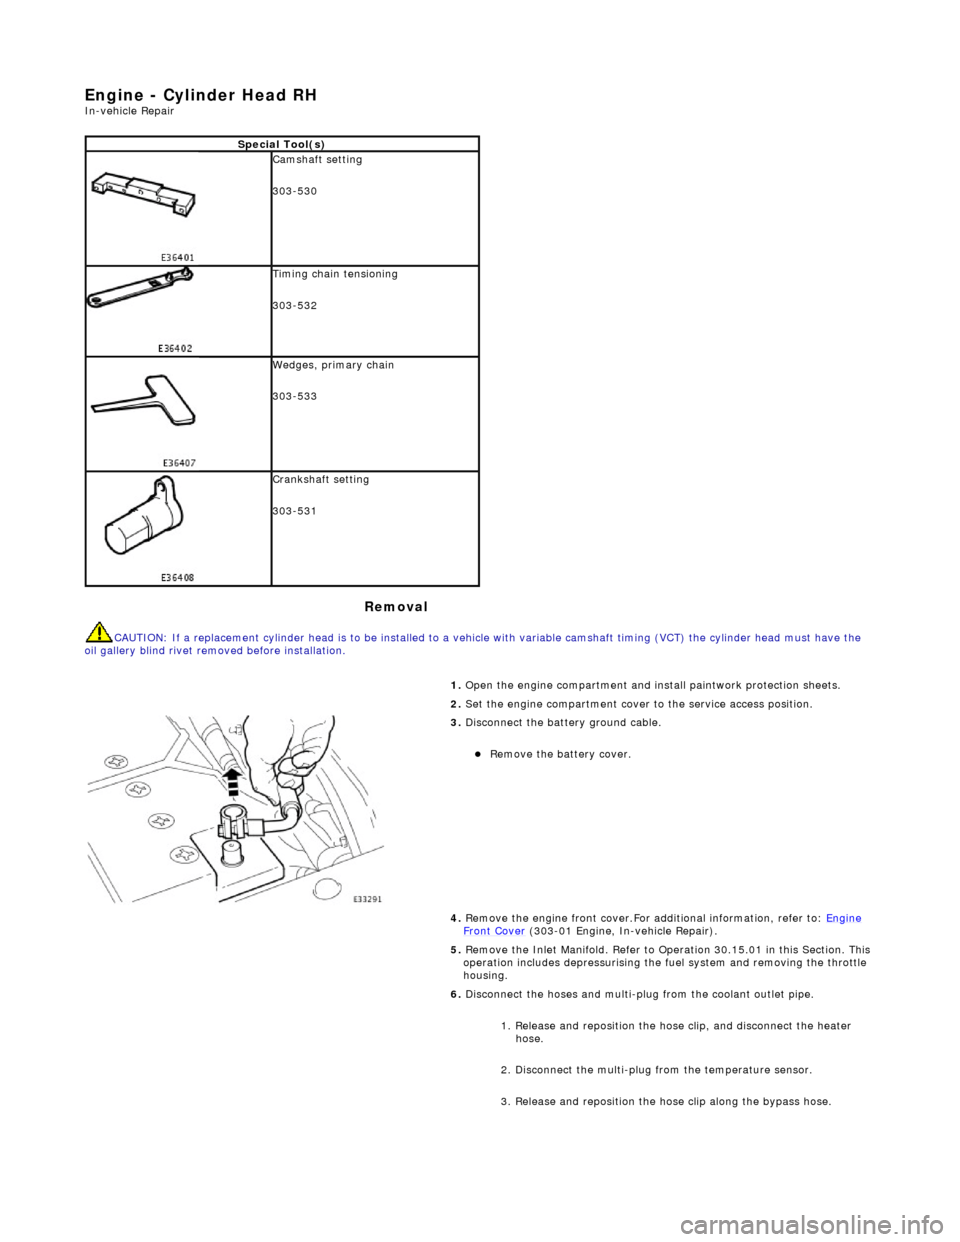
cial Tool(s)
Cams
haft setting
303-530
Ti
ming chain tensioning
303-532
Wedges, prim
ary chain
303-533
Cr
ankshaft setting
303-531
1.
Open the engine compartment and install paintwork protection sheets.
2. Set the engine compartment cover to the service access position.
3.
Disconnect the battery ground cable.
Re
move the battery cover.
4. Remove the engine front cover.For additional information, refer to: Engine
Front Cover (303-01 Engi
ne, In-vehicle Repair).
5. Remove the Inlet Manifold. Refer to Operation 30.15.01 in this Section. This operation includes depressurising the fuel system and removing the throttle
housing.
6. Disconnect the hoses and multi-plug from the coolant outlet pipe.
1. Release and reposition the hose clip, and disconnect the heater hose.
2. Disconnect the multi-plug from the temperature sensor.
3. Release and reposition the hose clip along the bypass hose.
Page 628 of 2490
7.
Remove the coolant outlet pipe.
1. Remove the four bolts which secure the outlet pipe.
2. Remove the outlet pipe from the bypass hose and from the cylinder heads.
8. Remove and discard the sealing ring s from the outlet pipe grooves.
9.
Remove the nuts which secure the catalytic converter to the A-Bank
exhaust manifold flange.
10 . Re
move the VVT bush carrier.
1. Remove the three bolts which secure the carrier to the cylinder block.
2. Release the carrier from the two ring dowels and remove it.
11. R
emove the seals from the bush carrier.
1. Remove the sealing ring (scarf jointed) from the carrier bush groove.
2. Remove the O-ring from the carrier oil-way recess.
12. Raise the vehicle on a ramp.
13. Remove the crankshaft position sensor.
Page 629 of 2490

• N
OTE: Remove the sensor and allow it to hang free under the engine.
1
. Remove the bolt which secures the crankshaft position sensor to
the flywheel housing.
2. Remove the access grommet (for torque converter bolts) from the housing.
14. Install the damper securing bolt (old one) to the crankshaft, hand-tight
only.
15
.
Rotate the crankshaft until the triangular arrow indent on the drive plate is
visible through the access hole; confirm that the timing flat on each
camshaft is uppermost.
16
.
Install the crankshaft setting peg 3 03 - 531 to the crankshaft position
sensor location.
1. Install the crankshaft setting peg 303 - 531.
Position
the crankshaft so that the setting peg engages fully into the
timing slot.
2. Install and tighten the bolt to secure the setting peg.
17. Remove the damper securing bolt from the crankshaft.
18. Lower the vehicle on the ramp.
19
.
Install the camshaft locking tool 303 - 530 to the A-Bank camshafts,
aligning the shafts slightly as necessary.
20
.
Loosen the bolt which secures the sprocket to the camshaft.
Page 639 of 2490

28
.
Install the tensioner to the cylinder block.
1. Position and align the tensioner to the cylinder block and to the mating slot on the rear face of the tensioner blade.
2. Install and tighten the two bolts to 12 Nm.
29
.
Use a wedge 303 - 533 (or two if required) between the primary chain
tensioner and tensioner blade, to ta ke up the slack in the chain, for
tightening the VVT unit and exhaust camshaft sprocket.
30
.
CAUTION: Make sure that a new bolt is installed.
Tighten the exhaust camshaft sprocket securing bolt. 1. Instal the chain tensioner t ool 303 - 532 to the sprocket holes.
Appl
y force to the tool in an anti
-clockwise direction to tension the
chain on its drive side.
2. Whilst applying the opposing force to the sprocket and chain, tighten the sprocket securing bolt to 20 Nm + 90°.
31
.
CAUTION: Make sure that a new bolt is installed.
Tighten the VVT unit securing bolt. 1. Whilst still applying the opposing force to the sprocket and chain (using 303 - 532), check that the wedges are still in place, tighten
the VVT unit securing bolt to 20 Nm + 90°.
R
emove the chain tensioning tool and the wedge(s).
32
.
Remove the camshaft locking tool 303 - 530.
33. Raise the vehicle on the ramp.
34. Remove the crankshaft setting tool 303 - 531.
35. Install the crankshaft position sensor.
1. Install the sensor to the flywheel housing and Install the securing bolt. Tighten to 10 Nm.
Page 641 of 2490
2.
Connect the multi-plug to the temperature sensor.
3. Expand and reposition the hose clip along the bypass hose.
43. Install the Inlet Manifold. Refer to Operation 30.15.01 in this Section. This
operation includes installing the throttle housing.
44. Install the engine front cover.For additional information, refer to: Engine
Front Cover (303-01 Engi
ne, In-vehicle Repair).
45. Move the engine compartment cover from the service position and connect
the gas struts.
46. Remove the paint protection sheets and close the cover.
47. Connect the battery and install th e battery cover.For additional
information, refer to: Battery Connect
(414
-01 Battery, Mounting and
Cables, General Procedures).
Page 664 of 2490
Engine - Exhaust Camshaft Sprocket LH4.0L NA V8 - AJ27
In-vehicle Repair
Removal
Special Tool(s)
Camshaft setting
303-530
Crankshaft setting
303-531
Timing chain tensioning
303-532
1. Open the engine compartment and fit paintwork protection
sheets.
2. Disconnect the batt ery ground cable.
Remove the battery cover.
3. Remove the Cam Cover from Ba nk 2. Refer to Operation
12.29.43.
4. Raise the vehicle on a ramp.
5. Remove the crankshaft position sensor.
1. Remove the bolt which secures the crankshaft position sensor to the flywheel housing.
Remove the sensor and allow it to hang free under the
engine.
2. Remove the access grommet (for torque converter bolts) from the housing.
Page 665 of 2490

6. Rotate the crankshaft until the triangular arrow indent on
the drive plate is visible thro ugh the access hole; confirm
that the timing flat on ea ch camshaft is uppermost.
7. Install the crankshaft setting peg 303-531 to the crankshaft
position sensor location.
1. Install the crankshaft setting peg 303-531.
Position the crankshaft so that the setting peg engages
fully into the timing slot.
2. Install and tighten the bolt to secure the setting peg.
8. Lower the vehicle on the ramp.
9. Install the camshaft locking tool 303-530 to Bank 2 camshafts,
aligning the shafts sl ightly as necessary.
10. CAUTION: Use a length of steel strip that will not fall
into the timing cover.
Protect the upper face of the ti ming cover from scratches, when
removing the bolt which secures the sprocket.
1. Place a flat piece of stee l strip along the timing cover
horizontal jointing face, adjacent to the exhaust
camshaft sprocket.
2. Secure the steel strip in place with adhesive tape.
11. A ball-ended hexagon drive bit is required to remove the
sprocket securing bolt. A suitable tool is available from Snap On as (FABLM10E) Long Series 10mm AF.