1998 JAGUAR X308 window trim
[x] Cancel search: window trimPage 28 of 2490

Removal and Installation
Door (76. 28.04)
Front Doo
r
Opening Weatherstrip (76.40.01)
Fuel Filler Door (76.10.25)
Hood (76.16.01)
Hood Hinge (76.16.12)
Hood Striker (76.16.24)
Hood Strut (76.16.15)
Luggage Compartment Lid Hinge (76.19.28)
Luggage Compartment Lid Opening Weatherstrip (76.19.06)
Luggage Compartment Lid Striker (76.19.12)
Luggage Compartment Lid Strut (76.19.27)
Rear Door Opening Weathe
rstrip (76.40.02)
501‐05: Interior Trim and Ornamentation
Description and Operation
Interior Trim
Removal and Installation
A‐Pillar Trim Panel (76.13.31)
B‐Pillar Trim Panel (76.13.28)
Cowl Side Trim Panel (76.13.30)
C‐Pillar Trim Panel (76.13.73)
Door Window Control Switch Finish Pane
l (76.47.33)
Engine Cover (76.11.35)
Floor Covering (76.49.08)
Folding Tray (76.47.31)
Folding Tray Finish Panel (76.47.32)
Front Door Armrest (76.34.22)
Front Door Trim Panel Finish Panel (76.47.11)
Front Door Stowage Compartment (76.34.27)
Front Door Trim Panel (76.34.01)
Headliner (76.64.01)
Luggage Compartment Front Trim Panel (76.19.31)
Luggage Compart
ment Lid Trim Panel (76.19.05)
Luggage Compartment Rear Trim Panel (76.19.44)
Luggage Compartment Side Trim Panel (76.19.22)
Overhead Console Finish Panel (76.47.41)
Page 29 of 2490

Parcel Shelf (76.67. 06)
Parcel Shelf
Support (76.67.09)
Passenger Assist Handle (76.58.30)
Rear Door Armrest (76.34.23)
Rear Door Trim Panel Finish Panel (76.47.12)
Rear Door Trim Panel (76.34.04)
Rear Window Blind (76.14.04)
Rear Door Window Control Switch Finish Panel (76.47.34)
Scuff Plate Trim Panel (76.13.81)
Sun Visor (76.10.48)
501‐08: Exterior Trim and Or
namentation
Description and Operation
Exterior Trim
Removal and Installation
A‐Pillar Moulding LH (76.13.19)
A‐Pillar Moulding RH (76.13.20)
Coachlines
Door Moulding (76.43.72)
Front Fender Moulding (76.10.48) (76.43.73)
Luggage Compartment Lid Badges (76.44.03)
Luggage Compartment Lid Moulding (76.43.79)
Radiator Grille (76.
55.03)
Radiator Grille Bezel (76.55.15)
501‐09: Rear View Mirrors
Description and Operation
Rear View Mirrors
Removal and Installation
Auto‐Dimming Interior Mirror (76.10.56)
Exterior Mirror (76.10.52)
Exterior Mirror Cover (76.10.55)
Exterior Mirror Glass (76.10.53)
Exterior Mirror Motor (76.10.57) (76.11.09)
Interior Mirror (76.10.51)
Interior Mirro
r Mounting Block (76.10.62)
Page 30 of 2490

501‐10: Seating
Specificatio
n
Description and Operation
Seats
Removal and Installation
Front Seat (76.70.01)
Front Seat Backrest (76.70.06)
Front Seat Backrest Cover (76.70.15)
Front Seat Backrest Heater Mat (86.75.14)
Front Seat Backrest Trim Panel (76.70.03)
Front Seat Cushion (76.70.11)
Front Seat Cushion Cover (76.70.33)
Front Sea
t Cushion Heater Mat (86.75.13)
Front Seat Head Restraint (76.70.14)
Front Seat Head Restraint Motor (86.75.17)
Front Seat Recliner Motor (86.75.04)
Front Seat Track (76.70.20)
Front Seat Track Motor (86.75.33)
Lumbar Motor (86.75.12)
Rear Seat Armrest (76.70.39)
Rear Seat Backrest (76.70.38)
Rear Seat Backrest Cover (76.70.48) (78.90.12)
Rear Seat Backrest Heater Mat (86.75.35)
Rear Seat Cushio
n (76.70.37)
Rear Seat Cushion Cover (76.70.47)
Rear Seat Cushion Heater Mat (86.75.37)
Rear Seat Head Restraint (76.70.56)
Rear Seat Track
Seat Control Switch (86.75.23)
501‐11: Glass, Frames and Mechanisms
Description and Operation
Glass, Fra
mes and Mechanisms
Removal and Installation
Door Window Control Switch Bulb (86.46.12)
Front Door Window Glass (76.31.01)
Front Door Window Glass Weatherstrip (76.40.28)
Page 31 of 2490

Front Doo r
Window Regulator and Motor (76.31.45)
Front Door Window Regulator Motor (76.31.45)
Front Door Window Control Switch (86.25.07)
Rear Door Window Glass (76.31.02)
Rear Door Window Glass Weatherstrip (76.40.29)
Rear Door Window Regulator and Motor (86.25.09)
Rear Door Window Regulator Motor (86.25.09)
Rear Door Window Control Swi
tch (86.25.10)
Rear Quarter Window Glass (76.31.31)
Rear Window Glass (76.81.11)
Windshield Glass (76.81.40)
501‐12: Instrument Panel and Console
Specification
Description and Operation
Instrument Panel and Instrument Panel Console
Removal and Installation
Audio Unit Housing (76.25.15)
Climate Control Assembly Housing
Coin Stowage Compartment (76.46.37)
Floor Co
nsole (76.25.01)
Floor Console Ashtray (76.25.25)
Floor Console Extension (76.25.05)
Floor Console Finish Panel (76.47.26)
Floor Console Finish Panel Bracket (76.25.26)
Floor Console Stowage Compartment (76.25.16)
Floor Console Stowage Compartment Lid (76.25.18)
Glove Compartment (76.52.03)
Glove Compartment Lid (76.52.02)
Glove Compartment Lid Damper (76.52.22)
Glove Co
mpartment Liner (76.52.21)
Instrument Cluster Finish Panel (76.47.24)
Instrument Cluster Finish Panel Bezel (88.20.33)
Instrument Panel (76.46.01)
Instrument Panel Finish Panel (76.47.06)
Instrument Panel Lower Trim Panel (76.46.11)
Overhead Console (76.13.69)
Page 2061 of 2490

Interior Trim and Ornamentation - Door Window Control Switch Finish
Panel
Removal and Installation
Removal
Installation
1.
Remove door casing veneer panel. Refer to 76.47.11.
2. Remove door casing. Refer to 76.34.01.
3. Remove door armrest and remo ve switchpack assembly from
armrest. Refer to 76.34.22.
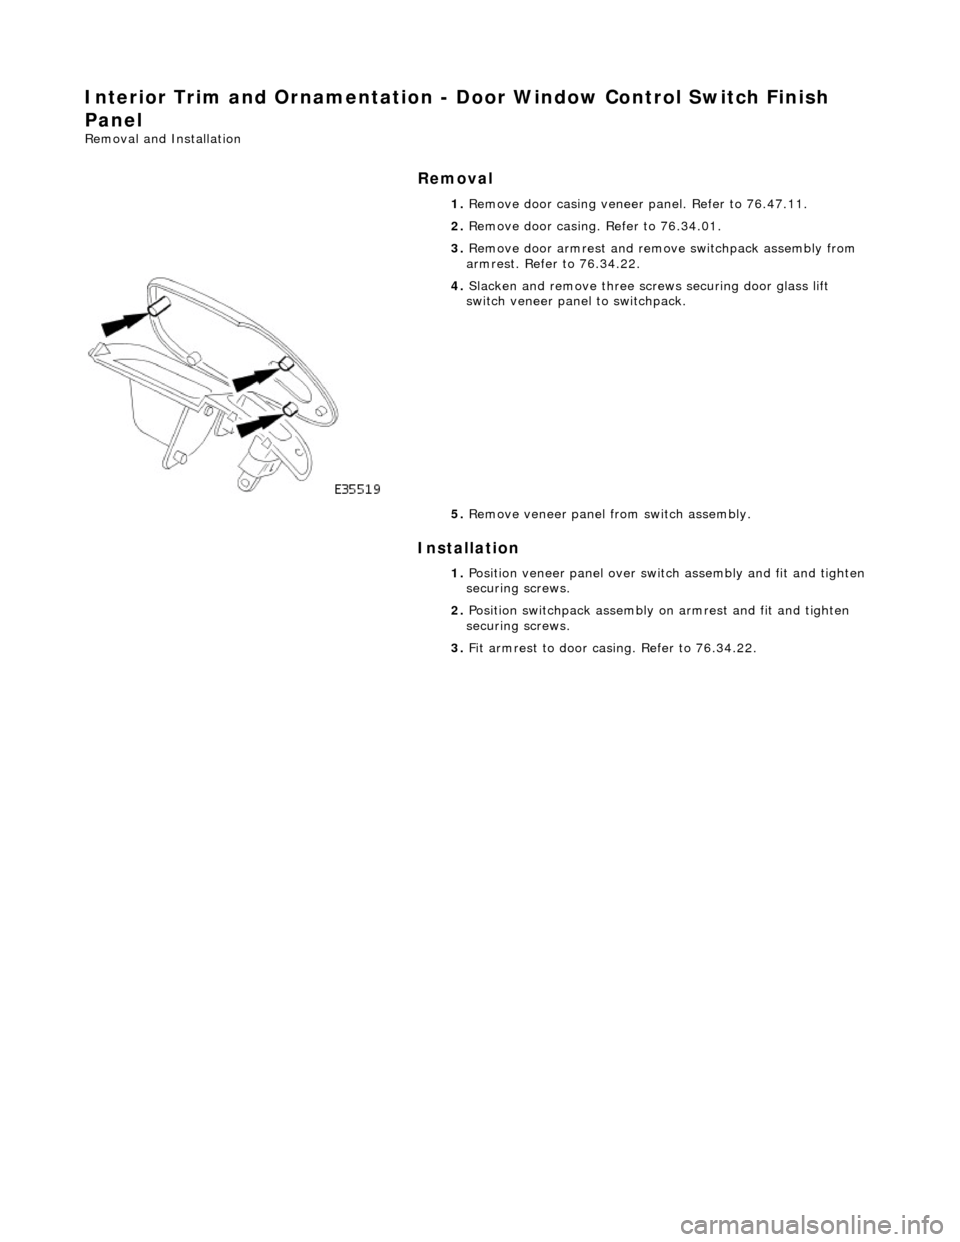
4. Slacken and remove th ree screws securing door glass lift
switch veneer panel to switchpack.
5. Remove veneer panel from switch assembly.
1. Position veneer panel over swit ch assembly and fit and tighten
securing screws.
2. Position switchpack assembly on armrest and fit and tighten
securing screws.
3. Fit armrest to door casing. Refer to 76.34.22.
Page 2076 of 2490

Interior Trim and Ornamentation - Headliner
Removal and Installation
Removal
Vehicles with roof opening panel
All vehicles
1. Remove the roof opening panel trim.
For additional information, refer to: Roof Opening Panel Trim
(501-17 Roof Opening Panel, Removal and Installation).
2. Remove both C-pill ar trim panels.
For additional information, refer to: C
-Pillar Trim Panel (501-05
Interior Trim and Ornamentatio n, Removal and Installation).
3. Remove both A-pill ar trim panels.
For additional information, refer to: A
-Pillar Trim Panel (501-05
Interior Trim and Ornamentatio n, Removal and Installation).
4. Remove the overhead console.
For additional information, refer to: Overhead Console
(501-12
Instrument Panel and Console, Removal and Installation).
5. Remove the rear window glass.
For additional information, refer to: Rear Window Glass
(501-
11 Glass, Frames and Mechanis ms, Removal and Installation).
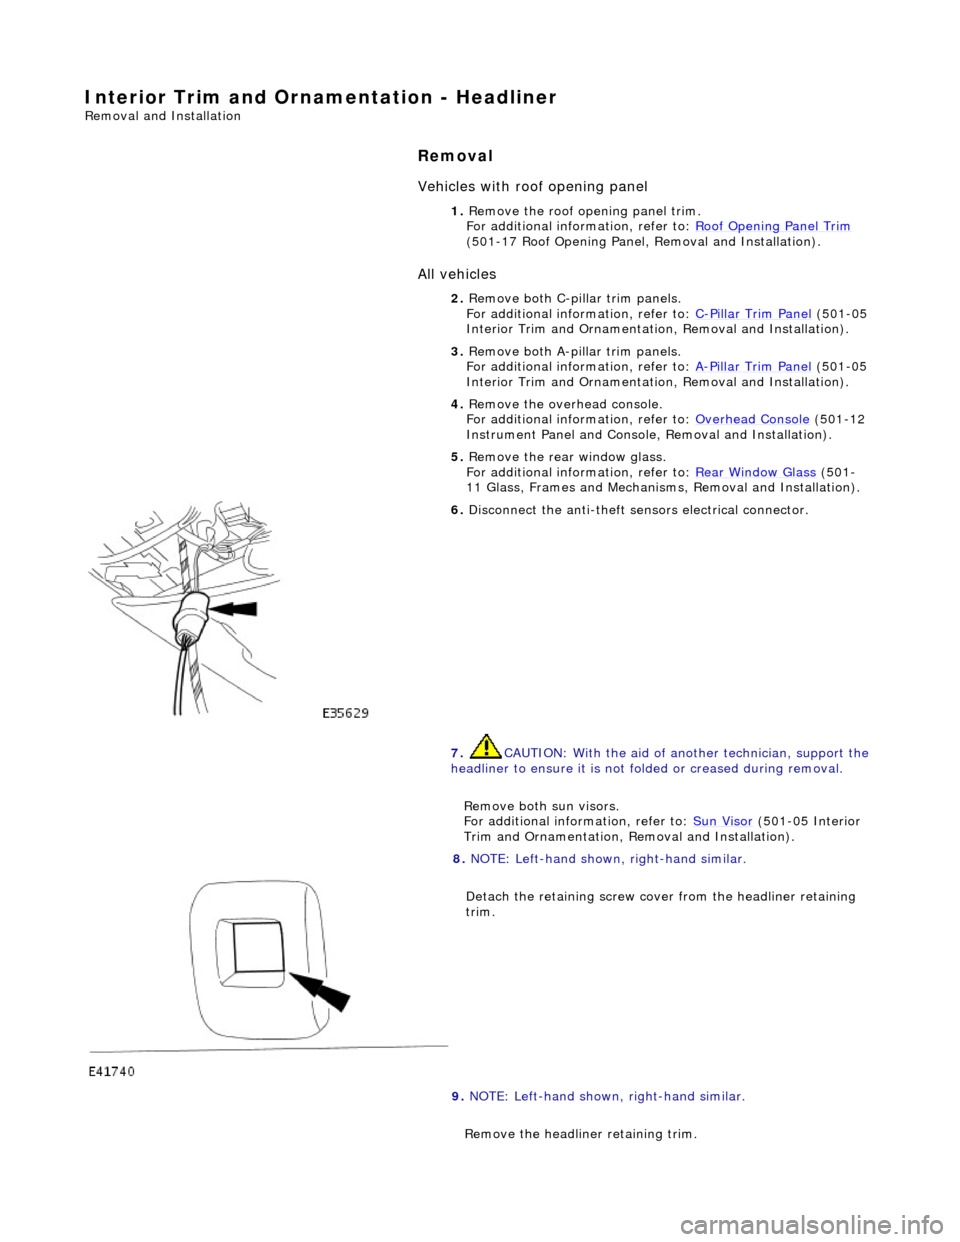
6. Disconnect the anti-theft se nsors electrical connector.
7. CAUTION: With the aid of an other technician, support the
headliner to ensure it is not folded or creased during removal.
Remove both sun visors.
For additional information, refer to: Sun Visor
(501-05 Interior
Trim and Ornamentation, Re moval and Installation).
8. NOTE: Left-hand shown, right-hand similar.
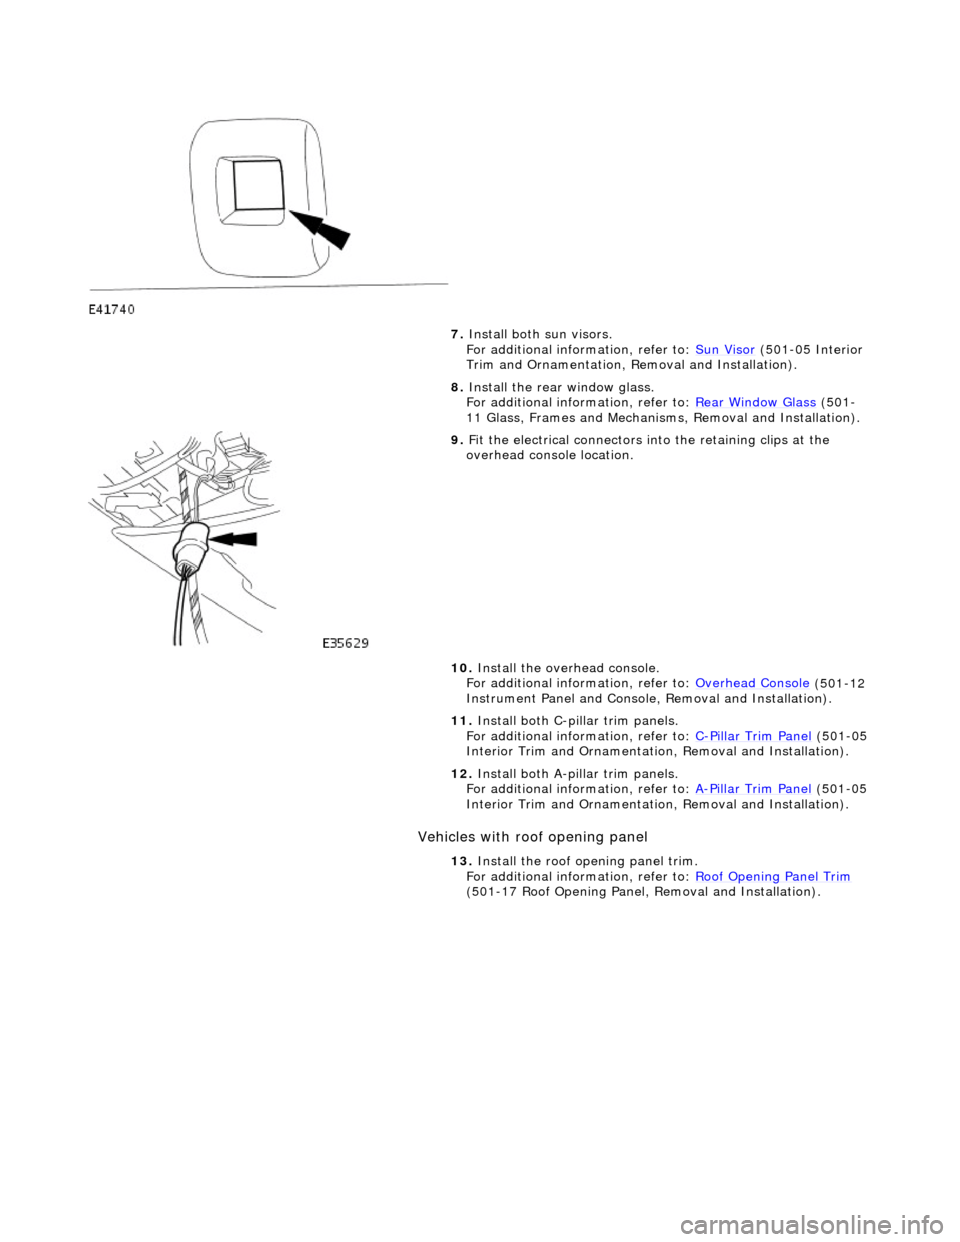
Detach the retaining screw cove r from the headliner retaining
trim.
9. NOTE: Left-hand shown, right-hand similar.
Remove the headline r retaining trim.
Page 2079 of 2490

Vehicles with roof opening panel
7. Install both sun visors.
For additional information, refer to: Sun Visor (501-05 Interior
Trim and Ornamentation, Re moval and Installation).
8. Install the rear window glass.
For additional information, refer to: Rear Window Glass
(501-
11 Glass, Frames and Mechanis ms, Removal and Installation).
9. Fit the electrical connectors into the retaining clips at the
overhead console location.
10. Install the overhead console.
For additional information, refer to: Overhead Console
(501-12
Instrument Panel and Console, Removal and Installation).
11. Install both C-pillar trim panels.
For additional information, refer to: C
-Pillar Trim Panel (501-05
Interior Trim and Ornamentatio n, Removal and Installation).
12. Install both A-pillar trim panels.
For additional information, refer to: A
-Pillar Trim Panel (501-05
Interior Trim and Ornamentatio n, Removal and Installation).
13. Install the roof opening panel trim.
For additional information, refer to: Roof Opening Panel Trim
(501-17 Roof Opening Panel, Removal and Installation).
Page 2095 of 2490

Interior Trim and Ornamentation - Rear Window Blind
Removal and Installation
Removal
Installation
1.
Remove rear seat cushion. Refer to 76.73.18.
2. Remove rear seat squa b. Refer to 76.70.38.
3. Remove rear parcel tray. Refer to 76.67.06.90
4. Place parcel tray face down on clean bench.
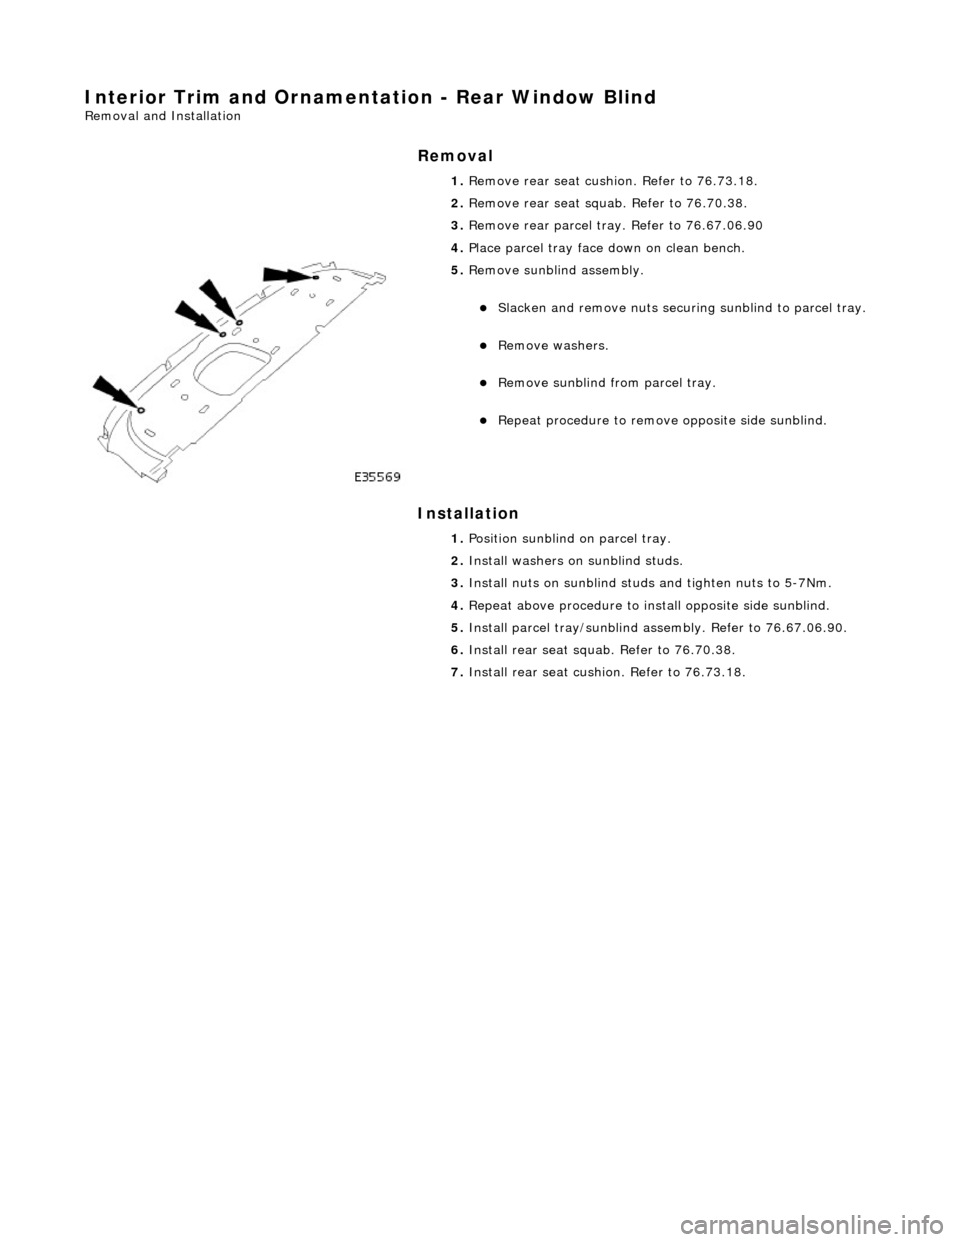
5. Remove sunblind assembly.
Slacken and remove nuts securing sunblind to parcel tray.
Remove washers.
Remove sunblind from parcel tray.
Repeat procedure to remove opposite side sunblind.
1. Position sunblind on parcel tray.
2. Install washers on sunblind studs.
3. Install nuts on sunblind stud s and tighten nuts to 5-7Nm.
4. Repeat above procedure to inst all opposite side sunblind.
5. Install parcel tray/sunblind as sembly. Refer to 76.67.06.90.
6. Install rear seat squa b. Refer to 76.70.38.
7. Install rear seat cushio n. Refer to 76.73.18.