Page 225 of 278

Compact Spare Tire
Your vehicle has a compact spare tire that takes up less space. Use thisspare tire as a temporary replace-
ment only. Get your regular tire
repaired or replaced and put back on
your vehicle as soon as you can.
Check the inflation pressure of the
compact spare tire every time you
check the other tires. It should be
inflated to: 60 psi (420 kPa , 4.2 kgf/cm2) Follow these precautions whenever
you are using the compact spare tire: Do not exceed 50 mph (80 km/h)
under any circumstances.
This tire gives a harsher ride and
less traction on some road sur-
faces than the regular tire. Use
greater caution while driving on
this tire.
Do not mount snow chains on the
compact spare.
The wheel of the compact spare
tire is designed especially to fit
your vehicle. Do not use your
spare tire on another vehicle
unless it is the same make and
model.
The compact spare tire has a shorter
tread life than a regular tire. Replace
it when you can see the tread wear
indicator bars. The replacement should be the same size and design
tire, mounted on the same wheel.
The compact spare tire is not designed to be mounted on a regular
wheel, and the compact wheel is not designed for mounting a regular tire.
Taking Care of the Unexpected INDICATOR
LOCATION
MARK
TREAD WEARINDICATOR
BARProCarManuals.comMain Menu Table of Contents s t
Page 226 of 278

Changing a Flat Tire
If you have a flat tire while driving, stop in a safe place to change it.
Stopping in traffic or on the shoulder
of a busy road is dangerous. Drive slowly along the shoulder until you
get to an exit or an area to stop that is far away from the traffic lanes.
1. Park the vehicle on firm, levelground away from traffic. Turn on
the hazard warning lights and turnthe ignition switch to LOCK (0).
2. Put the transmission in Park (automatic) or Reverse (manual).
Apply the parking brake. Have all of the passengers get out of the
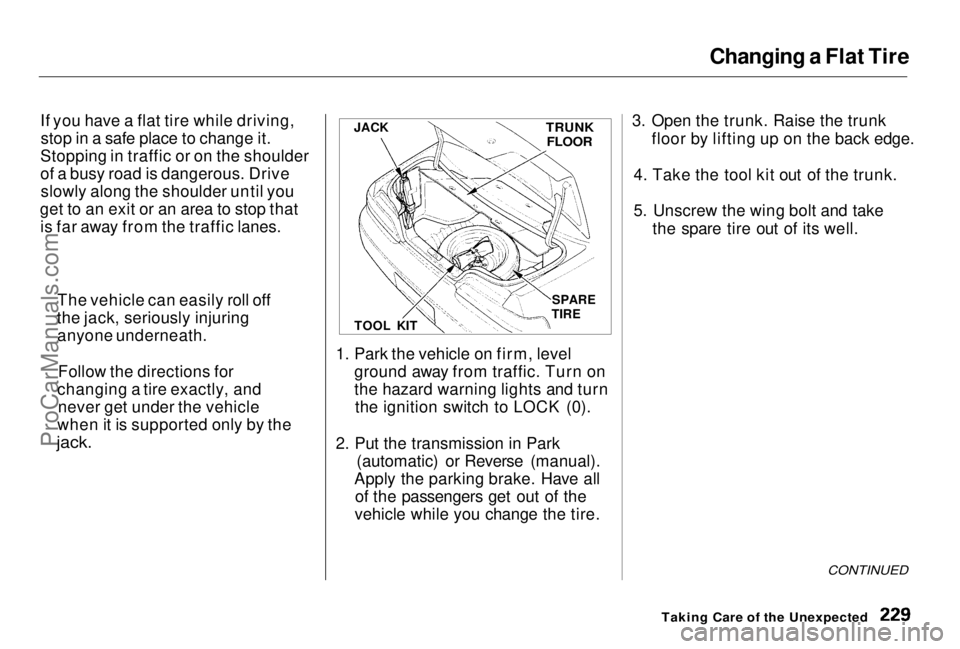
vehicle while you change the tire. 3. Open the trunk. Raise the trunk
floor by lifting up on the back edge.
4. Take the tool kit out of the trunk.
5. Unscrew the wing bolt and take the spare tire out of its well.
CONTINUED
Taking Care of the Unexpected
The vehicle can easily roll off
the jack, seriously injuring anyone underneath.
Follow the directions for
changing a tire exactly, and never get under the vehicle
when it is supported only by the
jack.
JACK
TRUNK
FLOOR
TOOL KIT SPARE
TIREProCarManuals.comMain Menu Table of Contents s t
Page 227 of 278
Changing a Flat Tire
6. The jack is behind a cover in the left fender. Remove the cover by
turning the handle clockwise, thenpulling on the cover. 7. Turn the jack's end bracket
counterclockwise to loosen it, then
remove the jack. 8. Loosen the five wheel nuts 1/2
turn with the wheel wrench.
Taking Care of the Unexpected
HANDLE
COVER JACK
WHEEL WRENCHProCarManuals.comMain Menu Table of Contents s t
Page 228 of 278
Changing a Flat Tire
9. Locate the jacking point nearest the tire you need to change. It is
pointed to by A mark molded intothe underside of the body. Place
the jack under the jacking point.
Turn the end bracket clockwise until the top of the jack contacts
the jacking point. Make sure the
jacking point tab is resting in the
jack notch. 10. Use the extension and wheel
wrench as shown to raise the
vehicle until the flat tire is off the
ground.
11. Re move the wheel nuts and flat
tire. Temporarily place the flat tire
on the ground with the outside
surface of the wheel facing up.
You could scratch the wheel if you
put it face down.
CONTINUED
Taking Care of the Unexpected
JACKING
POINT WHEEL
WRENCH
EXTENSIONProCarManuals.comMain Menu Table of Contents s t
Page 229 of 278
Changing a Flat Tire
12. Before mounting the spare tire, wipe any dirt off the mounting
surface of the wheel and hub with
a clean cloth. Wipe the hub
carefully, it may be hot from
driving.
13. Put on the spare tire. Put the
wheel nuts back on finger-tight,
then tighten them in a crisscross
pattern with the wheel wrench
until the wheel is firmly against
the hub. Do not try to tighten
them fully.
14. Lower the vehicle to the ground
and remove the jack.
Taking Care of the Unexpected BRAKE HUBProCarManuals.comMain Menu Table of Contents s t
Page 230 of 278
Changing a Flat Tire
15. Tighten the wheel nuts securely in
the same crisscross pattern. Have
the wheel nut torque checked at
the nearest automotive service
facility.
Tighten the wheel nuts to:
80 lbf .
ft (108N .
m , 11 kgf .
m)
16. Remove the center cap before
storing the flat tire in the trunk
well. 17. Place the flat tire face down in the
spare tire well.
18. Remove the spacer cone from the wing bolt, turn it over, and put it
back on the bolt.
CONTINUED
Taking Care of the Unexpected
CENTER CAP
WING BOLT
SPACER
CONEProCarManuals.comMain Menu Table of Contents s t
Page 231 of 278

Changing a Flat Tire, If Your Engine Won't Start
19. Secure the flat tire by screwing the win
g bolt back into its hole.
20. Store the jack in its holder. Turn the jack's end bracket to lock it in
place.
Replace the cover. Store the
tool kit. 21. Stor
e the center cap in the trunk.
Make
sure it does not get scratch-
ed
or damaged.
22.
Lower the trunk floor, then close
the trunk lid.
Type SH only
If yo
u mount the compact spare on
either front or rear tire, it may cause
the
ATTS indicator light in the
instrument
panel to come on due to
the
difference in tire diameter. The
light
will go out when the proper tire
is installed.
If Your Engine Won't Start
Diagnosing
why your engine won't
start falls into two areas, depending
on what you hear when you turn the
key to START (III):
You hear nothing, or almostnothing. The engine's starter
motor does not operate at all, oroperates
very slowly. You can hear the starter motor
operating normally, or the starter
motor
sounds like it is spinning
faster than normal, but the engine does
not start up and run.
Taking Car
e of the Unexpected
Loose items can fly around the
interior i
n a crash and could
seriously injure the occupants.
Store th
e wheel, jack and tools
securely before driving.
ProCarManuals.comMain Menu Table of Contents s t
Page 232 of 278

If Your Engine Won't Start
Nothing Happens or the Starter
Motor Operates Very Slowly
When you turn the ignition switch to START (III), you do not hear the
normal noise of the engine trying tostart. You may hear a clicking sound
or series of clicks, or nothing at all. Check these things: Your vehicle has the Immobilizer
System. You should use a
properly-coded master or valet key
to start the engine (see page 69).
A key that is not properly coded will cause the immobilizer systemindicator in the dash panel to blinkrapidly. Check the transmission interlock.
If you have a manual transmission,
the clutch pedal must be pushed all the way to the floor or the
starter will not operate. With an
automatic transmission, it must be
in Park or Neutral. Turn the ignition switch to ON (II).
Turn on the headlights and check
their brightness. If the headlightsare very dim or don't light at all,
the battery is discharged. See
Jump Starting on page 236.
Turn the ignition switch to START
(III). If the headlights do not dim,
check the condition of the fuses. If
the fuses are OK, there is proba-
bly something wrong with the electrical circuit for the ignitionswitch or starter motor. You will
need a qualified technician to
determine the problem. (See
Towing on page 250.) If the headlights dim noticeably or
go out when you try to start the
engine, either the battery is dis-
charged or the connections are
corroded. Check the condition of
the battery and terminal connec- tions (see page 190). You can
then try jump starting the vehicle
from a booster battery (see page
236).
Taking Care of the UnexpectedProCarManuals.comMain Menu Table of Contents s t