Page 57 of 272

Gauges
The gauge does not stay at the same fuel level reading after you turn off
the ignition. When you add fuel, the
gauge slowly changes to the new
reading after you turn the ignitionswitch back ON (II).
Maintenance Required
Indicator
This indicator reminds you that it is time to take your vehicle in for sched-
uled maintenance.Refer to the Maintenance Schedules
for Normal and Severe Driving Conditions on pages 164 — 168 .
For the first 6,000 miles (9,600 km)
after the Maintenance Required
Indicator is reset, it will come on for
two seconds when you turn the
ignition switch ON (II).
Between 6,000 miles (9,600 km) and
7,500 miles (12,000 km) this
indicator will light for two seconds
when you first turn the ignition switch ON (II), and then flash for
ten seconds.
If you exceed 7,500 miles (12,000
km) without having the scheduled
maintenance performed, this
indicator will remain on as a constant
reminder.
Your dealer will reset this indicator after completing the scheduled
maintenance. If this maintenance is done by someone other than your
Honda dealer, reset the indicator as
follows.
1. Turn off the engine.
2. Press and hold the select/reset button in the instrument panel,
then turn the ignition switch ON
(II).
3. Hold the button for about ten sec- onds, until the indicator resets. Low Fuel Indicator
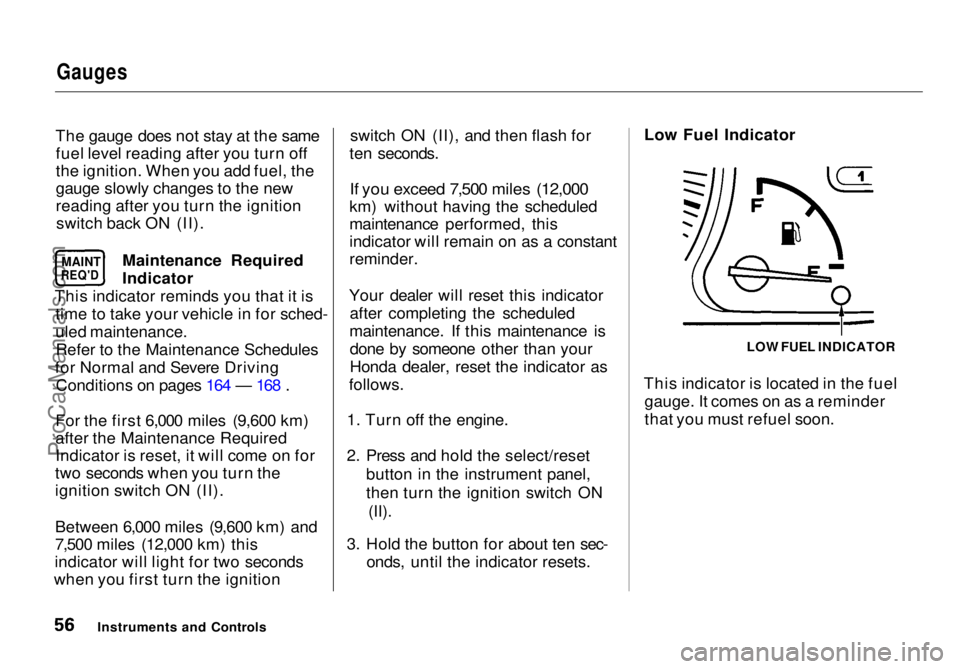
This indicator is located in the fuel gauge. It comes on as a reminder
that you must refuel soon.
Instruments and Controls LOW FUEL INDICATOR
MAINT
REQ'DProCarManuals.comMain Menu Table of Contents s t
Page 68 of 272

Keys and Locks
Keys
Your vehicle comes with two kinds of keys: a master key and a valet key.
The master key fits all locks on your
vehicle:
Ignition
Doors
Glove box
Tailgate
The valet key works only in the
ignition and the door locks. You can
keep the glove box locked when you
leave your vehicle and valet key at a parking facility.
You should have received a key number plate with your keys. You
will need this key number if you ever have to get a lost key replaced. Keep
the plate stored in a safe place. If you
need to replace a key, use only
Honda-approved key blanks.
These keys contain electronic circuits that arc activated by theImmobilizer System. They will not
work to start the engine if the circuits are damaged. Protect the keys from direct
sunlight, high temperature, and
high humidity. Do not drop the keys or set heavy
objects on them. Keep the keys away from liquids.
If they get wet, dry them immedi-
ately with a soft cloth.
The keys do not contain batteries. Do not try to take them apart.
Remote Transmitter
Some models also come with two
remote transmitters; see page 71 for
an explanation of the operation.
Instruments and Controls
KEY
NUMBER
PLATE
MASTER
KEY
(BLACK)
VALET KEY
(GRAY)ProCarManuals.comMain Menu Table of Contents s t
Page 69 of 272

Keys and Locks
Immobilizer System
The Immobilizer System protects
your vehicle from theft. A properly- coded master or valet key must be
used in the ignition switch for the
engine to start. If an improperly-
coded key (or other device) is used,
the engine's starting circuit is
disabled.
When you turn the ignition switch to ON (II), the Immobilizer System
indicator should come on for a few seconds, then go out. If the indicator
starts to blink, it means the system
does not recognize the coding of the
key. Turn the ignition switch to LOCK (0), remove the key, reinsert
it, and turn the switch to ON (II)
again.
If the system repeatedly does not
recognize the coding of your key,
contact your Honda dealer.
This indicator will also blink several times when you turn the ignitionswitch from ON (II) to ACCESSORY (I) or LOCK (0).
The system may not recognize your key's coding if the key is in contact
with a key from another immobilizer system. If you have a key from
another vehicle's immobilizer system,
keep it separate.
Do not attempt to alter this system
or add other devices to it. Electrical
problems could result that may make
your vehicle undriveable.
If you have lost your key and you
cannot start the engine, contact your
Honda dealer. As required by the FCC:
This device complies with Part 15 of the
FCC rules. Operation is subject to the
following two conditions: (1) This device
may not cause harmful interference, and (2) this device must accept any
interference received, including interference that may cause undesired operation.
Changes or modifications not expressly
approved by the party responsible for compliance could void the user's
authority to operate the equipment.
Instruments and ControlsProCarManuals.comMain Menu Table of Contents s t
Page 71 of 272
Keys and Locks
ACCESSORY (I) — In this position, you can operate the audio systemand the cigarette lighter.
ON (II) — This is the normal key
position when driving. All features and accessories on the vehicle are
usable. Several of the lights on the
instrument panel come on as a test
when you turn the ignition switch
from ACCESSORY to ON (see page 51). START (III) — Use this position
only to start the engine. The switch
returns to ON (II) when you let go of
the key.
The engine will not start if the Immobilizer System does not
recognize the key's coding (see page 68).
Each front door has a master door
lock switch. Either switch locks andunlocks all doors. Push the switch
down to lock all doors, and up to
unlock them. The lock tab on the
tailgate also locks and unlocks when
you use the master door lock switch.
Instruments and Controls Power Door Locks
MASTER DOOR LOCK SWITCHProCarManuals.comMain Menu Table of Contents s t
Page 96 of 272
Heating and Cooling
Vent Controls
You can adjust the direction of the air coming from the dashboard vents
by moving the tab in the center of
each vent up-and-down and side-to-
side.
CORNER VENT
The vents in the corners of the dashboard can be opened and closed
with the dials next to them. How to Use the System
This section covers how to set up the system controls for ventilation,
heating, cooling, dehumidifying, and defrosting.
The engine must be running for the heater and air conditioning to
generate hot and cold air. The heateruses engine coolant to warm the air.
If the engine is cold, it will be several
minutes before you feel warm air
coming from the system.
The air conditioning does not rely on engine temperature.
Comfort and Convenience Features
CENTER VENTProCarManuals.comMain Menu Table of Contents s t
Page 98 of 272

Heating and Cooling
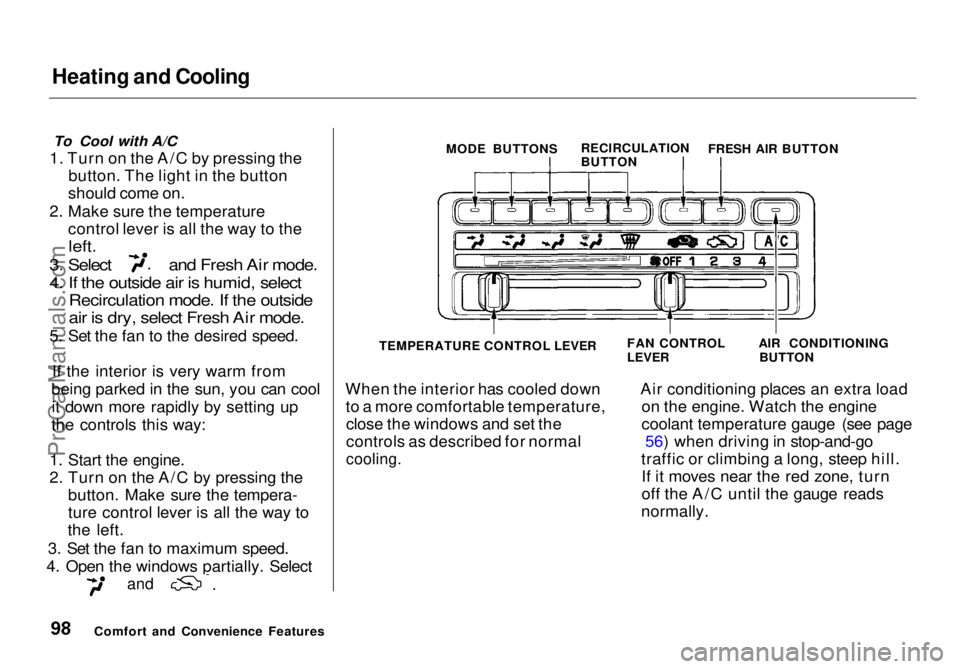
To Cool with A/C
1. Turn on the A/C by pressing the button. The light in the button
should come on.
2. Make sure the temperature control lever is all the way to the
left.
3. Select and Fresh Air mode.
4. If the outside air is humid, select
Recirculation mode. If the outside
air is dry, select Fresh Air mode.
5. Set the fan to the desired speed.
If the interior is very warm from
being parked in the sun, you can cool it down more rapidly by setting up
the controls this way:
1. Start the engine.
2. Turn on the A/C by pressing the button. Make sure the tempera-
ture control lever is all the way to
the left.
3. Set the fan to maximum speed.
4. Open the windows partially. Select
and
When the interior has cooled down
to a more comfortable temperature,close the windows and set the
controls as described for normal
cooling.
Air conditioning places an extra load
on the engine. Watch the engine
coolant temperature gauge (see page 56) when driving in stop-and-go
traffic or climbing a long, steep hill. If it moves near the red zone, turn
off the A/C until the gauge reads
normally.
Comfort and Convenience Features MODE BUTTONS
RECIRCULATION
BUTTONFRESH AIR BUTTON
TEMPERATURE CONTROL LEVER
FAN CONTROL
LEVER
AIR CONDITIONING
BUTTONProCarManuals.comMain Menu Table of Contents s t
Page 99 of 272

Heating and Cooling
To Heat
To warm the interior:
1. Start the engine. 2. Select and
3. Set the fan to the desired speed.
4. Adjust the warmth of the air with the temperature control lever.
To Heat and Dehumidify with Air
Conditioning
Air conditioning, as it cools, removes moisture from the air. When used incombination with the heater, it
makes the interior warm and dry.
1. Switch the fan on.
2. Turn on the air conditioning. 3. Select and
4. Adjust the temperature control
lever so the mixture of heated and
cooled air feels comfortable.
This setting is suitable for all driving conditions whenever the outside
temperature is above 32°F (0°C).
To Defog and Defrost
To remove fog from the inside of the windows:
1. Switch the fan on.
2. Turn on the air conditioning. 3. Select and
4. Adjust the temperature control
lever so the airflow from the
defroster vents feels warm.
5. Turn on the rear window defogger to help clear the rear window.
CONTINUED
Comfort and Convenience FeaturesProCarManuals.comMain Menu Table of Contents s t
Page 100 of 272
Heating and Cooling
To remove exterior frost or ice from the windshield and side windowsafter the vehicle has been sitting out
in cold weather:
1. Start the engine. 2. Select and
3. Switch the fan and temperature
controls to maximum.
To rapidly remove exterior frost or ice from the windshield (on very cold days), first select Once the
windshield is clear, select to
avoid fogging the windows.
Comfort and Convenience Features MODE BUTTONS
RECIRCULATION
BUTTON FRESH AIR BUTTON
TEMPERATURE
CONTROL LEVER FAN CONTROL
LEVER
AIR CONDITIONING
SWITCHProCarManuals.comMain Menu Table of Contents s t