1998 HONDA ODYSSEY ESP
[x] Cancel search: ESPPage 69 of 272

Keys and Locks
Immobilizer System
The Immobilizer System protects
your vehicle from theft. A properly- coded master or valet key must be
used in the ignition switch for the
engine to start. If an improperly-
coded key (or other device) is used,
the engine's starting circuit is
disabled.
When you turn the ignition switch to ON (II), the Immobilizer System
indicator should come on for a few seconds, then go out. If the indicator
starts to blink, it means the system
does not recognize the coding of the
key. Turn the ignition switch to LOCK (0), remove the key, reinsert
it, and turn the switch to ON (II)
again.
If the system repeatedly does not
recognize the coding of your key,
contact your Honda dealer.
This indicator will also blink several times when you turn the ignitionswitch from ON (II) to ACCESSORY (I) or LOCK (0).
The system may not recognize your key's coding if the key is in contact
with a key from another immobilizer system. If you have a key from
another vehicle's immobilizer system,
keep it separate.
Do not attempt to alter this system
or add other devices to it. Electrical
problems could result that may make
your vehicle undriveable.
If you have lost your key and you
cannot start the engine, contact your
Honda dealer. As required by the FCC:
This device complies with Part 15 of the
FCC rules. Operation is subject to the
following two conditions: (1) This device
may not cause harmful interference, and (2) this device must accept any
interference received, including interference that may cause undesired operation.
Changes or modifications not expressly
approved by the party responsible for compliance could void the user's
authority to operate the equipment.
Instruments and ControlsProCarManuals.comMain Menu Table of Contents s t
Page 73 of 272
Keys and Locks
If you use the unlock feature on the
remote transmitter, and a door or the
tailgate is not opened within 20 seconds, all doors and the tailgate
will automatically lock. The remote transmitter will not work if the key isin the ignition.
As required by the FCC: This device complies with Part 15 of the
FCC rules. Operation is subject to the
following two conditions: (1) This device may not cause harmful interference, and (2) this device must accept any
interference received, including
interference that may cause undesired operation.
Changes or modifications not expressly
approved by the party responsible for compliance could void the user's
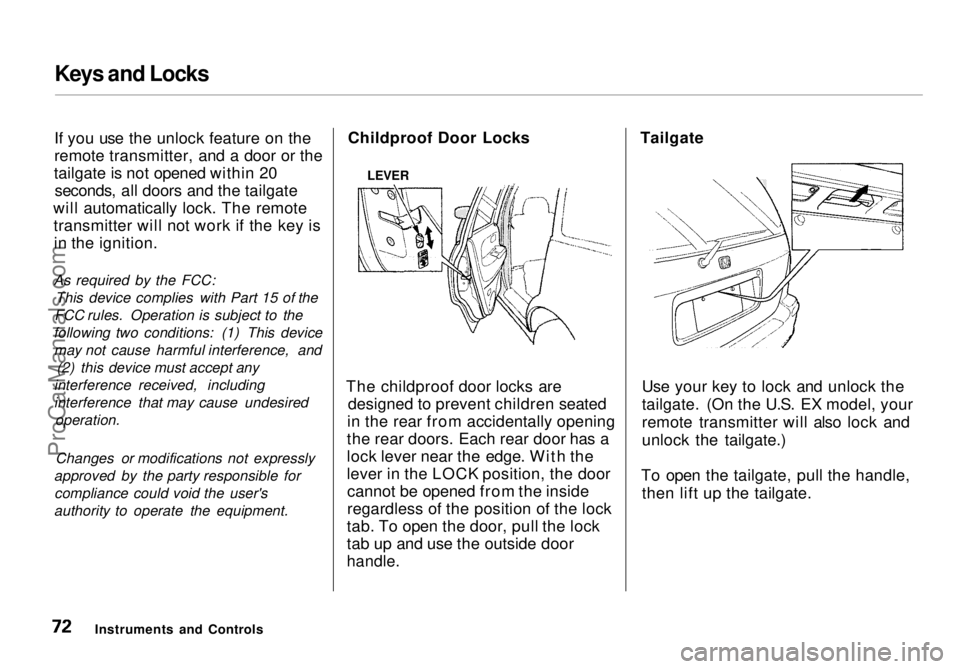
authority to operate the equipment. Childproof Door Locks
The childproof door locks are designed to prevent children seated
in the rear from accidentally opening
the rear doors. Each rear door has a
lock lever near the edge. With the
lever in the LOCK position, the door cannot be opened from the inside
regardless of the position of the lock
tab. To open the door, pull the lock
tab up and use the outside door
handle.
Tailgate
Use your key to lock and unlock the
tailgate. (On the U.S. EX model, your
remote transmitter will also lock and
unlock the tailgate.)
To open the tailgate, pull the handle, then lift up the tailgate.
Instruments and Controls
LEVERProCarManuals.comMain Menu Table of Contents s t
Page 93 of 272
Comfort and Convenience Features
The heating and air conditioning systems in your Honda provide a
comfortable driving environment in all weather conditions.
The standard audio system has
many features. This section de-
scribes those features and how to
use them. (If you selected an optional audio system, refer to the
operating instructions that came
with it.)
Some models have an anti-theft
audio system that requires a code
number to enable it.
Heating and Cooling........................ 94
What Each Control Does............ 94How to Use the System............... 96
To Turn Everything Off........... 101
Rear A/C Unit............................ 102
Audio System (U.S. LX and
Canadian EX)......................... 103
Operating the Radio.................. 104
Adjusting the Sound.................. 106
Audio System Lighting............. 106
Radio Frequencies and Reception................................ 106
Operating the Cassette Player...................................... 107
Tape Search Functions............. 108 Caring for Cassettes.................. 109
Operating the Optional CD Player/Changer..................... 110
Audio System (U.S. EX)................ 112 Operating the Radio.................. 113
Adjusting the Sound.................. 116 Radio Frequencies..................... 117
Radio Reception......................... 117
Operating the Cassette Player...................................... 119
Tape Search Functions............. 120 Caring for the Cassette
Player...................................... 121
Operating the Optional CD Player/Changer..................... 122
Protecting Compact Discs........ 124 CD Changer Error
Indications.............................. 125
Theft Protection........................ 126
Comfort and Convenience FeaturesProCarManuals.comMain Menu s t
Page 95 of 272
Heating and Cooling
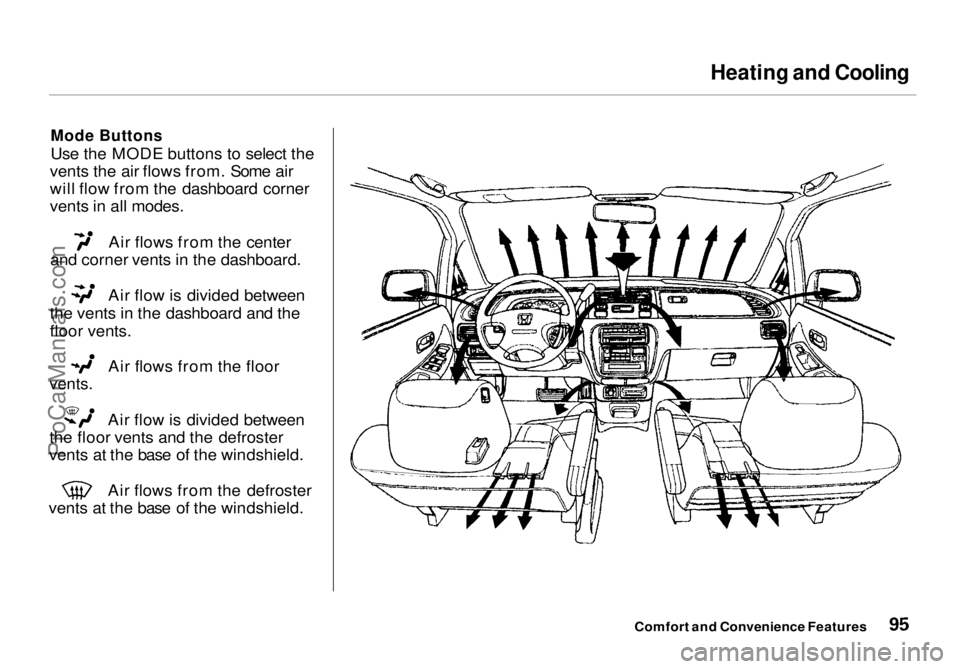
Mode Buttons
Use the MODE buttons to select the
vents the air flows from. Some air
will flow from the dashboard corner
vents in all modes. Air flows from the center
and corner vents in the dashboard. Air flow is divided between
the vents in the dashboard and the
floor vents. Air flows from the floor
vents.
Air flow is divided between
the floor vents and the defroster
vents at the base of the windshield. Air flows from the defroster
vents at the base of the windshield.
Comfort and Convenience FeaturesProCarManuals.comMain Menu Table of Contents s t
Page 99 of 272
Heating and Cooling
To Heat
To warm the interior:
1. Start the engine. 2. Select and
3. Set the fan to the desired speed.
4. Adjust the warmth of the air with the temperature control lever.
To Heat and Dehumidify with Air
Conditioning
Air conditioning, as it cools, removes moisture from the air. When used incombination with the heater, it
makes the interior warm and dry.
1. Switch the fan on.
2. Turn on the air conditioning. 3. Select and
4. Adjust the temperature control
lever so the mixture of heated and
cooled air feels comfortable.
This setting is suitable for all driving conditions whenever the outside
temperature is above 32°F (0°C).
To Defog and Defrost
To remove fog from the inside of the windows:
1. Switch the fan on.
2. Turn on the air conditioning. 3. Select and
4. Adjust the temperature control
lever so the airflow from the
defroster vents feels warm.
5. Turn on the rear window defogger to help clear the rear window.
CONTINUED
Comfort and Convenience FeaturesProCarManuals.comMain Menu Table of Contents s t
Page 105 of 272

Audio System
You can use any of three methods to find radio stations on the selected
band: TUNE, SEEK, or the Preset
buttons.
TUNE — Use the TUNE/SEEK buttons to tune the radio to a desired frequency. Press ( ) to change
to a higher frequency, and press
( ) to tune to a lower frequency.
The frequency numbers will start to change rapidly. Release the switch
when the display reaches the desired
frequency. To change the frequency in small increments, press and
release the appropriate TUNE/
SEEK button. SEEK — The SEEK function
searches the band for a station with
a strong signal. To activate it, push
the TUNE/SEEK button until you
hear a beep, then release it. Depending on which TUNE/SEEK
button you pushed, the system scans
upward or downward from the current frequency. It stops when it
finds a station with a strong signal.
Preset — You can store the fre-
quencies of your favorite radiostations in the six preset buttons.
Each button will store one frequency on the AM band, and two on the FM
band.
To store a frequency:
1. Select the desired band, AM or FM. FM1 and FM2 let you store
two frequencies with each Preset
button.
2. Use the TUNE or SEEK function to tune the radio to a desired
station.
3. Pick the Preset button you want for that station. Press the buttonand hold it until you hear a beep.
4. Repeat steps 1 to 3 to store a total of six stations on AM and twelve
on FM.
Once a station's frequency is stored,
simply press and release the proper
Preset button to tune to it.
The preset frequencies will be lost if your vehicle's battery goes dead, is disconnected, or the radio fuse is
removed.
Comfort and Convenience FeaturesProCarManuals.comMain Menu Table of Contents s t
Page 111 of 272
Audio System
To select a different disc, press the appropriate preset button (1 — 6). If
you select an empty slot in the magazine, the changer will, after
finding that slot empty, try to load
the CD in the next slot. Thiscontinues until it finds a CD to load
and play.
You can use the TUNE/SEEK buttons to select tracks within a disc. Push and release the appropriate
TUNE/SEEK button, the system will move to the beginning of a track. Press the button to move to the
beginning of the next track, and press the button to move to the
beginning of the current track.
If you press and hold the TUNE/
SEEK button, you will hear a beep
and the system will continue to move
across tracks. Release the button
when you think it has reached the desired place on the disc. REPEAT — When you activate the
Repeat feature by pressing the RPT
button, the system continuously
replays the current track. You will see RPT in the display as a reminder.
Press the RPT button again to turn it
off.
To take the system out of CD mode, press the AM or FM button, or inserta cassette in the player. When you
return to CD mode, play will contin-
ue at the same disc and track.
If you turn the system off while a CD
is playing, either with the PWR/VOL
knob or the ignition switch, play will continue at the same disc and track
when you turn it back on.
Protecting Compact Discs
For information on how to handle
and protect compact discs, see page
104.
CD Changer Error Indications
For information on the meaning of
the CD Error Indications and what to do when you see those indications,
refer to page 125 .
Comfort and Convenience FeaturesProCarManuals.comMain Menu Table of Contents s t
Page 113 of 272

Audio System
Operating the Radio
The ignition switch must be in
ACCESSORY (I) or ON (II) to operate the audio system. Turn thesystem on by pushing the PWR/
VOL knob.
Adjust the volume by turning the PWR/VOL knob.
The band and frequency that the radio was last tuned to is displayed.
To change bands, press the AM/FM 1-2 button. On the FM band, ST will
be displayed if the station is broad- casting in stereo. Stereo reproduc-
tion on AM is not available.
You can use any of three methods to find radio stations on the selected
band: TUNE, SEEK, or the Preset
buttons.
TUNE — Use the TUNE/SEEK
switch to tune the radio to a desired
frequency. Push the switch up to tune to a higher frequency, and push
the switch down to tune to a lower
frequency. The frequency numbers
will start to change rapidly. Release the switch when the display reaches
the desired frequency. To change
the frequency in small increments,
push and release the TUNE/SEEK switch quickly. SEEK — The SEEK function
searches the band for a station with
a strong signal. To activate it, push
the TUNE/SEEK switch until you
hear a beep, then release it.
Depending on which way you pushed
the switch, the system scans upward or downward from the current
frequency. It stops when it finds a station with a strong signal.
Preset — You can store the fre-
quencies of your favorite radiostations in the six preset buttons.
Each button will store one frequency on the AM band, and two on the FM
band.
CONTINUED
Comfort and Convenience FeaturesProCarManuals.comMain Menu Table of Contents s t