Page 1217 of 1681
Lighting System
OAYTIMERESISTOR (Can.dal
Test, page 23-168
HEADLIGHTS
Component Locations Index
HIGH BEAM INDICATOR LIGHT{ln the galge assembly}Bulb Locations. page 23-122
COMAINATION LIGHT SwlTCHReplscement, page 23-168Test, page 23-162
Adjustment, page 23-170Replacement, page 23-170
CONTBOL UNIT {Can.d.)Input, Test page 23-164
23-160
Page 1218 of 1681
!/ Hatchback:
Sedan:
LICENSE PALTE LIGHTSReplacement, page 23-177
TAILLIGHT. Replacement, page 23 174. Bulb r€placement, page 23-174
LICENSE PALTE LIGHTSReplacement, page 23-177
INNER TAILI-IGHT. Replacement, page 23-175. Bulb replacement, page 23-176
. Replacement, page 23-175.8ulb replacement, page 23'176
23-161
Page 1222 of 1681

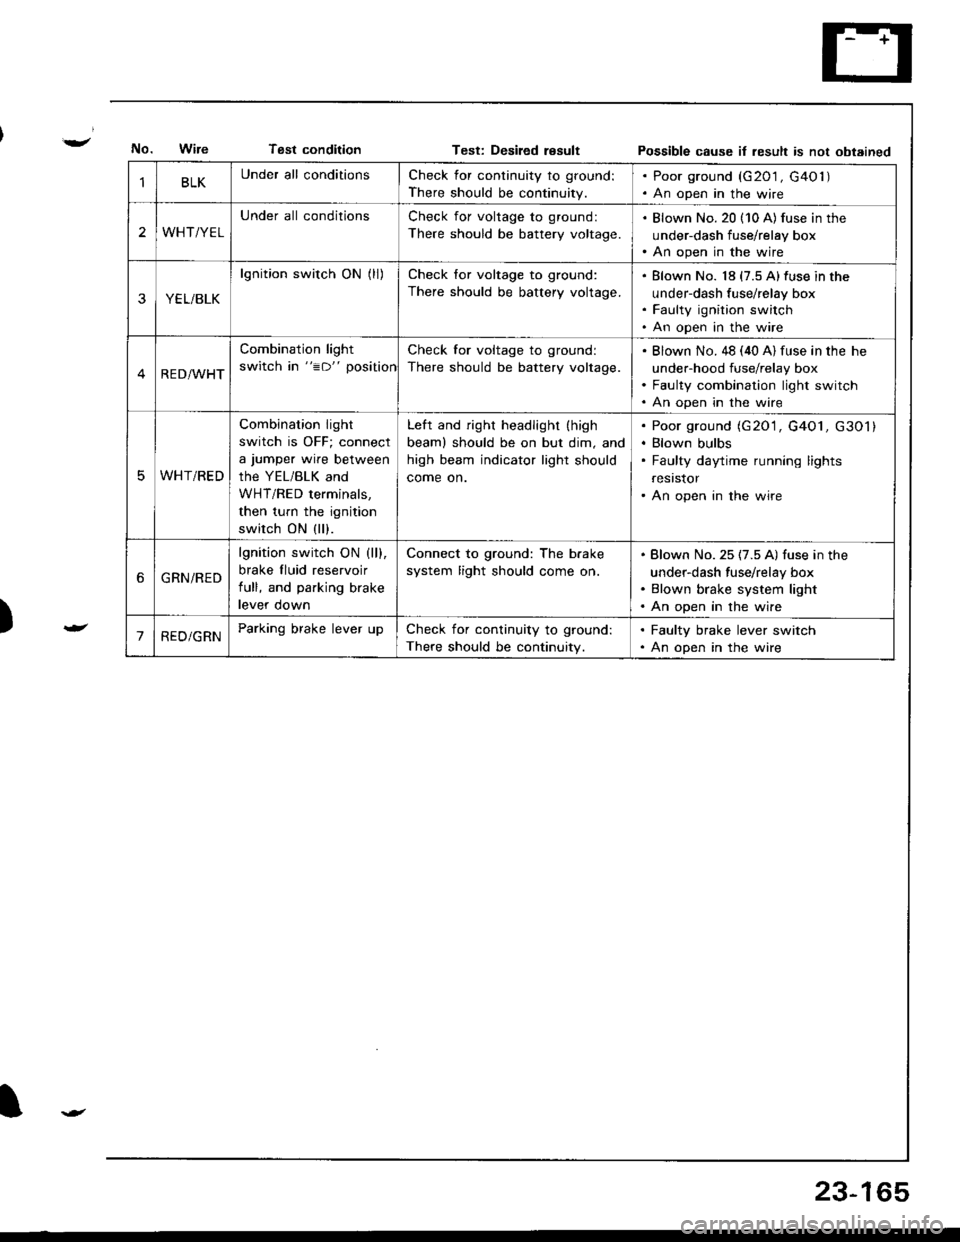
Tsst conditionTest: Desiled resultPossible cause it result is not obtained
)
BLKUnder all conditionsCheck for continuity to ground:
There should be continuity.
. Poor ground (G201 , G40l ). An open in the wire
2WHT/YEL
Under all conditionsCheck for voltage to ground:
There should be battery voltage.
. Blown No. 20 (10 A) fus€ in the
under-dash fuse/relay box. An open in the wire
YEL/BLK
lgnition switch ON (ll)Check for voltage to ground:
There should be battery voltage.
Blown No. 18 (7.5 A)fuse in the
under-dash fuse/relay box
Faulty ignition switch
An open in the wire
RED/WHT
Combination light
switch in "=D" position
Check for voltage to ground:
There should be battery voltage.
Blown No. 48 (40 A) fuse in the he
under-hood fuse/relay box
Faulty combination light switch
An open in the wire
WHT/RED
Combination light
switch is OFF; connect
a jumper wire between
the YEL/BLK and
WHT/RED terminals,
then turn the ignition
switch ON (ll).
Left and right headlight (high
beaml should be on but dim, and
high beam indicator light should
come on.
Poor ground (G20'1, G4O1, G301)
Blown bulbs
Faulty daytime running lights
resrstor
An open in the wire
6GRN/RED
lgnition switch ON (ll).
brake fluid reservoir
full, and parking brake
levef oown
Connect to ground: The b.ake
system light should come on.
Blown No. 25 (7.5 A) fuse in the
under-dash fuse/relay box
Blown brake system light
An open in the wire
'1RED/GRNParking brake lever upCheck for continuity to ground:
There should be continuity.
. Faulty brake lever switch. An open in the wire
23-165
Page 1226 of 1681
)
Headlight
Description
The low beam lights are projector-type lights which are more compact while maintaining sufticient brightness. Bundlingthe light rays reduces stray light and yields a spotlight-effect which improves visibility during night or foul weather driving.For easier aiming, the headlights are equipped with vertical and horizontal gauges.
NOTE: As the outer lenses are made of a resin material, don't cover the headlights when they a.e turned on.
OUTER LENSCONVEX LENSSU8-REFLECTORSECOND FOCUSINTERRUPTER PLATEREFLECTORFIRST FOCUSBULB
23-169
Page 1229 of 1681
Headlight
Headlight Replacement
1. Remove the front bumper (see section 20).
2. Remove the mounting bolts, then pull out the head-
light, and disconnect the connectors from it.
After replacement, the horizontal and venical aim-
ing must be checked using conventional methods.
Use the aiming charts on page 23-171.
Bulb Replacement
CAUTION:
a Halogen headlights can becomo very hot in use; do
not touch them or the attaching haldware imm6diately
after they have been tuh6d ott.a Do not try to replace or cl6an the headlights with tho
lights on.
1. Disconnect the 2P connector(s) from the headlight.
Turn the bulb(s) counterclockwise and remove the
bulb(s).
2P CONNECTORS
HEADLIGHT
2PCONNECTOR
2P CONNECTOR
23-172
Page 1230 of 1681
)
I
Front Parking/Front Turn
Signal Lights
Replacement
'1.Remove the screw, and pull the front parking/tront
turn signal lights out of the front bumper.
CONNECTOR
l.
FRONT TURN SIGNAL LIGHT
Disconnect the 3P and 2P connectors trom the
lights.
Turn the bulb socket 45o counterclockwise to re-
move it from the housing.
/e*----
Ar)
fl
Front Side Marker
Lights
1.Remove the screw, and pull the tront side marker
light assembly out of the tront bumper.
Disconnect the 3P and 2P connectors from the
lights.
Turn the bulb socket 45o countefclockwise to re-
move it from the housing.
FRONT SIDE MARKER LIGHT
Replacement
23-173
Page 1231 of 1681
Taillights (Hatchback)
Replacement
1.
2.
Open the rear hatch.
Remove the rear panel lining and the side lining (see
section 20).
Disconnect the 5P connector from the taillight.
Remove the six mounting nuts, then pull out the
taillight.
NOTE:
a lnspect the gasket. Replace it if it is distorted or
stays compressed.
a After installation, run water over the lights to
make sure they don't leak.
6P CONNECTOR
Replacement
Rear turn signal/Rear parking lighis.
1 . Open the rear hatch, then remove the access panel.
2. Remove the bulb from the bulb socket.
O: REAR TURN SIGNAL LIGHT BULB (32 CP)
@: REAR PARKING LIGHT BULB {3 CP)
Brake/Taillighr/Back-up lights:
1. Open the rear hatch.
2. Remove the rear panel lining {see section 20).
(i): BACK-UP LIGHT BULB (32 CF,
(Dr BRAKE/TAILLIGHT BULB (32/3 CP)
ACCESS PANEL
23-174
----
Page 1233 of 1681
Taillights (Sedanl
Bulb Replacement
Taillight:'1. Open the trunk lid, then remove the rear panel lin-
ing and side lining (see section 20).
2. Remove the bulb from the bulb socket.
O: BRAKE/TAILLIGHT BULB 132/3 CPI
@; TURN SIGNAL LIGHT BULB (32 CP)
@: REAR PARKING LIGHT EULB (3 CP)
23-176
Inn€r Taillight:'1. Open the trunk lid, then remove the bulb housing,
2. Remove the bulb from the bulb housing.
BACK.UP LIGHT BULB (32 CP}
BRAKE/TAILLIGHT BULB {32l3 CP)
O:
/n.
EULB HOUSING