1998 HONDA CIVIC wiring
[x] Cancel search: wiringPage 1832 of 2189
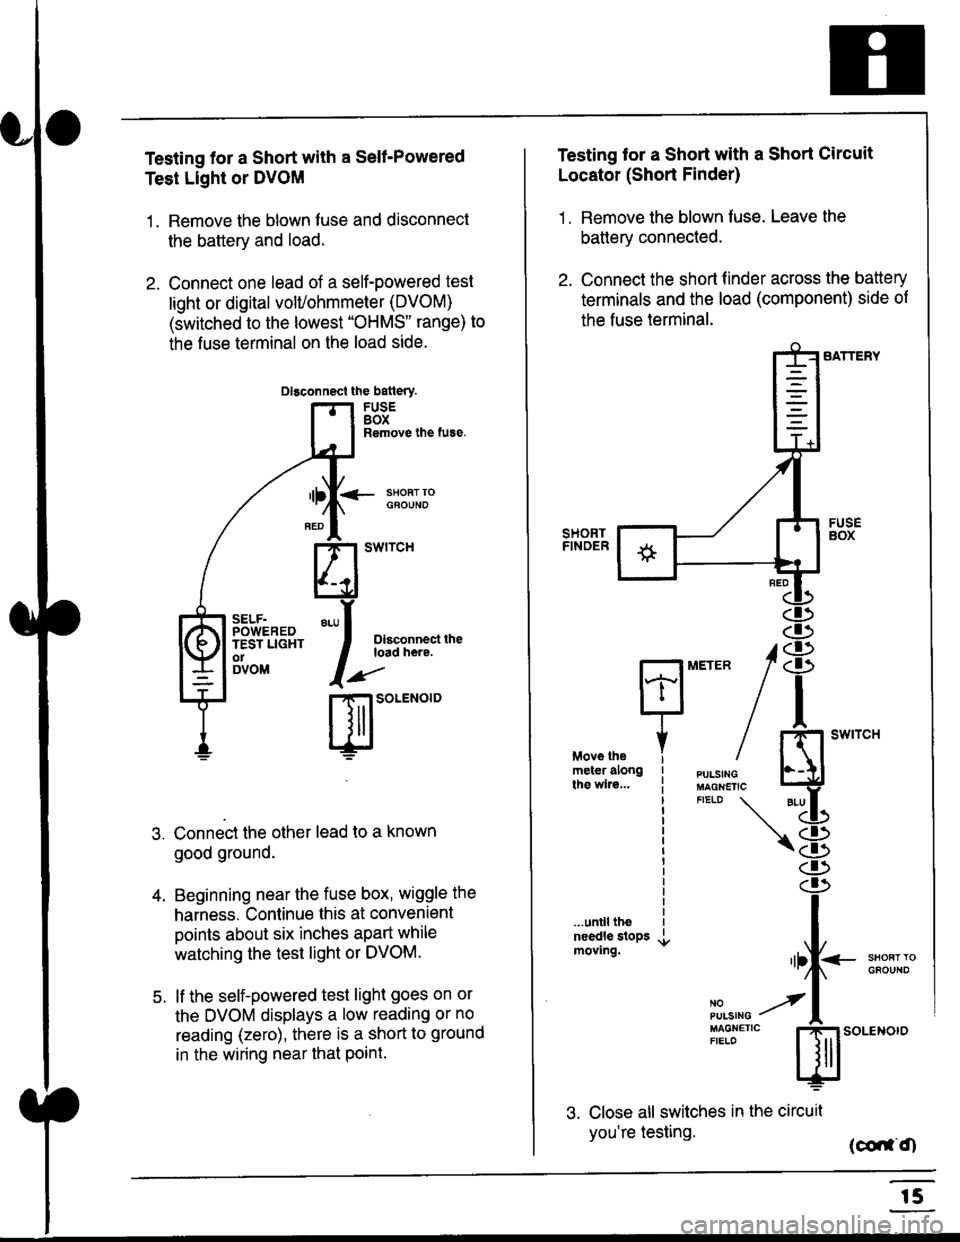
Testing for a Short with a Sell-Powered
Test Light or DVOM
1. Remove the blown fuse and disconnect
the battery and load.
2. Connect one lead of a self-powered test
light or digital volUohmmeter (DVOM)
(switched to the lowest "OHMS" range) to
the fuse terminal on the load side.
Dlsconnect the batlery.
FUSEBOXRemove the fuse.
<- ssoRr rociouNo
Dlsconnect theload here.
.)"'
r| SOLENOID
Connect the other lead to a known
good ground.
Beginning near the fuse box, wiggle the
harness. Continue this at convenient
points about six inches apart while
watching the test light or DVOM.
lf the self-powered test light goes on or
the DVOM displays a low reading or no
reading (zero), there is a short to ground
in the wiring near that Point.
SELF.POWEREDTEST LIGHTo1DVOM
4.
5.
Testing tor a Short with a Short Circuit
Locator (Short Finder)
1 . Remove the blown fuse. Leave the
battery connected.
2. Connect the short finder across the battery
terminals and the load (component) side of
the fuse terminal.
SATTERY
SHORTFINOER
FUSEBOX
PULSINGMAGNETICFIELD \
NOPUISING
\
I swtrcH
I
<- stl
Kl"I- -.T.1
"'at
\8
.r.
rlll<
,l
m
...unilltheneedle slopsmoving.SHOFTTGFOUNO'llt
No --tPULS|NG z
MAGNETTC IFIELD ISoLENOTO
3. Close all switches in the circuil
you're testing. (co,f,O
r5
Page 1833 of 2189
How To Use This Manual
Troubleshooting Tests (cont'd)
4. Turn on the short finder. This creates a
pulsing magnetic field around the wiring
between the fuse box and the short.
5. Beginning at the fuse box, slowly move
the short finder along the circuit wiring.
The meter will show current Dulses
through sheet metal and body trim. As
long as the meter is between the fuse and
lhe short, the needle will move with each
current pulse. Once you move the meter
past the point of the short, the needle will
stop moving. Check the wiring and
connectors in this area to locate the cause
of the short.
co
Page 1946 of 2189
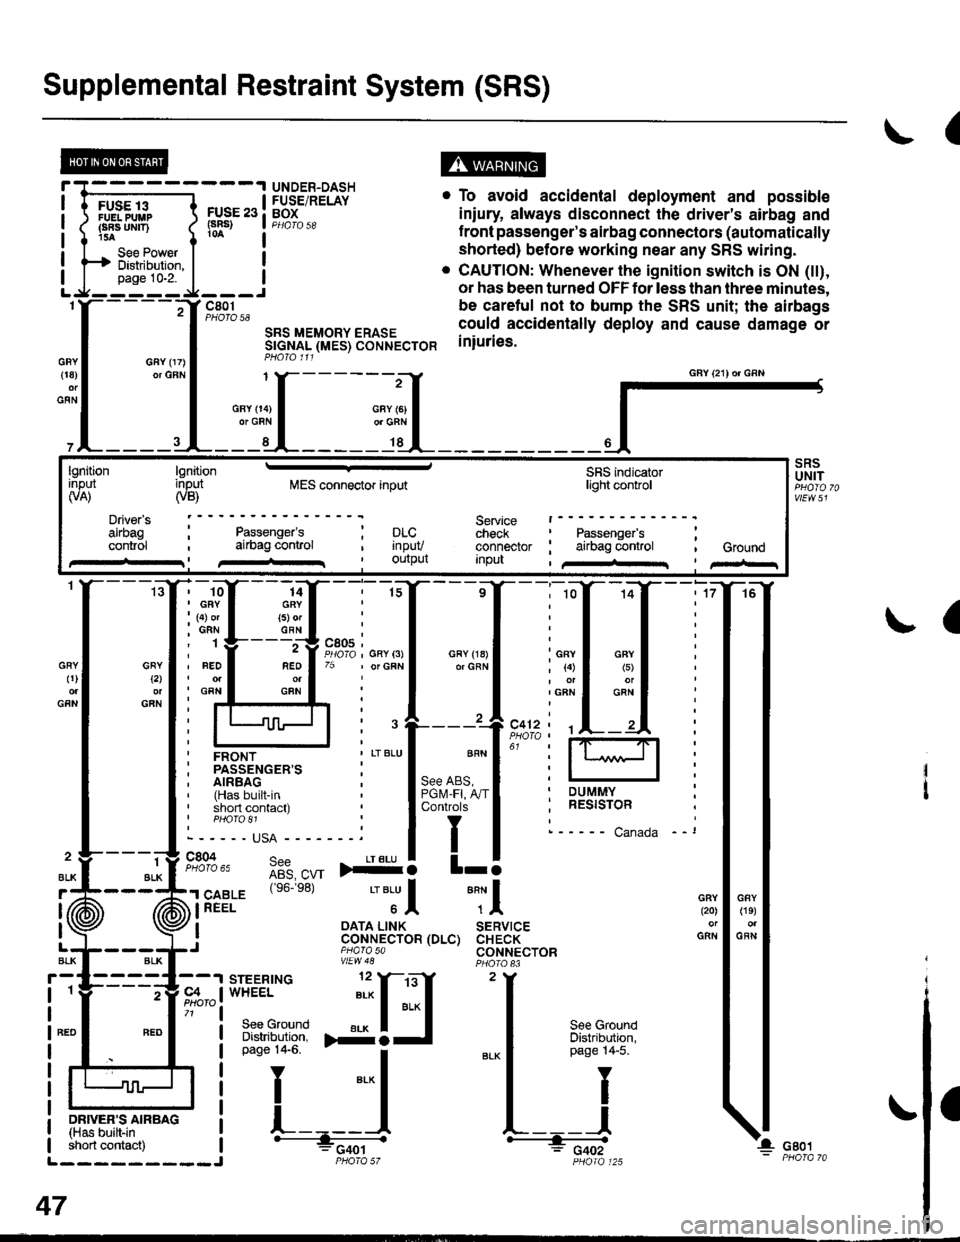
Supplemental Restraint System (SRS)
(
FUSE 13FUELPUUPFBA UMT)15A
See PowerDistibution,page 10-2.
FUSE 23(sRs)
c801PHOTO 58
SRS MEMORY ERASESTGNAL (MES) CONNECTORPHO|O 111
. To avoid accidental deployment and possible
iniury always disconnect the driver's airbag and
f ront passenger's airbag connectors (automatically
shorted) before working near any SRS wiring.
. CAUTION: Whenever the ignition switch is ON (tt),
or has been turned OFF for less than three minutes,
be caretul not to bump the SRS unit; the airbags
could accidentally deploy and cause damage or
iniuries.
UNDER-DASHFUSE/RELAYBOX
GFY 07)or GFN{18)
GFN
GFYt2l
GFN
GRY0)
GFN
2
ALK
J (ii
t\
GFY O4)or GRN
SRSUNIT
a
-ffiffi,*l-{
H!=";=_J
iffii'r:fi:*" i tH-
PHOIO 125short contact) | - FCqOtL_________J PHO|A 57
47
GAY (21) or GRN
lgnitionInput(VA)
Driver's
cont.ol
lgnitioninput(VB)MES connector inputSRS indicatorlighl control
Service t------check : Passengefs ;connector ; airbag control , GroundInpu , /+rr I pir-r
Passenger'sai|bag conlrol; prc..t rnpuv, Ourpul
14GRY(5) orGFN
rffi{{_ilil
i ffi i""'"1*"o,"'.1'' i lffil
ffirtu!-T:l
ir:r*::"."
ilstEl'{s6.e8'�
'"'Jl "Tl
, I oATA L|NK SERVTCE: CoNNECTOR (DLC) CHECK,J piarasa CONNECTORvtEw48
Page 2030 of 2189
Power Door Locks (cont'd)
Keyless Entry Does Not Work In Any
Mode
NOTE: Before beginning, verify that all the
transmitters are programmed to the vehicle.
1 . Does the radio work properly?
Yes - Go to step 9.
No - Go to the neld step.
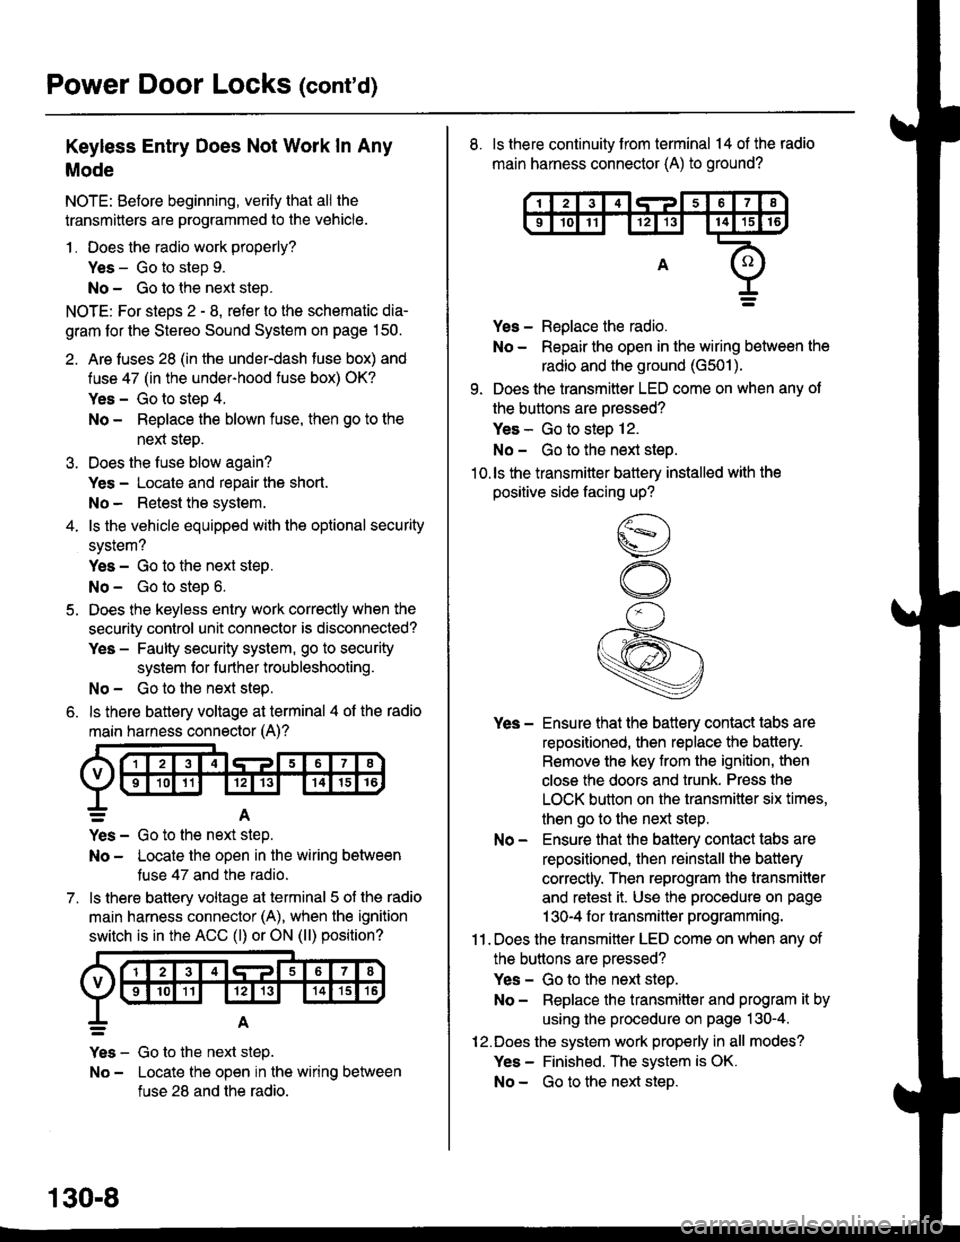
NOTE: For steos 2 - 8. refer to the schematic dia-
gram for the Stereo Sound System on page 150.
2. Are fuses 28 (in the under-dash fuse box) and
fuse 47 (in the under-hood fuse box) OK?
Yes - Go to step 4.
No - Replace the blown fuse, then go to the
nen steo.
3. Does the fuse blow again?
Yes - Locate and repair the short.
No- Retest the system.
4. ls the vehicle equipped with the optional security
system?
Yes - Go to the next steP.
No - Go to steD 6.
5. Does the keyless entry work correctly when the
security control unit connector is disconnected?
Yes - Faulty security system, go to security
system for f urther troubleshooting.
No - Go to the next step.
6. ls there battery voltage at terminal 4 of the radio
main harness connector (A)?
7.
=A
Yes - Go to the nen step.
No - Locate the open in the wiring between
tuse 47 and the radio.
ls there battery voltage at terminal 5 of the radio
main harness connector (A), when the ignition
switch is in the ACC (l) or ON (ll) position?
Yes - Go to the next step.
No - Locate the open in the wiring between
fuse 28 and the radio.
130-8
8. ls there continuity from terminal 14 of the radio
main harness connector (A) to ground?
Yes - Replace the radio.
No - Repair the open in the wiring between the
radio and the ground (G501).
9. Does the transmitter LED come on when any ot
the buttons are oressed?
Yes - Go to steo 12.
No - Go to the next steo.'10.ls the transmitter battery installed with the
positive side facing up?
Yes - Ensure that the battery contact tabs are
repositioned, then replace the battery.
Remove the key from the ignition, then
close the doors and trunk. Press the
LOCK button on the transmitter six times,
then go to the next step.
No - Ensure that the baftery contact tabs are
repositioned, then reinstall the batlery
correctly. Then reprogram the transmitter
and retest it. Use the procedure on page
1 30-4 f or transmitter programming.
11 . Does the transmitter LED come on when any of
the buttons are oressed?
Yes - Go to the next step.
No - Replace the transmitter and program it by
using the procedure on page 130-4.
12.Does the system work properly in all modes?
Yes - Finished. The system is OK.
No - Go to the next steD.
Page 2059 of 2189
\.
\iu
Security System Does Not Work In Any
Mode (HX, LX, EX, DX-V, Si)
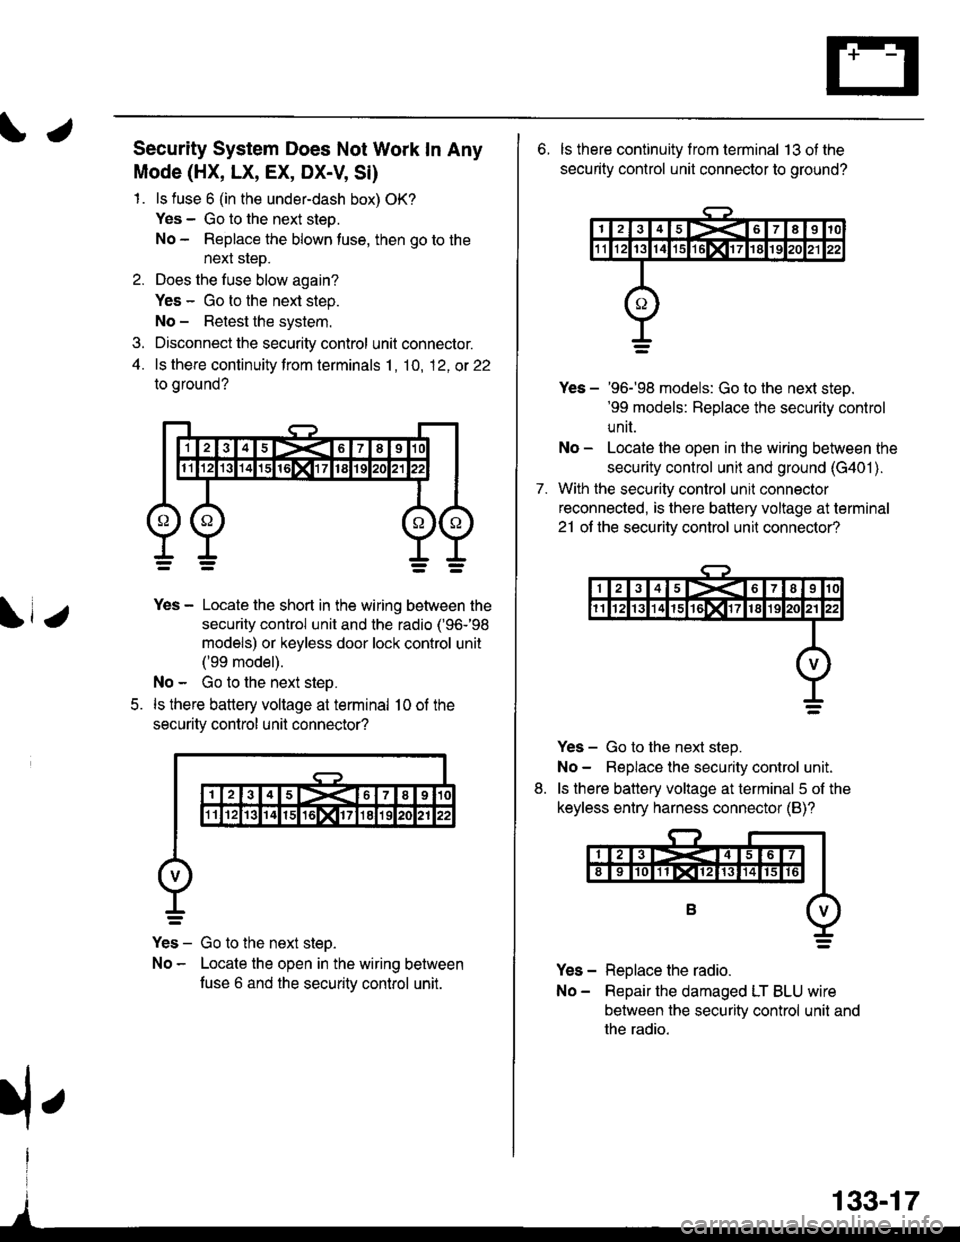
1. ls fuse 6 (in the under-dash box) OK?
Yes - Go to the next steo.
No - Replace the blown tuse, then go to the
next sleD.
2. Does the fuse blow again?
Yes - Go to the next step.
No - Retest the system.
3. Disconnect the security control unit connector.
4. ls there continuity from terminals 1, 10, 12, ot 22
to oround?
5.
Yes - Locate the short in the wiring between the
security control unit and the radio ('96-'98
models) or keyless door lock control unit
('99 model).
No - Go to the next step.
ls there battery voltage at terminal 10 of the
securitv control unil connector?
Yes - Go to the next steo.
No - Locate the open in the wiring between
fuse 6 and the securitv control unit.
133-17
rfe
6. ls there continuity f rom terminal 13 ot the
security control unit connector to ground?
7.
Yes - '96-'98 models: Go to the next steD.'99 models: Replace the security control
unit.
No - Locate the open in the wiring between the
security control unit and ground (G401 ).
With the security control unil connector
reconnected, is there battery voltage at terminal
21 ot the securitv control unit connector?
Yes - Go to the next step.
No- Beplace the security control unit.
ls there battery voltage at terminal 5 of the
keyless entry harness connector (B)?
Yes - Replace the radio.
No- Repair the damaged LT BLU wire
between the security control unit and
the radio.
8.
Page 2060 of 2189
Security System (cont'd)
Security System Does Not Work ln Any
Mode (CX, DX)
1. ls luse 54 (in the under-hood fuse box) OK?
Yes - Go to the next step.
No - Repiace the blown fuse, then go to the
next step.
2. ls the fuse in the securiiy in-line fuse holder OK?
Yes - Go to the next step.
No - Replace the blown fuse, then go to next
srep.
3. Does either fuse blow again?
Yes - Locate and repair the short.
No - Retest the system.
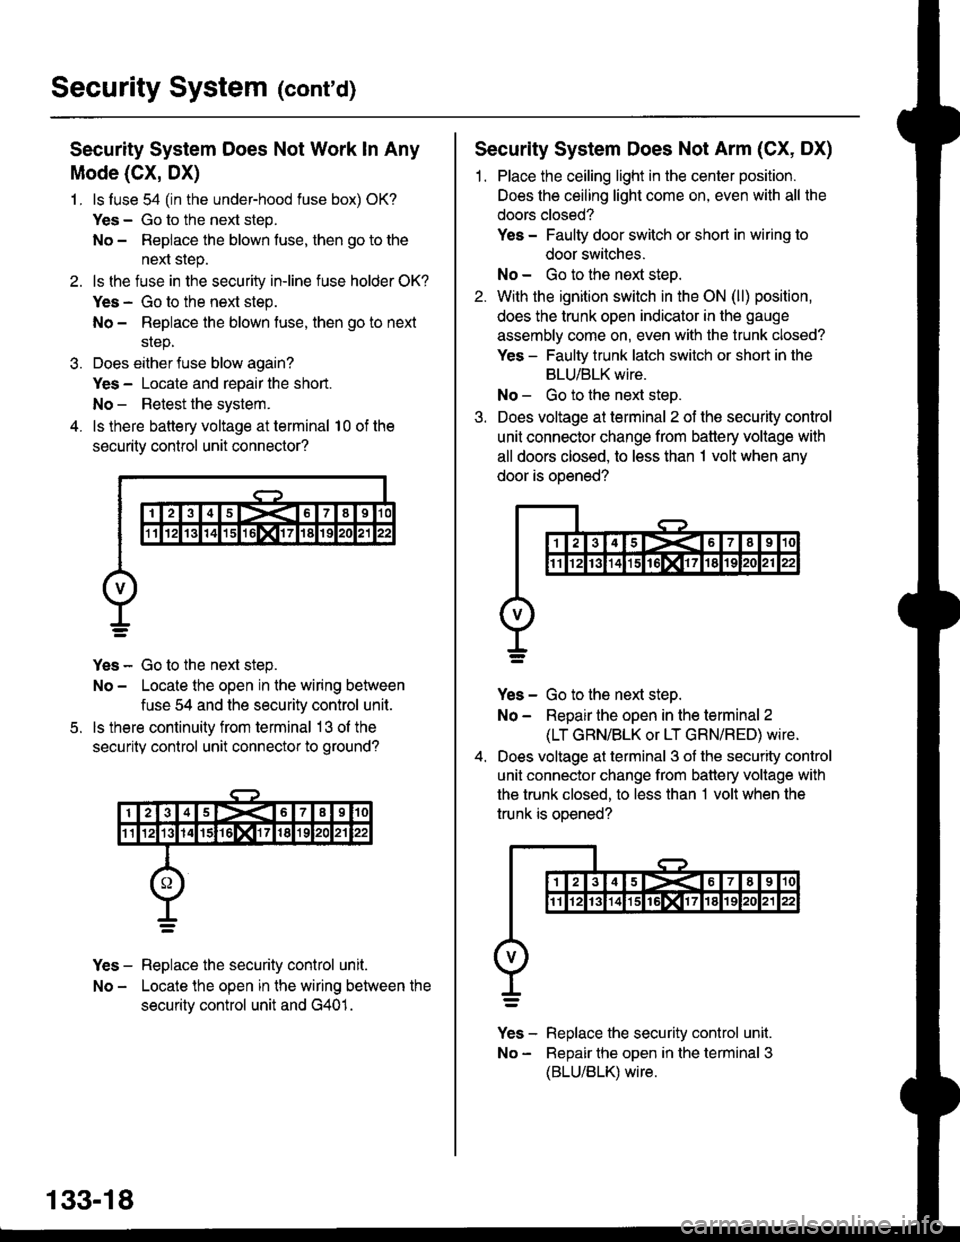
4. ls there battery voltage at terminal 10 of the
security control unit connector?
Yes - Go to the next step.
No - Locate the open in the wiring between
fuse 54 and the security control unit.
ls there continuity from terminal 13 ol the
security control unit connector to ground?
Yes - Replace the security control unit.
No - Locate the open in the wiring between the
securitv control unit and G401.
5.
133-18
Security System Does Not Arm (CX, DX)
1. Place the ceiling light in the center position.
Does the ceiling light come on, even with all the
doors closed?
Yes - Faulty door switch or short in wiring to
door switches.
No - Go to the next steo.
2. With the ignition switch in the ON (ll) position,
does the trunk open indicator in the gauge
assembly come on, even with the trunk closed?
Yes - Faulty trunk latch switch or short in the
BLU/BLK wire.
No - Go to the next step.
3. Does voltage at terminal 2 of the security control
unit connector change from battery voltage with
all doors closed, to less than 1 volt when any
door is ooened?
Yes - Go to the next step.
No - Repair the open in the terminal 2
(LT GRN/BLK or LT GRN/RED) wire.
Does voltage at terminal 3 of the security control
unit connector change from battery voltage with
the trunk closed, to less than 1 volt when the
trunk is oDened?
v]" - R"pt"." tne security control unit.
No - Bepair the open in the terminal 3
(BLU/BLK) wire.
Page 2062 of 2189
Security System (cont'd)
Security System Does Not Disarm With
The Transmitter (HX, LX, EX, DX-V, Si)
1 . With all the doors closed and locked, do the
doors unlock when the transmitter UNLOCK
button is pressed?
Yes - Go to the next step.
No - Go to "Doors Do Not Unlock With The
Transmitte/' on page 130-11 ('96-98
models) or 130-18 ('99 models).
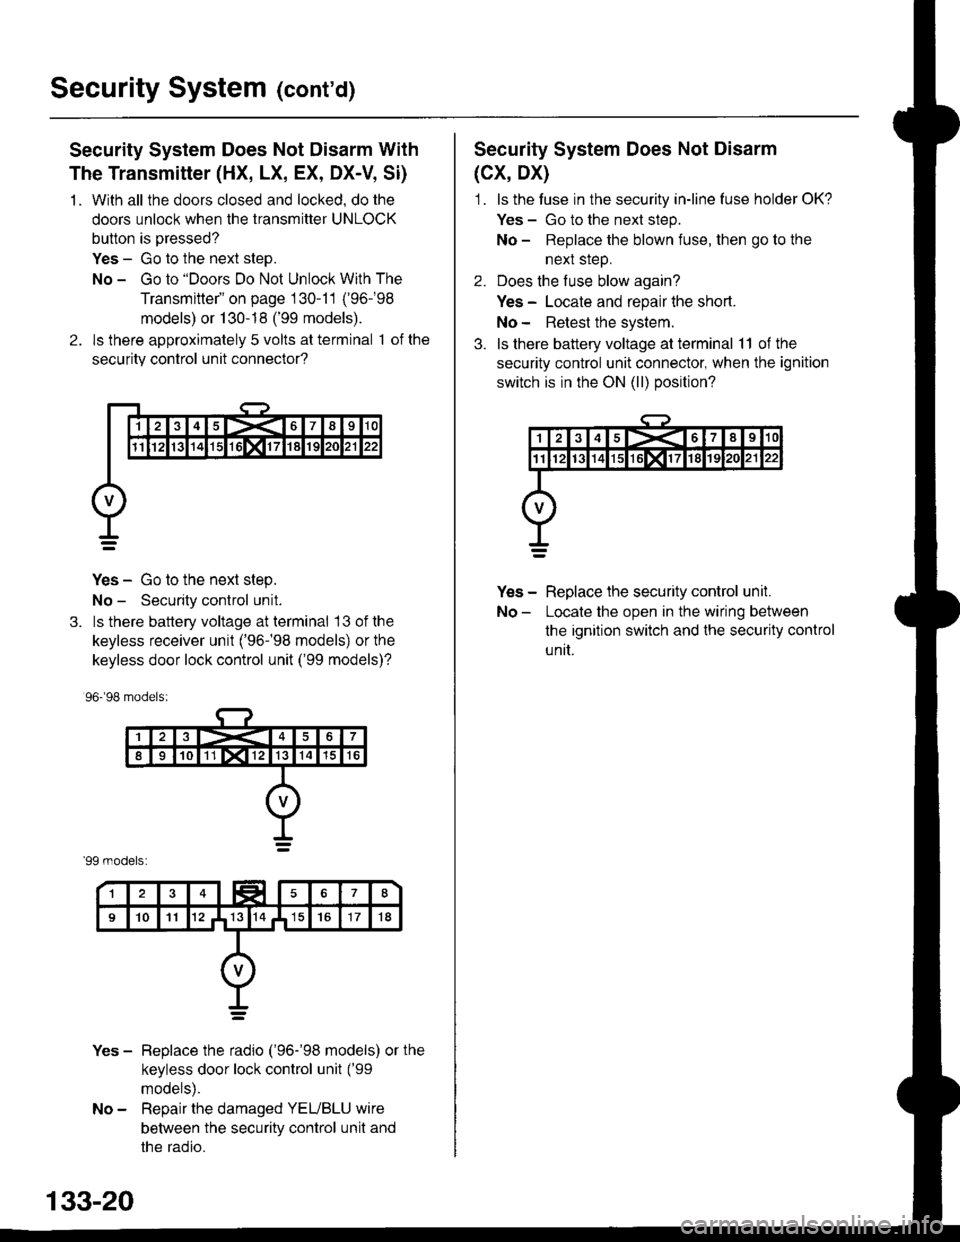
2. ls there approximately 5 volts at terminal 1 of the
securitv control unit connector?
Yes - Go to the next step.
No - Security control unit.
3. ls there battery voltage at terminal 13 ofthe
keyless receiver unit ('96-�98 models) or the
keyless door lock control unit ('99 models)?
96.�98 models:
'99 models:
Yes - Beplace the radio ('96-'98 models) or the
keyless door lock control unit ('99
models).
No - Repair the damaged YEUBLU wire
between the security control unit and
the radio.
133-20
Security System Does Not Disarm
(cx, Dx)
1. ls the tuse in the security in-line luse holder OK?
Yes - Go to the next step.
No - Replace the blown fuse, then go to the
nexl sreD.
2. Does the fuse blow again?
Yes - Locate and repair lhe short.
No- Retest the system.
3. ls there battery voltage at terminal 11 of the
security control unit connector, when the ignition
switch is in the ON (ll) position?
Yes - Replace the security control unil.
No - Locate the open in the wiring between
the ignition switch and lhe securily control
unit.
Page 2063 of 2189
rl,Security System Does Not Disarm With
The Valet Switch
Security System Does Not Work ln The
Valet Mode ('96-'98 HX, LX, EX)
1. ls luse 3 (in the under-dash fuse box) OK?
Yes - Go to the next steD.
No - Replace the blown fuse, then go to the
next step.
2. Does the fuse blow again?
Yes - Locate and reoair the short.
No - Retest the system.
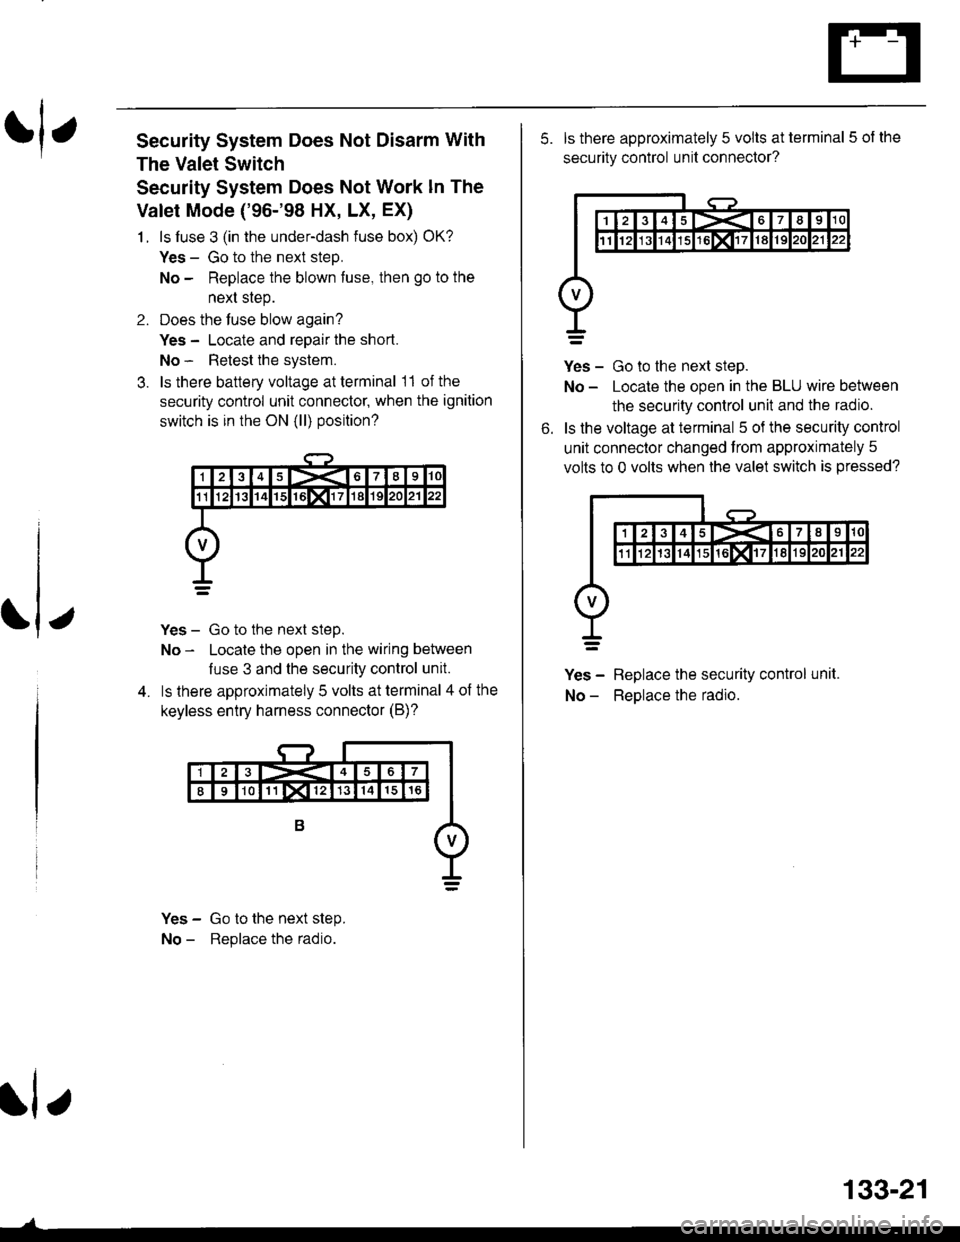
3. ls there battery voltage at terminal 11 of the
security control unit connecto( when the ignition
switch is in the ON (ll) position?
Yes - Go to the next step.
No - Locate the open in the wiring between
luse 3 and the security control unit.
ls lhere approximately 5 volts at terminal 4 of the
keyless entry harness connector (B)?
Yes - Go to the next step.
No - Replace the radio.
rl e
133-21
5. ls there approximately 5 volts at terminal 5 of the
security control unit connector?
Yes - Go to the next step.
No - Locate the open in the BLU wire between
the security control unit and the radio.
ls the voltage at terminal 5 oJ the security control
unit connector changed from approximately 5
volts to 0 volts when the valet switch is pressed?
Yes - Replace the security control unit.
No - ReDlace the radio.
6.