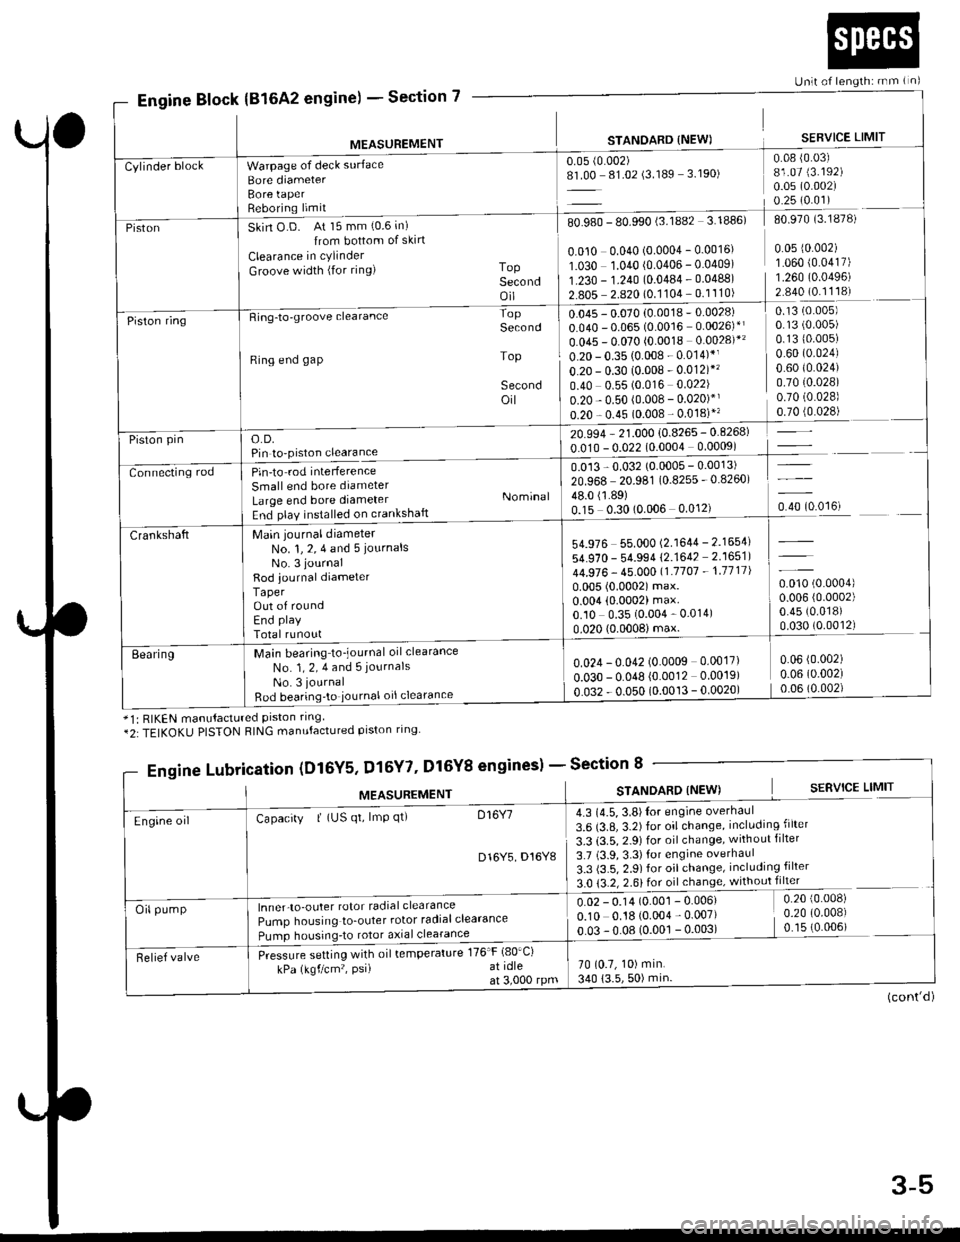
1998 HONDA CIVIC engine oil capacity
[x] Cancel search: engine oil capacityPage 50 of 2189
Section 7
Unlt of length: rnm ( n)
Engine Block(816A2 engine) -
MEASUREMENT
Warpage of deck surface
Bore diameterBore taperReboring limit
STANOARD {NEW)
0.05 (0.002)
8L00 81.02 (3.189 3.190)
SERVICE LIMIT
0.08 {0.03)81.07 (3.192)
0.05 (0.002)
0.25 (0.01)
Cylinder block
PistonSkin O D. At 15 mm (0.6 in)
{rom bottom of skirt
Clearance in cylinder
Groove width (for ring) ToPSecondoil
80.980 - 80.990 (3.lUUz 3. rUubl du Y/u lJ. ro/o,
I0.010 0.040 (o.ooo4 - 0.0016' 0 05 r0 002) II O3O 1.040 10.0406 - 0.04091 1 060 {0 0417) |1.230 - 1.?40 {0.0484 . 0.04881 1.260 10.04961 1'*: ?:::i?l:91'::ll:l I::::::= lPiston ringRing-to-groove clearance
Ring end gap
o.D.Pin to-piston clearance
Pin'to rod interference
Small end bore diameter
Large end bore diameterEnd play installed on crankshaft
Main journal diameterNo. 1, 2, 4 and 5 iournalsNo. 3 journal
Rod journal diameterTaperOut of roundEnd play
Total runout
Main bearing to_journal oil clearance
No. 1, 2, 4 and 5 journals
No. 3 journal
Bod bearing'to iournal oil clearance
Second
Top
Secondoil
Nominal
0.13 (0.005)
0.1310.005)0.60 (0.024)
0.60 t0.024)0.7010.028)0.70 (0.028)
,rr]q!4l
-l
u.u45 - u.u/u lu.uu ro
0.040 - 0.065 (0.0016 0.0026)*l
0.045 - 0.070 (0.0018 0.0028)*'
0.20 - 0.35 (0.008 - 0.014)*1
o.20 - 0.30 (0.008 - 0.012)*'�
0.40 0.55 (0.016 0.022)
0.20 - 0.50 (0.008 - 0.020)*'
0.20 - 0.45 (0.008 - 0.018)"
20.994 - 21.000 {0.8265 - 0.8268)
0.010 - 0.022 (0.0004 0.0009)
0.013 - 0.032 (0.0005 - 0.0013)
20.968 20.981 (0.8255 - 0.8260)
lliSlto?,o.oou o.o''r, o.rotoo'ut
Piston pin
Connecting rod
54.976 55.000 (2.1644 - 2.1654)
54.970 - 54.994 (2.1642 2.1651)
44.976 - 45.00011.'1707 - 1.1711|
0.005 (0.0002) max.0.004 (0.0002) max.0.10 0.35 (0.004 - 0.014)
0.020 (0.0008imax.
0.010 (0.0004)
0.006 (0.0002)
0.45 (0.018)
0.030 (0.0012)
Crankshaft
Eearing0.024 - 0.042 (0.0009 0.0017)
o.o3o - 0.048 {0.0012 0.0019)
0.032 - 0.050 (0.0013 - 0.0020)
0.06 (0.002)
0.06 (0.002)
0.06 (0.002)
*1: RIKEN manutactured prston rrng*2:TEIKOKU PISTON RING manufactured piston ring
gineslSection 8
(cont'd)
Engine Lubri,cation (Dl6Y5, Dl5Y7' Dl6Y8 enginesl -
MEASUREMENTSTANOARD (NEW) S€RVICE LIMIT
4.3 (4.5, 3.8)Ior engine overhaul
3.6 (3.8, 3.2) for oil change, including filter
3.3 (3.5, 2.9) for oil change, without filter
3.7 (3.9,3.3)for engine overhaul
3.3 (3.5, 2.9) for oil change, including filter
3.0 {3.2, 2.6} for oil change, without filter
0.02 - 0.14 (O.OO1 - 0.006) 0.20 {0 008)
0.10 0.18 (o.oo4 - 0.007) i 0.20 (0 008)
o 03 !.08 (qool!.oo3l _ (0 006) -
70 (0.7, 10) min.
340 (3.5,50) min
Engine oilCapacity | (US qt, lmp qt) D16Y7
D16Y5 D16Y8
lnner-to-outer rotor radial clearance
Pump housing to_outer rotor radialclearance
Pumo housrnq_to rotor a)rial clearance
Pressure setting with oil temperature 176'F (80'Ci
kPa (kgf/cm'�, PsiI at idleat 3,000 rpm
Oil pump
Relief valve
3-5
Page 51 of 2189
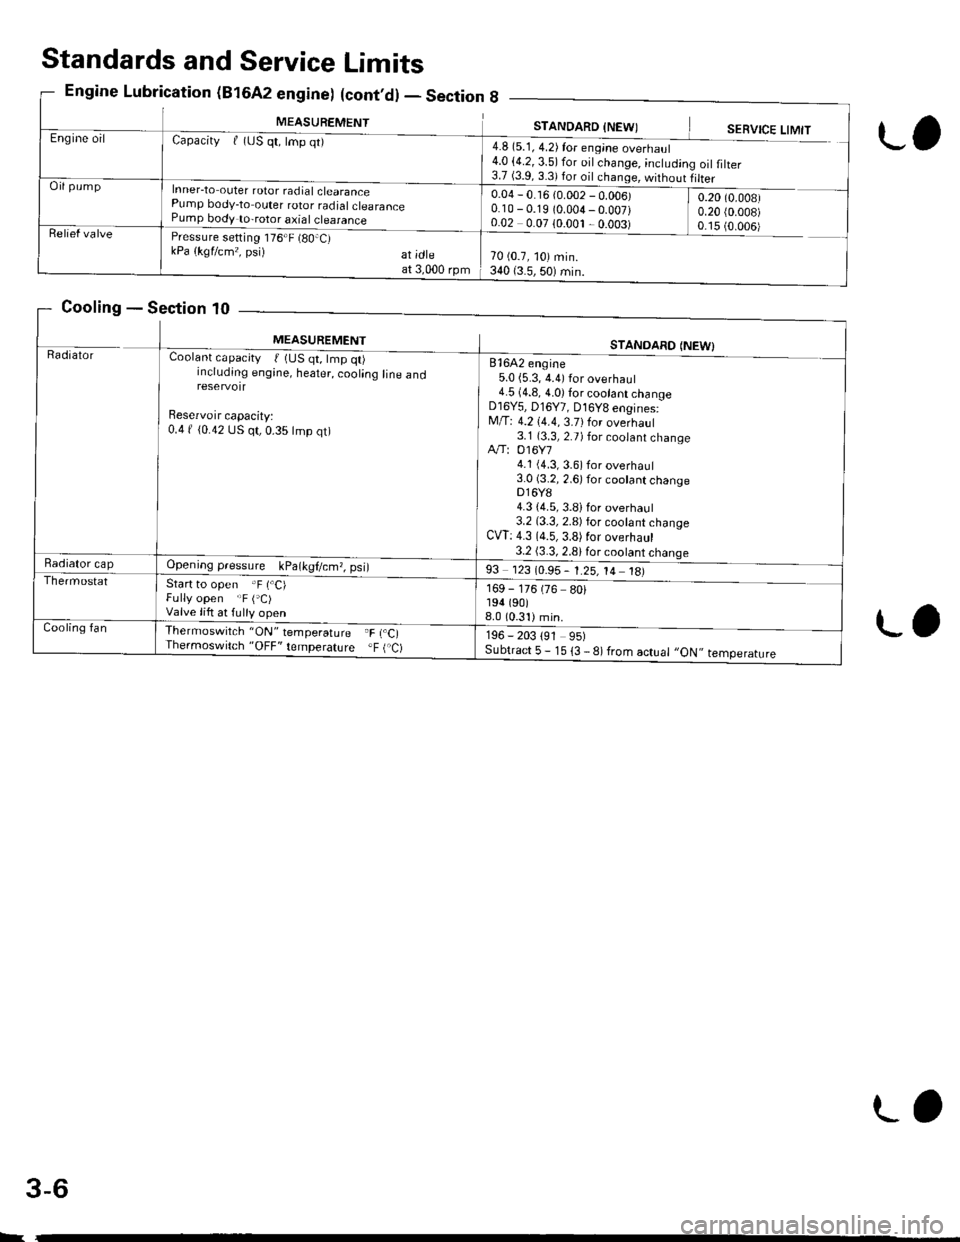
MEASUREMENTSTANDARD INFWIEngine oilCapacityf (uS qt, lmp qt)
Inner-to outer rotor radial clearancePump body-to outer rotor radialclearancePump body to-rotor axial clearance
4.8 (5.1, 4.2) for eng;ne overhaul4.0 (4.2, 3.5) for oil change, ;ncludin3.7 (3.9.3 3)for dil .h,nde '^,irh^,,rg oilfilter
Oil pump0.04 - 0.16 {0.002 - 0.006)0.10 - 0.19 (0.004-0.007)0.02 0.07 10.001 ,0.003)
0.20 (0.008)
0.20 {0.008)0 15 {O OO6iRelief valvePressure setting 176"F (80.C)kPa (kgflcm,, psi) at;dteat 3,000 rpm70 (0.7, 10) min.340 (3.5,50) min.
Standards and Service Limits
Engine Lubrication (B16A2 engine) (cont,d) - Section 8
Cooling - Section 10
L,
L.
MEASUREMENTSTANOARO {NEW)RadratorCoolant capacity t 1US qt, tmp qt)including engine, heater, cooling line andreservotr
Beservoir capacity:0.4 f {0.42 US qt, 0.35 lmp qt)
81642 engine5.0 {5.3, 4.4) for overhaul4.5 (4.8, 4.0) for cootant changeD16Y5, D16Y7, D16Y8 engines:M/T: 4.2 (4.4, 3.7)for overhaul3.1 (3.3, 2.7) for coolant changeA"/T: 016Y74.1 (4.3, 3.6) for overhaul3.0 (3.2, 2.6) for cootant changeDl6Y84.3 {4.5, 3.8)for overhaul3.2 (3.3, 2.8) for cootant changeCW: 4.3 (4.5,3.8)for overhaul3.2 (3.3, 2.8)for cootant chanqeRadiator capOpeningpressure kPa(kgl/cm,,psi)
Start to open .F (.C)Fully open "F ('C)Valve lift at fulty open
93 123 (0.95- 1.25, 14 18)
169 - 176 (76 80)194 (90)
8.0 (0.31)min.
196 - 203 191 95)Subtract 5 - 15 {3 - 8) from actual ,,ON,, temperature
Thermostat
Cooling fanThermoswilch 'ON" temperature F r.C,Thermoswitch "OFF' lemperature .F ( C)
L
3-6
L,
Page 62 of 2189

Unit of length: mm lin)
STANDARD {NEW) SERVICE LIMITMEASUREMENT
Differential
Dtri"*"t"|p'.b"gear
S"t rrg-t" b""il"s
Pinion shaft contact area LD.
Carrier-to pinion clearanceDrive shaft contact area l.D.Carrier to driveshaft clearance
BacklashLD.Pinion gear to-pinion shafl clearance
)uter race clearance
18.010 18.028'0.7091 - 0.7098)
0.023 0.057 (0.0009 - 0.0022) 0.1 (0 004)
26.025 - 26.045 (.0246 1 0254\0.045 0.086 (0.0018 - 0.0034) 0.12(0.005)
0 05 - 0.15 i0 002 0.006)18 042 18.066 {0.7103 0.7" l3)
0.055 - 0.095 (0.0022 - 0.0037) 0.15 {0.006)
0 0.15 (0 - 0.006) Adjlrst
MEASUBEMENT Wire DiaO.D. Free Length I No. of Coils
SpringsPH regulator valve spring 1 2 (0 047)
PH control valve spring 1 7 {0.067)PL regulator valve spring 0 9 (0.035)
PH'PL control valve spring 1 0 (0 039)
crutlh reduc'ns vdrve spnns ] :19 9]:lLLbrication valve spring I b (u ubJr
Shitt valve spring 1 4 (0.055)
Shift control valve spring 1 0 (0.039)
Stan clutch control valve spring 0.4 (0 016)
Pitot regulator valve spring 0.6 (0 024)
Start clutch valve accumulator spring 1 2 \0 O47)
Reverse control valve spring 1 2 (0.047)
Shift inhibitor valve spring 1 3 (0 051)
9.0 {0.354)13.4 (0.528)
1.2lO.2A3\10.0 (0.394)
16.8 (0.661)
13.4 (0.528)
8.2 (0.323)
1 .4 t0.29114.1 (0.161)
5.7 t0.224)8.3 {0.327)9.4 (0.370)
13.2 (0.520)
26.7 (1.051)
39.4 (1.551)
14.6 (0.575)
31.4 (1.236)
44.4 \1.14al51.6 (2.031)
34.1 (1.343)
19.3 (0.760)
12.1 (0.476)
9.5 (0.374)
29.8 (1.173)
31.4 (1.236)
48.3 (1.902)
r0.08.11.28.68.0
13.01.56.85.012.311.010.6
Section 14
SteeringSection 17
M/S: [,4anual steering, P/Sl Power steering*: When using a ne; bett, adjust dellection or tension to new values. Run the engine for 5 minutes then turn it off-
Readjust the deflection or tension to used belt values.
cw
MEASUREMENTSTANDARD {NEWI
Steering wheelPlay at steering wheel circumferenceStarting load at steering wheelcircumferenceN (ksf, lbf)Manual steeringPower steering Engine running
0 - 10 (0 0.4)
15 (1.5,3.3)
29 (3.0,6.6)
GearboxAngle of rack guide screw loosened M/S
from locked position P/S
Preload at pinion gear shaft N m (kglcm, lbfin) M/S
20!5"20'Max0.5 - 1.7 (5 - 17,4.3 - 14.8i
0.6 1.2 (6 - 12, 5.20 - 10.42)
Pump pressure with valve closed(oil temp./speed: 40'C (105"F) min./idleDo not run for more than 5 seconds).kPa (kgtcm?, psi)
6,400 - 7,400 {65 - 75, 920 - 1,070)
Power steeringfluidRecommended power steering fluid
Fluid capacity | {US qt, lmp q0Reservoir
HONDA Power Steering Fluid
0.85 (0.90,0.75) at disassembly0.4 {0.42.0.35}
7.5 11.0 {0.30 - 0.43)with used belt
5.0 7.0 (0.20 0.28) with new belt10.5 - 14.0 10.41 - 0.55) with used belt7.5 10.010.30 0.39) with new belt
390 540 {40 55,88 '120) wrth used bek
340 - 490 (35 - 50, 77 - 110) with used belt
740 880 (75 - 90, 170 - 200) with new belt
640 780 (65 - 80, 143-176)with newbelt
Power steeringbelt*
Deflection with 98 N (10 kgf,22 lbf)
between pulleys '99 modell 81642 Engine Type only
'96 '99 models: Other Engine TYPes
ron.ionffiN (kgf, lbf) '99 model: 81642 Engine Tvpe only'96 -'99 models: Other Engine TYPes'99 modelr 81642 Engine TYPe onlY'96 '99 models: Other Engine TYPes
3-17
Page 63 of 2189
MEASUREMENTSTANOARO INEW}SERVICE LIMIT
algnmenlCamber FrontRearCaster FrontTotaltoe FrontBearFront wheel turning angle Inward wheelOutward wheel
0"00'1 1"-1.1 1'1'40'� I 1"In'1.01 2.0 {1/16 t 1/'16)In 2.0 ljB (1/161 1/16)39.50'�33'10'(Reference)
Bim runout Aluminum wheel AxialBadialSteelwheel AxialRadla I
0 0.7 (0 - 0.03)0- 0.7 (0 - 0.03)0 - 1.0 (0 0.04)0 - 1.0 (0 0.04)
2.0 (0.08)
1.5 10.06)2.0 {0.0B)1.5 (0.06)Wheel bearingEnd play FrontRear0 0.0s (0 - 0.002)0 0.05 (0 0.002)
Standards and Service Limits
Suspension - Section 18
Brakes - Section 19
*1. 5410 Stamped on the caliper body.*2. 2056 Stamped on the caliper body.
Air Conditioning - Section 22
*: When using a new belt, adjust deflection or tension to new values. Run the engine for 5 minutes then turn it of{.Readjust deflection or tension to used belt values.
3-18
MEASUREMENTSTANDARO INEWISERVICE LIMIT
Parklng brakePlay in stroke at 196 N (20 kgf, 44 lbfi lever forceTo be locked when pulled6 - I notchesFoot brakepeoalPedal height (with floor mat removed) M/TA/'T, CVTFree play
156.5 {6.16)161 (6 5/16)1 5(1/16-3/16)
Master cvlinderPiston to pushrod clearance0 - 0.4 (0 0.02)
Disc brakeDisc thickness FrontRearDisc runout FrontRearDisc parallelism Front and rearPad thackness Front
Rear
20.9 - 21.8 (0.82 - 0.86)8.9 - 9.1 (0.350 - 0.358)
9.5 10.5*'8.5 - 9.5*'7.0 8.0 (0.28-0.3r)
19.0 (0.75)
8.0 (0.31)
0.10 (0.004)
0.10 (0.004)
0.015 (0.0006)
1.6 (0.06)1.6 (0.06)'r.6 (0.06)
Rear brakedrumLD.Lining thickness200 17.a7l4.0 (0.16)201 \7 .9112.0 {0.08}
MEASUREMENTSTANDARD INEWI
Conditioning
SANDEN
Lubricant type: SP 10 (P/N 38897 - Pl3 - A01AH or 3889Lubricant capacity Condensermf (floz, lmp oz) EvaporatorLine or hoseReceiver
I - P13 A0li lFor refrigerant: HFC-134a (R,134a))
| 20 \2t3 0.11
I 45 (1 2/3, 1.6)10 (1/3,0.4)
10 t1/3,0.4)NIPPONDENSOLubricant type: ND'O|L8 (P/N 38899 - PR7 - 003) (For ReLubricant capacity Condensermf (floz, lmp oz) EvaporatorLine or hoseReceiver
f.igerant: HFC,134a (R-134a))25 (s/6 0.9)60 (2,2.11
10 (1/3,0.4)
10 (1/3.0.4)
CompressorSANDENLubricant type: SP-10Lubricant capacity ml lfl oz, lmp oz)Field coil resistance at 68'F (20"C) OPulley-to-pressure plate clearance
130 150 (4 1/3 4.6, 5.0 - 5.3)
0.5 r 0.15 10.020 t 0.006)
NIPPONDENSOLubricant type: ND-OlL8 {P/N 38899 - PR7 ,003 or P/N 38899 pR7 - AO1) (For Refrigerant: HFC 134a {R,134a))Lubricant capacity m{(fl oz, lrnpoz) | 14O(4.7,4.9J -15S{5.2.5.4)Stator coil resistance at 20'C (68.F) 0Pulley-to-pressure plate clearance3.4 - 3.80.510.15 (0.0210.006)
Compressorbelt*Deffection with 98 N (1Okgl.22lbllbetween pulleys7.5 - 9.5 (0.30 0.37) with used belt5.0 - 6.5 (0.20 - 0.26)with new belt
Belt tension N (kgf, lbf)Measured with belt tension gauge340 490 i35 50, 77 - 110) with used bell690 - 830 (70 - 85, 150 190) with new belt
Page 65 of 2189
Design Specifications
ITEMMETRICENGLISHNOTEDII/IENSIONS Overall Length2 door Coupe/4 door Sedan (,96 98)('99,'�00)2 door Hatchback (,96, ,97)
('98 - 00)OverallwidthOverall height 2 door Coupe/2 door Hatchback4-door SedanWheelbase
I Track FronvRearGround ClearanceSeatiog Capacity
4,445 mm4,450 mm4,170 mm4,180 mm1,705 mm1,375 mm1,390 mm2,620 mm1,475/1,415 mm150 mm
175.0 in115.2 in164.2 in164.6 in67.1 in54.1 in54.7 in103.1 in58.1/58.15.9 in
WEIGHT (USA)Gross Vehicle Weight Raring (GVWR)2 door Coupe HX M/T, DX M/THX CVI ('96)HX CVT ('97,'98)HX CVT ('99}DX A,/T (96 98,DX A"/T ('99, '00)
EXSi2 door Hatchbacl CX. DX r'96, 97,cx, DX ('98)cx (,99, ,00)
DXM/Ti'99,00iDX A/T ( 99, 00,4 door Sedan DX, LX, DX-VEX
3,290 tbs3,320 tbs3,330 tbs3,360 rbs3,290 rbs3,310 tbs3,440 tbs3,480 tbs3,285 tbs3,290 tbs3,290 tbs3,290 tbs3,330lbs3,330 tbs3,460 tbsWEIGHT (CANADA)Gross Vehicle Weight Bating (GVWR)2-door Coupe DX ('96)DX ('97 00)DX-Gsi 1,96)si ('97 - 00)siR2 door Hatchback CX, CX,G ('96)cx, cx,G 1,97)cx-G (,98)
cx ('98 00)DX M/T, SE M/IDX A,/T, SE A,/T4 door Sedan LX, LX VEX M/IEX A/T
1,500 ks1,510 kg1,510 kg1,560 kg1,570 kg1,590 ks1,495 kg1,505 kg1,510 ks1,510 ks1,510 kg1,530 kg1,510 kg1,510 ks1,540 ksENGINEType
Cylinder ArrangementBore and Stroke D16Y5, D16Y7, Dt6y8B 1642DisplacementD16Y5, D16Y7, Dl6Y881642Compression Ratio D16Y5, D16y7D16Y8816A2Valve TrainLubrication SystemOil Pump Displacement at 6,800 engine rprnD16Y5, D,l6Y7, D16Y881642Water Pump Displacementat 6,000 engine rpm 016Y5, D16Y7, D16y8816A2Fuel Required D16Y5, D16Y7, D16y8
816A2
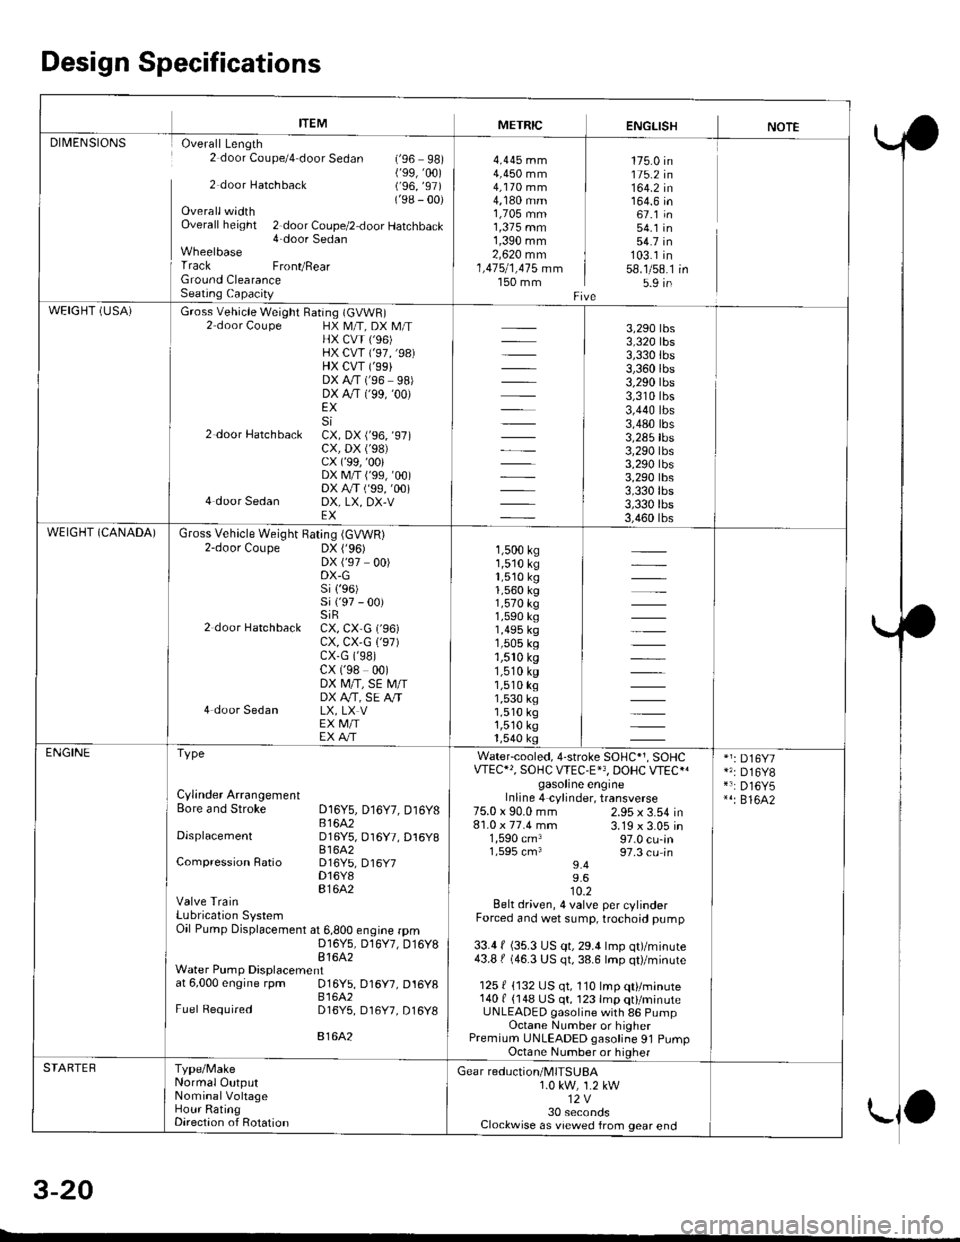
Water-cooled, 4-stroke SOHC*1, SOHCVTEC"', SOHC WEC.E'3, DOHC VTEC{gasoline engineInline 4 cylinder, transverse2.95 x 3.54 in3.19 x 3.05 in97.0 cu-in97.3 cu in9.49.610.2Belt driven, 4 valve per cylinderForced and wet sump, trochoid pump
33.4 f (35.3 US qt, 29.4 lmp qt)/minute43.8 | (46.3 US qt, 38.6 lmp qt)/minute
125 { {132 US qt, 110 lmp qt}/minute140 f {148 US qt, 123 lmp qt}/minuteUNLEADED gasoline with 86 PumpOctane Number or higherPremium UNLEADED gasoline 91 PumpOctane Number or higher
75.0 x 90.0 mm81.0 x 77.4 mm1,590 cm31,595 cm3
*1: D16Y7*': D16Y8*3: D16Y5*': 816A2
STARTEBType/MakeNormal OutputNominalVohageHour RatingDirection of Rotation
Gear reduction/MITSUBA1.0 kw, 1.2 kw12V30 secondsClockwise as viewed from gear end
5-Z.V
-
Page 66 of 2189
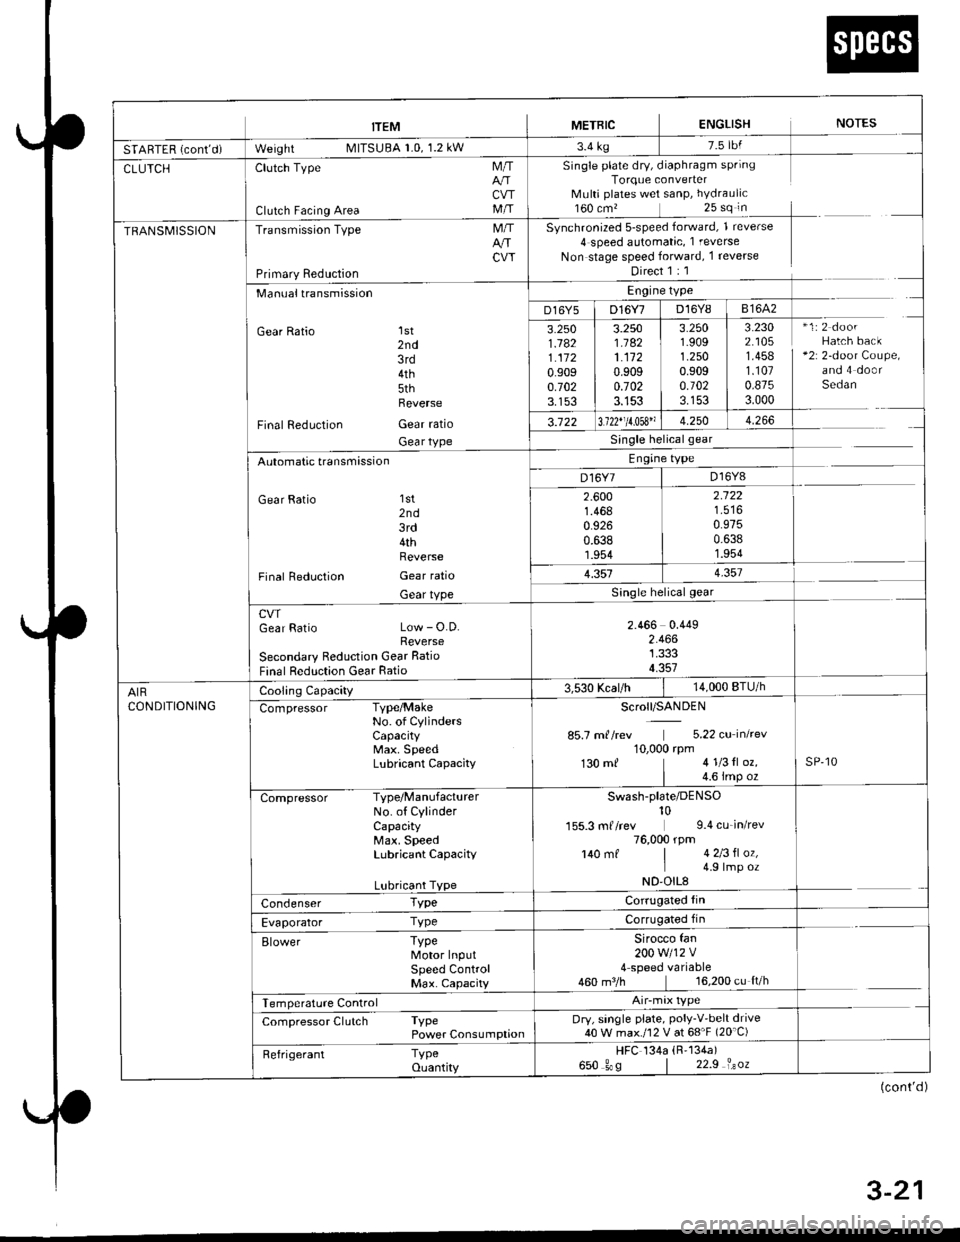
trEM I merntc ENGLISH NorEs
SfAnff n i*nt-i- W"'gf,t MllSUBA r.u, l.z kw r'4 rg
CLUTCHClutch Type
Clutch Facing Area
M/T
CVTM/T
Single plate dry, diaphragm springTorque converterMulti plates wet sanP, hYdraulic160 cm,25 sq in
Synchronized 5-speed forward, 1 reverse
4 speed automatic, 1 reverse
Non stage speed forward, 1 reverse
Direct 1 : 1
TRANSMISSIONTransmission Type
Primary Reduction
M/TArrCW
Manualtransmission
Gear Ratio 1st2nd3rd4th5thReverse
Final Reduction Gear ratio
Gear tYPe
Engine type
D16Y5 | D16Y7 D16Y8 I 81642
3.2501.1821.1120.9090.7023.153
3.2501.1821.1120.9090.7023.153
3.2501.9091.2500.9090.1023.153
3.2302.1051.4581.1070.8753.000
*1:2 doorHatch back+2r 2-door Coupe,and 4 doorSedan
3.122 13.122"11.053" 1 4.250 | 4.266
Single helicalgear
Engine type
D16Y7 | D16Y8Automatic transmission
Gear Ratio 'lst
2nd3rd4thReverse
Final Reduction Gear ratio
Gear tYPe
2.6001.4680.9260.6381.954
2.122
0.9750.6381.954
1.3514.357
cwGear Ratio Low - O.D.Reverse
Secondary Reduction Gear Ratio
Final Reduction Gear Ratio
2.466 0.4492.4661.3334.357
AIRCONDITIONING
Cooling Capacity3,530 Kcal/h14,000 BTU/h
Compressor Type/MakeNo. of CYlindersCaPacitYMax. SpeedLubricant CaPacitY
Scroll/SANDEN
85.7 m//rev 5.22 cu inkev10,000 rpm130 mf 41l3tl oz.
| 4.6 imp ozsP,10
Compressor Type/ManufacturerNo. of CylinderCapacityMax. SpeedLubricant CaPacitY
Lubricant TYPe
Swash-plate/DENso10155.3 mf /rev 9.4 cu_in/rev76,000 rpm140 mf | 4 2l3fl oz,I 4 9lmp ozND'OIL8
Condenser TypeCorrugated fin
Evaporator TyPeCorrugated fin
Elower TyPeMotor InputSPeed ControlMax. CaPacity
Sirocco fan200w112v4 speed variable460 m3/h 16,200 cu ft/h
Temperature Control
Compressor Clutch TyPePower ConsumPtionDry, single plate, PolY-V'belt drive40 W max./12 V at 68'F (20'C)
Refrigerant TyPeouantity
HFC 134a (R'134a)
650 gos | 22.9 isoz
(cont'd )
4 . J-Z I
Page 233 of 2189
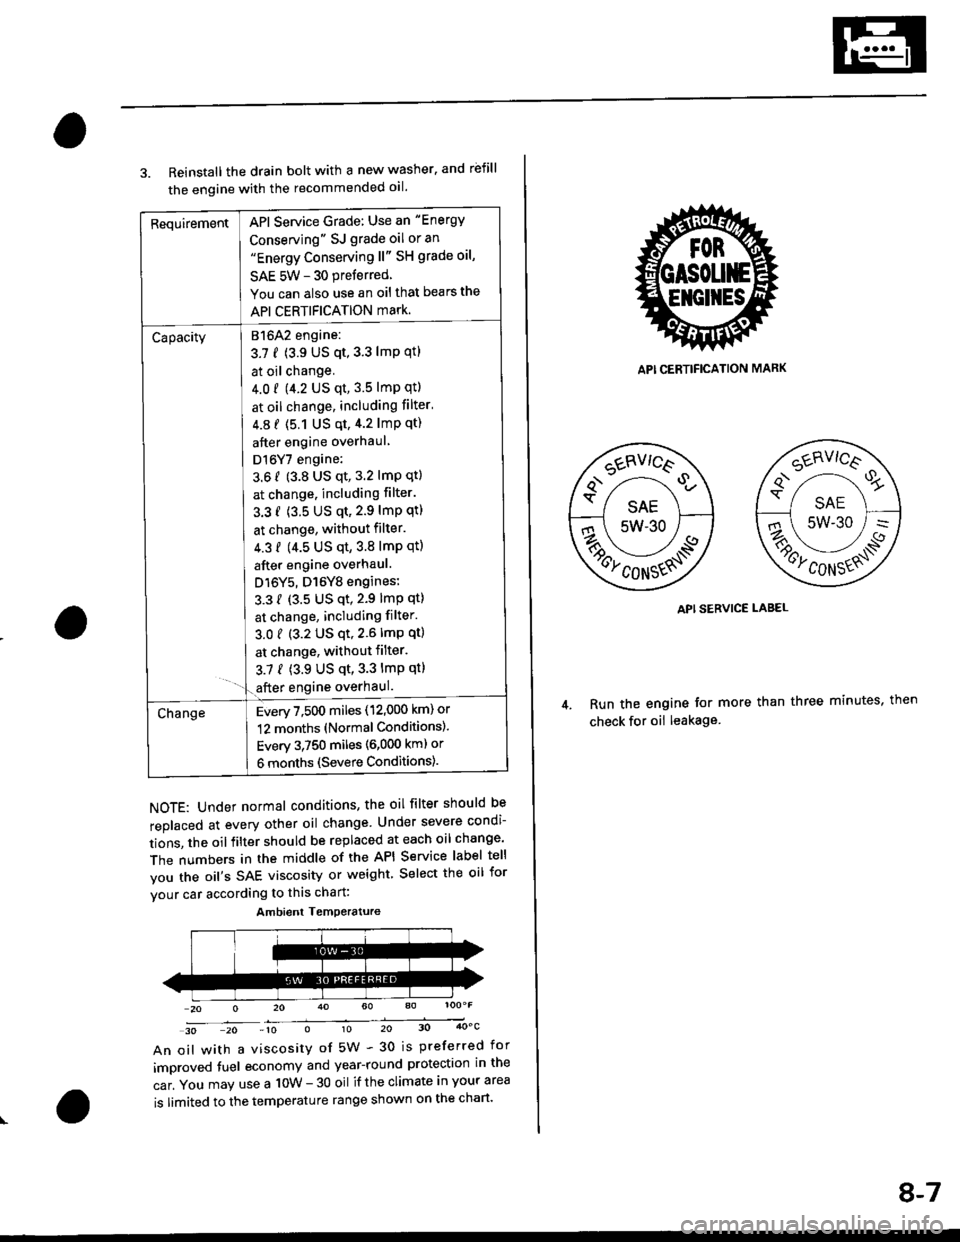
RequirementAPI Service Grade: Use an "Energy
Conserving" SJ grade oil or an"Energy Conserving ll" SH grade oil,
SAE 5W - 30 preferred
You can also use an oil that bears the
API CERTIFICATION mark.
Capacity[atolz engine:
3.7 f (3.9 US qt,3.3 lmp qtl
I at oil change.
J 4.0 r 9.2 US qt, 3.5 lmp qtl
I at oil change, including filter'
| 4.8 f (5.1 Us qt,4.2 lmp qt)
I after engine overhaul
I Dl6Y7 engine:
3.6 f (3.8 US qt, 3.2 lmP qt)
I at change. including filter.
I 3.3 f (3.5 US qt,2.9 lmP qtl
I at change, without filter.
I 4.3 f (4.5 us qt,3.8 lmp qtl
I after engine overhaul.
J D16Y5, D16Y8 engines:
L 3.3 { {3.5 US qt,2.9 lmp qt}
I at change, including filter.
3.01 (3.2 US qt,2.6lmp qt)
I at change, withoutfilter.
3.7 { (3.9 US qt,3.3 lmp qt}- '1.€fter engine overhaul.
ChangeEvery 7,500 miles (12,000 km) or
12 months (Normal Conditions).
Every 3,750 miles (6,000 kml or
6 months (Severe Conditions).
3. Reinstall the drain bolt with a new washer. and rbfill
the engine with the recommended oil.
NOTE: Under normal conditions, the oil filter should be
replaced at every other oil change Under severe condi-
tions, the oilfilter should be replaced at each oil change'
The numbers in the middle of the API Service label tell
you the oil's SAE viscosity or weight Select the oil for
vour car according to this chart:
30 20 -10 010 20 30 4OoC
An oil with a viscosity of 5W - 30 is preferred for
improved tuel economy and year-round protection in the
car. You may use a 10W - 30 oil if the climate in your area
is limited to the temperature range shown on the chart'
Ambient Temoerature
API CERTIFICATION MARK
API SERVICE LABEL
Run the engine tor more than three minutes, then
check for oii leakage
8-7
Page 583 of 2189
MaintenanceBack-up Light Switch
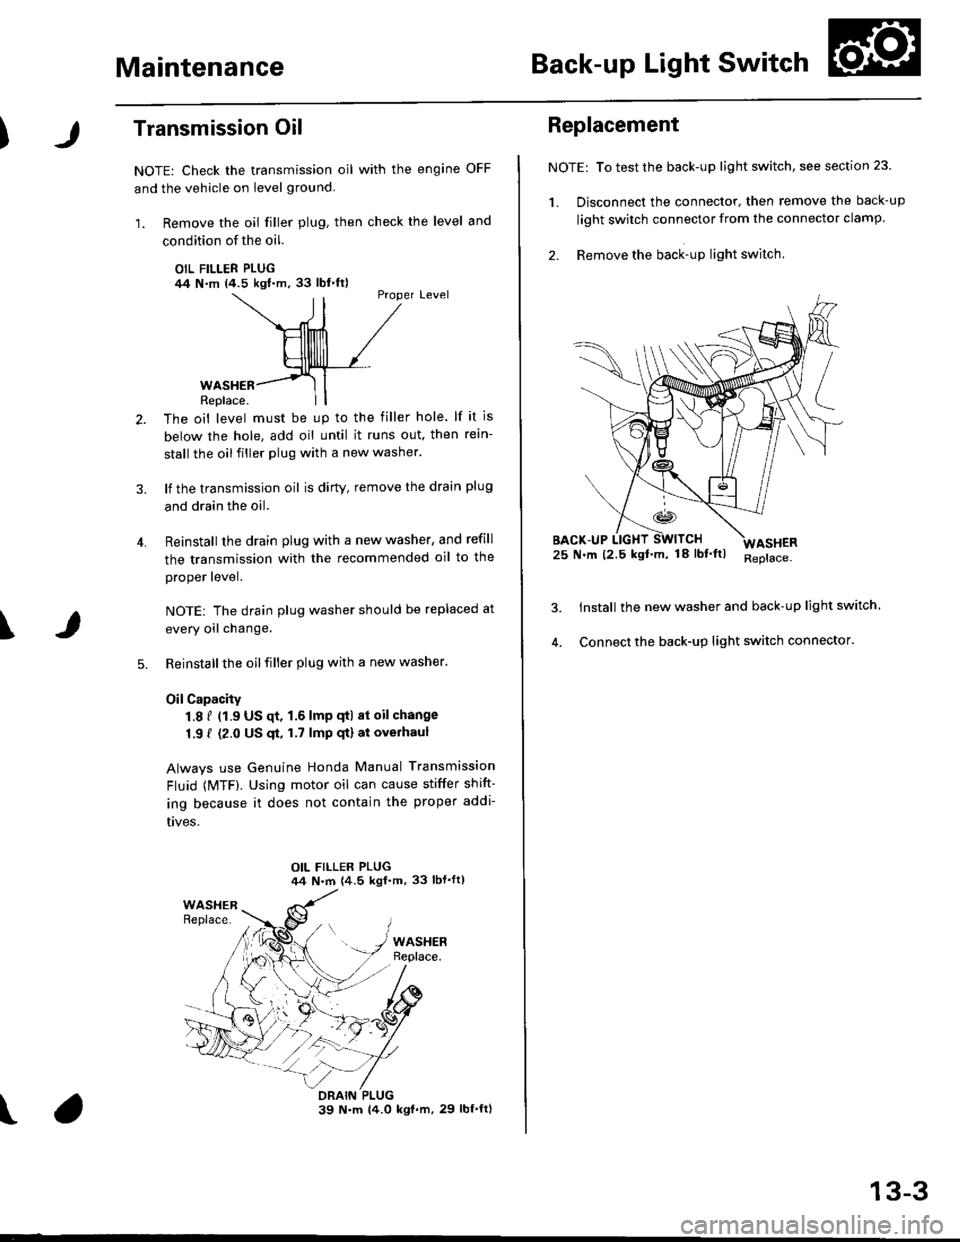
Transmission Oil
NOTE: Check the transmission oil with the engine OFF
and the vehicle on level ground.
1. Remove the oil filler plug, then check the level and
condition of the oil.
OIL FILLER PLUG/14 N.m (4.5 kgl.m,33 lbl.ft)Proper Level
4.
WASHERReplace.
The oil level must be up to the filler hole. lf it is
below the hole, add oil until it runs out. then rein-
stall the oil filler plug with a new washer.
lf the transmission oil is dirty, remove the drain plug
and drain the oil.
Reinstall the drain plug with a new washer, and refill
the transmission with the recommended oil to the
proper lever.
NOTE: The drain plug washer should be replaced at
every oil change.
Reinstall the oil filler plug with a new washer.
OilCapacity
1.8 f (1.9 US qt. 1.6 lmp qtl at oil change
1.9 { (2.0 US $, 1.7 lmp qt) at overhaul
Always use Genuine Honda Manual Transmission
Fluid {MTF). Using motor oil can cause stiffer shift-
ing because it does not contain the proper addi-
t|ves.
\
\
Replacement
NOTE: To test the back-up light switch, see section 23
1. Disconnect the connector, then remove the back-up
light swirch connector from the connector clamp.
2. Remove the back-up light switch.
25 N.m (2.5 kgf'm, 18lbf'ltl
Install the new washer and back-up light switch
Connect the back-up light switch connector.
ASHER
13-3