Page 921 of 2189

Electrical Troubleshooting ('96 - 9g Models)
Troubleshooting Flowchart - A/T Gear position Switch (Short)
NOTE: Record all freeze data before you troubleshoot.
Posrible Cause
. Short in A/T go.r positionswitch wire. Faulty A/T g€ar polition switch
NOTE: Code P1705(5) is caused whenthe TCM receives two gear positionInputs at the same time.
TCM CONNECTOR A {26P}
Wire side of female terminals
To page 14-245
. OBD ll Scan Tool indicates CodeP1705.. Seif-diagnosis @ indicator lightblinksfive times.
Obsorve the A/T gear positionindicetor:1. Turn the ignition switch ON1[).2. Observe tho Ay'T gear positionindicator, and shift to eachposition separately.
Th6 lyrtcm i3 OK at thi. tima.Check the wi.s hamels for drm.ag9.
Do any jndicators stay on when thesh;ft lever is not in that position?
Measure ATP R Vohage:1. Shift to all positions other thanE.2. Measure the voltage betweenthe 411 and A13 or A26 termi-nats.
Check for sho.t in tho wireb€twoon the Al1 t rminaland th6A/l ge.r polhion switch or A/Tgear position indicstor. lf wilo isOK check for loos6 TCM conncc-tora. It nocassery, subrtitute aknown-good TCM and r€chsck.
ls there approx. 10 V?
Measure ATP NP Volt.ge:1. Shift to all positions otherthan @ or @.2. Measure the voltage betweenthe A10 and 413 or 426 termi-nals,Ch.ck tor 3hort in th€ wircb€twe€n thc Al0 termin.l andthe A/T 96r. porition indicrtor,or a short in the wilea b?twecntho A/T gerr porition indic.to.and the A/T geer positionswitch. It wires ar6 OK, chsck forloose TCM conn.clols. ll nccNe3-sa.y, substituto a known-goodTCM rnd locheck.
ls there approx. 10 V?
Measure ATP O Vohage:1. Shift to all positions otherthanE,2. Measure the voltage betweenthe Ag and A13 or 426 terminals.
Checl tor short in the wirelr€tweon tho A9 terminal and theA/T g6a. position 3witch. lf wireb OK. check tor loos€ TCM con-nectors. lf nocelsary, substhute aknown-good TCM and rechack.
ls there approx. '10 V?
14-244
b
Page 922 of 2189
From page l4-244
Measure ATP S Vollage:
1. Shift to all Positions otherthan
2. Measure the voltage between
the A8 and A13 or A26 termi
nals.
Check lor shott in the wire
between the A8 terminal and the
A/T gea. Position switch or the
A/T gear position indicator. lf wire
is OK, check for loose TCM con_
nectors. lI necessary, substitute a
known-good TCM and recheck.
ls there approx. 10 V?
Measure ATP L Voltage:'1. Shift to all positions other than
E-2, Measure the voltage between
the A7 and A13 or A26 termi-
nals.
Check for short in the wi.e
between the A7 terminal and the
A/T gear position switch or the
A/T gear position indicator. lf wire
b OK. check for loose TCM con-
nectors. ff necessary, substilute a
known-good TCM and recheck.
ls there approx. 10 V?
Check lor loose TCM connectors.
lf necessary. substitute a known'
good TCM and recheck.
TCM CONNECTOR A (26P)
Wire side of female termanals
14-245
Page 923 of 2189

Electrical Troubleshooting (,96 - 9g Models)
Troubleshooting Flowchart - A/T Gear position Switch (Openf
NOTE: Record all freeze data before you troubleshoot.
Pos.ribls Cause
. Disconnocted A/T gear positionswitch connector. Open in A/T gear position switch
. Faulty A/T gear position switch
TCM CONNECTOR A I26PI
Wire side of female terminals
. OBD ll Scan Toot indicat* CodeP1706,. Solf-diagnosis E indicator tightblinb six times.
Measule ATP R Volt.gei1. Turn the ignition switch ON l).2. Shifi to E position.3. Measure the voltage betweenthe A11 and 413 or ,426 termi-nals.
Repair open in tho wire betwoenlhe A11 terminal and the A/Tgoar po3ition switch.
Measure ATP NP Volt.gei1. Shifrto E orE position.2. Measure the voltage betlveenthe A10 and A13 or 426 terminals.
Repair open in the wiro betweenthe A10 terminal .nd tho A/Tgea. poshion swhch.
Measure ATP D Vohage:1. Shift to E position.2. Measure the voltage betweenthe Ag and A'13 or 426 termi-
Repair open in the wire lretweenthe A9 terminel and the A/T gearposition 3witch.
To page 14-Z4j
14-246
Page 941 of 2189
Electrical Troubleshooting ('96 - 98 Modelsl
Troubleshooting Flowchart - lq Indicator Light On Constantly
TCM CONNECTOR A {26PI
Wire side of female terminals
YEL
The E indic.tor light is on con-stantly {not blinking} whoneverthe ignilion switch is ON llll.
Measure D INO Voltage:1. Turn the ignition switch OFF.2. Disconnect the A (26P) con'nector from the TCM.3. Turn the ignition switch ON (ll).4, Measure the voltage betweenthe A20 terminal and bodyground,
Repeir 3hort to power in thc wirebetween tho A20 terminal andihe gauge ass€mbly.
Measure ATP DVohage:1. Turn the ignition switch OFF.2. Connect the A (26P) connec-tor to the TCM.3. Turn the ignition switch ON (ll).4. Shift to any position other thanE,5. Measure the voltage betweenthe A9 terminal and bodygrou nd.
Check tor a short to ground onthe wire. ll wire is OK, .epl.cethe A/T gear position indic.tor.
2347810ll1213
1a15161720232526
GRN/BLK
123a5789101t1213
1at5161720a2526
14-264
-
Page 942 of 2189

Electrical Troubleshooting ('99 - 00 Models)
Troubleshooting Flowchart - A/T Gear Position Switch (Short)
NOTE: Record all freeze data before you troubleshoot.
Po3sible Cause
. Short in A/T gear po3ition 3witch
. F.ulty A/T ge6r Position switch
NOTE: Code P1705(5) is caused when
the PCM received two gear Positioninputs at the same time.
PCM CONNECTORS
LGl (BRN/8LKI LG2 (BRN/8LKI
Wire side of female terminals
(cont'd)
14-265
B t25Pt llO(16P1
. oBD ll scln lool indicats code
P't705.. Self-diagnosb E indicator light
blinks fivetim€s.
Obseive tho A/T Gear Polition
lndicetor:1. Turn the ignition switch ON (ll).
2. Observe the A,/T gear positaon
indicator, and shift oach Posi-tion separately.
Tho ry3t6m is OK at this tims.
Check th€ wiro hsrno!! tor
damage.
Does any indicator stay on
when the shift lever is not an
that position?
M.Furo ATP R Vohtge:1. Shift to all positions other than
E.2. Measure the voltage between
the D6 and 820 or 822 termi'
nals,
Chock for lhort in tho wit€
betwe€n the D6 telminal and thg
A/T ge.r position 3witch or A/T
gear po3ition indicttoi, !nd
chcck for open in the witgs
botwo€n the 820 lnd 822 tetmi_n.ls and body g.ound (G1011. F
wiro3 ere OK, check tor loo3o ter'
minal fit in the PrCM connoctors.ll n6c€3sary, 3ubstitute a known-good PCM and rochock.
ls there approx. 10 V?
To page 14 266
Page 944 of 2189

M6asure ATP S Voliag€:1. Shift to all positions other
than E.2. Measure the voltage between
the D13 and 820 or 822 termi
nals.
Check for short in the wire
between the D13 terminal and
the A/T gear position lwitch orA/T goar position indicator. Itwir6s are OK, check lor loose l€r-
minal fit in the PCM connectors.ll nec*3arv, substitute a known'good PCM and r6check.
ls there approx. '10 V?
Measure ATP L Voltage:1. Shi{t to all positions other
than E.2. Measure the voltage between
the A22 and 820 or 822 termi-nals.
Check lor sho.t in ihe wire
betwgon the A22 terminal and
th. A/T geat position switch or
A/T gear position indicator. It
wires are OK, ch€ck for 10036 ter-minal fit in the PCM connectors.lf n6cessery, substitute a known_good PCM and recheck.
ls there approx- 10 V?
Check tor loos€ terminalfit in the
PCM connectors, It nec6s3arY,
substitute a known-good PCM
and rech6ck.
From page 14-266
B t2sP)
LG1{BRN/BLKI
t32Pl
PCM CONNECTORS
Wire side of Iemale terminals
PCM CONNECTORS
D (16P1
ATP S {LT GRN/RED)
LG2 (BRN/BLKI
B t25Pl
Page 967 of 2189

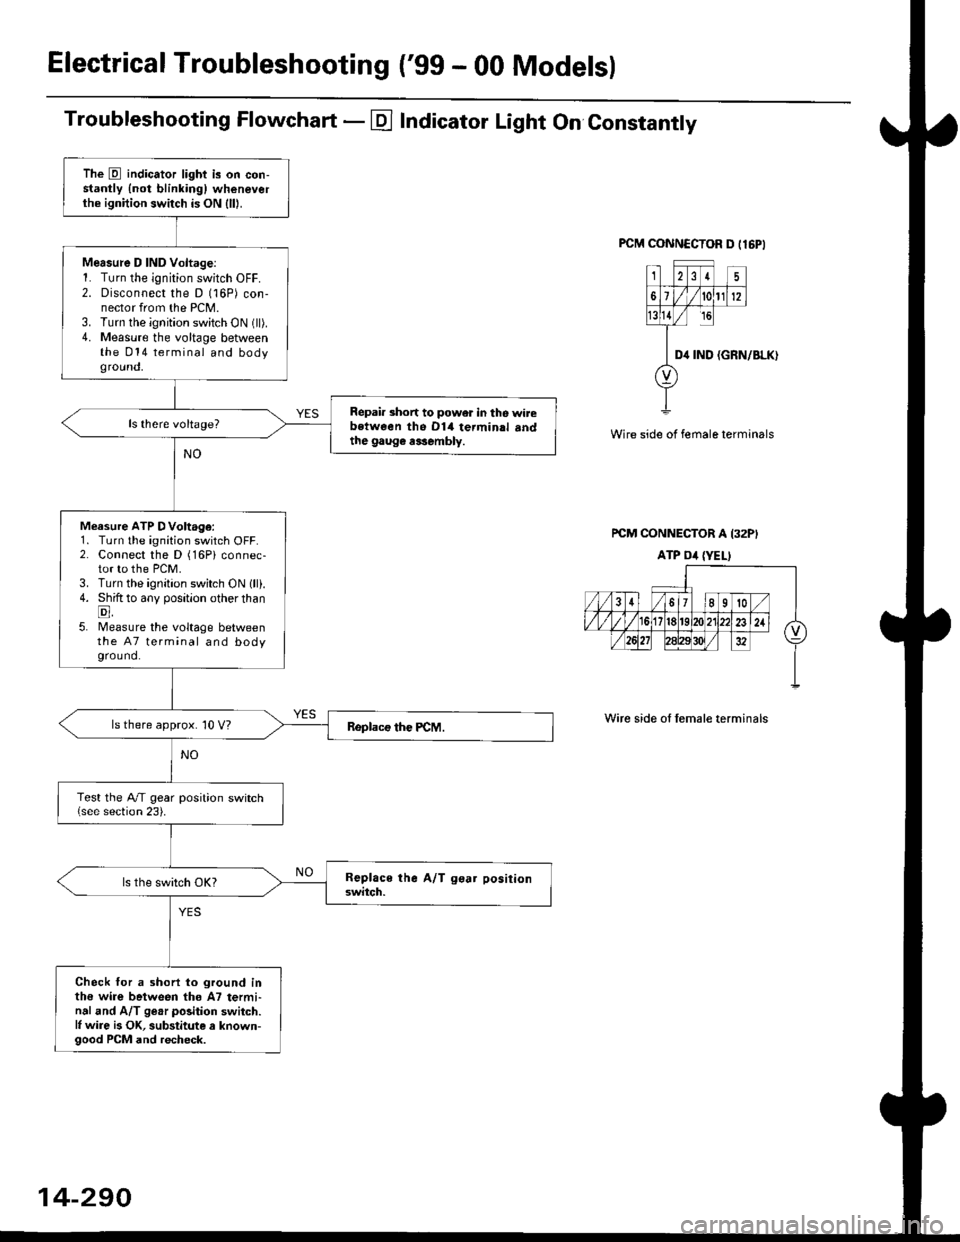
ElectricalTroubleshooting ('gg - 00 Models)
Troubleshooting Flowchart - E Indicator Light On Constantly
FCM CONNCCTOR D tl6PI
23I5
61t012
tsll / rc
II D4 rND
o
(GRN/BLK)
Wire side of female terminals
rcM CONNECTOR A I32PI
ATP Dil {YELI
Wire side of lemale terminals
The E indicator light is on con-stantly {not blinkingl wheneverthe ignition switch is ON lll|.
Mersure D IND Voltage:1. Turn the ignition switch OFF.2. Disconnect the D (16P) con-nector from the PCM.3. Turn the ignition switch ON (ll).4. Measure the voltage betweenthe 014 terminal and bodyground,
Repair short to power in tho wirebstween the Dl4 termin.l sndthe gaug€ r3sembly.
Measure ATP DVoltage:1. Turn the ignition switch OFF.2. Connect the D (16Pi connec-tor to the PCM.3. Turn the ignition switch ON lll).4. Shift to any position other thanE,5. lMeasure the voltage betweenthe 47 terminal and bodyground.
ls there approx. 10 V?
Test the A/T gear position switch{see section 23).
Check for a shorl lo ground inthe wire between tho A7 termi-nal and A/T ge.r polition switch.l, wire is OK, substitute a known-good PCM and recheck.
14-290
Page 1031 of 2189

t
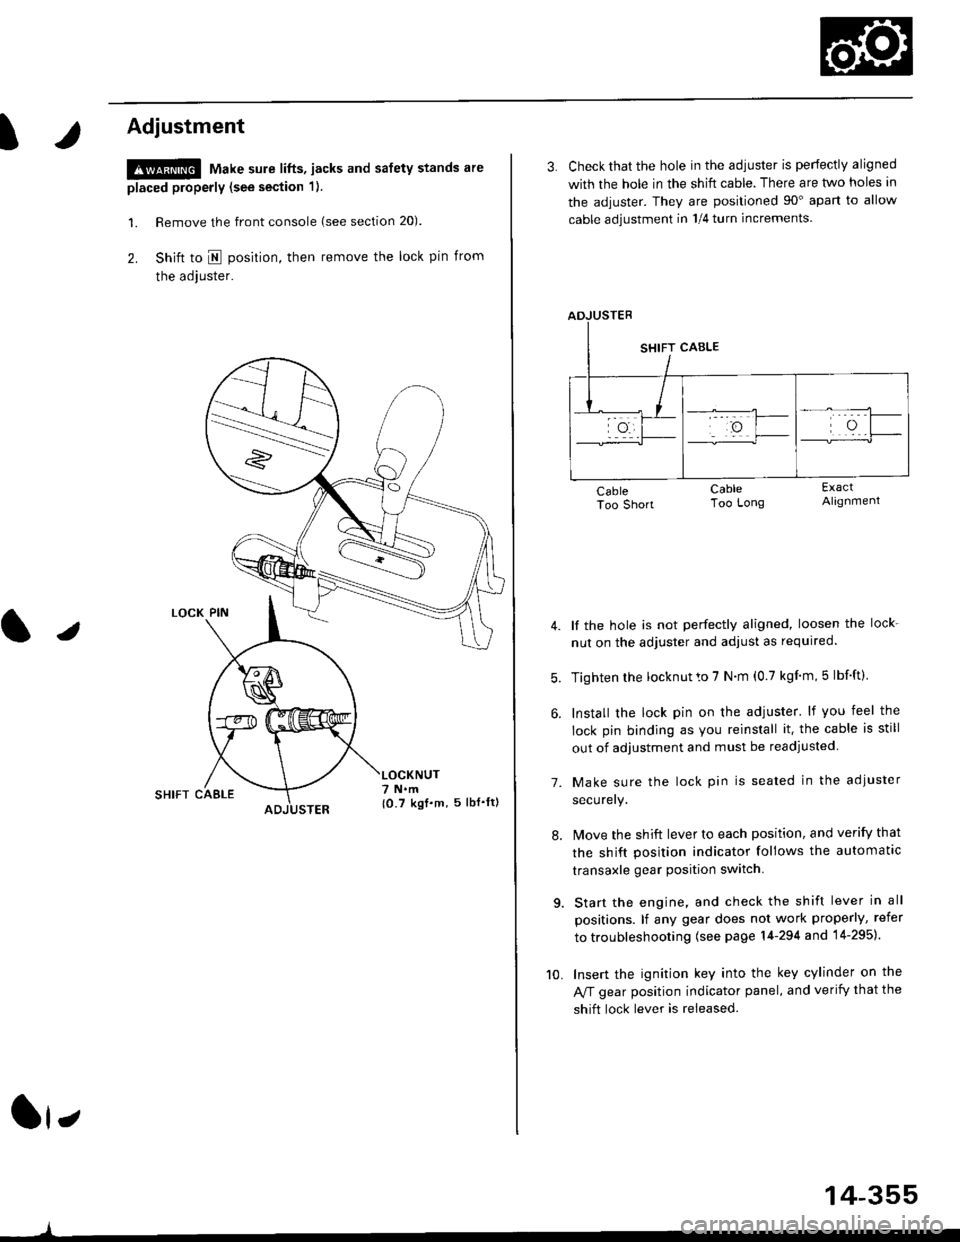
Adjustment
!@ Make sure lifts, jacks and safety stands are
placed properly (see section 1).
l. Remove the front console (see section 20).
2. Shift to I posirion, then remove the lock pin from
the adjuster.
SHIFT CAELE
l,
,l
{0.7 kgf.m, 5lbf'ltl
3. Check that the hole in the adiuster is perfectly aligned
with the hole in the shift cable. There are two holes in
the adjuster. They are positioned 90" apart to allow
cable adjustment in 1/4 turn increments.
lf the hole is not perfectly aligned, loosen the lock-
nut on the adjuster and adjust as required.
Tighten rhe locknut to 7 N.m (0.7 kgim,5 lbf'ft).
Install the lock pin on the adjuster' lf you feel the
lock pin binding as you reinstall it. the cable is still
out of adjustment and must be readjusted
Make sure the lock pin is seated in the adiuster
securery.
lMove the shift lever to each position, and verify that
the shift position indicator follows the automatlc
transaxle gear position switch.
Start the engine, and check the shift lever in all
positions. lf any gear does not work properly, refer
to troubleshooting (see page 14-294 and 14-295).
Insert the ignition key into the key cylinder on the
Aff gear position indicator panel, and verify that the
shift lock lever is released.
7.
10.
14-355