Page 1326 of 2189
Hood
Adjustment
NOTE: Before adjusting the hood, loosen each bolt slightly.
1. Adjust the hood hinges right and left, as well as fore and aft, by using the elongated holes.
2. Turn the hood edge cushions, as necessary. to make the hood fit flush with the body at front and side edges.
3, Adjust the hood latch to obtain the proper height at the forward edge.
4. After adjustment, tighten each bolt securely.
6x1.0mm9.8 N.m {1.0 kgt.m,7.2 tbt.tll
NOTE: Move the hood latch right or left
is centered in the hood latch as shown.
)
until the striker
6x1.0mm9.8 N.m {1.0 kgf.m,7.2 tbf.ftl
\
20-96
Page 1327 of 2189
Trunk Lid
Adjustment
NOTE; Before adjusting the trunk lid, loosen each bolt slightly.
1. Adjust the trunk lid hinges right and left, as well as fore and aft, by using the elongated holes'
2. Turn the trunk lid edge cushions, as necessary, to make the trunk lid fit flush with the body at the rear and side edges.
3. Adiust the fit between the trunk lid and the trunk lid opening by moving the striker'
4. After adjustment, tighten each bolt securely
TRUNK LIO EDGE
CUSHION
TRUNK LID
NOTE: Take care notto hit the rear windowwhen loosening thebolts.
NOTE: Move the striker right or left until it's centered in
the trunk lid latch as shown.
TRUNK LIO
9.8 N.m {1.0 kgf.m,7 .2lbl.ltlSTRIKER
20-97
Page 1328 of 2189
Hatch
Adjustment
NOTE:
. Before adjusting the hatch, loosen each bolt and nut slightly.
a The suDport struts should be removed.
. To adjust, remove both hatch sidetrim (see page 20-63) and the rear roof trim (see page 20-65).
1. Adjust the hatch hinges right and left, as well as fore and aft. by using the elongated holes
2. Turn the hatch edge cushions, as necessary, to make the hatch fit flush with the body at each side.
3. Adjust the hatch fit to the hatch opening by moving the striker.
4. After adiustment, tighten each bolt and nut securely.
6x1.0mm9.8 N.m (1.0 kgf.m,
HATCHEDGE CUSHION
HATCHHINGERearward
HAEDGECUSHION
j ... 22
\,_1q
N.m (2.2 kgf.m,tbf.ftl
\
co
38Nm(3.9kgfm,2.8 rbf.ft)
NOTE: Move the striker right or left until it's centered in
the hatch latch. as shown.
HATCHHINGESTRIKER
l0x1VER
HATCHEDGECUSHION
9.8 N.m 11.0 kst.m,7.2 tbf.ft)HATCHLATCH
20-98
6x1.0mm
Page 1337 of 2189
Opener Cable/Opener and Latch/Wiper and Washer
Component Location Index
2Dt3DItD'
y"Tl,"nll,ib?*'r.* o*t"
Replacement, Page 20_1 13
Adiustment, Page 20'1 17
WINDSHIELDWASHER NOZZLESAdjustment, Page 20_1 17
HOOD LATCH
{see page 20-110)
REAR WINDOW WIPER
ARM and MOTORReplacement, Page 20-1 15
Adjustment, page 20 117
LOCK CYLINDER(see page 20 113)
LOCK CYLINDER
TRUNK LIO LATCH
{see page 20 112)
FUEL LID OPENERCABLE(see page 20-108i
LID OPENERCABLE(see page 20 108)
LID/FUELLID OPENER(see page 20 111)
RELEASE HANDLE(see page 20-110)
3D:
REAR WINDOWWASHER NOZZLEAdiustment, page 20-1 17
REAR WINDOWWASHER TUBE(see page 20-116)
HATCH OPENERCABLE(see page 20 110)
WASHER RESERVOIRReplacement, Page 20-1 15
HATCH/FUEL LID OPENER(see page 20 1'11)
FUEL LID OPENERCABLE(see page 20 110)
(see page 20 111)
20-107
Page 1339 of 2189
TRUNK LID LATCH(see page 20'112)
?e-=....-
4D:
To trunk lidlatch.
latch.
TRUNK LID/FUELLID OPENER(see page 20 111)
TRUNK LID
OPENER CABLE
aA '--!
\- - -l
N"La
FUEL LIDOPEN€R CAELE
TRUNK LID/FUELLID OPENER(see page 20-111)FUELLATCH
(cont'd)
20-109
(see page 20'112)
Page 1340 of 2189

Opener CablesOpener and Latch
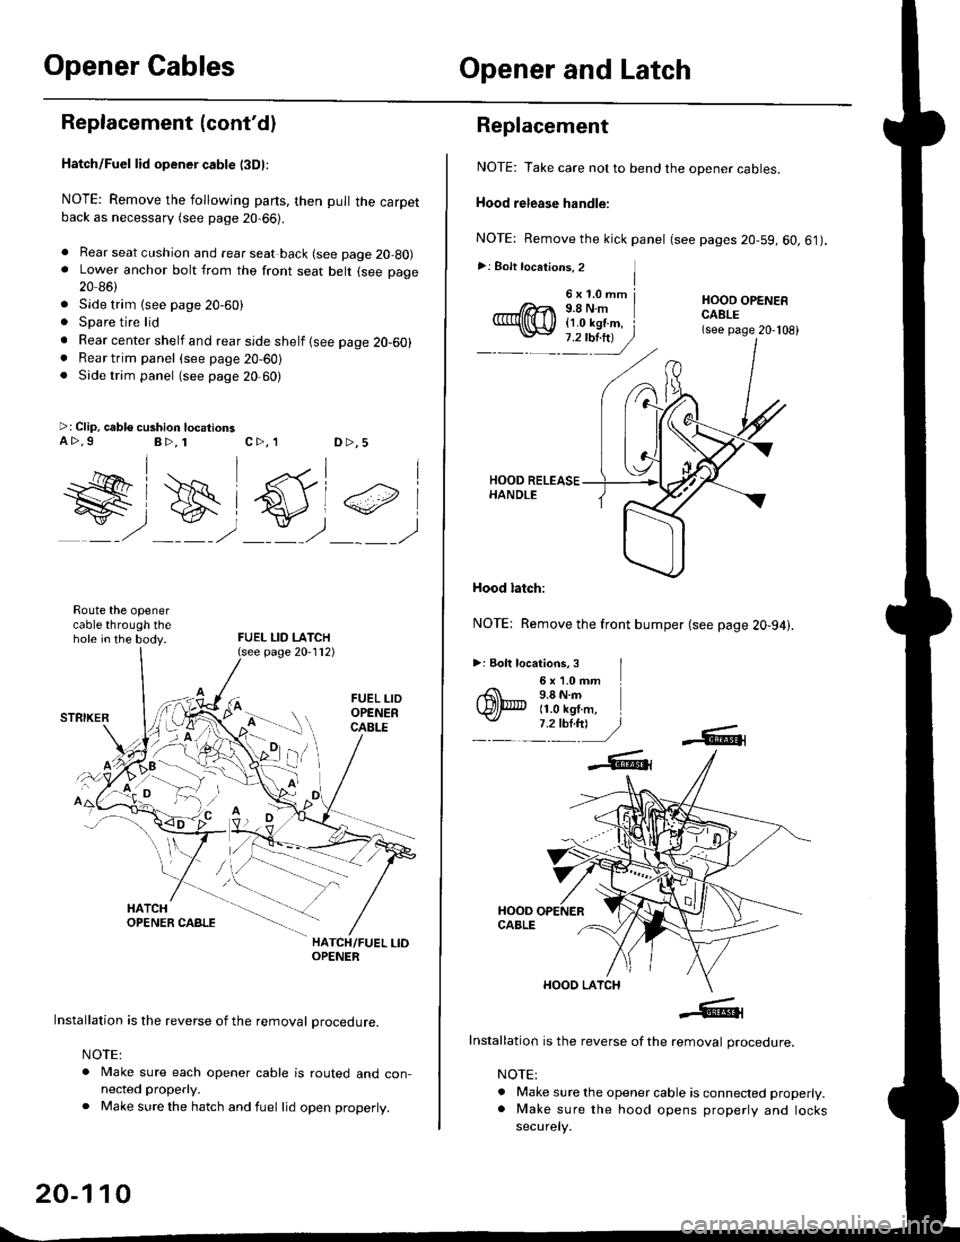
Replacement (cont'dl
Hatch/Fuel lid opener cable l3Dl:
NOTE: Remove the following parts, then pull the carpetback as necessary (see page 20-66).
. Rear seat cushion and rear seat back (see page 20-80). Lower anchor bolt from the front seat belt (see page
20 86)
. Side trim {see page 20-60). Spare tire lid
. Rear center shelf and rear side shelf {see page 20-60). Rear trim panel (see page 20-60). Side trim panel (see page 20,60)
>: Clip, cable cushion locationsa>.9B>, 1c>, 1D >,5
W#)
FUEL LID LATCH
#,
Route the openercable through thehole in the body.
HATCH/FUEL LIOOPENER
Installation is the reverse of the removal procedure.
NOTE:
. Make sure each opener cable is routed and con-nected properly.
. Make sure the hatch and fuel lid open properly.
page 20-112)
20-110
6x1.0mm j9.8Nm{1.0 kgf.m, i
Replacement
NOTE: Take care not to bend the opener cables.
Hood release handle:
NOTE: Remove the kick panel (see pages 20-59, 60.61).
>: Bolt locations, 2 ]I
HOOO OPENERCABLE(see page 20-108)
Hood latch:
NOTE: Remove the front bumper (see page 20-94).
>: Eolt locations, 3 I6 x '1.0 mm9.8 N.m11.0 kgf.m,
Installation is the reverse of the removal procedure.
NOTE:
. Make sure the opener cable is connected properly.. Make sure the hood opens properly and locks
securely.
Page 1341 of 2189
Trunk lid or Hatch/Fuel lid opener:
NOTE: Remove the side trim (see pages 20 59,60.61)
>: Boll locations, 2
OPENER LOCK
6xl.0mm9.8Nm11.0 kgf.m,7.2 tbl.ttl
a@- CYLINDER
Ya//t2't4Dl
ti
TBUNK LID/HATCHOPENER CABLE(see20-108, 110)
To trunk lid latchor striker.
To fuel lid latch. \
FUEL LIDOPENER CABLE(see pages 20-108, '110)
Installation is the reverse of the removal procedure
NOTE:
. lvake sure the opener cable is connected properly.
. Make sure the trunk lid or hatch and fuel lid open
properly.
l:'.j
Striker (3Dl:
NOTE: Remove the rear trim panel (see page 20-60)
>: Bolt locations, 2
6xl.0mmHATCHOPENER CAELE(see page 20-110)
lnstallation is the reverse of the removal procedure.
NOTE:
. N4ake sure each
erlY.
. Make sure the
securelY.
opener cable is connected ProP-
hatch opens properly and locks
(cont'd)
20-111
Page 1342 of 2189

Opener and Latch
Replacement (cont'd)
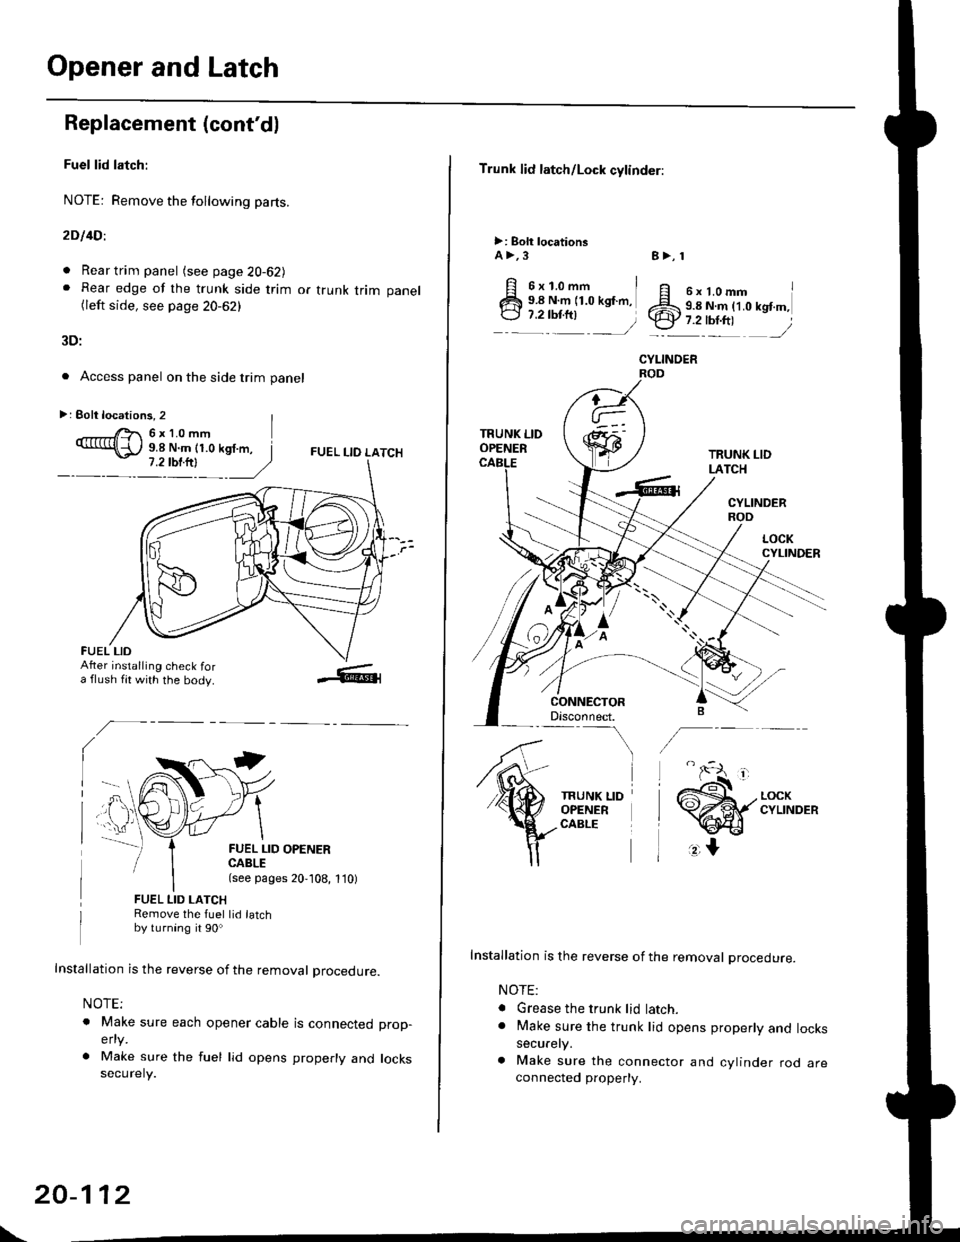
Fuel lid latch:
NOTE: Remove the following pa(s.
2D l4Dl
. Rear trim panel (see page 20-62J. Rear edge of the trunk side trim or trunk trim panel(left side, see page 20-62)
3D:
. Access panel on the side trim panel
FUEL I-IO LATCH
II
FUEL LID OPENERCABLE(see pages 20,108, 1'10)
FUEL LID LATCHRemove the fuel lid latchby turning it 90o
Installation is the reverse of the removal procedure.
NOTE;
o Make sure each opener cable is connectedelty
. Make sure the fuel lid opens properly andsecurely.
prop-
locks
>: Eolt locations, 2 |r'- 6x10mm9.8 N.m (1.0 kgf.m, I
FUEL LIDAfter installing check fora flush fit with the body.
\
20-112
Trunk lid latch/Lock cylinder:
>: Bolt locationsA >,3
6x1.omm i9.8 N.m (1.0 kgf.m,
:::^ _=)
TRUNK LIDOPENER
CONNECTORDisconnect.-\
TRUNK LIDOPENERCABLE
8>, 1
ff e rt.omm IZS 9.8 N.ln (1.0 kgt m,.ty 7.2-tbr.ftt ,/
CYLINOER
TRUNK LIDLATCH
CYLINDERROD
Installation is the reverse of the removal procedure.
NOTE:
. Grease the trunk lid latch.. Make sure the trunk lid opens properly and lockssecurely.
a Make sure the connector and cylinder rod areconnected property.