Page 97 of 251
Audio System
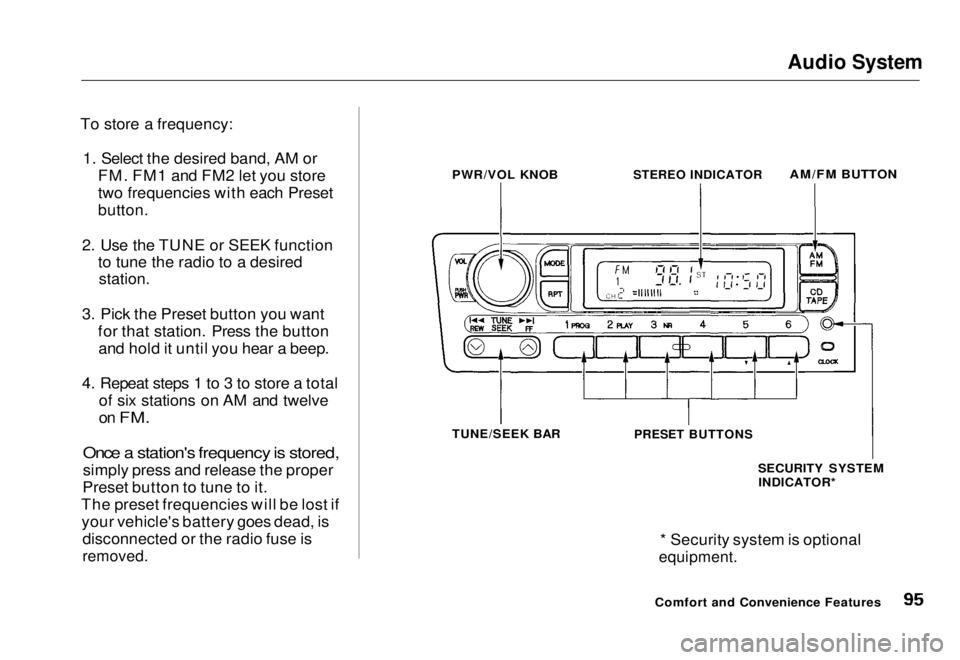
To store a frequency: 1. Select the desired band, AM or FM. FM1 and FM2 let you store
two frequencies with each Preset
button.
2. Use the TUNE or SEEK function to tune the radio to a desired
station.
3. Pick the Preset button you want for that station. Press the buttonand hold it until you hear a beep.
4. Repeat steps 1 to 3 to store a total of six stations on AM and twelve
on
FM.
Once a station's frequency is stored,
simply press and release the proper
Preset button to tune to it.
The preset frequencies will be lost if your vehicle's battery goes dead, is disconnected or the radio fuse is
removed.
* Security system is optional
equipment.
Comfort and Convenience Features
PWR/VOL KNOB
STEREO INDICATOR
AM/FM BUTTON
TUNE/SEEK BAR
PRESET BUTTONS
SECURITY SYSTEMINDICATOR*Main Menu Table of Contents s t
Page 112 of 251
Service Station Procedures
Opening the Hood
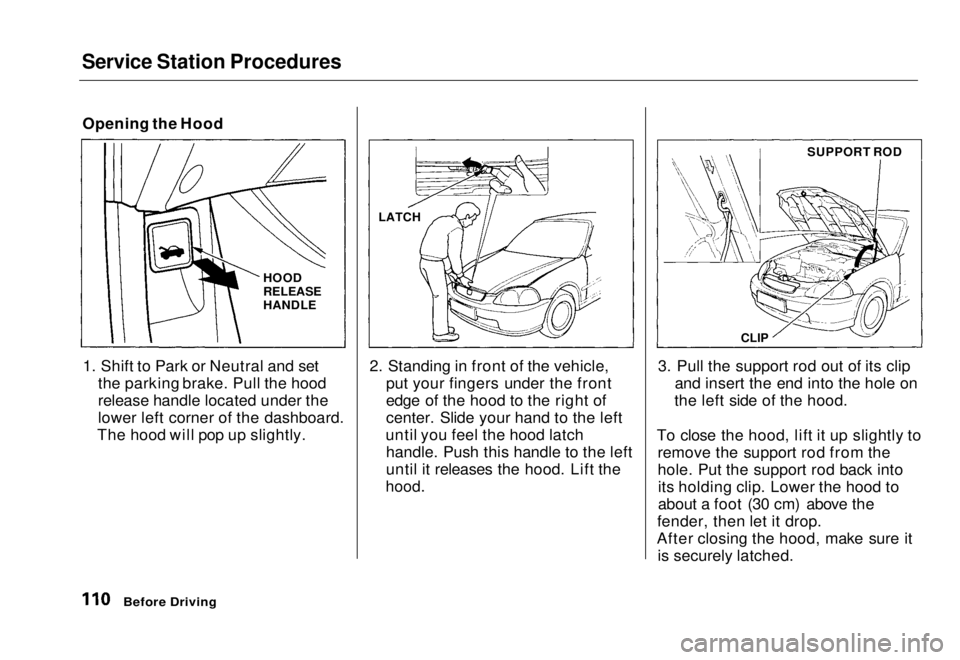
1. Shift to Park or Neutral and set the parking brake. Pull the hood
release handle located under the
lower left corner of the dashboard.
The hood will pop up slightly. 2. Standing in front of the vehicle,
put your fingers under the front
edge of the hood to the right of
center. Slide your hand to the left
until you feel the hood latch handle. Push this handle to the left
until it releases the hood. Lift the
hood.
3. Pull the support rod out of its clip
and insert the end into the hole on
the left side of the hood.
To close the hood, lift it up slightly to remove the support rod from the
hole. Put the support rod back intoits holding clip. Lower the hood to
about a foot (30 cm) above the
fender, then let it drop.
After closing the hood, make sure it is securely latched.
Before Driving
LATCH
HOOD
RELEASE
HANDLE
CLIP
SUPPORT RODMain Menu Table of Contents s t
Page 119 of 251
Carrying Cargo
Load Limit
The maximum load for your vehicle
is
850
Ib
(395 kg).
This figure includes the total weight of all occupants, cargo and
accessories.
To figure out how much cargo you can carry:
Add up the weight of all occupants. Subtract the total from 850 Ib (395
kg).
The final number is the total weight
of cargo you can carry. Carrying Items in the Passenger
Compartment Store or secure all items that could
be thrown around and hurt someone during a crash.
Do not put any items on top of the
rear shelf. They can block your
view and be thrown around the vehicle during a crash.
Be sure items placed on the floor
behind the front seats cannot roll
under the seats and interfere with
the driver's ability to operate the pedals, or with the proper
operation of the seats. Keep the glove box closed while
driving. If the lid is open, a
passenger could injure their knees during a crash or sudden stop.
Before Driving
Overloading or improper
loading can affect handling and
stability and cause a crash in
which you can be hurt or killed.
Follow all load limits and other
loading guidelines in this
manual.Main Menu Table of Contents s t
Page 122 of 251
Preparing to Drive
You should do the following checks and adjustments every day before
you drive your vehicle.
1. Make sure all windows, mirrors, and outside lights are clean and
unobstructed. Remove frost, snow, or ice.
2. Check that the hood and trunk are fully closed.
3. Visually check the tires. If a tire looks low, use a gauge to check its
pressure.
4. Check that any items you may be
carrying with you inside are stored
properly or fastened down
securely.
5. Check the adjustment of the seat (see page 74).
6. Check the adjustment of the inside and outside mirrors (see
page 79).
7. Check the adjustment of the steering wheel (see page 63).
8. Make sure the doors are securely closed and locked. 9. Fasten your seat belt. Check that
your passengers have fastened
their seat belts (see page 7).
10. Turn the ignition switch ON (II). Check the indicator lights in the
instrument panel.
11. Start the engine (see page 121).
12. Check the gauges and indicator lights in the instrument panel (see
page 33).
DrivingMain Menu Table of Contents s t
Page 156 of 251
Engine Oil
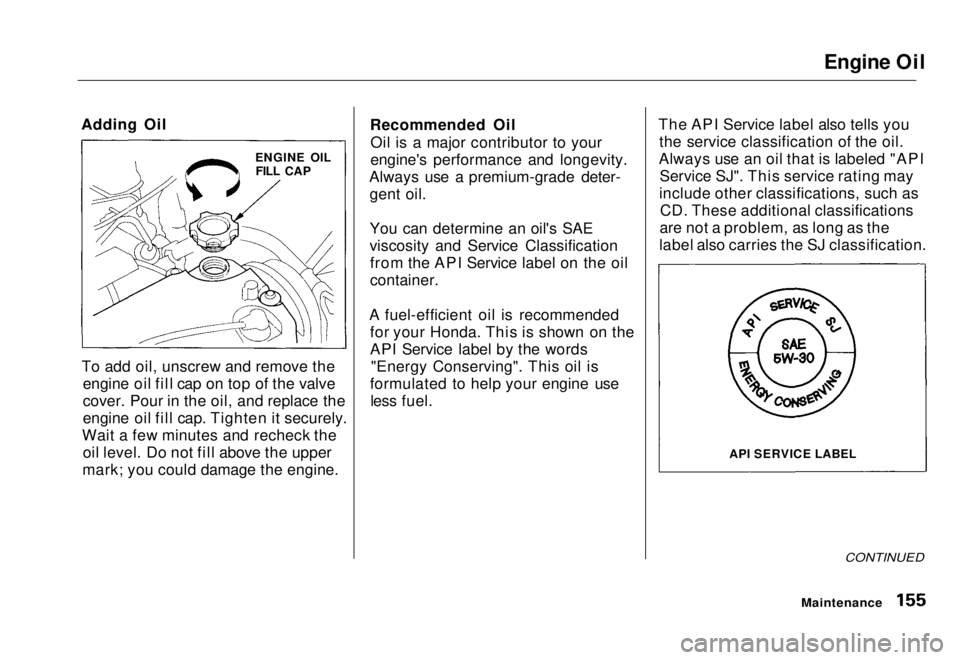
Adding Oil
To add oil, unscrew and remove the engine oil fill cap on top of the valve
cover. Pour in the oil, and replace the
engine oil fill cap. Tighten it securely.
Wait a few minutes and recheck the oil level. Do not fill above the upper
mark; you could damage the engine. Recommended Oil
Oil is a major contributor to your
engine's performance and longevity.
Always use a premium-grade deter- gent oil.
You can determine an oil's SAE
viscosity and Service Classificationfrom the API Service label on the oil
container.
A fuel-efficient oil is recommended for your Honda. This is shown on the
API Service label by the words"Energy Conserving". This oil is
formulated to help your engine use less fuel. The API Service label also tells you
the service classification of the oil.
Always use an oil that is labeled "API Service SJ". This service rating may
include other classifications, such as CD. These additional classifications
are not a problem, as long as the
label also carries the SJ classification.
CONTINUED
Maintenance
ENGINE OIL
FILL CAP
API SERVICE LABELMain Menu Table of Contents s t
Page 166 of 251
Transmission Fluid
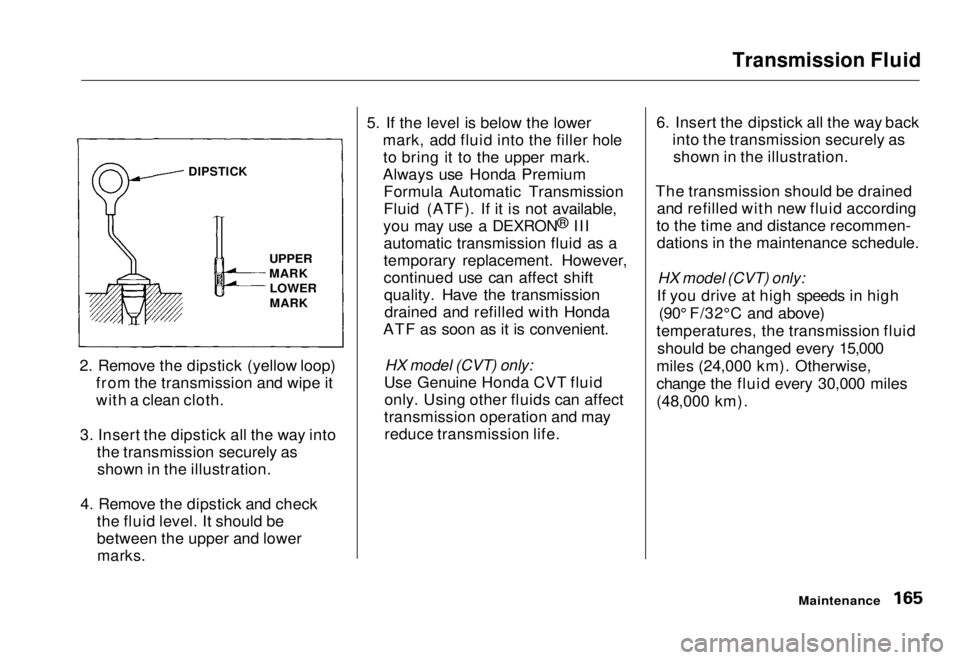
2. Remove the dipstick (yellow loop) from the transmission and wipe it
with a clean cloth.
3. Insert the dipstick all the way into the transmission securely asshown in the illustration.
4. Remove the dipstick and check the fluid level. It should be
between the upper and lower
marks.
5. If the level is below the lower
mark, add fluid into the filler holeto bring it to the upper mark.
Always use Honda Premium Formula Automatic Transmission
Fluid (ATF). If it is not available,
you may use a DEXRON ®
III
automatic transmission fluid as a
temporary replacement. However,
continued use can affect shift quality. Have the transmissiondrained and refilled with Honda
ATF as soon as it is convenient.
HX model (CVT) only:
Use Genuine Honda CVT fluid only. Using other fluids can affect
transmission operation and may reduce transmission life. 6. Insert the dipstick all the way back
into the transmission securely asshown in the illustration.
The transmission should be drained and refilled with new fluid according
to the time and distance recommen- dations in the maintenance schedule.
HX model (CVT) only:
If you drive at high speeds in high (90° F/32°C and above)
temperatures, the transmission fluid should be changed every 15,000
miles (24,000 km). Otherwise,
change the fluid every 30,000 miles
(48,000 km).
Maintenance
DIPSTICK
UPPER
MARK
LOWER
MARKMain Menu Table of Contents s t
Page 167 of 251
Transmission Fluid, Brake and Clutch Fluid
5-speed Manual Transmission
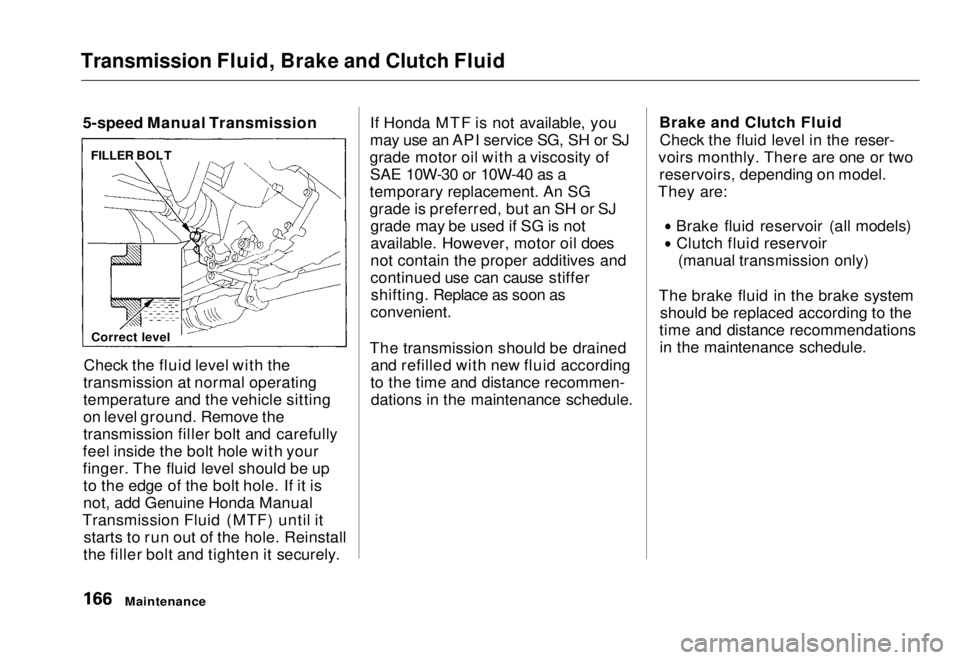
Check the fluid level with the
transmission at normal operating
temperature and the vehicle sitting
on level ground. Remove the
transmission filler bolt and carefully
feel inside the bolt hole with your
finger. The fluid level should be up to the edge of the bolt hole. If it is
not, add Genuine Honda Manual
Transmission Fluid (MTF) until it starts to run out of the hole. Reinstall
the filler bolt and tighten it securely. If Honda MTF is not available, you
may use an API service SG, SH or SJ
grade motor oil with a viscosity of SAE 10W-30 or 10W-40 as a
temporary replacement. An SG
grade is preferred, but an SH or SJ grade may be used if SG is not
available. However, motor oil does
not contain the proper additives and
continued use can cause stiffershifting. Replace as soon as
convenient.
The transmission should be drained and refilled with new fluid according
to the time and distance recommen- dations in the maintenance schedule. Brake and Clutch Fluid
Check the fluid level in the reser-
voirs monthly. There are one or two reservoirs, depending on model.
They are:
Brake fluid reservoir (all models)Clutch fluid reservoir (manual transmission only)
The brake fluid in the brake system should be replaced according to the
time and distance recommendations in the maintenance schedule.
Maintenance
FILLER BOLT
Correct levelMain Menu Table of Contents s t
Page 192 of 251
Lights
Replacing the Front Side Marker/
Turn Signal and Parking Light Bulb
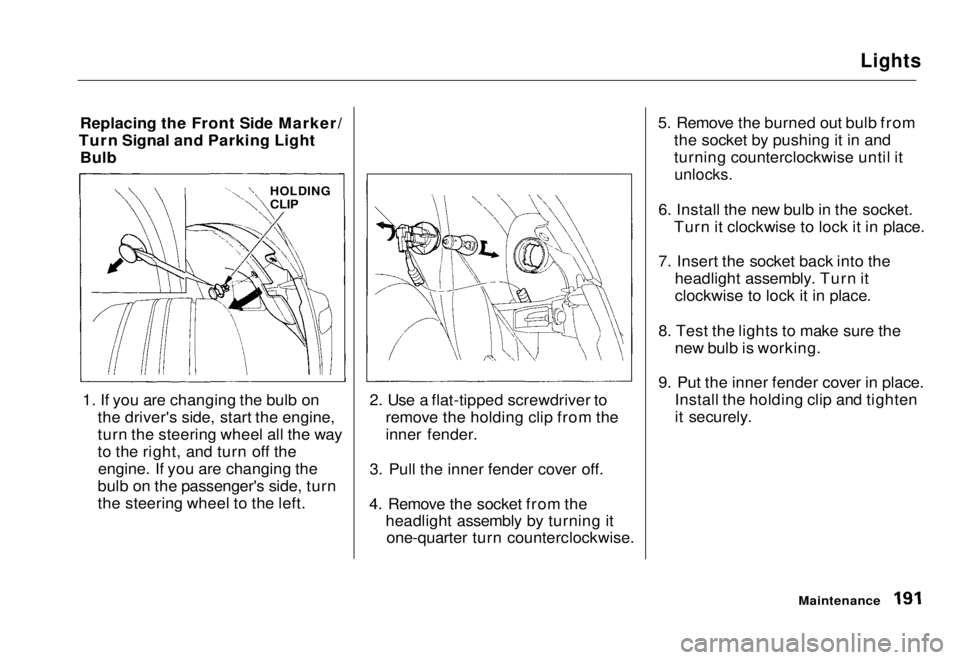
1. If you are changing the bulb on the driver's side, start the engine,
turn the steering wheel all the way
to the right, and turn off theengine. If you are changing the
bulb on the passenger's side, turn
the steering wheel to the left. 2. Use a flat-tipped screwdriver to
remove the holding clip from the
inner fender.
3. Pull the inner fender cover off.
4. Remove the socket from the headlight assembly by turning itone-quarter turn counterclockwise. 5. Remove the burned out bulb from
the socket by pushing it in and
turning counterclockwise until it
unlocks.
6. Install the new bulb in the socket. Turn it clockwise to lock it in place.
7. Insert the socket back into the headlight assembly. Turn it
clockwise to lock it in place.
8. Test the lights to make sure the new bulb is working.
9. Put the inner fender cover in place. Install the holding clip and tighten
it securely.
Maintenance
HOLDING
CLIPMain Menu Table of Contents s t