Page 96 of 251
Audio System
AM/FM Stereo Audio System
Your Honda's audio system provides clear reception on both AM and FM
bands, while the preset buttons allow
you to easily select your favorite stations.
A cassette player, CD player or CD changer is available as optional
equipment. The cassette player is
standard on the Si model in Canada.
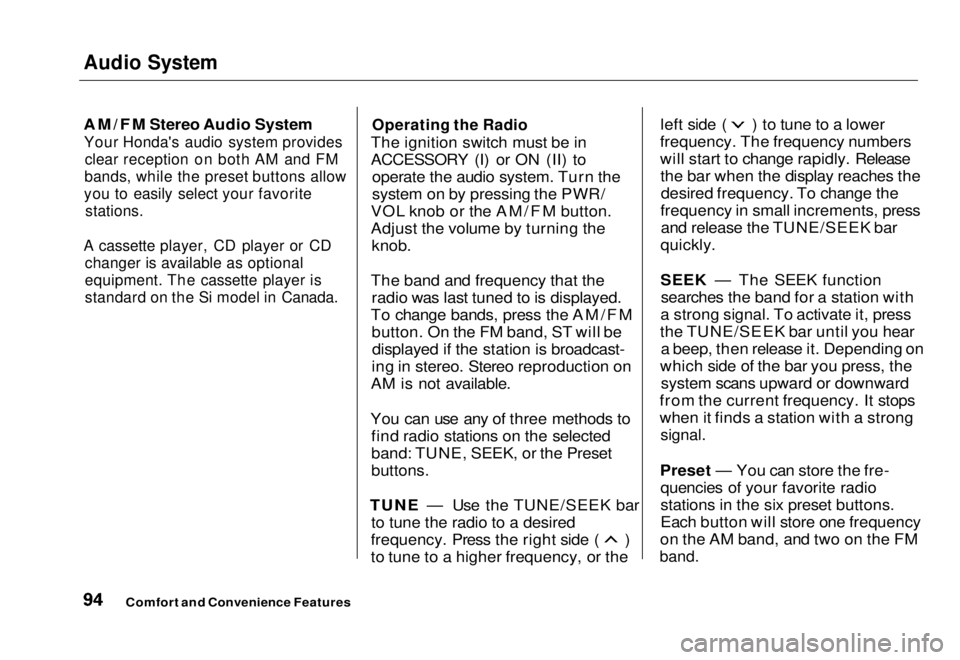
Operating the Radio
The ignition switch must be in
ACCESSORY (I) or ON (II) to operate the audio system. Turn the
system on by pressing the PWR/
VOL knob or the AM/FM button.
Adjust the volume by turning the
knob.
The band and frequency that the radio was last tuned to is displayed.
To change bands, press the AM/FM button. On the FM band, ST will bedisplayed if the station is broadcast-
ing in stereo. Stereo reproduction on
AM is not available.
You can use any of three methods to find radio stations on the selected
band: TUNE, SEEK, or the Preset
buttons.
TUNE — Use the TUNE/SEEK bar to tune the radio to a desired frequency. Press the right side ( )
to tune to a higher frequency, or the left side ( ) to tune to a lower
frequency. The frequency numbers
will start to change rapidly. Release the bar when the display reaches thedesired frequency. To change the
frequency in small increments, press and release the TUNE/SEEK bar
quickly.
SEEK — The SEEK function searches the band for a station with
a strong signal. To activate it, press
the TUNE/SEEK bar until you hear a beep, then release it. Depending on
which side of the bar you press, the system scans upward or downward
from the current frequency. It stops
when it finds a station with a strong
signal.
Preset — You can store the fre- quencies of your favorite radio
stations in the six preset buttons.
Each button will store one frequency
on the AM band, and two on the FM
band.
Comfort and Convenience FeaturesMain Menu Table of Contents s t
Page 97 of 251
Audio System
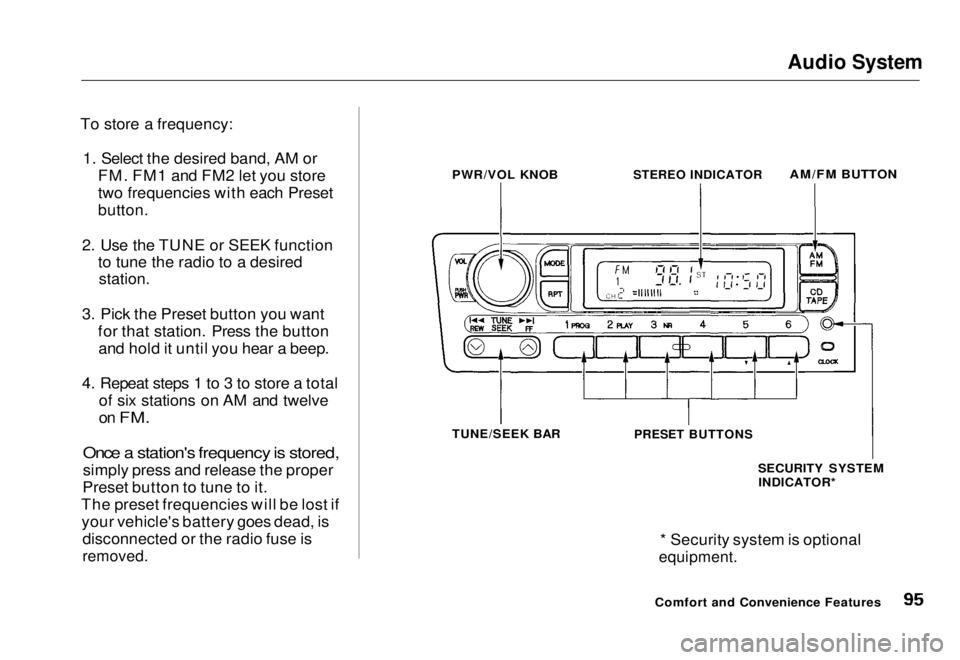
To store a frequency: 1. Select the desired band, AM or FM. FM1 and FM2 let you store
two frequencies with each Preset
button.
2. Use the TUNE or SEEK function to tune the radio to a desired
station.
3. Pick the Preset button you want for that station. Press the buttonand hold it until you hear a beep.
4. Repeat steps 1 to 3 to store a total of six stations on AM and twelve
on
FM.
Once a station's frequency is stored,
simply press and release the proper
Preset button to tune to it.
The preset frequencies will be lost if your vehicle's battery goes dead, is disconnected or the radio fuse is
removed.
* Security system is optional
equipment.
Comfort and Convenience Features
PWR/VOL KNOB
STEREO INDICATOR
AM/FM BUTTON
TUNE/SEEK BAR
PRESET BUTTONS
SECURITY SYSTEMINDICATOR*Main Menu Table of Contents s t
Page 101 of 251
Audio System
Digital Clock
The audio system also displays the time. The ignition switch must be in
ACCESSORY (I) or ON (II).
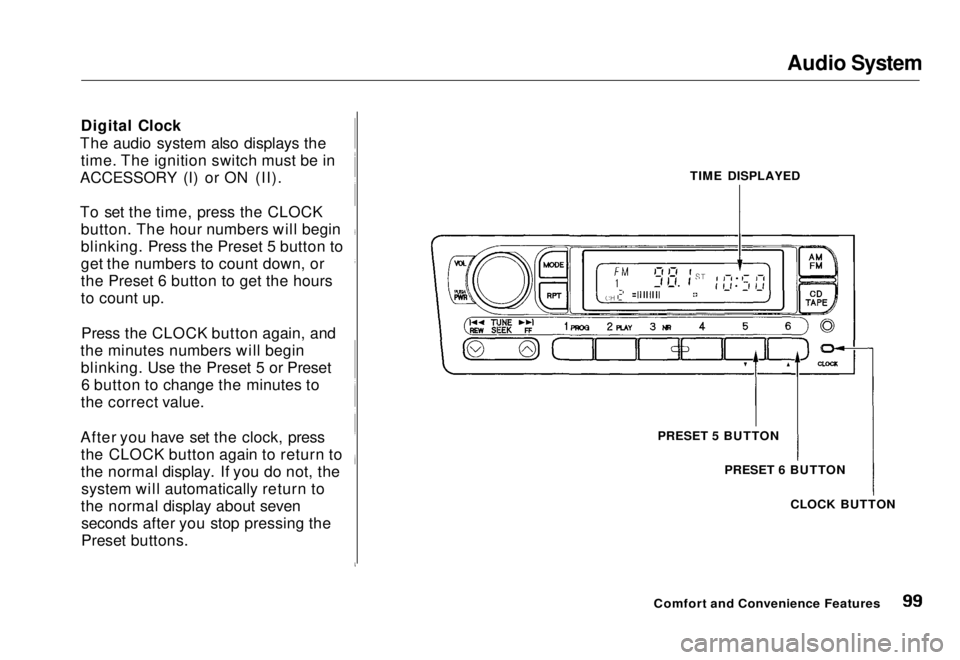
To set the time, press the CLOCK button. The hour numbers will begin
blinking. Press the Preset 5 button to
get the numbers to count down, or
the Preset 6 button to get the hours
to count up.
Press the CLOCK button again, and
the minutes numbers will begin blinking. Use the Preset 5 or Preset6 button to change the minutes to
the correct value.
After you have set the clock, press the CLOCK button again to return to
the normal display. If you do not, thesystem will automatically return to
the normal display about seven seconds after you stop pressing the
Preset buttons. TIME DISPLAYED
PRESET 5 BUTTON PRESET 6 BUTTON
CLOCK BUTTON
Comfort and Convenience FeaturesMain Menu Table of Contents s t
Page 105 of 251
Audio System
Operating the Optional CD
Player/Changer
A Compact Disc changer is available through your dealer. It holds up to six discs, providing several hours of
continuous entertainment. You
operate the CD changer with the
same controls used for the radio.
Your dealer also has an accessory in- dash single CD player available that
is operated by the radio controls. To
operate this unit, use the instructions (except for those relating to multiple
discs) in this section.
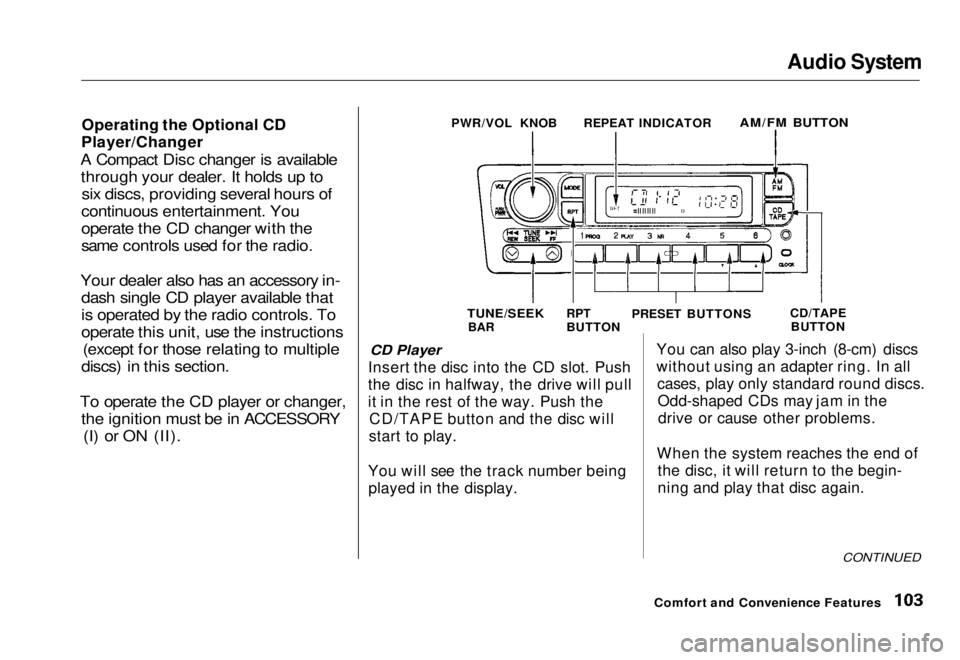
To operate the CD player or changer, the ignition must be in ACCESSORY (I) or ON (II). CD Player
Insert the disc into the CD slot. Push
the disc in halfway, the drive will pull
it in the rest of the way. Push the CD/TAPE button and the disc will
start to play.
You will see the track number being played in the display. You can also play 3-inch (8-cm) discs
without using an adapter ring. In all
cases, play only standard round discs.Odd-shaped CDs may jam in thedrive or cause other problems.
When the system reaches the end of the disc, it will return to the begin-
ning and play that disc again.
CONTINUED
Comfort and Convenience Features
PWR/VOL KNOB
REPEAT INDICATOR
AM/FM BUTTON
TUNE/SEEK
BAR RPT
BUTTON
PRESET BUTTONS
CD/TAPE
BUTTONMain Menu Table of Contents s t