1998 GMC SIERRA brake light
[x] Cancel search: brake lightPage 248 of 452

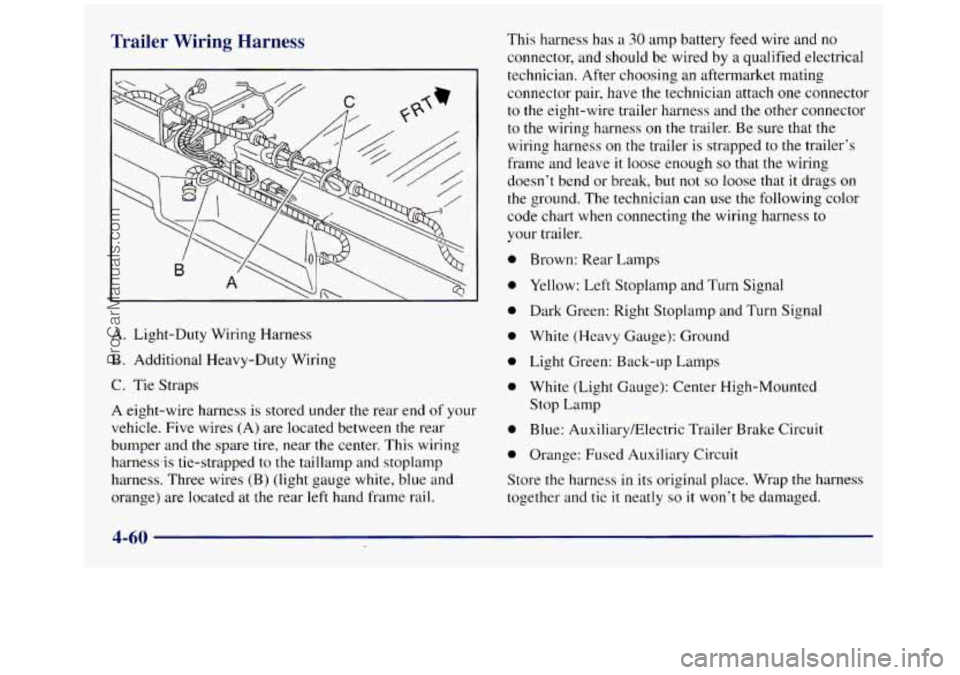
Trailer Wiring Harness
A. Light-Duty Wiring Harness
B. Additional Heavy-Duty Wiring
C. Tie Straps
A eight-wire harness is stored under the rear end of your
vehicle. Five wires (A) are located between the rear
bumper and the spare tire, near the center. This wiring
harnewis tie-strapped to the taillamp and stoplamp
harness. Three wires (B) (light gauge white, blue and
orange) are located at
the rear left hand frame rail. This
harness has a
30 amp battery feed wire and no
connector, and should be wired
by a qualified electrical
technician. After choosing an aftermarket mating
connector pair, have the technician attach one connector
to the eight-wire trailer harness and the other connector
to the wiring harness on the trailer. Be sure that the
wiring harness on the trailer is strapped to the trailer’s
frame and leave
it loose enough so that the wiring
doesn’t bend or break, but not
so loose that it drags on
the ground. The technician can use the following color
code chart when connecting the wiring harness to
your trailer.
0 Brown: Rear Lamps
0 Yellow: Left Stoplamp and Turn Signal
0 Dark Green: Right Stoplamp and Turn Signal
0 White (Heavy Gauge): Ground
0 Light Green: Back-up Lamps
0 White (Light Gauge): Center High-Mounted
Stop Lamp
0 Blue: Auxiliary/Electric Trailer Brake Circuit
0 Orange: Fused Auxiliary Circuit
Store the harness
in its original place. Wrap the harness
together and tie
it neatly so it won’t be damaged.
4-60
ProCarManuals.com
Page 256 of 452

2. Get the vehicles close enough so the jumper cables
can reach, but be sure the vehicles aren’t touching
each other. If they are, it could cause a ground
connection
you don’t want. You wouldn’t be able
to start your vehicle, and the bad grounding could
damage the electrical systems.
To avoid the possibility
of the vehicles rolling, set
the parking brake firmly on both vehicles involved
in the jump start procedure. Put an automatic
transmission in
PARK (P) or a manual transmission
in NEUTRAL (N).
If you have a four-wheel-drive
vehicle, be sure the transfer case is not in
NEUTRAL
(N).
3. Turn off the ignition on both vehicles. Unplug
unnecessary accessories plugged into the cigarette
lighter or accessory power outlets. Turn
off all lamps
that aren’t needed as well as radios. This will avoid
sparks and help save both batteries. In addition, it
could save your radio!
I NOTICE:
If you leave your radio on, it could be badly
damaged. The repairs wouldn’t be covered by
your warranty.
4. Open the hoods and locate the batteries. Find the
positive
(+) and negative (-) terminals on each battery.
If your vehicle has air conditioning, the auxiliary
electric fan under the hood can start up even
when the engine is not running and can injure
you. Keep hands, clothing and tools
away from
any underhood electric fan.
5-4
t
ProCarManuals.com
Page 328 of 452

Some driving conditions or climates may cause a brake
squeal when the brakes are first applied or lightly
applied. This does
not mean something is wrong with
your brakes.
Properly torqued wheel
nuts are necessary to help
prevent brake pulsation. When tires are rotated, inspect
brake pads for wear and evenly torque wheel nuts
in the
proper sequence to
GM specifications.
If you have rear drum brakes, they don‘t have wear
indicators, but if you ever hear a rear brake rubbing
noise, have the rear brake linings inspected immediately. Also, the rear brake drums should be removed and
inspected each time the tires are removed for rotation
or
changing. When you have the front brake pads replaced,
have the rear brakes inspected, too.
Brake linings should always be replaced as complete
axle sets.
See “Brake System Inspection”
in Section 7 of this manual
under
Part C “Periodic Maintenance Inspections.”
Brake Pedal Travel
See your dealer if the brake pedal does not return to
normal height, or
if there is a rapid increase in pedal
travel. This could be a sign of brake trouble.
Brake Adjustment
Every time you make a brake stop, your disc brakes
adjust for wear.
If your brake pedal goes down farther than normal, your
rear drum brakes may need adjustment. Adjust them by
backing
up and firmly applying the brakes a few times.
Replacing Brake System Parts
The braking system on a modern vehicle is complex. Its
many parts have to be
of top quality and work well
together if the vehicle is to have really good braking.
Your vehicle was designed and tested
with top-quality
GM brake parts. When you replace parts of your braking
system
-- for example, when your brake linings wear
down and you have
to have new ones put in -- be sure
you get new approved
GM replacement parts. If you
don’t,
your brakes may no longer work properly. For
example,
if someone puts in brake linings that are wrong
for your vehicle, the balance between your front and
rear brakes can change
-- for the worse. The braking
performance you’ve come
to expect can change in many
other ways
if someone puts in the wrong replacement
brake parts.
6-38
ProCarManuals.com
Page 364 of 452

Fuse/Circuit Breaker Usage
20
21
22
23
24
A
B
PRNDL, Automatic Transmission,
Speedometer, Check Gages
Warning Light
Security/Steering
Not Used
Not Used
Front Axle,
4WD Indicator Lamp,
TP2 Relay (Gasoline Engine)
Power Door Lock, Six-Way Power Seat, Keyless Entry Module
Power Windows
Underhood Fuse/Relay Center
The underhood fusehelay center is located in the rear of
the engine compartment near the brake fluid reservoir.
Move the retainer clips
for the cover to access the
fuse block.
You can remove fuses with a fuse extractor. The fuse
extractor
is mounted to the interior fuse block. TO
remove fuses
if you don’t have a fuse extractor, hold the
end of the fuse between your thumb and index finger
and pull straight out.
6-74
ProCarManuals.com
Page 365 of 452

STARTER RELAY
[-I
[-I
[T)
I BLOWER
n STOPiHAZ
Name
ECM-B RR DEFOG
IGN-E
FUEL
SOL
GLOW PLUG
Usage
Horn, Underhood Lamps
Auxiliary Fan
Injectors, PCM/VCM
Not Used
Air Conditioning
Not Used
Ignition Switch, EGR, Canister
Purge, EVRV Idle Coast Solenoid,
Heated
02, Fuel Heater
(Diesel Engine), Water Sensor
(Diesel Engine)
HTD ST-RR Not Used
LIGHTING Headlamp and Panel Dimmer
BATT Battery, Fuse Block Busbar
IGN-A Ignition Switch
IGN-B Ignition Switch Switch,
Fog and Courtesy Fuses
ABS Anti-Lock Brake Module
BLOWER High Blower Relay
STOP/HAZ Stoplamps
HEATED SEATS Not Used
6-75
Usage
Fuel Pump, PCM/VCM
Rear Window Defogger
Auxiliary Fan Relay Coi
il, AIC
Compressor Relay, Hot Fuel
Module, Dual Tanks
Fuel Solenoid (Diesel Engine)
Glow Plugs (Diesel Engine)
Name
HORN
AUX FAN
ECM- 1
HTD ST-FR
AIC HTD MIR
ENG-
1
ProCarManuals.com
Page 435 of 452

Section 9 Index
Accessory Power Outlet ......................... 2-59
AirBag ....................................... 1-23
Adding Equipment
............................ 1-3 1
How Does it Restrain .......................... 1-28
How it Works ................................ 1 -26
Location .................................... 1-26
Readiness Light ......................... 1.25, 2.65
What Makes it Inflate .......................... 1-27
What Will You See After
it Inflates ............... 1-28
When Should it Inflate ......................... 1-27
Air Bag
Off Light .......................... 1.58. 2.65
Air Cleaner
.................................... 6- 18
Air Cleaner Filter Restriction Indicator Check ........ 7-41
Air Conditioning ............................ 3.3. 3.4
Air Conditionillg Refrigerants ..................... 6-79
Alignment and Balance. Tire
...................... 6-59
Antenna
...................................... 3-26
Antifreeze
........................... 6-28.6-79.7-46
Anti-Lock Brake System Warning Light
................ 2.68. 4.7
Brakes ...................................... 4-7
Appearance Care
............................... 6-6 I
Adding Equipment to the Outside of Your Vehicle ...... 6-3
Servicing
................................... 1-30
Aluminum Wheels. Cleaning ...................... 6-67
Appearance Care and Materials .................... 6-69
Arbitration Program .............................. 8-9
Armrest Storage Compartment
.................... 2-56
Audio Equipment. Adding
........................ 3-24
Audio System
.................................. 3-7
Automatic Transmission
Check
...................................... 7-41
Fluid
.................................. 6-21. 7-47
Operation ................................... 2-15
Park Mechanism Check
........................ 7-43
Starting Your Engine
.......................... 2-12
Axle. Front
............................... 6-27. 7-47
Axle. Locking Rear
............................. 2-32
Axle. Rear
............................... 6-26. 7-47
Ashtrays ...................................... 2-58
Battery
...................................... 6-39
Jump Starting
................................. 5-3
Warnings ................................ 5-3. 5-5
BBB Auto Line ................................. 8-9
Better Business Bureau Mediation ................... 8-9
Blizzard. Driving
In ............................. 4-38
Replacement.
Keyless Entry ..................... 2-8
9-1
ProCarManuals.com
Page 436 of 452

Brake Adjustment
.................................. 6-38
Fluid .................................. 6-35, 7-46 Master Cylinder .............................. 6-35
PedalTravel ................................. 6-38 Replacing System Parts ........................ 6-38
System Warning Light ......................... 2-67
Transmission Shift Interlock Check ............... 7-42
Brakes, Anti-Lock ............................... 4-7
Braking ........................................ 4-6 Braking in Emergencies ........................... 4-8
Break-In, New Vehicle .......................... 2-10
Bulb Replacement .............................. 6-39
Parking ..................................... 2-25
Trailer ...................................... 4-56
Wear ....................................... 6-37
BTSICheck ..................................... 42
Camper vpe Mirror ........................... 2-48
Camper Wiring Harness .......................... 4-48
Canadian Roadside Assistance ...................... 8-7
Capacities and Specifications ...................... 6-77
Carbon Monoxide .................... 2.30.2.31. 4.40
Care of Your Cassette Tape Player .................. 3-25
Cassette Deck Service ........................... 7-40
Cassette Tape Player ........................ 3-9, 3- 12
Cassette Tape Player Care ........................ 3-25
CassetteKompact Disc Storage ............... 2-55, 2-56
Center Overhead Console ........................ 2-51
Center Passenger Position ........................ 1-32
Certification Label .............................. 4-43
CargoLamp ................................... 2-45
.
ProCarManuals.com