1998 DODGE RAM 1500 track bar
[x] Cancel search: track barPage 56 of 2627

(12) Perform a wheel alignment (Refer to 2 - SUS-
PENSION/WHEEL ALIGNMENT - STANDARD
PROCEDURE).
LOWER CONTROL ARM
REMOVAL
REMOVAL - 4X4 (LD)
(1) Raise and support the vehicle.
(2) Remove the wheel and tire assembly.
(3) Remove the upper ball joint nut. Separate ball
joint from the steering knuckle with Remover 8677.
(4) Remove the front halfshaft, (Refer to 3 - DIF-
FERENTIAL & DRIVELINE/HALF SHAFT -
REMOVAL).
(5) Remove the torsion bar, (Refer to 2 - SUSPEN-
SION/FRONT/TRACK BAR - REMOVAL).
(6) Remove the shock absorber lower bolt.
(7) Remove the stabilizer bar link (Refer to 2 -
SUSPENSION/FRONT/STABILIZER LINK -
REMOVAL).
(8) Remove the lower ball joint nut. Separate ball
joint from the steering knuckle with Remover 8677.
(9) Remove the control arm pivot bolts and suspen-
sion arm from frame rail brackets (Fig. 23).
REMOVAL - 4X2
(1) Raise and support the vehicle.
(2) Remove the tire and wheel assembly.
(3) Support the lower control arm at the outboard
side of the lower control arm to support vehicle
weight.(4) Remove the shock (Refer to 2 - SUSPENSION/
FRONT/SHOCK - REMOVAL).
(5) Install Spring Compressor DD-1278 up through
the lower suspension arm, coil spring and shock hole
in the frame. The bell-shaped adapter goes against
the lower suspension arm. Install the nut on top of
the tool at the shock hole.
(6) Tighten the spring compressor nut against bell-
shaped adapter finger tight then loosen 1/2 turn.
NOTE: This will hold the spring in place until the
lower suspension arm is separated from the steer-
ing knuckle.
(7) Remove the stabilizer link (Refer to 2 - SUS-
PENSION/FRONT/STABILIZER LINK - REMOVAL).
(8) Remove the lower ball joint nut at the steering
knuckle.
(9) Install Ball Joint Remover tool 8677 on the
lower ball joint and separate the ball joint from the
knuckle.
NOTE: Do not allow the upper control arm and
steering knuckle to rebound downwards they must
be supported.
(10) Support the upper control arm and steering
knuckle out of the way.
(11) Remove the lower control arm support.
(12) Tighten the spring compressor tool to allow
clearance for the lower ball joint to be removed out of
the knuckle.
(13) Loosen the tension on the spring compressor
tool slowly allowing the lower suspension arm to
pivot downward.
(14) Remove the spring compressor tool.
(15) Remove coil spring and isolator pad from the
vehicle (Fig. 26).
(16) Remove the front and rear pivot bolts (Fig.
24).
(17) Remove the lower control arm.
INSTALLATION
INSTALLATION - 4X4 (LD)
(1) Position the lower control arm at the frame rail
brackets. Install the pivot bolts and nuts. Tighten the
nuts finger-tight.
CAUTION: The ball joint stud taper must be CLEAN
and DRY before installing the knuckle. Clean the
stud taper with mineral spirits to remove dirt and
grease.
(2) Insert the lower ball joint into the steering
knuckle. Install and tighten the retaining nut to 52
Fig. 23 LOWER CONTROL ARM
1 - LOWER CONTROL ARM
2 - UPPER CONTROL ARM
3 - FRONT BOLT
4 - NUTS
5 - REAR BOLT
DRFRONT - INDEPENDENT FRONT SUSPENSION 2 - 21
LOWER BALL JOINT (Continued)
Page 57 of 2627

N´m (38 ft. lbs.)(on 1500 series only an additional 90É
turn is required).
(3) Install the torsion bar, (Refer to 2 - SUSPEN-
SION/FRONT/TRACK BAR - INSTALLATION).
(4) Install shock absorber lower bolt and tighten to
135 N´m (100 ft. lbs.).
(5) Install the front halfshaft, (Refer to 3 - DIF-
FERENTIAL & DRIVELINE/HALF SHAFT -
INSTALLATION).
(6) Insert the upper ball joint into the steering
knuckle. Install and tighten the retaining nut to 54
N´m (40 ft. lbs.)(on 1500 series only an additional 90É
turn is required).
(7) Install the stabilizer bar link (Refer to 2 - SUS-
PENSION/FRONT/STABILIZER LINK - INSTALLA-
TION).
(8) Tighten the lower control arm front pivot nut
to 204 N´m (150 ft. lbs.). Tighten rear pivot bolt to
204 N´m (150 ft. lbs.).
(9) Install the wheel and tire assembly,(Refer to 22
- TIRES/WHEELS/WHEELS - STANDARD PROCE-
DURE).
(10) Remove the support and lower the vehicle.
(11) Adjust the front suspension height and per-
form a wheel alignment (Refer to 2 - SUSPENSION/
WHEEL ALIGNMENT - STANDARD PROCEDURE).
INSTALLATION - 4X2
(1) Install the lower control arm into place on the
vehicle.
(2) Install the front and rear control arm pivot
bolts finger tight.
(3) Install the coil spring into the frame pocket(Re-
fer to 2 - SUSPENSION/FRONT/SPRING - INSTAL-
LATION).(4) Install the Spring Compressor DD-1278 up
through the lower suspension arm, coil spring and
shock hole in the frame.
(5) Tighten the tool nut to compress the coil
spring.
(6) Remove the support from the upper control
arm and steering knuckle.
(7) Position the lower ball joint into the steering
knuckle.
(8) Install the retaining nut on the lower ball joint
and tighten to 52 N´m (38 ft. lbs.)(on 1500 series only
an additional 90É turn is required) or 135 N´m (100
ft. lbs.)(HD 4X2 only).
(9) Support the lower control arm at the outboard
side of the lower control arm to support vehicle
weight.
(10) Remove the spring compressor tool.
(11) Install the shock absorber. (Refer to 2 - SUS-
PENSION/FRONT/SHOCK - INSTALLATION).
(12) Install the stabilizer link (Refer to 2 - SUS-
PENSION/FRONT/STABILIZER LINK - INSTALLA-
TION).
(13) Remove the lower control arm support.
(14) Install the wheel and tire assembly and lower
the vehicle. (Refer to 22 - TIRES/WHEELS/WHEELS
- STANDARD PROCEDURE).
(15) Lower the vehicle to the floor with vehicle
weight and Tighten the front and rear control arm
pivot bolts to 204 N´m (150 ft. lbs.)(LD) or 285 N´m
(210 ft. lbs.)(HD 4X2 only).
(16) Perform a wheel alignment (Refer to 2 - SUS-
PENSION/WHEEL ALIGNMENT - STANDARD
PROCEDURE).
SPRING
REMOVAL
(1) Raise and support vehicle.
(2) Remove the front wheel and tire assembly.
(3) Support the lower control arm at the outboard
side of the lower control arm to support vehicle
weight.
(4) Remove the shock absorber (Refer to 2 - SUS-
PENSION/FRONT/SHOCK - REMOVAL).
(5) Install Spring Compressor DD-1278 up through
the lower suspension arm, coil spring and shock hole
in the frame. The bell-shaped adapter goes against
the lower suspension arm. Install the nut on top of
the tool at the shock hole (Fig. 25).
(6) Tighten the spring compressor nut against bell-
shaped adapter finger tight then loosen 1/2 turn.
NOTE: This will hold the spring in place until the
lower suspension arm is separated from the steer-
ing knuckle.
Fig. 24 LOWER CONTROL ARM - 4X2
1 - FRONT PIVOT BOLT
2 - REAR PIVOT BOLT
3 - LOWER CONTROL ARM
2 - 22 FRONT - INDEPENDENT FRONT SUSPENSIONDR
LOWER CONTROL ARM (Continued)
Page 72 of 2627
KNUCKLE
REMOVAL
(1) Remove the hub bearing (Refer to 2 - SUSPEN-
SION/FRONT/HUB / BEARING - REMOVAL).
(2) Remove tie-rod or drag link end from the steer-
ing knuckle arm.
(3) Remove the ABS sensor wire and bracket from
knuckle. Refer to Brakes, for proper procedures.
(4) Remove the cotter pin from the upper ball stud
nut. Remove the upper and lower ball stud nuts.
(5) Strike the steering knuckle with a brass ham-
mer to loosen.
(6) Remove knuckle from axle tube yokes.
INSTALLATION
(1) Position the steering knuckle on the ball studs.
(2) Install and tighten lower ball stud nut to 47
N´m (35 ft. lbs.) torque. Do not install cotter pin at
this time.
(3) Install and tighten upper ball stud nut to 94
N´m (70 ft. lbs.) torque. Advance nut to next slot to
line up hole and install new cotter pin.
(4) Retorque lower ball stud nut to 190±217 N´m
(140±160 ft. lbs.) torque. Advance nut to next slot to
line up hole and install new cotter pin.
(5) Install the hub bearing (Refer to 2 - SUSPEN-
SION/FRONT/HUB / BEARING - INSTALLATION).
(6) Install tie-rod or drag link end onto the steer-
ing knuckle arm.
(7) Install the ABS sensor wire and bracket to the
knuckle. Refer to Brakes, for proper procedure.
UPPER SUSPENSION ARM
REMOVAL
REMOVAL - LEFT
(1) Raise and support the vehicle.
(2) Remove the upper suspension arm nut and bolt
at the axle bracket (Fig. 21).
(3) Remove the nut and bolt at the frame rail and
remove the upper suspension arm.
REMOVAL - RIGHT
(1) Raise and support the vehicle.
(2) Disconnect the exhaust system at the mani-
folds.
(3) Disconnect the rubber exhaust mounts at the
muffler.
(4) Support the transmission.
(5) Remove the transmission cross member.
(6) Lower the exhaust system down in order to
gain access to the removal of the upper bolt.(7) Remove the nut and bolt at the frame rail and
remove the upper suspension arm.
(8) Remove the upper suspension arm nut and bolt
at the axle bracket.
(9) Remove the suspension arm from the vehicle.
INSTALLATION
INSTALLATION - LEFT
(1) Position the upper suspension arm at the axle
and frame rail.
(2) Install the bolts and finger tighten the nuts.
(3) Remove the supports and lower the vehicle.
(4) Tighten nut at the axle bracket to 163 N´m
(120 ft. lbs.). Tighten nut at frame bracket to 163
N´m (120 ft. lbs.).
INSTALLATION - RIGHT
(1) Position the upper suspension arm at the axle
and frame rail.
(2) Install the bolts, then finger tighten the nuts.
(3) Reconnect the rubber exhaust mounts at the
muffler.
(4) Reconnect the exhaust at the manifolds.
(5) Install the transmission crossmember.
(6) Remove the supports and lower the vehicle.
(7) Tighten nut at the axle bracket to 163 N´m
(120 ft. lbs.). Tighten nut at frame bracket to 163
N´m (120 ft. lbs.).
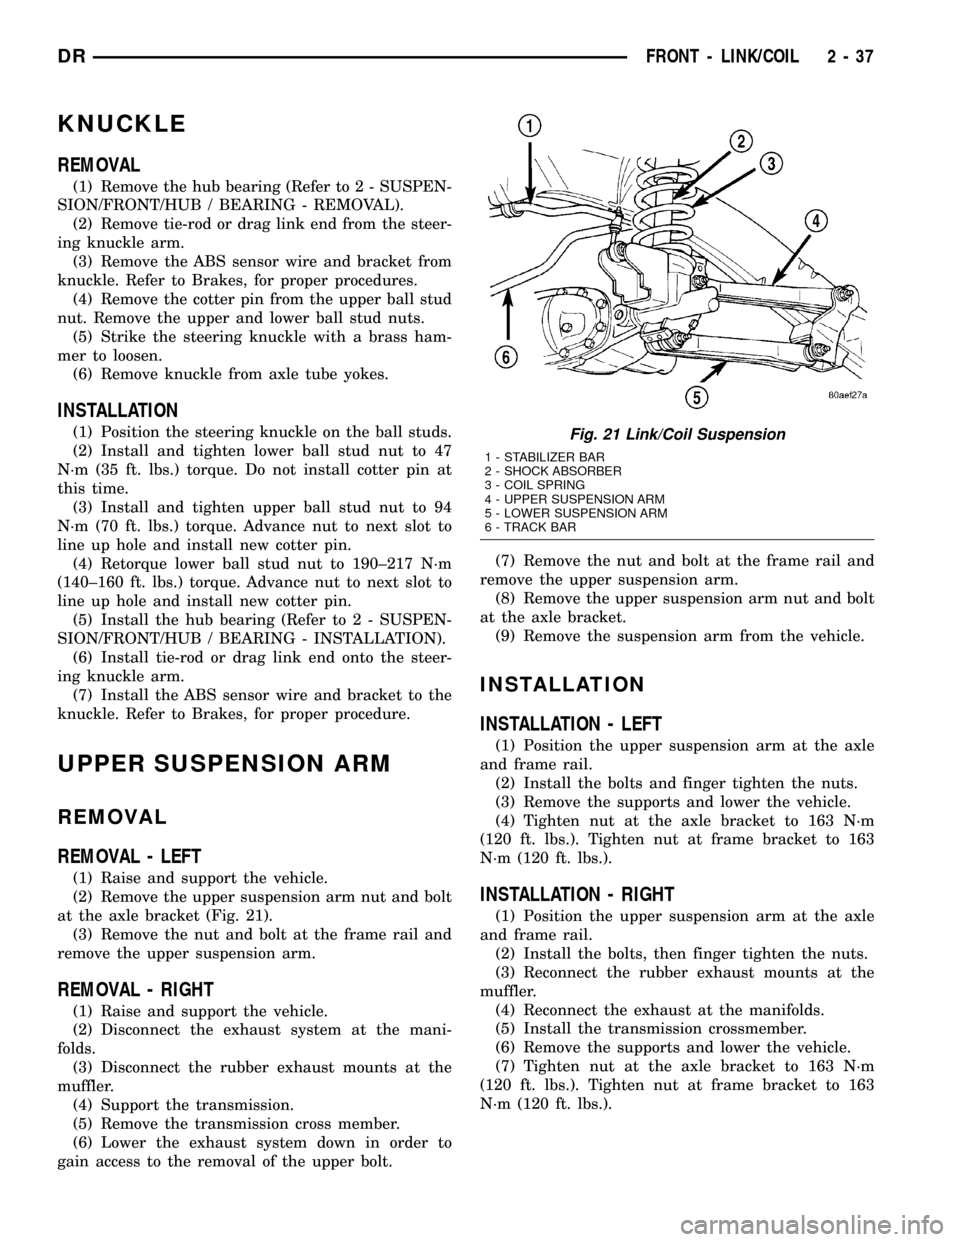
Fig. 21 Link/Coil Suspension
1 - STABILIZER BAR
2 - SHOCK ABSORBER
3 - COIL SPRING
4 - UPPER SUSPENSION ARM
5 - LOWER SUSPENSION ARM
6 - TRACK BAR
DRFRONT - LINK/COIL 2 - 37
Page 74 of 2627

SPRING
REMOVAL
(1) Raise and support the vehicle. Position a
hydraulic jack under the axle to support it.
(2) Paint or scribe alignment marks on lower sus-
pension arm cam adjusters and axle bracket for
installation reference.
(3) Remove the upper suspension arm and loosen
lower suspension arm bolts.
(4) Mark and disconnect the front propeller shaft
from the axle 4x4 models.
(5) Disconnect the track bar from the frame rail
bracket.
(6) Disconnect the drag link from pitman arm.
(7) Disconnect the stabilizer bar link and shock
absorber from the axle.
(8) Lower the axle until the spring is free from the
upper mount. Remove the coil spring.
INSTALLATION
(1) Position the coil spring on the axle pad.
(2) Raise the axle into position until the spring
seats in the upper mount.
(3) Connect the stabilizer bar links and shock
absorbers to the axle bracket. Connect the track bar
to the frame rail bracket.
(4) Install the upper suspension arm.
(5) Install the front propeller shaft to the axle 4x4
model.
(6) Install drag link to pitman arm and tighten
nut to specifications. Install new cotter pin.
(7) Remove the supports and lower the vehicle.
(8) Tighten the following suspension components
to specifications:
²Link to stabilizer bar nut.
²Lower shock bolt.
²Track bar bolt at axle shaft tube bracket.
²Upper suspension arm nut at axle bracket.
²Upper suspension nut at frame bracket.
²Align lower suspension arm reference marks and
tighten cam nut.
²Lower suspension nut at frame bracket.
STABILIZER BAR
REMOVAL
(1) Raise and support the vehicle.
(2) Hold the stabilizer link shafts with a wrench
and remove the link nuts at the stabilizer bar.
(3) Remove the retainers and grommets from the
stabilizer bar links.
(4) Remove the stabilizer bar link nuts from the
axle brackets.
Fig. 23 Shock Absorber and Bracket
1 - GROMMET
2 - RETAINER
3 - BRACKET
4 - RETAINER
5 - SHOCK
6 - GROMMET
Fig. 24 Shock Absorber Axle Mount
1 - SHOCK
2 - SPRING
3 - FLAG NUT
4 - SHOCK BOLT
DRFRONT - LINK/COIL 2 - 39
SHOCK (Continued)
Page 138 of 2627

Condition Possible Causes Correction
Gear Teeth Broke 1. Overloading. 1. Replace gears. Examine other
gears and bearings for possible
damage.
2. Erratic clutch operation. 2. Replace gears and examine the
remaining parts for damage. Avoid
erratic clutch operation.
3. Ice-spotted pavement. 3. Replace gears and examine
remaining parts for damage.
4. Improper adjustments. 4. Replace gears and examine
remaining parts for damage. Ensure
ring gear backlash is correct.
Axle Noise 1. Insufficient lubricant. 1. Fill differential with the correct
fluid type and quantity.
2. Improper ring gear and pinion
adjustment.2. Check ring gear and pinion
contact pattern.
3. Unmatched ring gear and pinion. 3. Replace gears with a matched
ring gear and pinion.
4. Worn teeth on ring gear and/or
pinion.4. Replace ring gear and pinion.
5. Loose pinion bearings. 5. Adjust pinion bearing pre-load.
6. Loose differential bearings. 6. Adjust differential bearing
pre-load.
7. Mis-aligned or sprung ring gear. 7. Measure ring gear run-out.
Replace components as necessary.
8. Loose differential bearing cap
bolts.8. Inspect differential components
and replace as necessary. Ensure
that the bearing caps are torqued
tot he proper specification.
9. Housing not machined properly. 9. Replace housing.
REMOVAL
(1) With vehicle in neutral, position vehicle on
hoist.
(2) Remove brake calipers and rotors.
(3) Disconnect ABS wheel speed sensors.
(4) Disconnect axle vent hose.
(5) Remove front propeller shaft.
(6) Remove stabilizer bar links at the axle brack-
ets (Fig. 1).
(7) Disconnect shock absorbers from axle brackets
(Fig. 2).
(8) Remove track bar from the axle bracket (Fig.
3).
(9) Remove tie rod and drag link (Fig. 4) from the
steering knuckles.
(10) Position lift under the axle assembly and
secure axle to lift.
(11) Mark suspension alignment cams for installa-
tion reference.
Fig. 1 STABILIZER LINK
1 - PULLER C-3894-A
2 - LINK
DRFRONT AXLE - 9 1/4 AA 3 - 57
FRONT AXLE - 9 1/4 AA (Continued)
Page 139 of 2627

(12) Remove upper and lower suspension arms
from the axle bracket (Fig. 5).
(13) Lower the axle. The coil springs will drop
with the axle.
(14) Remove coil springs from the axle bracket.
INSTALLATION
CAUTION: Suspension components with rubber
bushings should be tightened with the weight of thevehicle on the suspension. Failure to heed caution
may result in damage.
(1) Support the axle on a suitable lifting device.
(2) Secure axle to lifting device.
(3) Position the axle under the vehicle.
(4) Install springs, retainer clip and bolts.
(5) Raise axle and align it with the spring pads.
(6) Position upper and lower suspension arms in
the axle brackets. Install bolts, nuts and align the
suspension alignment cams to the reference marks.
Do not tighten at this time.
Fig. 2 SHOCK ABSORBER
1 - SHOCK
2 - SPRING
3 - FLAG NUT
4 - SHOCK BOLT
Fig. 3 TRACK BAR
1 - TRACK BAR
2 - BOLT
3 - NUT
Fig. 4 DRAG LINK
1 - PITMAN ARM
2 - DRAGLINK
3 - PULLER C-3894-A
Fig. 5 LINK/COIL SUSPENSION
1 - STABILIZER BAR
2 - SHOCK ABSORBER
3 - COIL SPRING
4 - UPPER SUSPENSION ARM
5 - LOWER SUSPENSION ARM
6 - TRACK BAR
3 - 58 FRONT AXLE - 9 1/4 AADR
FRONT AXLE - 9 1/4 AA (Continued)
Page 140 of 2627
(7) Connect track bar to the axle bracket and
install the bolt. Do not tighten at this time.
(8) Install shock absorber and tighten bolts to 121
N´m (89 ft. lbs.).
(9) Install stabilizer bar link to the axle bracket.
Tighten the nut to 68 N´m (50 ft. lbs.).
(10) Install drag link and tie rod to the steering
knuckles and tighten the nuts to 108 N´m (80 ft.
lbs.).
(11) Install ABS wheel speed sensors.
(12) Install rotors and brake calipers.
(13) Connect the axle vent hose.
(14) Install front propeller shaft.
(15) With vehicle on the ground, tighten upper
suspension arm nuts at axle to 149 N´m (110 ft. lbs.).
Tighten upper suspension arm nuts at frame to 149
N´m (110 ft. lbs.).
(16) With vehicle on the ground, tighten lower sus-
pension arm nuts at axle to 190 N´m (140 ft. lbs.).
Tighten the lower suspension arm nuts at frame to
190 N´m (140 ft. lbs.).
(17) Tighten track bar bolt at the axle bracket to
176 N´m (130 ft. lbs.).
(18) Check front wheel alignment.
ADJUSTMENTS
Ring and pinion gears are supplied as matched
sets. Compensation for pinion depth variance is
achieved with a select shim. located between the rear
pinion bearing and pinion gear head.
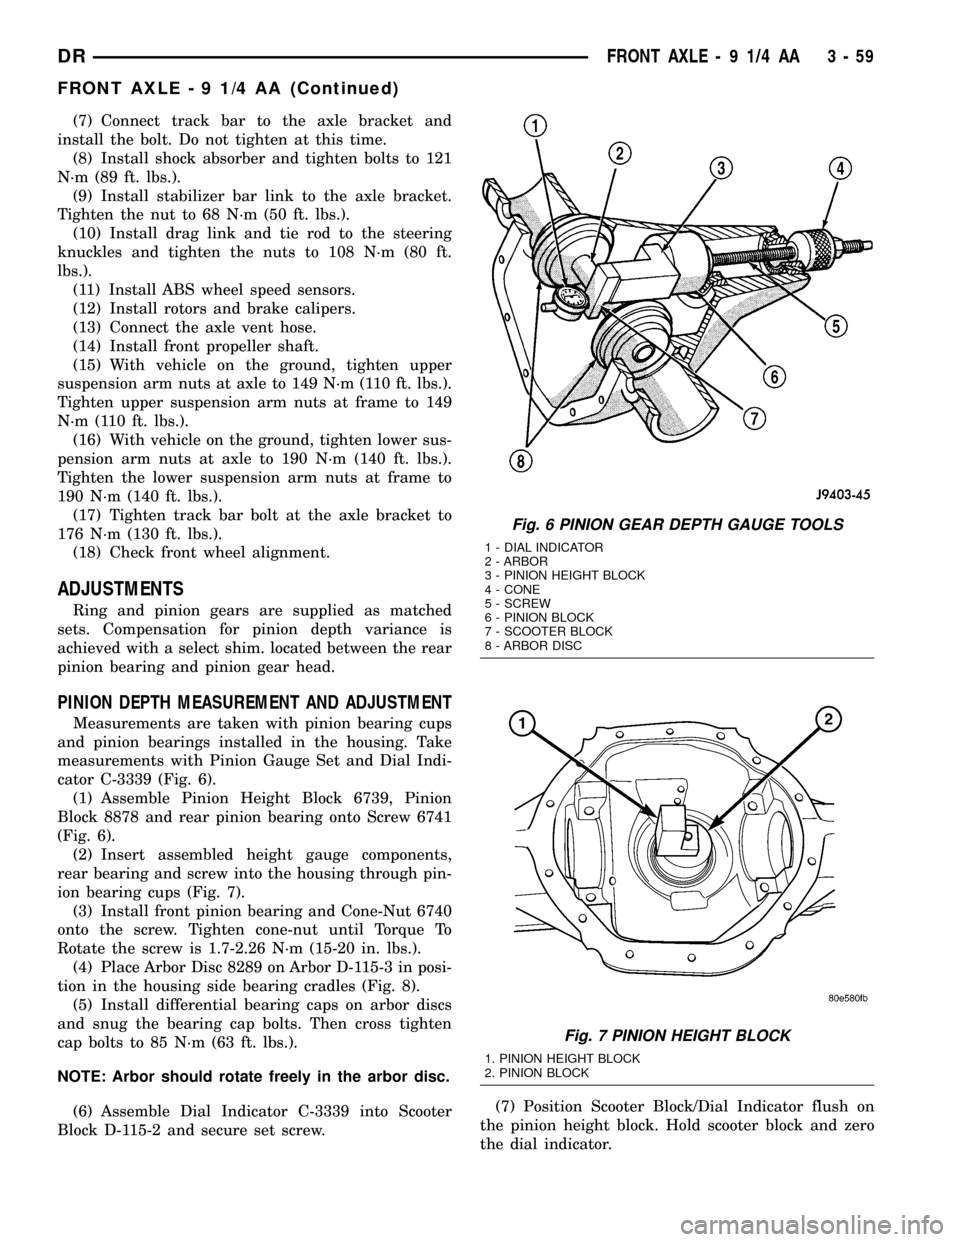
PINION DEPTH MEASUREMENT AND ADJUSTMENT
Measurements are taken with pinion bearing cups
and pinion bearings installed in the housing. Take
measurements with Pinion Gauge Set and Dial Indi-
cator C-3339 (Fig. 6).
(1) Assemble Pinion Height Block 6739, Pinion
Block 8878 and rear pinion bearing onto Screw 6741
(Fig. 6).
(2) Insert assembled height gauge components,
rear bearing and screw into the housing through pin-
ion bearing cups (Fig. 7).
(3) Install front pinion bearing and Cone-Nut 6740
onto the screw. Tighten cone-nut until Torque To
Rotate the screw is 1.7-2.26 N´m (15-20 in. lbs.).
(4) Place Arbor Disc 8289 on Arbor D-115-3 in posi-
tion in the housing side bearing cradles (Fig. 8).
(5) Install differential bearing caps on arbor discs
and snug the bearing cap bolts. Then cross tighten
cap bolts to 85 N´m (63 ft. lbs.).
NOTE: Arbor should rotate freely in the arbor disc.
(6) Assemble Dial Indicator C-3339 into Scooter
Block D-115-2 and secure set screw.(7) Position Scooter Block/Dial Indicator flush on
the pinion height block. Hold scooter block and zero
the dial indicator.
Fig. 6 PINION GEAR DEPTH GAUGE TOOLS
1 - DIAL INDICATOR
2 - ARBOR
3 - PINION HEIGHT BLOCK
4 - CONE
5 - SCREW
6 - PINION BLOCK
7 - SCOOTER BLOCK
8 - ARBOR DISC
Fig. 7 PINION HEIGHT BLOCK
1. PINION HEIGHT BLOCK
2. PINION BLOCK
DRFRONT AXLE - 9 1/4 AA 3 - 59
FRONT AXLE - 9 1/4 AA (Continued)
Page 610 of 2627

POWER SEATS
TABLE OF CONTENTS
page page
POWER SEATS
DESCRIPTION.........................13
OPERATION...........................13
DIAGNOSIS AND TESTING - POWER SEAT
SYSTEM............................13
DRIVER SEAT SWITCH
DESCRIPTION.........................14
OPERATION...........................14
DIAGNOSIS AND TESTING - DRIVER SEAT
SWITCH............................14
REMOVAL.............................15
INSTALLATION.........................15
PASSENGER SEAT SWITCH
DESCRIPTION.........................15
OPERATION...........................15
DIAGNOSIS AND TESTING - PASSENGER
SEAT SWITCH........................16REMOVAL.............................16
INSTALLATION.........................16
POWER SEAT TRACK
DESCRIPTION.........................16
OPERATION...........................16
DIAGNOSIS AND TESTING - POWER SEAT
TRACK.............................17
REMOVAL.............................17
INSTALLATION.........................17
LUMBAR CONTROL SWITCH
DESCRIPTION.........................17
OPERATION...........................18
REMOVAL.............................18
LUMBAR MOTOR
DESCRIPTION.........................18
OPERATION...........................18
DIAGNOSIS AND TESTING - LUMBAR MOTOR . 18
POWER SEATS
DESCRIPTION
The power seat system option allows the driver or
passenger to electrically adjust the seat position for
optimum control and comfort using the power seat
switches located on the outboard seat cushion side
shield. The power seat system allows the seating
position to be adjusted forward, rearward, front up,
front down, rear up, or rear down. The power seat
system receives battery current through a fuse in the
Integrated Power Module, regardless of the ignition
switch position. The power seat system includes the
following components:
²Driver Power Seat Switch
²Passenger Power Seat Switch
²Driver Power Seat Track
²Passenger Power Seat Track
²Power Lumbar Adjuster(s)
Some models equipped with the power seat option
also feature a power operated lumbar support in the
seat back. The power lumbar support allows the user
to inflate or deflate a bladder located in the lower
seat back to achieve optimum comfort and support in
the lower lumbar region of the spinal column. The
power lumbar support shares the battery feed circuit
of the power seat system.
Following are general descriptions of the major
components in the power seat system. Refer to
Heated Seat Systemfor information on the individ-ually controlled heated front seats. Refer to the own-
er's manual in the vehicle glove box for more
information on the features, use and operation of the
power seat system.
OPERATION
The power seat system allows the driver and/or
front passenger seating positions to be adjusted elec-
trically and independently using the separate power
seat switches found on the outboard seat cushion
side shield of each front seat. See the owner's manual
in the vehicle glove box for more information on the
features, use and operation of the power seat system.
DIAGNOSIS AND TESTING - POWER SEAT
SYSTEM
Before any testing of the power seat system is
attempted, the battery should be fully-charged and
all wire harness connections and pins checked to
ensure proper continuity and grounds. For circuit
descriptions and diagrams, refer to Wiring Diagrams.
With the dome lamp on, apply the power seat
switch in the direction of the failure. If the dome
lamp dims, the seat may be jamming. Check under
and behind the seat for binding or obstructions. If
the dome lamp does not dim, proceed with testing of
the individual components and circuits.
DRPOWER SEATS 8N - 13