1998 DODGE RAM 1500 Cylinder
[x] Cancel search: CylinderPage 1644 of 2627

The torquing force of this threaded nut (fitting)
provides a sealing pressure between the fuel line con-
nector and the fuel injector.Retaining nut torque
is very critical.If the nut (fitting) is under torqued,
the mating surfaces will not seal and a high-pressure
fuel leak will result. If the fitting is over torqued, the
connector and injector will deform and also cause a
high-pressure fuel leak. This leak will be inside the
cylinder head and will not be visible. The result will
be a possible fuel injector miss-fire and low power, or
a no-start condition.
The fuel injectors use hole type nozzles. High-pres-
sure flows into the side of the injector, the ECM acti-
vates the solenoid causing the injector needle to lift
and fuel to be injected. The clearances in the nozzle
bore are extremely small and any dirt or contami-
nants will cause the injector to stick. Because of this,
it is very important to do a thorough cleaning of any
lines before opening up any fuel system component.
Always cover or cap any open fuel connections before
a fuel system repair is performed.
Each fuel injector connector tube contains an edge
filter that is designed to beak up small contaminants
before entering the fuel injector.The edge filters
are not a substitute for proper cleaning andcovering of all fuel system components during
repair.
The bottom of each fuel injector is sealed to the
cylinder head with a1.5mmthick copper shim (gas-
ket). The correct thickness shim must always be re-
installed after removing an injector.
Fuel pressure in the injector circuit decreases after
injection. The injector needle valve is immediately
closed and fuel flow into the combustion chamber is
stopped. Exhaust gases are prevented from entering
the injector nozzle by the needle valve.
REMOVAL
CAUTION: Refer to Cleaning Fuel System Parts.
Six individual, solenoid actuated high-pressure fuel
injectors are used (Fig. 14). The injectors are verti-
cally mounted into a bored hole in the top of the cyl-
inder head. This bored hole is located between the
intake/exhaust valves. High-pressure connectors (Fig.
15), mounted into the side of the cylinder head, con-
nect each fuel injector to each high-pressure fuel line.
(1) Disconnect both negative battery cables from
both batteries. Cover and isolate ends of cables.
(2) Remove breather assembly.
Fig. 15 HIGH-PRESSURE CONNECTOR
1 - HIGH-PRESSURE CONNECTOR (TO FUEL INJECTOR)
2 - O-RING
3 - CONNECTOR RETAINER4 - FUEL RAIL
5 - HIGH-PRESSURE FUEL LINES
6 - LOCATING PINS
DRFUEL INJECTION - DIESEL 14 - 75
FUEL INJECTOR (Continued)
Page 1645 of 2627
(3) Remove valve cover. Refer to Engines for proce-
dures.
(4) Remove necessary high pressure fuel line con-
necting necessary fuel injector rail to high pressure
connector. Refer to Fuel Line Removal for procedures.
(5) A connector retainer (nut) (Fig. 15) is used on
each connector tube. Remove this nut(s) by unthread-
ing from cylinder head.
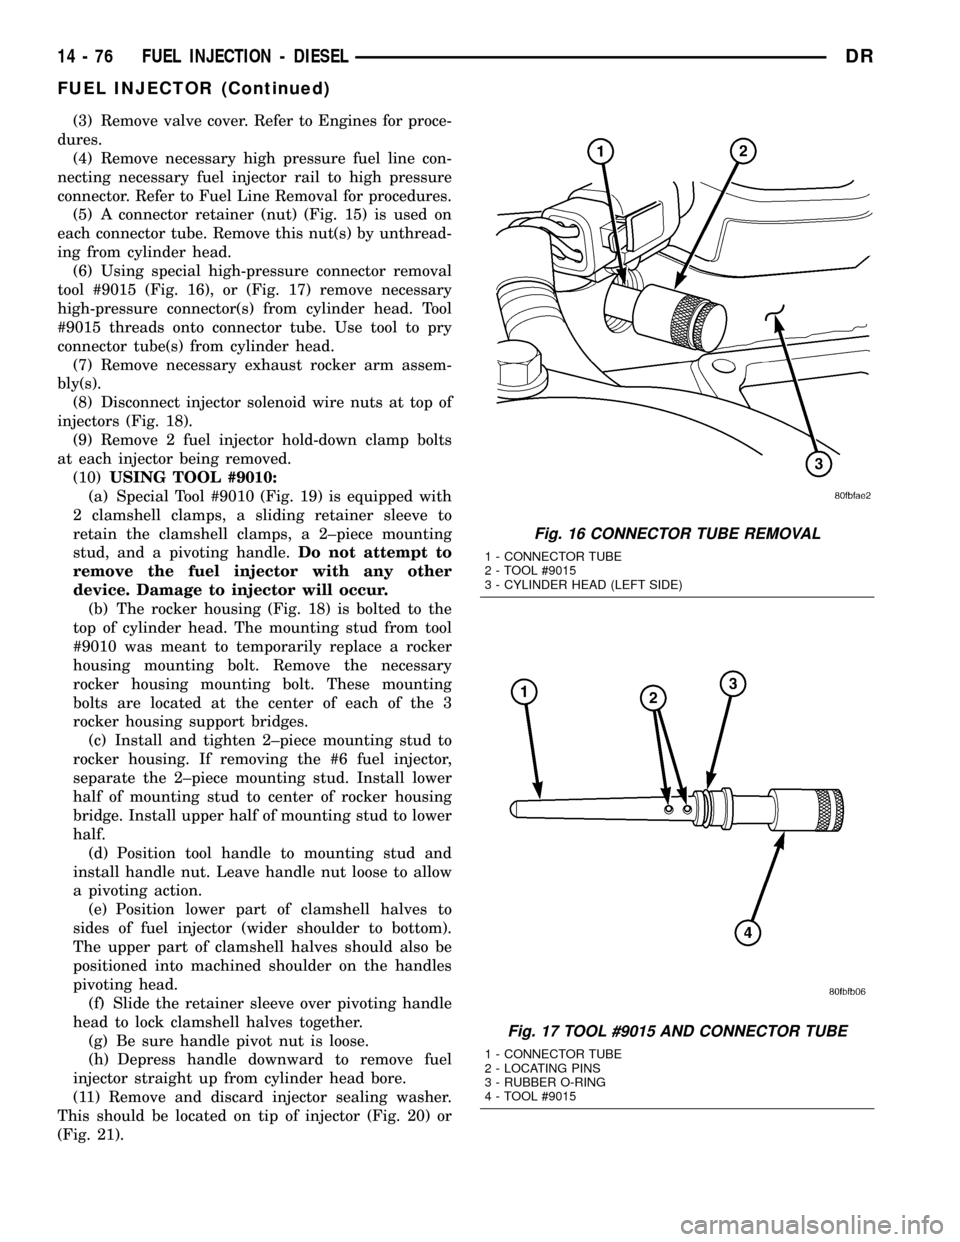
(6) Using special high-pressure connector removal
tool #9015 (Fig. 16), or (Fig. 17) remove necessary
high-pressure connector(s) from cylinder head. Tool
#9015 threads onto connector tube. Use tool to pry
connector tube(s) from cylinder head.
(7) Remove necessary exhaust rocker arm assem-
bly(s).
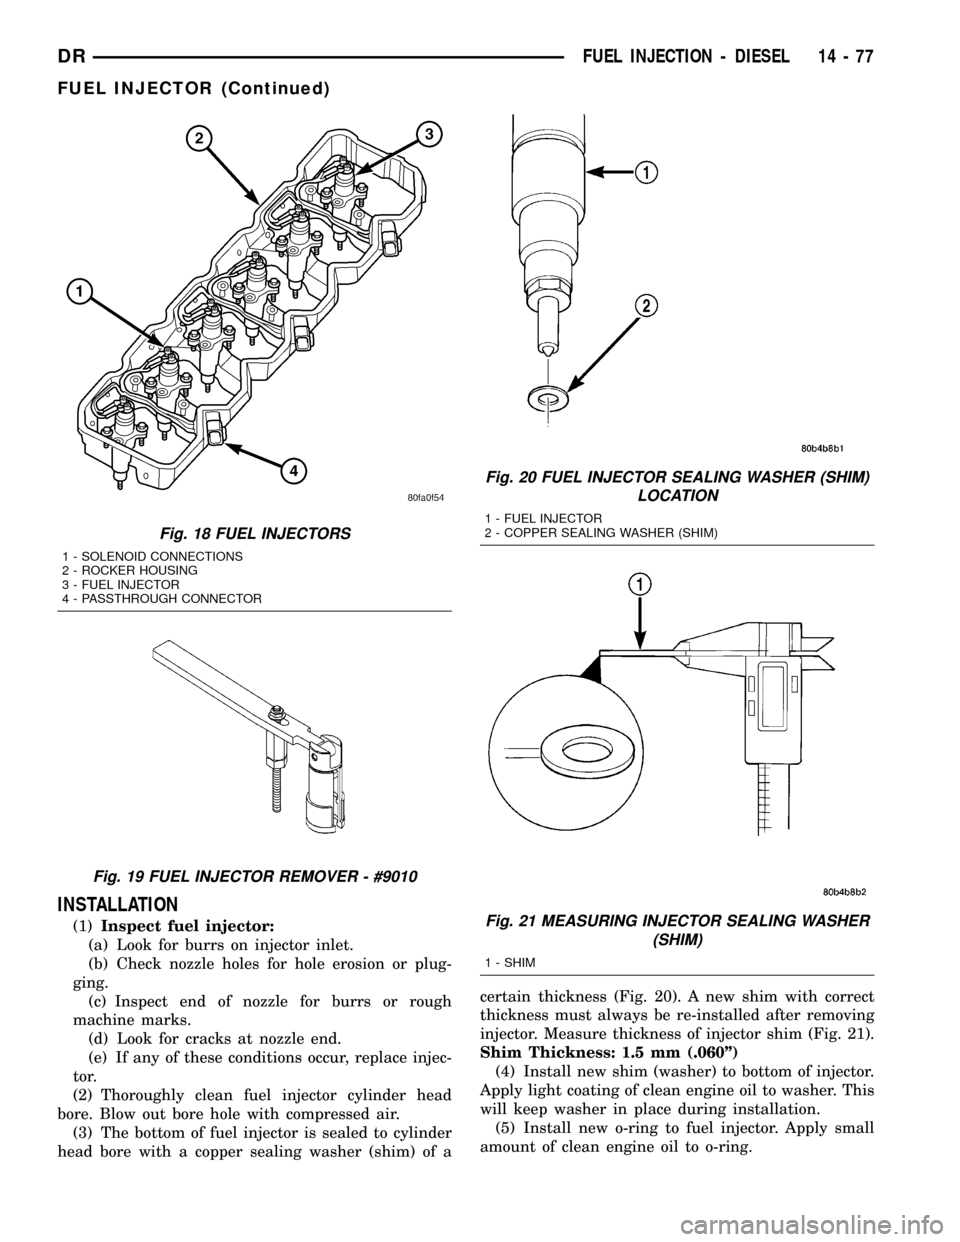
(8) Disconnect injector solenoid wire nuts at top of
injectors (Fig. 18).
(9) Remove 2 fuel injector hold-down clamp bolts
at each injector being removed.
(10)USING TOOL #9010:
(a) Special Tool #9010 (Fig. 19) is equipped with
2 clamshell clamps, a sliding retainer sleeve to
retain the clamshell clamps, a 2±piece mounting
stud, and a pivoting handle.Do not attempt to
remove the fuel injector with any other
device. Damage to injector will occur.
(b) The rocker housing (Fig. 18) is bolted to the
top of cylinder head. The mounting stud from tool
#9010 was meant to temporarily replace a rocker
housing mounting bolt. Remove the necessary
rocker housing mounting bolt. These mounting
bolts are located at the center of each of the 3
rocker housing support bridges.
(c) Install and tighten 2±piece mounting stud to
rocker housing. If removing the #6 fuel injector,
separate the 2±piece mounting stud. Install lower
half of mounting stud to center of rocker housing
bridge. Install upper half of mounting stud to lower
half.
(d) Position tool handle to mounting stud and
install handle nut. Leave handle nut loose to allow
a pivoting action.
(e) Position lower part of clamshell halves to
sides of fuel injector (wider shoulder to bottom).
The upper part of clamshell halves should also be
positioned into machined shoulder on the handles
pivoting head.
(f) Slide the retainer sleeve over pivoting handle
head to lock clamshell halves together.
(g) Be sure handle pivot nut is loose.
(h) Depress handle downward to remove fuel
injector straight up from cylinder head bore.
(11) Remove and discard injector sealing washer.
This should be located on tip of injector (Fig. 20) or
(Fig. 21).
Fig. 16 CONNECTOR TUBE REMOVAL
1 - CONNECTOR TUBE
2 - TOOL #9015
3 - CYLINDER HEAD (LEFT SIDE)
Fig. 17 TOOL #9015 AND CONNECTOR TUBE
1 - CONNECTOR TUBE
2 - LOCATING PINS
3 - RUBBER O-RING
4 - TOOL #9015
14 - 76 FUEL INJECTION - DIESELDR
FUEL INJECTOR (Continued)
Page 1646 of 2627
INSTALLATION
(1)Inspect fuel injector:
(a) Look for burrs on injector inlet.
(b) Check nozzle holes for hole erosion or plug-
ging.
(c) Inspect end of nozzle for burrs or rough
machine marks.
(d) Look for cracks at nozzle end.
(e) If any of these conditions occur, replace injec-
tor.
(2) Thoroughly clean fuel injector cylinder head
bore. Blow out bore hole with compressed air.
(3) The bottom of fuel injector is sealed to cylinder
head bore with a copper sealing washer (shim) of acertain thickness (Fig. 20). A new shim with correct
thickness must always be re-installed after removing
injector. Measure thickness of injector shim (Fig. 21).
Shim Thickness: 1.5 mm (.060º)
(4) Install new shim (washer) to bottom of injector.
Apply light coating of clean engine oil to washer. This
will keep washer in place during installation.
(5) Install new o-ring to fuel injector. Apply small
amount of clean engine oil to o-ring.
Fig. 18 FUEL INJECTORS
1 - SOLENOID CONNECTIONS
2 - ROCKER HOUSING
3 - FUEL INJECTOR
4 - PASSTHROUGH CONNECTOR
Fig. 19 FUEL INJECTOR REMOVER - #9010
Fig. 20 FUEL INJECTOR SEALING WASHER (SHIM)
LOCATION
1 - FUEL INJECTOR
2 - COPPER SEALING WASHER (SHIM)
Fig. 21 MEASURING INJECTOR SEALING WASHER
(SHIM)
1 - SHIM
DRFUEL INJECTION - DIESEL 14 - 77
FUEL INJECTOR (Continued)
Page 1647 of 2627

(6) Install injector into cylinder head with male
connector port facing the intake manifold. Push down
on fuel injector mounting flange to engage o-ring and
seat injector.
(7) Tightening Sequence:
(a) Install fuel injector holdown clamp (mount-
ing flange) bolts.Do a preliminary tightening
of these bolts to 5 N´m (44 in. lbs.) torque.
This preliminary tightening insures the fuel
injector is seated and centered.
(b) After tightening, relieve bolt torque, but
leave both bolts threaded in place.
(c) Install high-pressure connector and retaining
nut. Do a preliminary tightening to 15 N´m (11 ft.
lbs.) torque.
(d) Alternately tighten injector holdown bolts to
10 N´m (89 in. lbs.) torque.
(e) Do a final tightening of the high-pressure
connector and retaining nut. Tighten to 50 N´m (37
ft. lbs.) torque.
(8) Connect injector solenoid wires and nuts to top
of injectors (Fig. 18). Tighten connector nuts to 1.25
N´m (11 in. lbs.) torque.Be very careful not to
overtighten these nuts as damage to fuel injec-
tor will occur.
(9) Install exhaust rocker arm assembly. Refer to
Engine.
(10) Set exhaust valve lash. Refer to Engine.
(11) Install high pressure fuel line. Refer to Torque
Specifications.Be sure to use a secondary
back-up wrench on the connector nut (fitting)
while torquing fuel line fitting.Refer to Fuel Line
Installation for additional information.
(12) Install valve cover. Refer to Engine.
(13) Install breather assembly.
(14) Connect negative battery cables to both bat-
teries.
FUEL INJECTOR RAIL
DESCRIPTION
The fuel injector rail is bolted to the top of the
intake manifold.
OPERATION
The fuel rail is used as a distribution device to
supply high-pressure fuel to the high-pressure fuel
lines.
REMOVAL
CAUTION: Cleanliness cannot be overemphasized
when handling or replacing diesel fuel system com-
ponents. This especially includes the fuel injectors,
high-pressure fuel lines and fuel injection pump.Very tight tolerances are used with these parts. Dirt
contamination could cause rapid part wear and pos-
sible plugging of fuel injector nozzle tip holes. This
in turn could lead to possible engine misfire.
Always wash/clean any fuel system component
thoroughly before disassembly and then air dry.
Cap or cover any open part after disassembly.
Before assembly, examine each part for dirt, grease
or other contaminants and clean if necessary. When
installing new parts, lubricate them with clean
engine oil or clean diesel fuel only.
(1) Disconnect both negative battery cables at both
batteries. Isolate ends of both cables.
(2) Disconnect electrical connector at fuel pressure
sensor.
(3) Remove banjo bolt at fuel limiting valve.
(4) Disconnect necessary wiring harness retention
clips from intake manifold.
(5) Lift 2 rubber covers to gain access to positive
(+), intake heater cable nuts. Remove 2 nuts and
remove 2 cables from studs.
(6) Carefully remove 4 high-pressure fuel lines
from top of injector rail engine. Note position of each
line while removing.Do not bend lines while
removing.
CAUTION: WHEN LOOSENING OR TIGHTENING
HIGH-PRESSURE LINES ATTACHED TO A SEPA-
RATE FITTING, USE A BACK-UP WRENCH ON FIT-
TING. DO NOT ALLOW FITTING TO ROTATE.
DAMAGE TO BOTH FUEL LINE AND FITTING WILL
RESULT.
(7) Carefully remove 2 high-pressure fuel lines at
each end of injector rail. Note position of each line
while removing.Do not bend lines while remov-
ing.
(8) Remove fuel line connecting injector pump to
fuel rail.
(9) Remove 3 injector rail mounting bolts (Fig. 22).
(10) Remove rail from top of intake manifold.
INSTALLATION
(1) Clean any dirt/debris from top of intake mani-
fold and bottom of fuel rail.
(2) Position fuel rail to top of manifold and install
3 mounting bolts. Refer to Torque Specifications.
(3) Install all high-pressure lines to rail. Refer to
Fuel Lines for procedures.
(4) Reposition wiring harness to intake manifold
and install new tie wraps.
(5) Install and tighten fuel limiting valve banjo
bolt. Refer to Torque Specifications.
(6) Connect electrical connector to fuel pressure
sensor.
(7) Position 2 positive (+) cables to intake heater
studs. Install 2 nuts.
14 - 78 FUEL INJECTION - DIESELDR
FUEL INJECTOR (Continued)
Page 1661 of 2627

COLUMN
TABLE OF CONTENTS
page page
COLUMN
DESCRIPTION..........................6
DIAGNOSIS AND TESTING - STEERING
COLUMN.............................7
REMOVAL.............................7
INSTALLATION..........................9
IGNITION SWITCH
DESCRIPTION..........................9
OPERATION............................9
DIAGNOSIS AND TESTING - IGNITION
SWITCH.............................9
REMOVAL.............................10
INSTALLATION.........................11
KEY-IN IGNITION SWITCH
DESCRIPTION.........................11
DIAGNOSIS AND TESTING - IGNITION
SWITCH AND KEY LOCK CYLINDER.......11
KEY CYLINDER
REMOVAL.............................12
INSTALLATION.........................12GEAR SHIFT LEVER
REMOVAL.............................12
INSTALLATION.........................12
UPPER STEERING COUPLING
REMOVAL.............................13
INSTALLATION.........................13
LOWER STEERING COUPLING
REMOVAL
REMOVAL - ALL LD & HD EXCEPT 4X4 HD . 14
REMOVAL - 4X4 HD...................14
INSTALLATION
INSTALLATION - ALL LD & HD EXCEPT 4X4
HD.................................14
INSTALLATION - 4X4 HD................15
STEERING WHEEL
REMOVAL.............................15
INSTALLATION.........................15
TILT LEVER KNOB RELEASE
REMOVAL.............................16
INSTALLATION.........................16
COLUMN
DESCRIPTION
NOTE: The steering column on vehicles with an
automatic transmission may not be equipped with
an internal locking shaft that allows the ignition key
cylinder to be locked with the key. Alternative meth-
ods of locking the steering wheel for service will
have to be used.
The tilt and standard column (Fig. 1) has been
designed to be serviced as an assembly; less wiring,
switches, shrouds, steering wheel, etc. Most steering
column components can be serviced without remov-
ing the steering column from the vehicle.
To service the steering wheel, switches or airbag,
refer to Restraints and follow all WARNINGS and
CAUTIONS.
WARNING: THE AIRBAG SYSTEM IS A SENSITIVE,
COMPLEX ELECTRO-MECHANICAL UNIT. BEFORE
ATTEMPTING TO DIAGNOSE, REMOVE OR INSTALL
THE AIRBAG SYSTEM COMPONENTS YOU MUST
FIRST DISCONNECT AND ISOLATE THE BATTERY
NEGATIVE (GROUND) CABLE. THEN WAIT TWO
MINUTES FOR THE SYSTEM CAPACITOR TO DIS-
CHARGE. FAILURE TO DO SO COULD RESULT INACCIDENTAL DEPLOYMENT OF THE AIRBAG AND
POSSIBLE PERSONAL INJURY. THE FASTENERS,
SCREWS, AND BOLTS, ORIGINALLY USED FOR
THE AIRBAG COMPONENTS, HAVE SPECIAL COAT-
INGS AND ARE SPECIFICALLY DESIGNED FOR THE
AIRBAG SYSTEM. THEY MUST NEVER BE
REPLACED WITH ANY SUBSTITUTES. ANYTIME A
NEW FASTENER IS NEEDED, REPLACE WITH THE
CORRECT FASTENERS PROVIDED IN THE SERVICE
PACKAGE OR FASTENERS LISTED IN THE PARTS
BOOKS.
CAUTION: Do not hammer on steering column
shaft. This may cause damage to the shaft or bear-
ing.
CAUTION: Do not attempt to remove the pivot bolts
to disassemble the tilting mechanism. Do not
remove shaft lock plate or plate retainer. This will
damage the column.
CAUTION: Do not attempt to remove or modify the
park lock slider or link.
19 - 6 COLUMNDR
Page 1662 of 2627
NOTE: When servicing the steering wheel after
removing the old bolt a new bolt must be used
when installing.
NOTE: When servicing the coupler a new bolt must
be used when installing.
DIAGNOSIS AND TESTING - STEERING
COLUMN
If the vehicle is involved in a front end collision/the
air bag has deployed the column must be inspected.
This inspection will determine if the Column has col-
lapsed. Inspect the column mounting capsules visu-
ally and manually push and pull them to check for
separation or fractures. If capsules are fractured or
have moved the column MUST be replaced.
REMOVAL
WARNING: BEFORE SERVICING THE STEERING
COLUMN THE AIRBAG SYSTEM MUST BE DIS-
ARMED. REFER TO ELECTRICAL RESTRAINT SYS-
TEM FOR SERVICE PROCEDURES. FAILURE TO DO
SO MAY RESULT IN ACCIDENTAL DEPLOYMENT OF
THE AIRBAG AND POSSIBLE PERSONAL INJURY.CAUTION: All fasteners must be torqued to specifi-
cation to ensure proper operation of the steering
column.
(1) Position the front wheelsstraight ahead.
(2) Disconnect the negative (ground) cable from
the battery.
(3) Remove the two switches from the steering
wheel.
(4) Remove the airbag, (Refer to 8 - ELECTRICAL/
RESTRAINTS/DRIVER AIRBAG - REMOVAL).
(5) Remove the steering wheel with special tool
CJ98±1 or an appropriate steering wheel puller.
CAUTION: Ensure the puller bolts are fully engaged
into the steering wheel and not into the clock-
spring, before attempting to remove the wheel. Fail-
ure to do so may damage the steering wheel/
clockspring.
(6) Remove the steering column opening cover
(Refer to 23 - BODY/INSTRUMENT PANEL/STEER-
ING COLUMN OPENING COVER - REMOVAL).
(7) Remove the tilt lever.
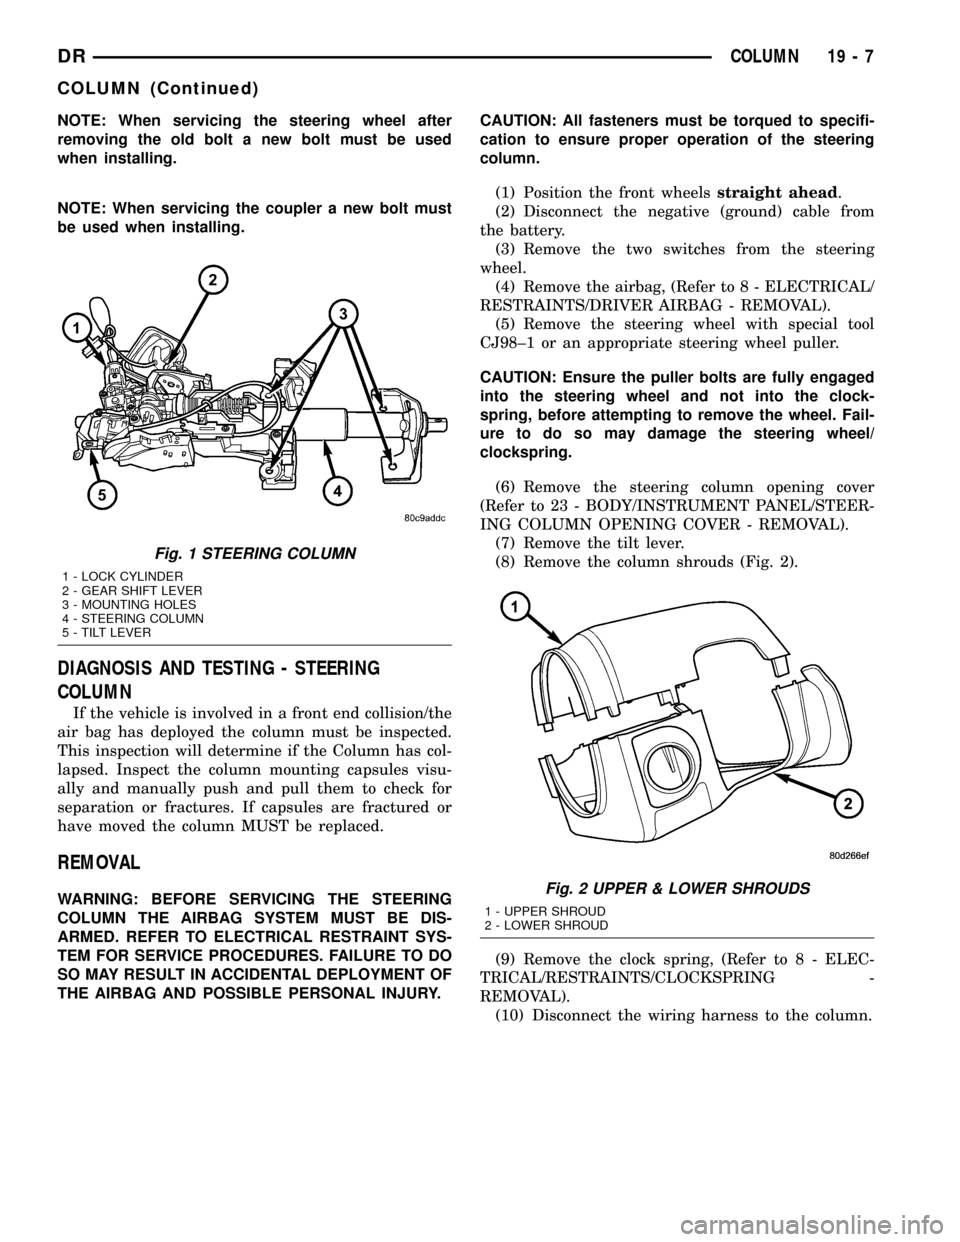
(8) Remove the column shrouds (Fig. 2).
(9) Remove the clock spring, (Refer to 8 - ELEC-
TRICAL/RESTRAINTS/CLOCKSPRING -
REMOVAL).
(10) Disconnect the wiring harness to the column.
Fig. 1 STEERING COLUMN
1 - LOCK CYLINDER
2 - GEAR SHIFT LEVER
3 - MOUNTING HOLES
4 - STEERING COLUMN
5 - TILT LEVER
Fig. 2 UPPER & LOWER SHROUDS
1 - UPPER SHROUD
2 - LOWER SHROUD
DRCOLUMN 19 - 7
COLUMN (Continued)
Page 1664 of 2627
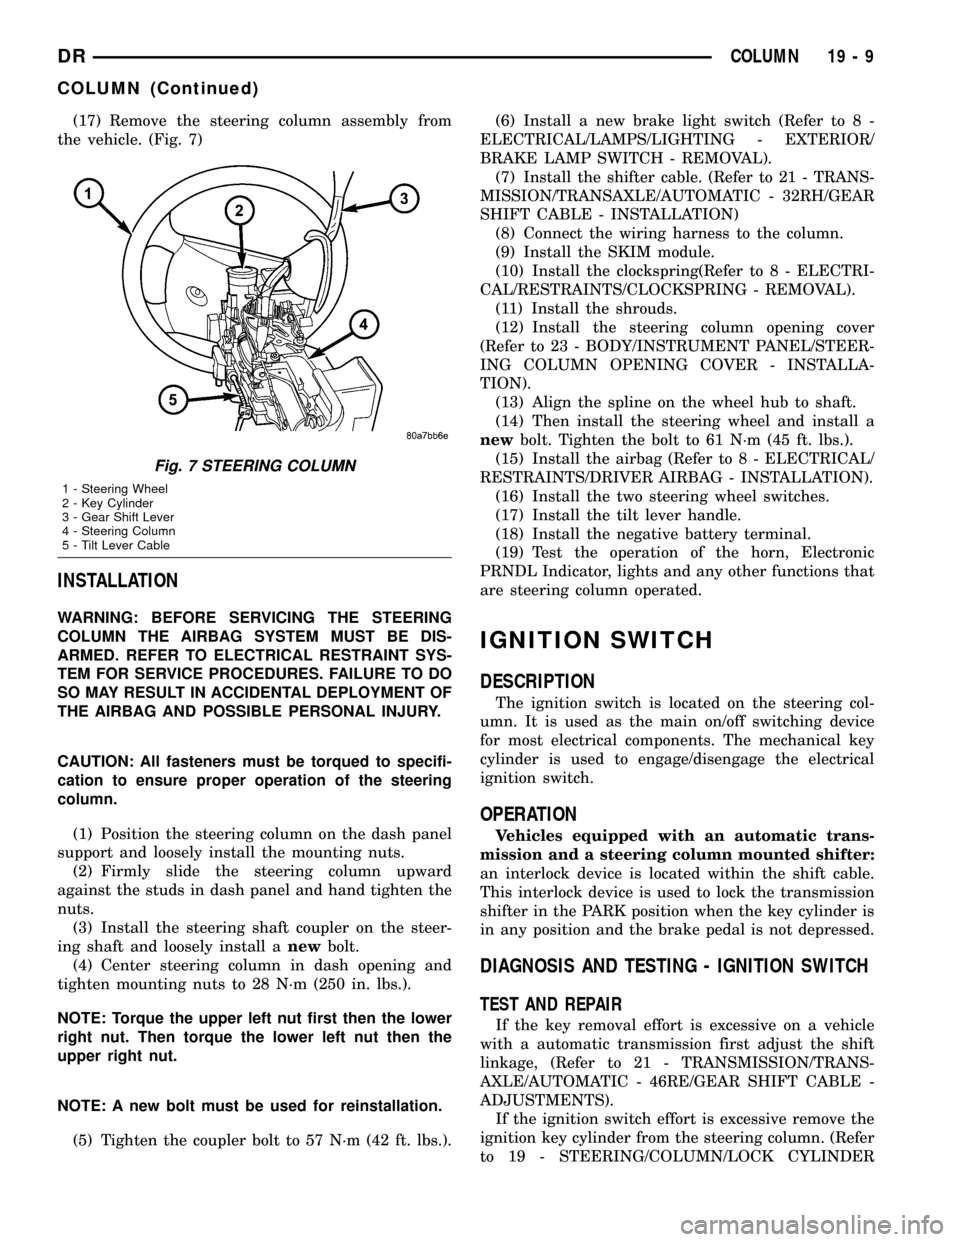
(17) Remove the steering column assembly from
the vehicle. (Fig. 7)
INSTALLATION
WARNING: BEFORE SERVICING THE STEERING
COLUMN THE AIRBAG SYSTEM MUST BE DIS-
ARMED. REFER TO ELECTRICAL RESTRAINT SYS-
TEM FOR SERVICE PROCEDURES. FAILURE TO DO
SO MAY RESULT IN ACCIDENTAL DEPLOYMENT OF
THE AIRBAG AND POSSIBLE PERSONAL INJURY.
CAUTION: All fasteners must be torqued to specifi-
cation to ensure proper operation of the steering
column.
(1) Position the steering column on the dash panel
support and loosely install the mounting nuts.
(2) Firmly slide the steering column upward
against the studs in dash panel and hand tighten the
nuts.
(3) Install the steering shaft coupler on the steer-
ing shaft and loosely install anewbolt.
(4) Center steering column in dash opening and
tighten mounting nuts to 28 N´m (250 in. lbs.).
NOTE: Torque the upper left nut first then the lower
right nut. Then torque the lower left nut then the
upper right nut.
NOTE: A new bolt must be used for reinstallation.
(5) Tighten the coupler bolt to 57 N´m (42 ft. lbs.).(6) Install a new brake light switch (Refer to 8 -
ELECTRICAL/LAMPS/LIGHTING - EXTERIOR/
BRAKE LAMP SWITCH - REMOVAL).
(7) Install the shifter cable. (Refer to 21 - TRANS-
MISSION/TRANSAXLE/AUTOMATIC - 32RH/GEAR
SHIFT CABLE - INSTALLATION)
(8) Connect the wiring harness to the column.
(9) Install the SKIM module.
(10) Install the clockspring(Refer to 8 - ELECTRI-
CAL/RESTRAINTS/CLOCKSPRING - REMOVAL).
(11) Install the shrouds.
(12) Install the steering column opening cover
(Refer to 23 - BODY/INSTRUMENT PANEL/STEER-
ING COLUMN OPENING COVER - INSTALLA-
TION).
(13) Align the spline on the wheel hub to shaft.
(14) Then install the steering wheel and install a
newbolt. Tighten the bolt to 61 N´m (45 ft. lbs.).
(15) Install the airbag (Refer to 8 - ELECTRICAL/
RESTRAINTS/DRIVER AIRBAG - INSTALLATION).
(16) Install the two steering wheel switches.
(17) Install the tilt lever handle.
(18) Install the negative battery terminal.
(19) Test the operation of the horn, Electronic
PRNDL Indicator, lights and any other functions that
are steering column operated.
IGNITION SWITCH
DESCRIPTION
The ignition switch is located on the steering col-
umn. It is used as the main on/off switching device
for most electrical components. The mechanical key
cylinder is used to engage/disengage the electrical
ignition switch.
OPERATION
Vehicles equipped with an automatic trans-
mission and a steering column mounted shifter:
an interlock device is located within the shift cable.
This interlock device is used to lock the transmission
shifter in the PARK position when the key cylinder is
in any position and the brake pedal is not depressed.
DIAGNOSIS AND TESTING - IGNITION SWITCH
TEST AND REPAIR
If the key removal effort is excessive on a vehicle
with a automatic transmission first adjust the shift
linkage, (Refer to 21 - TRANSMISSION/TRANS-
AXLE/AUTOMATIC - 46RE/GEAR SHIFT CABLE -
ADJUSTMENTS).
If the ignition switch effort is excessive remove the
ignition key cylinder from the steering column. (Refer
to 19 - STEERING/COLUMN/LOCK CYLINDER
Fig. 7 STEERING COLUMN
1 - Steering Wheel
2 - Key Cylinder
3 - Gear Shift Lever
4 - Steering Column
5 - Tilt Lever Cable
DRCOLUMN 19 - 9
COLUMN (Continued)
Page 1665 of 2627
HOUSING - REMOVAL). Check the turning effort of
the key cylinder. If the ignition key cylinder effort is
excessive replace the key cylinder.
REMOVAL
SERVICE PRECAUTIONS
NOTE: The steering column on vehicles equipped
with an automatic transmission is not equipped
with an internal locking shaft with the ignition cyl-
inder. Alternative methods of locking the steering
wheel for service will have to be used.
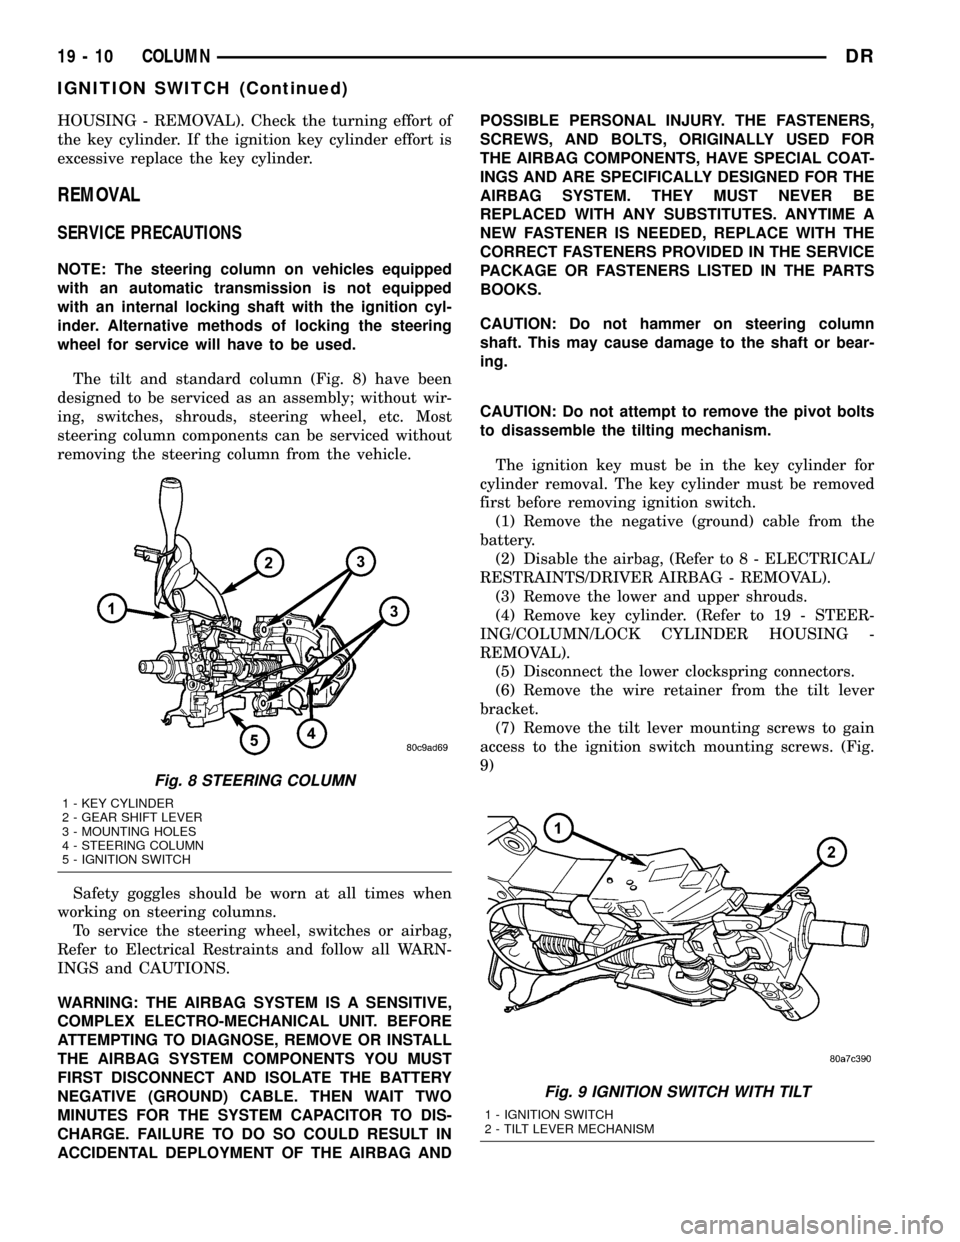
The tilt and standard column (Fig. 8) have been
designed to be serviced as an assembly; without wir-
ing, switches, shrouds, steering wheel, etc. Most
steering column components can be serviced without
removing the steering column from the vehicle.
Safety goggles should be worn at all times when
working on steering columns.
To service the steering wheel, switches or airbag,
Refer to Electrical Restraints and follow all WARN-
INGS and CAUTIONS.
WARNING: THE AIRBAG SYSTEM IS A SENSITIVE,
COMPLEX ELECTRO-MECHANICAL UNIT. BEFORE
ATTEMPTING TO DIAGNOSE, REMOVE OR INSTALL
THE AIRBAG SYSTEM COMPONENTS YOU MUST
FIRST DISCONNECT AND ISOLATE THE BATTERY
NEGATIVE (GROUND) CABLE. THEN WAIT TWO
MINUTES FOR THE SYSTEM CAPACITOR TO DIS-
CHARGE. FAILURE TO DO SO COULD RESULT IN
ACCIDENTAL DEPLOYMENT OF THE AIRBAG ANDPOSSIBLE PERSONAL INJURY. THE FASTENERS,
SCREWS, AND BOLTS, ORIGINALLY USED FOR
THE AIRBAG COMPONENTS, HAVE SPECIAL COAT-
INGS AND ARE SPECIFICALLY DESIGNED FOR THE
AIRBAG SYSTEM. THEY MUST NEVER BE
REPLACED WITH ANY SUBSTITUTES. ANYTIME A
NEW FASTENER IS NEEDED, REPLACE WITH THE
CORRECT FASTENERS PROVIDED IN THE SERVICE
PACKAGE OR FASTENERS LISTED IN THE PARTS
BOOKS.
CAUTION: Do not hammer on steering column
shaft. This may cause damage to the shaft or bear-
ing.
CAUTION: Do not attempt to remove the pivot bolts
to disassemble the tilting mechanism.
The ignition key must be in the key cylinder for
cylinder removal. The key cylinder must be removed
first before removing ignition switch.
(1) Remove the negative (ground) cable from the
battery.
(2) Disable the airbag, (Refer to 8 - ELECTRICAL/
RESTRAINTS/DRIVER AIRBAG - REMOVAL).
(3) Remove the lower and upper shrouds.
(4) Remove key cylinder. (Refer to 19 - STEER-
ING/COLUMN/LOCK CYLINDER HOUSING -
REMOVAL).
(5) Disconnect the lower clockspring connectors.
(6) Remove the wire retainer from the tilt lever
bracket.
(7) Remove the tilt lever mounting screws to gain
access to the ignition switch mounting screws. (Fig.
9)
Fig. 8 STEERING COLUMN
1 - KEY CYLINDER
2 - GEAR SHIFT LEVER
3 - MOUNTING HOLES
4 - STEERING COLUMN
5 - IGNITION SWITCH
Fig. 9 IGNITION SWITCH WITH TILT
1 - IGNITION SWITCH
2 - TILT LEVER MECHANISM
19 - 10 COLUMNDR
IGNITION SWITCH (Continued)