1998 DODGE RAM 1500 Rear seat
[x] Cancel search: Rear seatPage 1739 of 2627
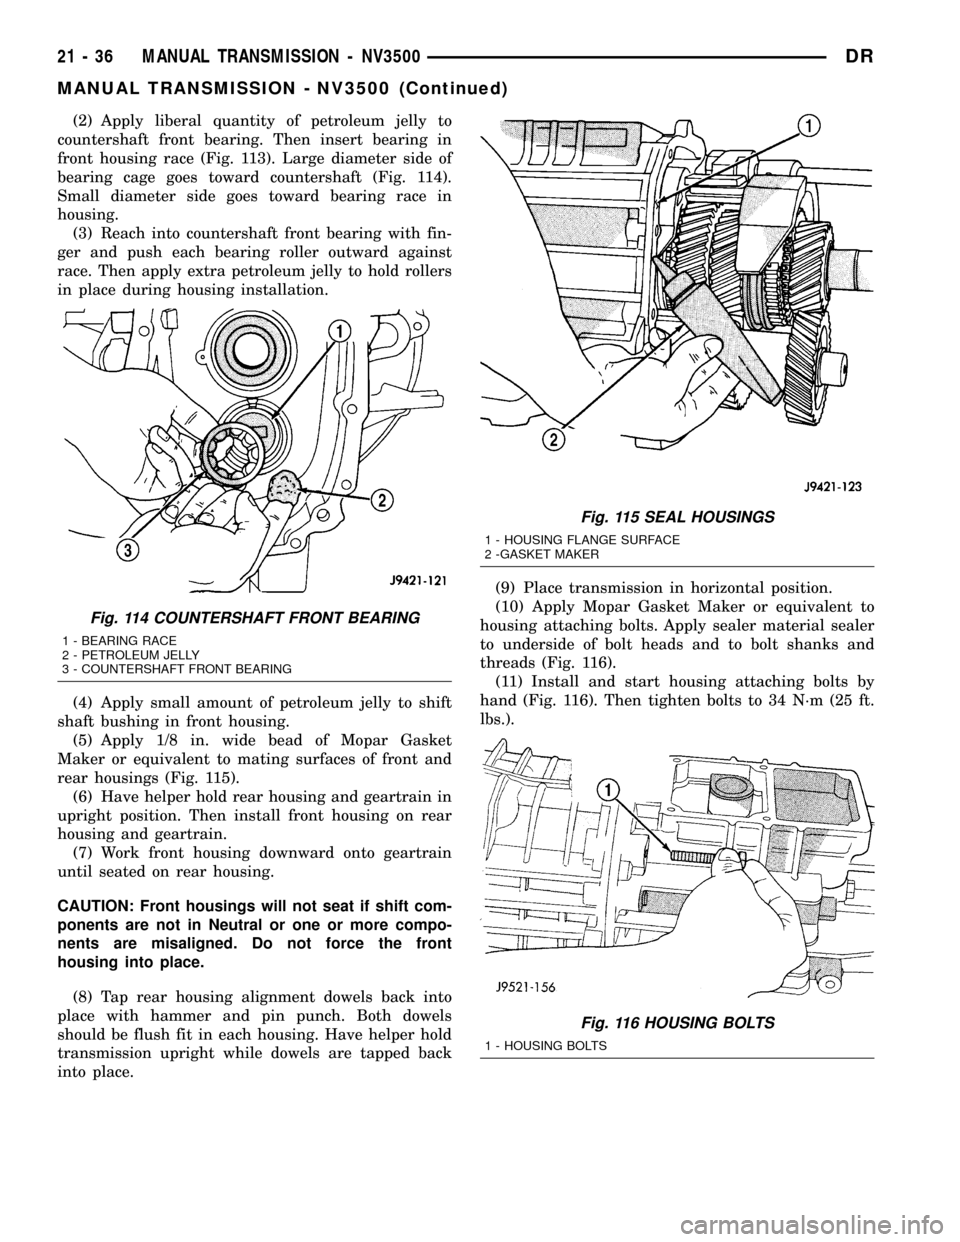
(2) Apply liberal quantity of petroleum jelly to
countershaft front bearing. Then insert bearing in
front housing race (Fig. 113). Large diameter side of
bearing cage goes toward countershaft (Fig. 114).
Small diameter side goes toward bearing race in
housing.
(3) Reach into countershaft front bearing with fin-
ger and push each bearing roller outward against
race. Then apply extra petroleum jelly to hold rollers
in place during housing installation.
(4) Apply small amount of petroleum jelly to shift
shaft bushing in front housing.
(5) Apply 1/8 in. wide bead of Mopar Gasket
Maker or equivalent to mating surfaces of front and
rear housings (Fig. 115).
(6) Have helper hold rear housing and geartrain in
upright position. Then install front housing on rear
housing and geartrain.
(7) Work front housing downward onto geartrain
until seated on rear housing.
CAUTION: Front housings will not seat if shift com-
ponents are not in Neutral or one or more compo-
nents are misaligned. Do not force the front
housing into place.
(8) Tap rear housing alignment dowels back into
place with hammer and pin punch. Both dowels
should be flush fit in each housing. Have helper hold
transmission upright while dowels are tapped back
into place.(9) Place transmission in horizontal position.
(10) Apply Mopar Gasket Maker or equivalent to
housing attaching bolts. Apply sealer material sealer
to underside of bolt heads and to bolt shanks and
threads (Fig. 116).
(11) Install and start housing attaching bolts by
hand (Fig. 116). Then tighten bolts to 34 N´m (25 ft.
lbs.).
Fig. 114 COUNTERSHAFT FRONT BEARING
1 - BEARING RACE
2 - PETROLEUM JELLY
3 - COUNTERSHAFT FRONT BEARING
Fig. 115 SEAL HOUSINGS
1 - HOUSING FLANGE SURFACE
2 -GASKET MAKER
Fig. 116 HOUSING BOLTS
1 - HOUSING BOLTS
21 - 36 MANUAL TRANSMISSION - NV3500DR
MANUAL TRANSMISSION - NV3500 (Continued)
Page 1742 of 2627

INSTALLATION
NOTE: If a new transmission is being installed, use
all components supplied with the new transmission.
For example, if a new shift tower is supplied, do not
re-use the original shift tower.
(1) Clean transmission front housing mounting
surface.
(2) Apply light coat of Mopar high temperature
bearing grease or equivalent to contact surfaces (Fig.
126) of following components:
²release fork ball stud.
²release bearing slide surface.
²input shaft splines.
²release bearing bore.
²propeller shaft slip yoke.
(3) Support and secure transmission to jack.
(4) Raise and align transmission input shaft with
clutch disc, then slide transmission into place.
(5) Verify front housing is fully seated. Install
transmission bolts without washers and tighten bolts
into the engine to 41 N´m (30 ft. lbs.). Tighten the
bolts with washers into the transmission to 68 N´m
(50 ft. lbs.) (Fig. 127).(6) Install rear crossmember and tighten nuts to
102 N´m (75 ft. lbs.).
(7) Install transmission rear mounting bolts and
tighten to 68 N´m (50 ft. lbs.).
(8) Install front dust shield tighten bolt to 4.5 N´m
(40 in. lbs.). If cover was removed, install onto the
transmission and engine(Refer to 9 - ENGINE/EN-
GINE BLOCK/STRUCTURAL COVER - INSTALLA-
TION).
(9) Install structural dust cover and tighten the
bolts to 54 N´m (40 ft. lbs.).
(10) Install starter motor.
(11) Install suspension crossmember and tighten
nuts to 102 N´m (75 ft. lbs.).
(12) Connect transmission harnesses to clips on
case and connect switches.
(13) Install slave cylinder and tighten cylinder
nuts to 23 N´m (200 in. lbs.).
(14) Install transfer case and transfer case linkage
if equipped.
(15) Remove transmission jack.
(16) Install propeller shaft/shafts with reference
marks aligned.
(17) Install exhaust on the exhaust manifolds.
(18) Fill transmission with lubricant. Correct fill
level is to bottom edge of fill plug hole.
Fig. 126 LUBRICATION POINTS
1 - RELEASE FORK
2 - FORK BALL STUD
3 - BEARING SLIDE SURFACE
4 - SPLINE
5 - RELEASE BEAING
Fig. 127 TRANSMISSION
1 - BOLT WITHOUT WASHER
2 - BOLT WITH WASHER
DRMANUAL TRANSMISSION - NV3500 21 - 39
MANUAL TRANSMISSION - NV3500 (Continued)
Page 1751 of 2627
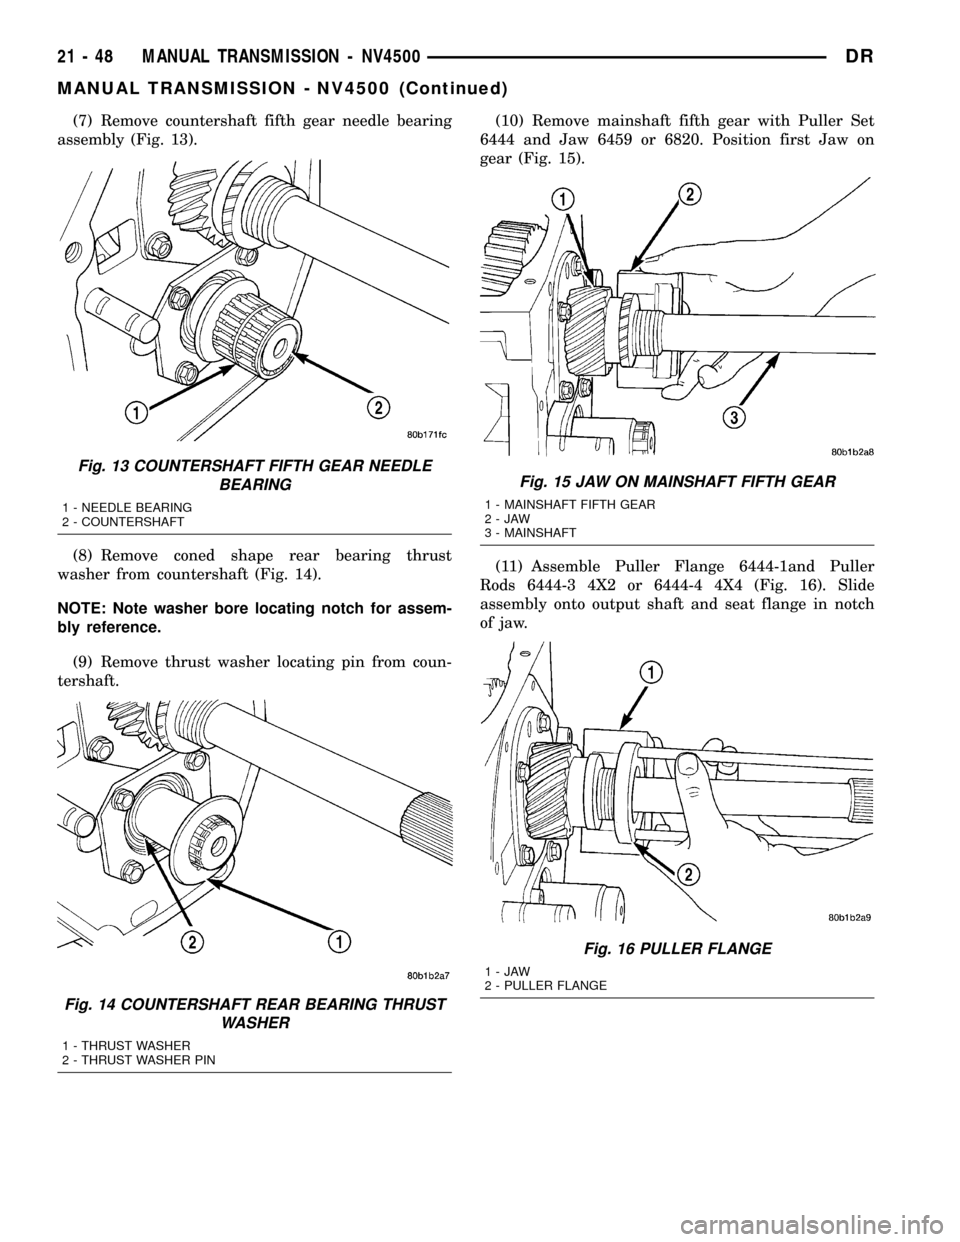
(7) Remove countershaft fifth gear needle bearing
assembly (Fig. 13).
(8) Remove coned shape rear bearing thrust
washer from countershaft (Fig. 14).
NOTE: Note washer bore locating notch for assem-
bly reference.
(9) Remove thrust washer locating pin from coun-
tershaft.(10) Remove mainshaft fifth gear with Puller Set
6444 and Jaw 6459 or 6820. Position first Jaw on
gear (Fig. 15).
(11) Assemble Puller Flange 6444-1and Puller
Rods 6444-3 4X2 or 6444-4 4X4 (Fig. 16). Slide
assembly onto output shaft and seat flange in notch
of jaw.
Fig. 13 COUNTERSHAFT FIFTH GEAR NEEDLE
BEARING
1 - NEEDLE BEARING
2 - COUNTERSHAFT
Fig. 14 COUNTERSHAFT REAR BEARING THRUST
WASHER
1 - THRUST WASHER
2 - THRUST WASHER PIN
Fig. 15 JAW ON MAINSHAFT FIFTH GEAR
1 - MAINSHAFT FIFTH GEAR
2-JAW
3 - MAINSHAFT
Fig. 16 PULLER FLANGE
1-JAW
2 - PULLER FLANGE
21 - 48 MANUAL TRANSMISSION - NV4500DR
MANUAL TRANSMISSION - NV4500 (Continued)
Page 1757 of 2627
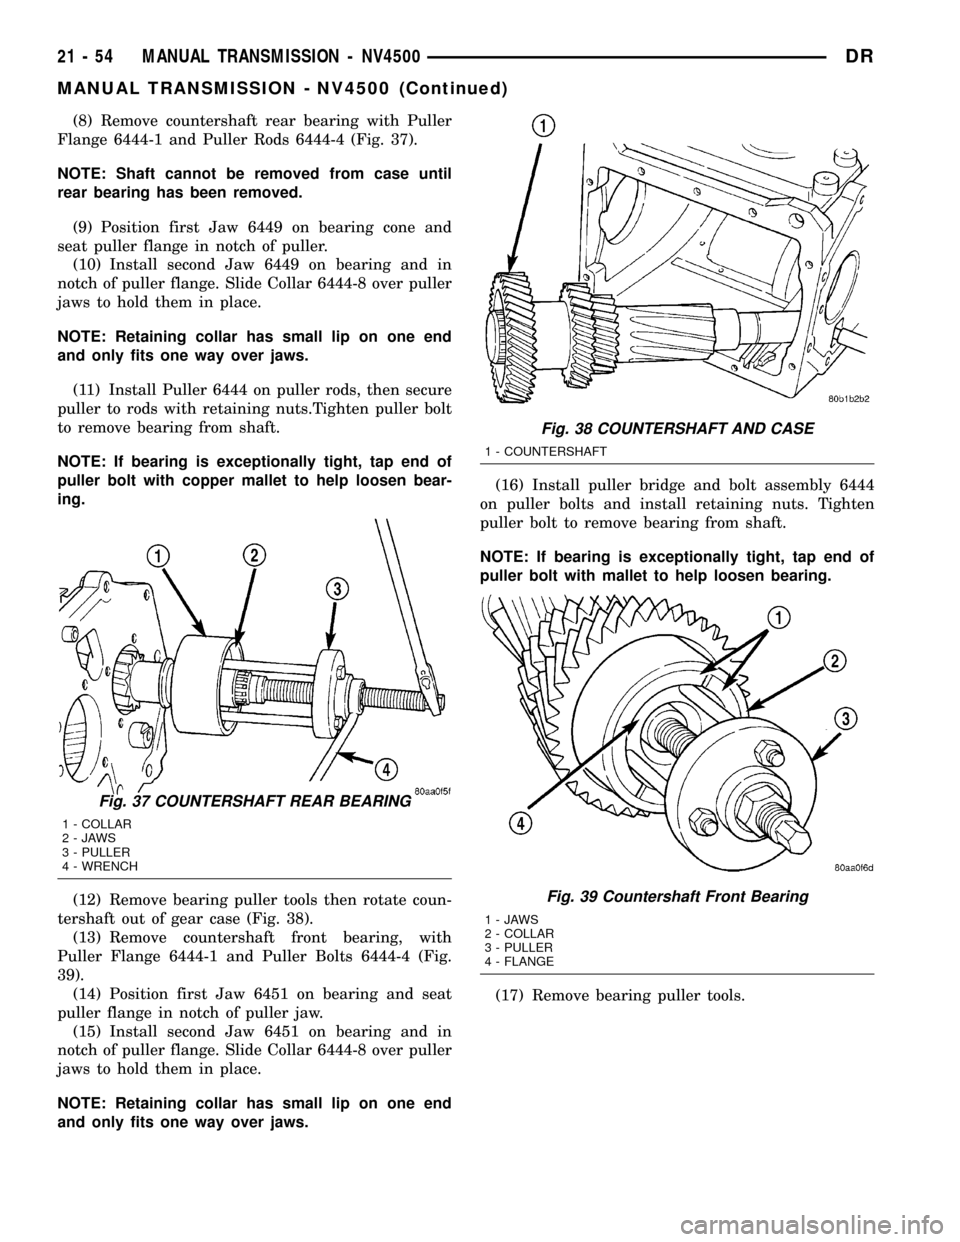
(8) Remove countershaft rear bearing with Puller
Flange 6444-1 and Puller Rods 6444-4 (Fig. 37).
NOTE: Shaft cannot be removed from case until
rear bearing has been removed.
(9) Position first Jaw 6449 on bearing cone and
seat puller flange in notch of puller.
(10) Install second Jaw 6449 on bearing and in
notch of puller flange. Slide Collar 6444-8 over puller
jaws to hold them in place.
NOTE: Retaining collar has small lip on one end
and only fits one way over jaws.
(11) Install Puller 6444 on puller rods, then secure
puller to rods with retaining nuts.Tighten puller bolt
to remove bearing from shaft.
NOTE: If bearing is exceptionally tight, tap end of
puller bolt with copper mallet to help loosen bear-
ing.
(12) Remove bearing puller tools then rotate coun-
tershaft out of gear case (Fig. 38).
(13) Remove countershaft front bearing, with
Puller Flange 6444-1 and Puller Bolts 6444-4 (Fig.
39).
(14) Position first Jaw 6451 on bearing and seat
puller flange in notch of puller jaw.
(15) Install second Jaw 6451 on bearing and in
notch of puller flange. Slide Collar 6444-8 over puller
jaws to hold them in place.
NOTE: Retaining collar has small lip on one end
and only fits one way over jaws.(16) Install puller bridge and bolt assembly 6444
on puller bolts and install retaining nuts. Tighten
puller bolt to remove bearing from shaft.
NOTE: If bearing is exceptionally tight, tap end of
puller bolt with mallet to help loosen bearing.
(17) Remove bearing puller tools.
Fig. 37 COUNTERSHAFT REAR BEARING
1 - COLLAR
2-JAWS
3 - PULLER
4 - WRENCH
Fig. 38 COUNTERSHAFT AND CASE
1 - COUNTERSHAFT
Fig. 39 Countershaft Front Bearing
1-JAWS
2 - COLLAR
3 - PULLER
4 - FLANGE
21 - 54 MANUAL TRANSMISSION - NV4500DR
MANUAL TRANSMISSION - NV4500 (Continued)
Page 1763 of 2627

(18) Remove mainshaft rear bearing, with Puller
Flange 6444-1 and Puller Rods 6444-3 for 4X2 or
6444-4 for 4X4.
(19) Position the first Jaw 6445 on the bearing
cone and seat Puller Flange 6444-1 in notch of jaw
(Fig. 57).
(20) Install second Jaw 6445 on the bearing cone
and puller flange. Slide Collar 6444-8 over jaws to
hold them in place.
(21) Install Puller 6444 on the puller rods and
secure with nuts (Fig. 58). Tighten puller bolt to the
remove bearing.
Fig. 57 MAINSHAFT REAR BEARING PULLER
1 - REAR BEARING
2 - FLANGE
3-JAW
4 - COLLAR5 - MAINSHAFT
6 - PULLER
7 - RODS
8-JAW
21 - 60 MANUAL TRANSMISSION - NV4500DR
MANUAL TRANSMISSION - NV4500 (Continued)
Page 1768 of 2627
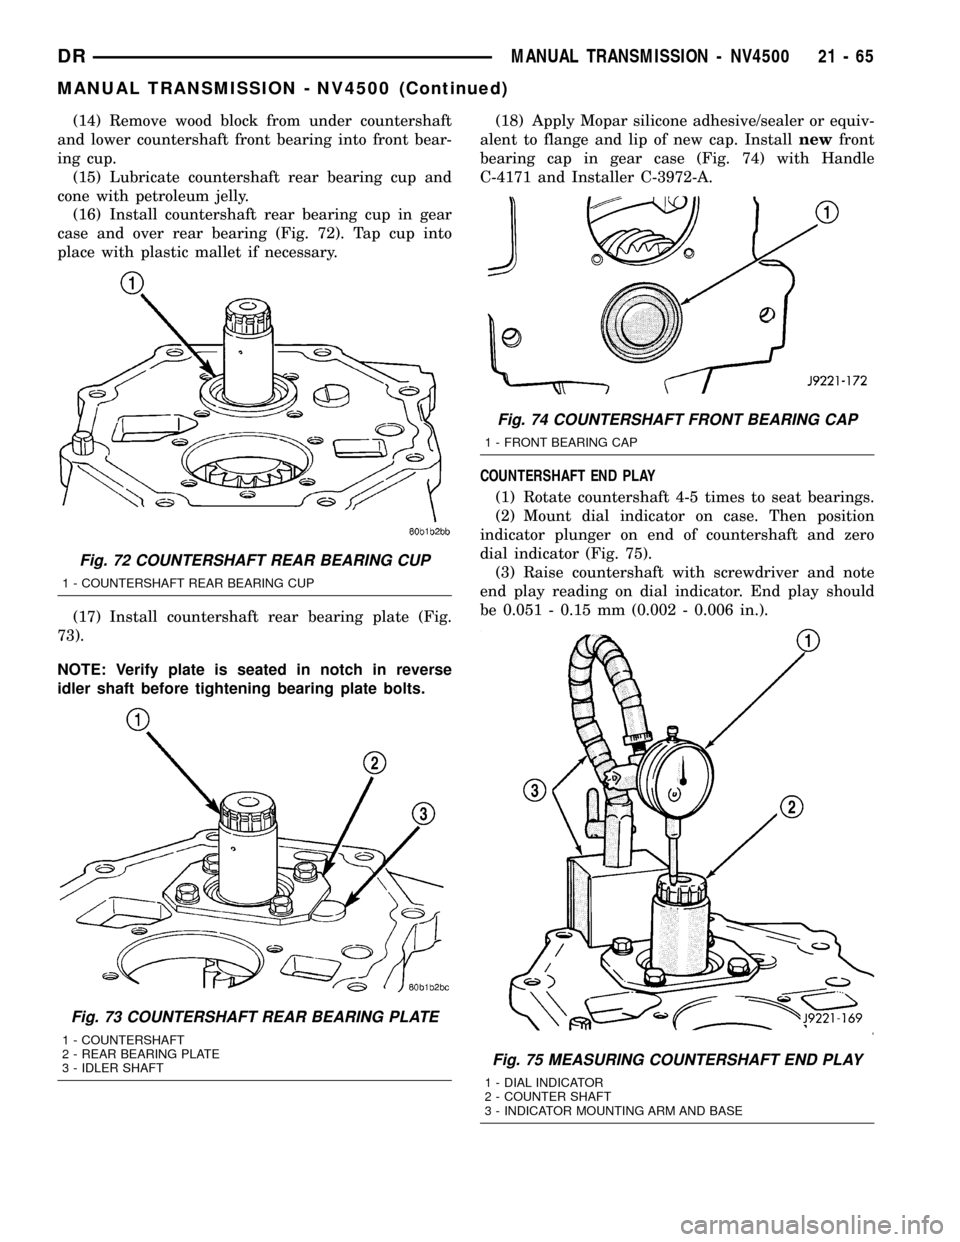
(14) Remove wood block from under countershaft
and lower countershaft front bearing into front bear-
ing cup.
(15) Lubricate countershaft rear bearing cup and
cone with petroleum jelly.
(16) Install countershaft rear bearing cup in gear
case and over rear bearing (Fig. 72). Tap cup into
place with plastic mallet if necessary.
(17) Install countershaft rear bearing plate (Fig.
73).
NOTE: Verify plate is seated in notch in reverse
idler shaft before tightening bearing plate bolts.(18) Apply Mopar silicone adhesive/sealer or equiv-
alent to flange and lip of new cap. Installnewfront
bearing cap in gear case (Fig. 74) with Handle
C-4171 and Installer C-3972-A.
COUNTERSHAFT END PLAY
(1) Rotate countershaft 4-5 times to seat bearings.
(2) Mount dial indicator on case. Then position
indicator plunger on end of countershaft and zero
dial indicator (Fig. 75).
(3) Raise countershaft with screwdriver and note
end play reading on dial indicator. End play should
be 0.051 - 0.15 mm (0.002 - 0.006 in.).
Fig. 72 COUNTERSHAFT REAR BEARING CUP
1 - COUNTERSHAFT REAR BEARING CUP
Fig. 73 COUNTERSHAFT REAR BEARING PLATE
1 - COUNTERSHAFT
2 - REAR BEARING PLATE
3 - IDLER SHAFT
Fig. 74 COUNTERSHAFT FRONT BEARING CAP
1 - FRONT BEARING CAP
Fig. 75 MEASURING COUNTERSHAFT END PLAY
1 - DIAL INDICATOR
2 - COUNTER SHAFT
3 - INDICATOR MOUNTING ARM AND BASE
DRMANUAL TRANSMISSION - NV4500 21 - 65
MANUAL TRANSMISSION - NV4500 (Continued)
Page 1769 of 2627

(4) Remove countershaft rear bearing plate.
(5) Install a end play shim that will provide mini-
mum countershaft end play. Position shim on rear
bearing cup (Fig. 76).
(6) Install countershaft rear bearing plate (Fig.
73).
NOTE: Verify plate is seated in reverse idler shaft
notch and end play shims are still in position
before installing bolts.
(7) Apply 1-2 drops Mopar Loc N' Seal or equiva-
lent to threads of rear bearing plate bolts. Then
install and tighten bearing plate bolts to 23 N´m (200
in. lbs.).
SHIFT LUG AND RAIL
(1) Lubricate shift lug and rail with CastroltSyn-
torq or equivalent.
(2) Insert shift lug rail part way into case.
(3) Install shift lug on rail.
(4) Position shift rail so roll pin notches are
toward outside of case (Fig. 77).
(5) Install roll pin that secures lug to rail (Fig. 77).
MAINSHAFT AND GEARTRAIN
CAUTION: The reverse, 1-2 and 3-4 synchro compo-
nents can be assembled and installed incorrectly.
Follow assembly procedures for component identi-
fication and location.
Lubricate mainshaft bearing surfaces and all bear-
ing assemblies with CastroltSyntorq or with petro-
leum jelly.(1) Install first snap ring in rear most groove of
mainshaft hub (Fig. 78). This snap ring locates first
gear clutch gear on shaft.
NOTE: Four of these snap rings are used to secure
various components on the mainshaft 1-2 synchro
hub. The snap rings are all the same size and are
interchangeable.
Fig. 76 COUNTERSHAFT END PLAY SHIM
1 - REAR BEARING CUP
2 - END PLAY SHIM (SELECTIVE)Fig. 77 SHIFT LUG AND RAIL
1 - NOTCHES (FOR 5TH GEAR SHIFT FORK ROLL PINS)
2 - LUG RAIL
3 - ROLL PIN HOLE
4 - SHIFT LUG
Fig. 78 FIRST GEAR BEARING AND SNAP RING
1 - SNAP RING
2 - FIRST GEAR BEARING
3 - MAINSHAFT SYNCHRO HUB
21 - 66 MANUAL TRANSMISSION - NV4500DR
MANUAL TRANSMISSION - NV4500 (Continued)
Page 1775 of 2627
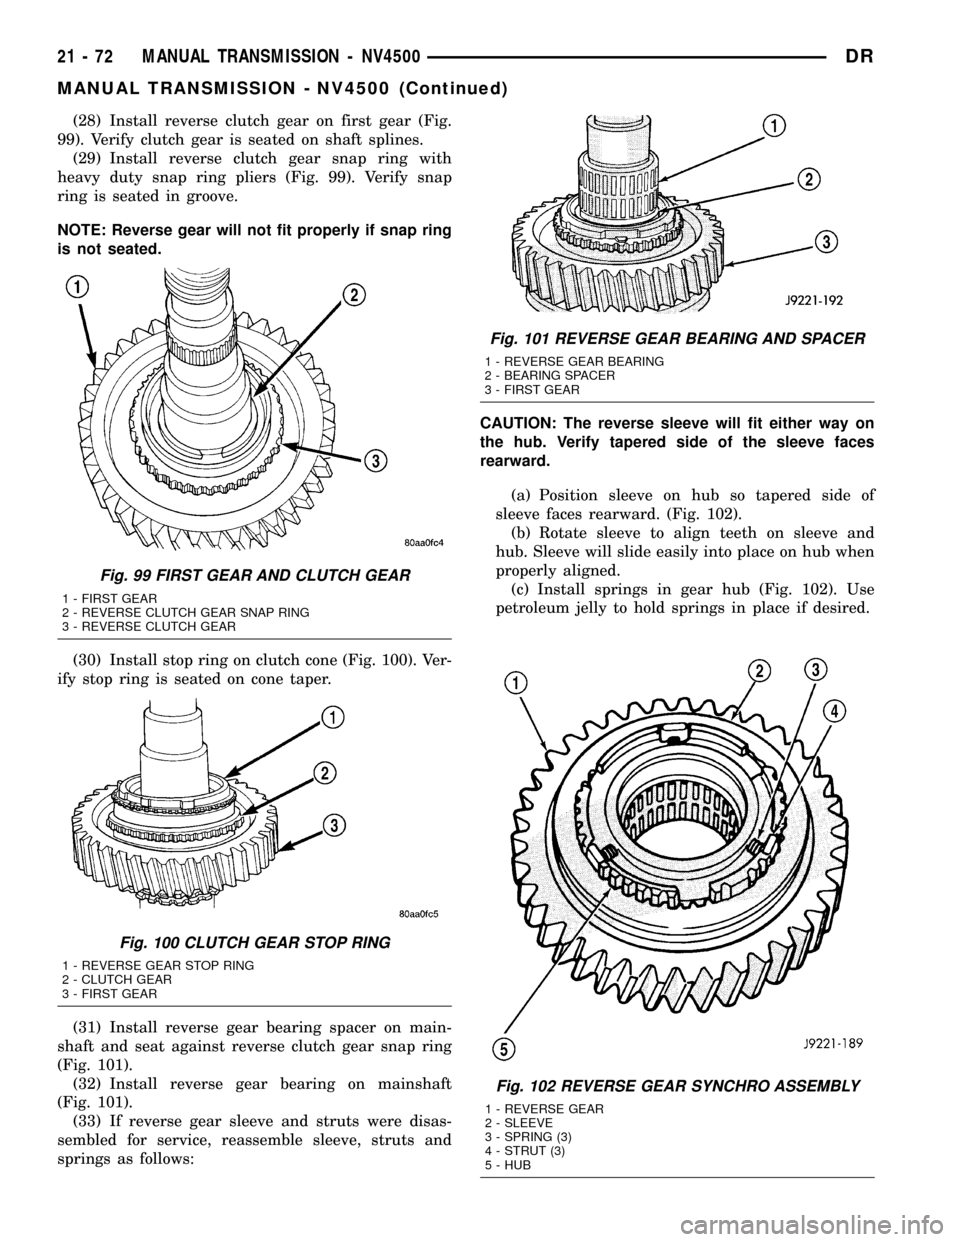
(28) Install reverse clutch gear on first gear (Fig.
99). Verify clutch gear is seated on shaft splines.
(29) Install reverse clutch gear snap ring with
heavy duty snap ring pliers (Fig. 99). Verify snap
ring is seated in groove.
NOTE: Reverse gear will not fit properly if snap ring
is not seated.
(30) Install stop ring on clutch cone (Fig. 100). Ver-
ify stop ring is seated on cone taper.
(31) Install reverse gear bearing spacer on main-
shaft and seat against reverse clutch gear snap ring
(Fig. 101).
(32) Install reverse gear bearing on mainshaft
(Fig. 101).
(33) If reverse gear sleeve and struts were disas-
sembled for service, reassemble sleeve, struts and
springs as follows:CAUTION: The reverse sleeve will fit either way on
the hub. Verify tapered side of the sleeve faces
rearward.
(a) Position sleeve on hub so tapered side of
sleeve faces rearward. (Fig. 102).
(b) Rotate sleeve to align teeth on sleeve and
hub. Sleeve will slide easily into place on hub when
properly aligned.
(c) Install springs in gear hub (Fig. 102). Use
petroleum jelly to hold springs in place if desired.
Fig. 102 REVERSE GEAR SYNCHRO ASSEMBLY
1 - REVERSE GEAR
2 - SLEEVE
3 - SPRING (3)
4 - STRUT (3)
5 - HUB
Fig. 99 FIRST GEAR AND CLUTCH GEAR
1 - FIRST GEAR
2 - REVERSE CLUTCH GEAR SNAP RING
3 - REVERSE CLUTCH GEAR
Fig. 100 CLUTCH GEAR STOP RING
1 - REVERSE GEAR STOP RING
2 - CLUTCH GEAR
3 - FIRST GEAR
Fig. 101 REVERSE GEAR BEARING AND SPACER
1 - REVERSE GEAR BEARING
2 - BEARING SPACER
3 - FIRST GEAR
21 - 72 MANUAL TRANSMISSION - NV4500DR
MANUAL TRANSMISSION - NV4500 (Continued)