1998 DODGE RAM 1500 car seat
[x] Cancel search: car seatPage 1647 of 2627
(6) Install injector into cylinder head with male
connector port facing the intake manifold. Push down
on fuel injector mounting flange to engage o-ring and
seat injector.
(7) Tightening Sequence:
(a) Install fuel injector holdown clamp (mount-
ing flange) bolts.Do a preliminary tightening
of these bolts to 5 N´m (44 in. lbs.) torque.
This preliminary tightening insures the fuel
injector is seated and centered.
(b) After tightening, relieve bolt torque, but
leave both bolts threaded in place.
(c) Install high-pressure connector and retaining
nut. Do a preliminary tightening to 15 N´m (11 ft.
lbs.) torque.
(d) Alternately tighten injector holdown bolts to
10 N´m (89 in. lbs.) torque.
(e) Do a final tightening of the high-pressure
connector and retaining nut. Tighten to 50 N´m (37
ft. lbs.) torque.
(8) Connect injector solenoid wires and nuts to top
of injectors (Fig. 18). Tighten connector nuts to 1.25
N´m (11 in. lbs.) torque.Be very careful not to
overtighten these nuts as damage to fuel injec-
tor will occur.
(9) Install exhaust rocker arm assembly. Refer to
Engine.
(10) Set exhaust valve lash. Refer to Engine.
(11) Install high pressure fuel line. Refer to Torque
Specifications.Be sure to use a secondary
back-up wrench on the connector nut (fitting)
while torquing fuel line fitting.Refer to Fuel Line
Installation for additional information.
(12) Install valve cover. Refer to Engine.
(13) Install breather assembly.
(14) Connect negative battery cables to both bat-
teries.
FUEL INJECTOR RAIL
DESCRIPTION
The fuel injector rail is bolted to the top of the
intake manifold.
OPERATION
The fuel rail is used as a distribution device to
supply high-pressure fuel to the high-pressure fuel
lines.
REMOVAL
CAUTION: Cleanliness cannot be overemphasized
when handling or replacing diesel fuel system com-
ponents. This especially includes the fuel injectors,
high-pressure fuel lines and fuel injection pump.Very tight tolerances are used with these parts. Dirt
contamination could cause rapid part wear and pos-
sible plugging of fuel injector nozzle tip holes. This
in turn could lead to possible engine misfire.
Always wash/clean any fuel system component
thoroughly before disassembly and then air dry.
Cap or cover any open part after disassembly.
Before assembly, examine each part for dirt, grease
or other contaminants and clean if necessary. When
installing new parts, lubricate them with clean
engine oil or clean diesel fuel only.
(1) Disconnect both negative battery cables at both
batteries. Isolate ends of both cables.
(2) Disconnect electrical connector at fuel pressure
sensor.
(3) Remove banjo bolt at fuel limiting valve.
(4) Disconnect necessary wiring harness retention
clips from intake manifold.
(5) Lift 2 rubber covers to gain access to positive
(+), intake heater cable nuts. Remove 2 nuts and
remove 2 cables from studs.
(6) Carefully remove 4 high-pressure fuel lines
from top of injector rail engine. Note position of each
line while removing.Do not bend lines while
removing.
CAUTION: WHEN LOOSENING OR TIGHTENING
HIGH-PRESSURE LINES ATTACHED TO A SEPA-
RATE FITTING, USE A BACK-UP WRENCH ON FIT-
TING. DO NOT ALLOW FITTING TO ROTATE.
DAMAGE TO BOTH FUEL LINE AND FITTING WILL
RESULT.
(7) Carefully remove 2 high-pressure fuel lines at
each end of injector rail. Note position of each line
while removing.Do not bend lines while remov-
ing.
(8) Remove fuel line connecting injector pump to
fuel rail.
(9) Remove 3 injector rail mounting bolts (Fig. 22).
(10) Remove rail from top of intake manifold.
INSTALLATION
(1) Clean any dirt/debris from top of intake mani-
fold and bottom of fuel rail.
(2) Position fuel rail to top of manifold and install
3 mounting bolts. Refer to Torque Specifications.
(3) Install all high-pressure lines to rail. Refer to
Fuel Lines for procedures.
(4) Reposition wiring harness to intake manifold
and install new tie wraps.
(5) Install and tighten fuel limiting valve banjo
bolt. Refer to Torque Specifications.
(6) Connect electrical connector to fuel pressure
sensor.
(7) Position 2 positive (+) cables to intake heater
studs. Install 2 nuts.
14 - 78 FUEL INJECTION - DIESELDR
FUEL INJECTOR (Continued)
Page 1674 of 2627
SPECIFICATIONS
TORQUE CHART
TORQUE SPECIFICATIONS
DESCRIPTION N´m Ft. Lbs. In. Lbs.
Rack and Pinion Steering
Gear
Gear to Frame Bolts319 235 Ð
Rack and Pinion Steering
Gear
Coupler Bolt49 36 Ð
Tie Rod End
Knuckle Nut61
Then tighten an additional
90É45
Then tighten an additional
90ÉÐ
Tie Rod End
Jam Nut75 55 Ð
Power Steering Line
Pressure Line32 23 Ð
Power Steering Line
Return Line71 52 Ð
Power Steering Line
Pressure Line To Pump37 27 Ð
BUSHING
REMOVAL
(1) Remove the steering gear (Refer to 19 -
STEERING/GEAR - REMOVAL).
CAUTION: Do not overtighten the vise on the gear
case.
(2) Mount the steering gear in a soft jawed vise.
NOTE: If the bushings are seized a brass punch can
be used to remove the bushings from the gear
using care not to strike the gear.
(3) Remove the front mounting bushings.
(4) Remove the rear mounting bushings.
(5) Remove the steering gear from the vise and
place it on the bench.
INSTALLATION
NOTE: Coat all bushings with a thin rubber lubri-
cate oil prior to installation.
NOTE: A rubber mallet can be used to assist in the
installation of the bushings once lubricated.
(1) Coat the rear bushings with a thin rubber
lubricate oil then install the rear bushings using a
rubber mallet to seat the bushings in the gear.
(2) Coat the front bushings with a thin rubber
lubricate oil then install the front bushings using a
rubber mallet to seat the bushings in the gear.
(3) Install the steering gear (Refer to 19 - STEER-
ING/GEAR - INSTALLATION).
(4) Adjust the toe position (if necessary) (Refer to 2
- SUSPENSION/WHEEL ALIGNMENT - STAN-
DARD PROCEDURE).
DRGEAR - INDEPENDENT FRONT SUSPENSION 19 - 19
GEAR - INDEPENDENT FRONT SUSPENSION (Continued)
Page 1702 of 2627
PULLEY
REMOVAL
CAUTION: Do not reuse the old power steering
pump pulley it is not intended for reuse. A new pul-
ley must be installed if removed.
(1) Remove the power steering pump assembly,
(Refer to 19 - STEERING/PUMP - REMOVAL).
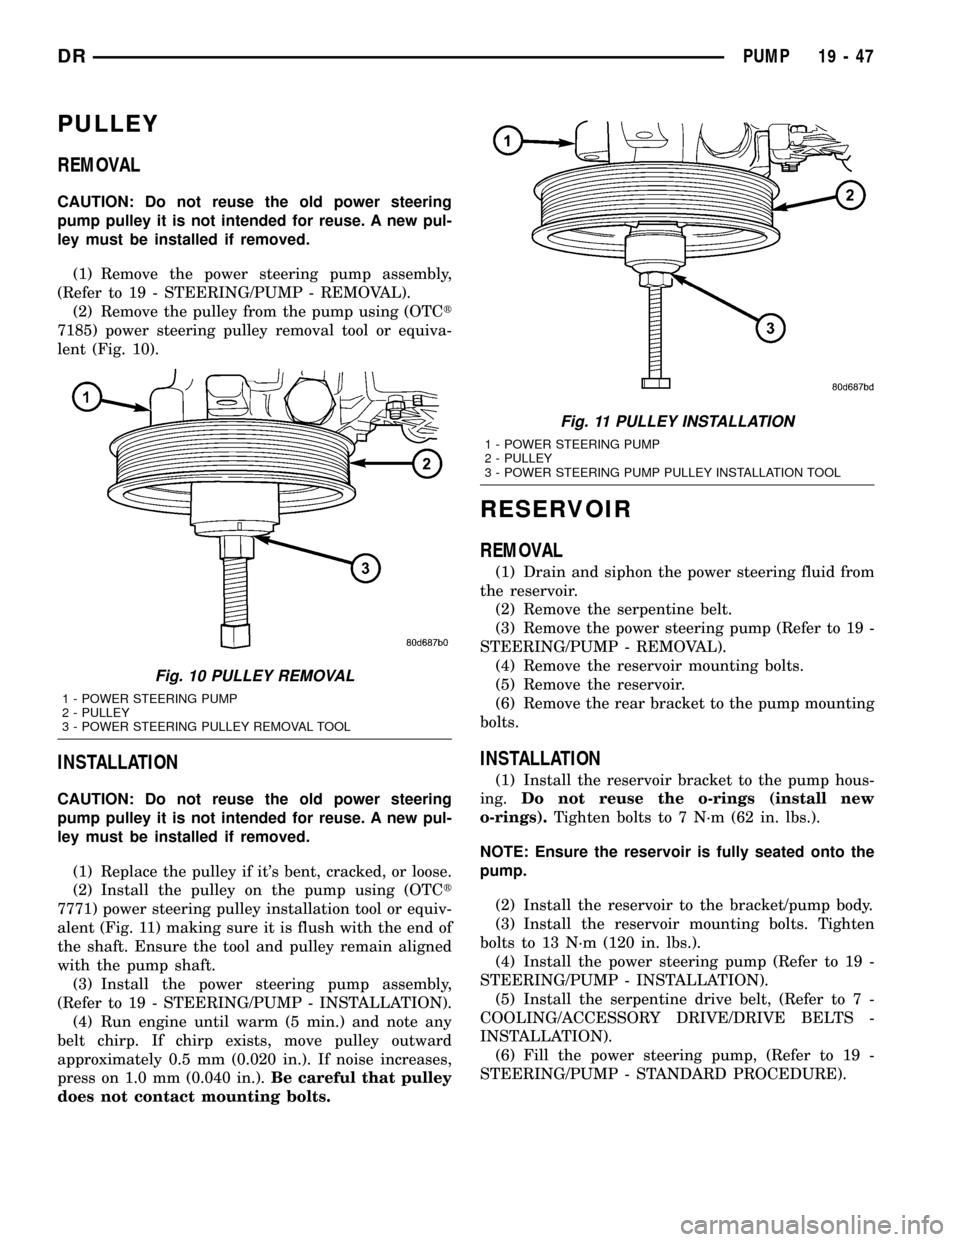
(2) Remove the pulley from the pump using (OTCt
7185) power steering pulley removal tool or equiva-
lent (Fig. 10).
INSTALLATION
CAUTION: Do not reuse the old power steering
pump pulley it is not intended for reuse. A new pul-
ley must be installed if removed.
(1) Replace the pulley if it's bent, cracked, or loose.
(2) Install the pulley on the pump using (OTCt
7771) power steering pulley installation tool or equiv-
alent (Fig. 11) making sure it is flush with the end of
the shaft. Ensure the tool and pulley remain aligned
with the pump shaft.
(3) Install the power steering pump assembly,
(Refer to 19 - STEERING/PUMP - INSTALLATION).
(4) Run engine until warm (5 min.) and note any
belt chirp. If chirp exists, move pulley outward
approximately 0.5 mm (0.020 in.). If noise increases,
press on 1.0 mm (0.040 in.).Be careful that pulley
does not contact mounting bolts.
RESERVOIR
REMOVAL
(1) Drain and siphon the power steering fluid from
the reservoir.
(2) Remove the serpentine belt.
(3) Remove the power steering pump (Refer to 19 -
STEERING/PUMP - REMOVAL).
(4) Remove the reservoir mounting bolts.
(5) Remove the reservoir.
(6) Remove the rear bracket to the pump mounting
bolts.
INSTALLATION
(1) Install the reservoir bracket to the pump hous-
ing.Do not reuse the o-rings (install new
o-rings).Tighten bolts to 7 N´m (62 in. lbs.).
NOTE: Ensure the reservoir is fully seated onto the
pump.
(2) Install the reservoir to the bracket/pump body.
(3) Install the reservoir mounting bolts. Tighten
bolts to 13 N´m (120 in. lbs.).
(4) Install the power steering pump (Refer to 19 -
STEERING/PUMP - INSTALLATION).
(5) Install the serpentine drive belt, (Refer to 7 -
COOLING/ACCESSORY DRIVE/DRIVE BELTS -
INSTALLATION).
(6) Fill the power steering pump, (Refer to 19 -
STEERING/PUMP - STANDARD PROCEDURE).
Fig. 10 PULLEY REMOVAL
1 - POWER STEERING PUMP
2 - PULLEY
3 - POWER STEERING PULLEY REMOVAL TOOL
Fig. 11 PULLEY INSTALLATION
1 - POWER STEERING PUMP
2 - PULLEY
3 - POWER STEERING PUMP PULLEY INSTALLATION TOOL
DRPUMP 19 - 47
Page 1726 of 2627
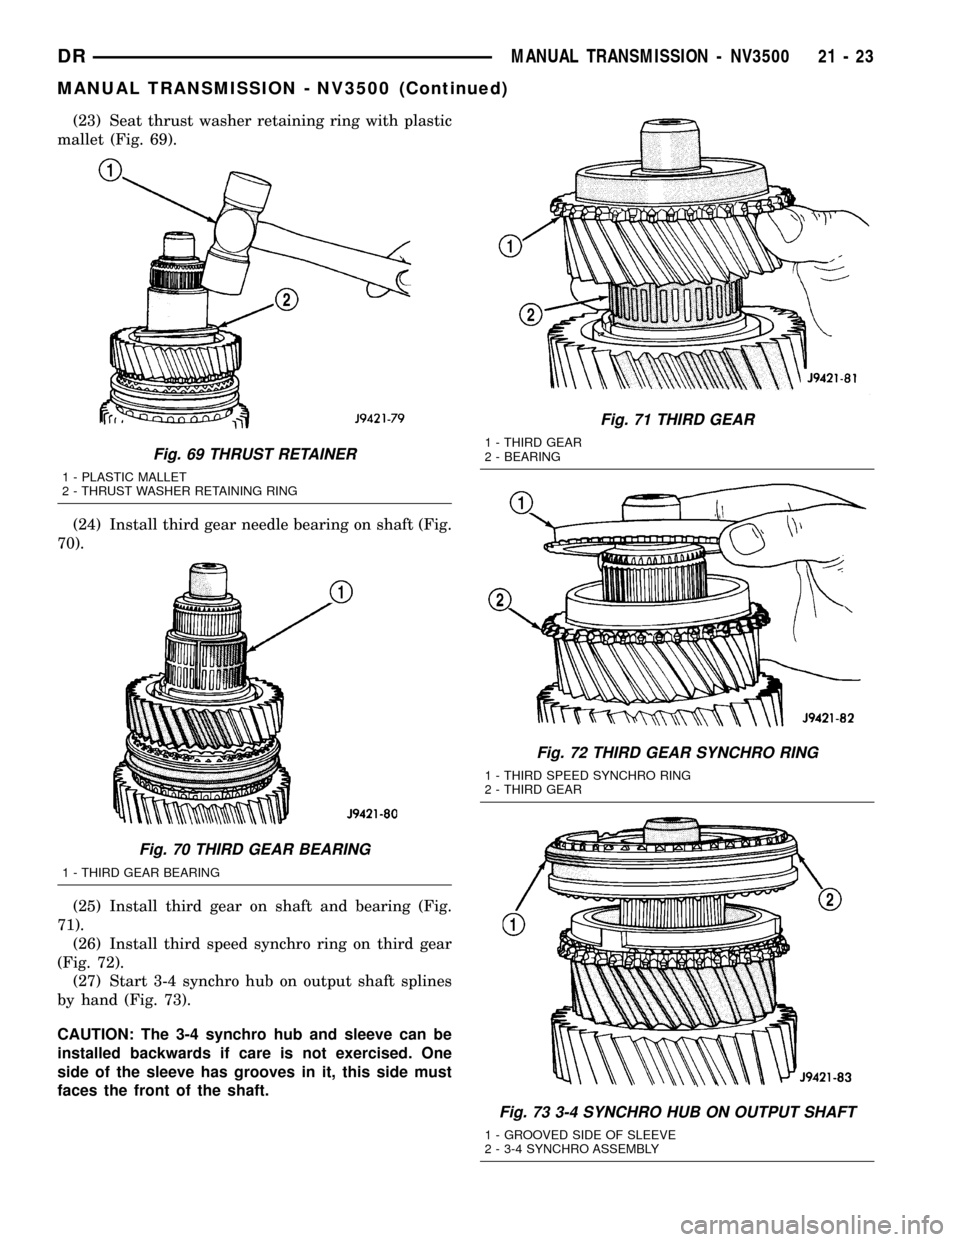
(23) Seat thrust washer retaining ring with plastic
mallet (Fig. 69).
(24) Install third gear needle bearing on shaft (Fig.
70).
(25) Install third gear on shaft and bearing (Fig.
71).
(26) Install third speed synchro ring on third gear
(Fig. 72).
(27) Start 3-4 synchro hub on output shaft splines
by hand (Fig. 73).
CAUTION: The 3-4 synchro hub and sleeve can be
installed backwards if care is not exercised. One
side of the sleeve has grooves in it, this side must
faces the front of the shaft.
Fig. 69 THRUST RETAINER
1 - PLASTIC MALLET
2 - THRUST WASHER RETAINING RING
Fig. 70 THIRD GEAR BEARING
1 - THIRD GEAR BEARING
Fig. 71 THIRD GEAR
1 - THIRD GEAR
2 - BEARING
Fig. 72 THIRD GEAR SYNCHRO RING
1 - THIRD SPEED SYNCHRO RING
2 - THIRD GEAR
Fig. 73 3-4 SYNCHRO HUB ON OUTPUT SHAFT
1 - GROOVED SIDE OF SLEEVE
2 - 3-4 SYNCHRO ASSEMBLY
DRMANUAL TRANSMISSION - NV3500 21 - 23
MANUAL TRANSMISSION - NV3500 (Continued)
Page 1731 of 2627
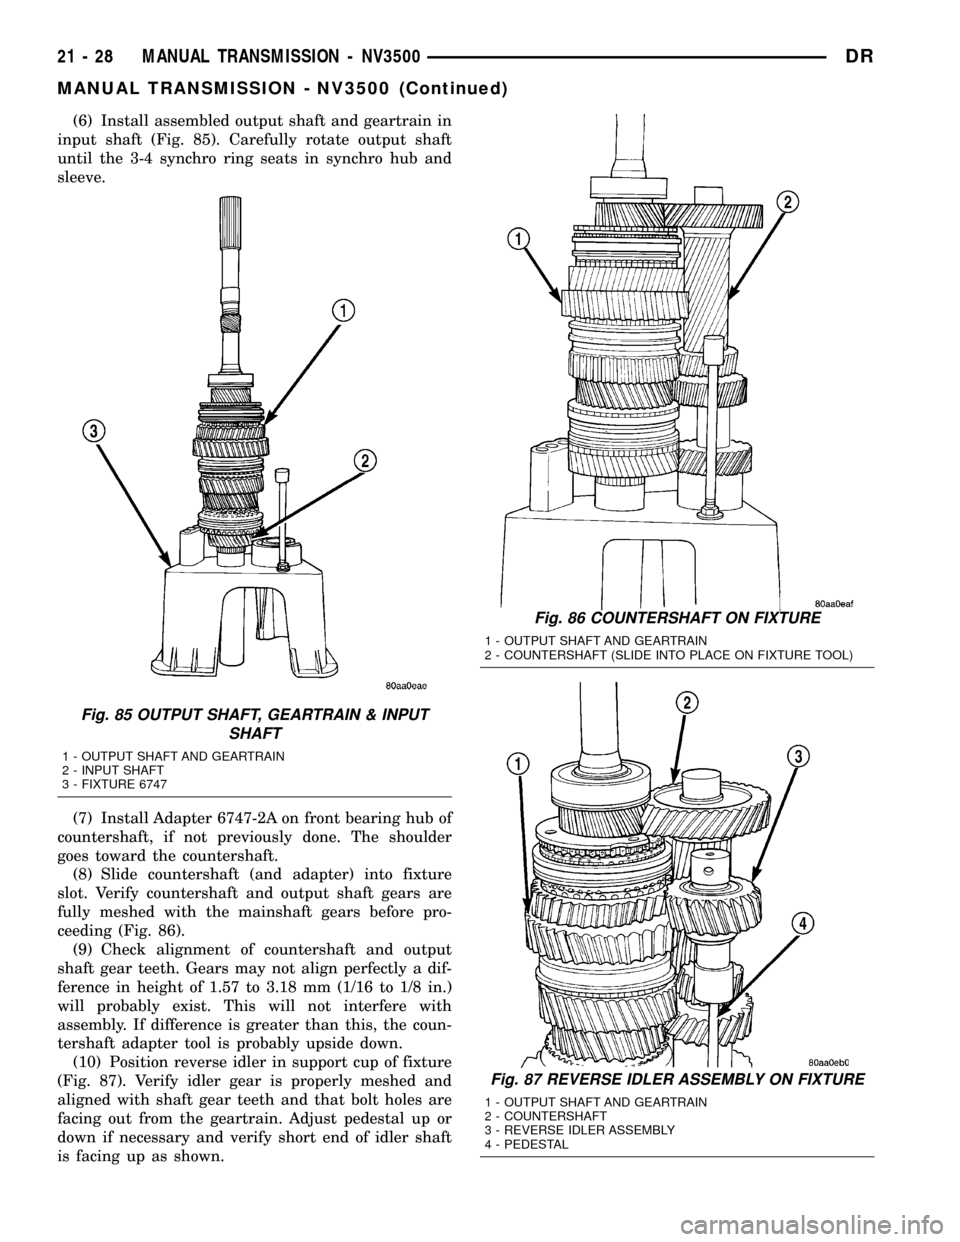
(6) Install assembled output shaft and geartrain in
input shaft (Fig. 85). Carefully rotate output shaft
until the 3-4 synchro ring seats in synchro hub and
sleeve.
(7) Install Adapter 6747-2A on front bearing hub of
countershaft, if not previously done. The shoulder
goes toward the countershaft.
(8) Slide countershaft (and adapter) into fixture
slot. Verify countershaft and output shaft gears are
fully meshed with the mainshaft gears before pro-
ceeding (Fig. 86).
(9) Check alignment of countershaft and output
shaft gear teeth. Gears may not align perfectly a dif-
ference in height of 1.57 to 3.18 mm (1/16 to 1/8 in.)
will probably exist. This will not interfere with
assembly. If difference is greater than this, the coun-
tershaft adapter tool is probably upside down.
(10) Position reverse idler in support cup of fixture
(Fig. 87). Verify idler gear is properly meshed and
aligned with shaft gear teeth and that bolt holes are
facing out from the geartrain. Adjust pedestal up or
down if necessary and verify short end of idler shaft
is facing up as shown.
Fig. 85 OUTPUT SHAFT, GEARTRAIN & INPUT
SHAFT
1 - OUTPUT SHAFT AND GEARTRAIN
2 - INPUT SHAFT
3 - FIXTURE 6747
Fig. 86 COUNTERSHAFT ON FIXTURE
1 - OUTPUT SHAFT AND GEARTRAIN
2 - COUNTERSHAFT (SLIDE INTO PLACE ON FIXTURE TOOL)
Fig. 87 REVERSE IDLER ASSEMBLY ON FIXTURE
1 - OUTPUT SHAFT AND GEARTRAIN
2 - COUNTERSHAFT
3 - REVERSE IDLER ASSEMBLY
4 - PEDESTAL
21 - 28 MANUAL TRANSMISSION - NV3500DR
MANUAL TRANSMISSION - NV3500 (Continued)
Page 1868 of 2627
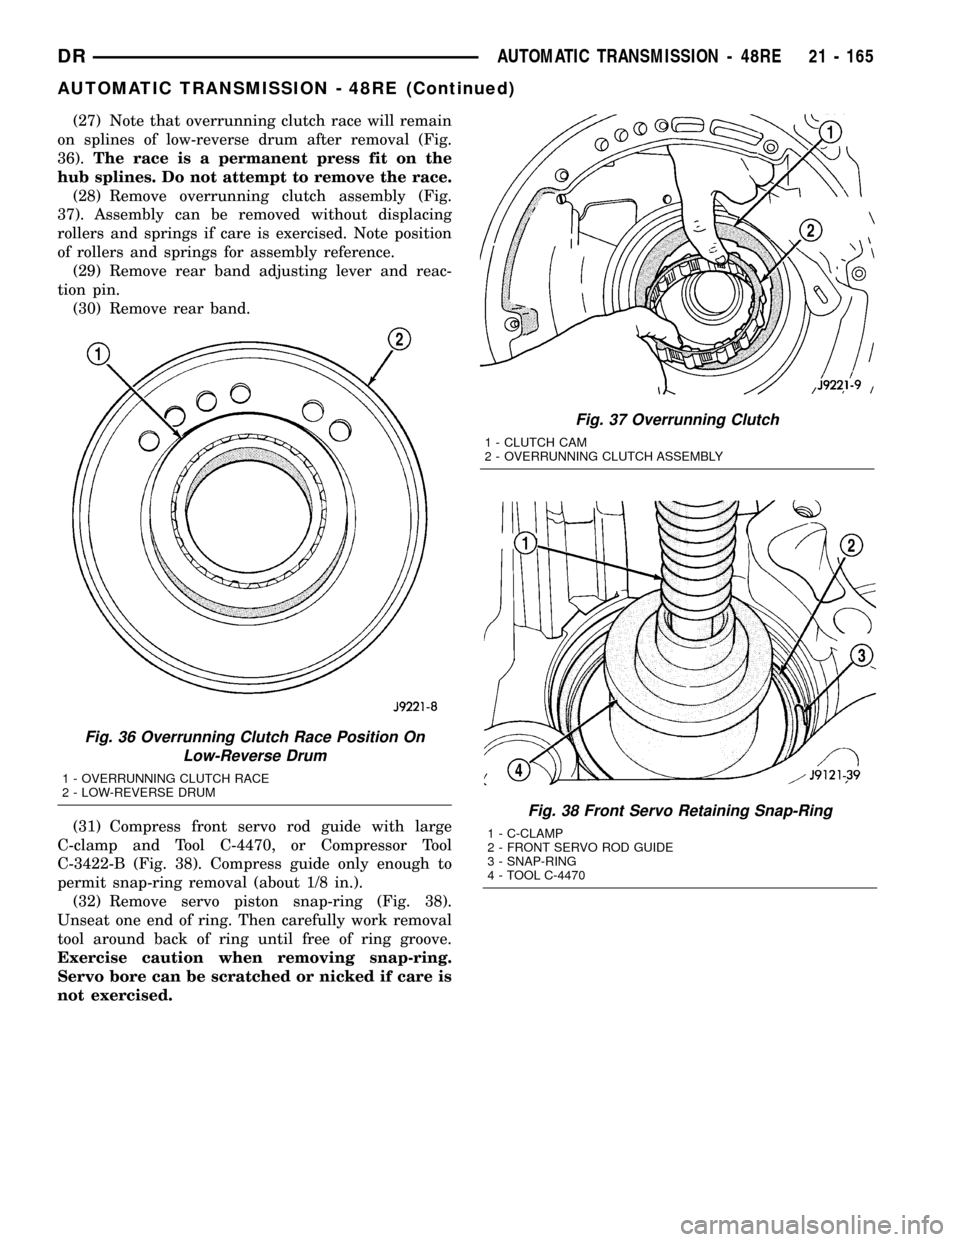
(27) Note that overrunning clutch race will remain
on splines of low-reverse drum after removal (Fig.
36).The race is a permanent press fit on the
hub splines. Do not attempt to remove the race.
(28) Remove overrunning clutch assembly (Fig.
37). Assembly can be removed without displacing
rollers and springs if care is exercised. Note position
of rollers and springs for assembly reference.
(29) Remove rear band adjusting lever and reac-
tion pin.
(30) Remove rear band.
(31) Compress front servo rod guide with large
C-clamp and Tool C-4470, or Compressor Tool
C-3422-B (Fig. 38). Compress guide only enough to
permit snap-ring removal (about 1/8 in.).
(32) Remove servo piston snap-ring (Fig. 38).
Unseat one end of ring. Then carefully work removal
tool around back of ring until free of ring groove.
Exercise caution when removing snap-ring.
Servo bore can be scratched or nicked if care is
not exercised.
Fig. 38 Front Servo Retaining Snap-Ring
1 - C-CLAMP
2 - FRONT SERVO ROD GUIDE
3 - SNAP-RING
4 - TOOL C-4470
Fig. 36 Overrunning Clutch Race Position On
Low-Reverse Drum
1 - OVERRUNNING CLUTCH RACE
2 - LOW-REVERSE DRUM
Fig. 37 Overrunning Clutch
1 - CLUTCH CAM
2 - OVERRUNNING CLUTCH ASSEMBLY
DRAUTOMATIC TRANSMISSION - 48RE 21 - 165
AUTOMATIC TRANSMISSION - 48RE (Continued)
Page 1870 of 2627
assembled. Verify that thrust washers, thrust plates
and seal rings are correctly positioned.
The planetary geartrain, front/rear clutch assem-
blies and oil pump are all much easier to install
when the transmission case is upright. Either tilt the
case upward with wood blocks, or cut a hole in the
bench large enough for the intermediate shaft and
rear support. Then lower the shaft and support into
the hole and support the rear of the case directly on
the bench.
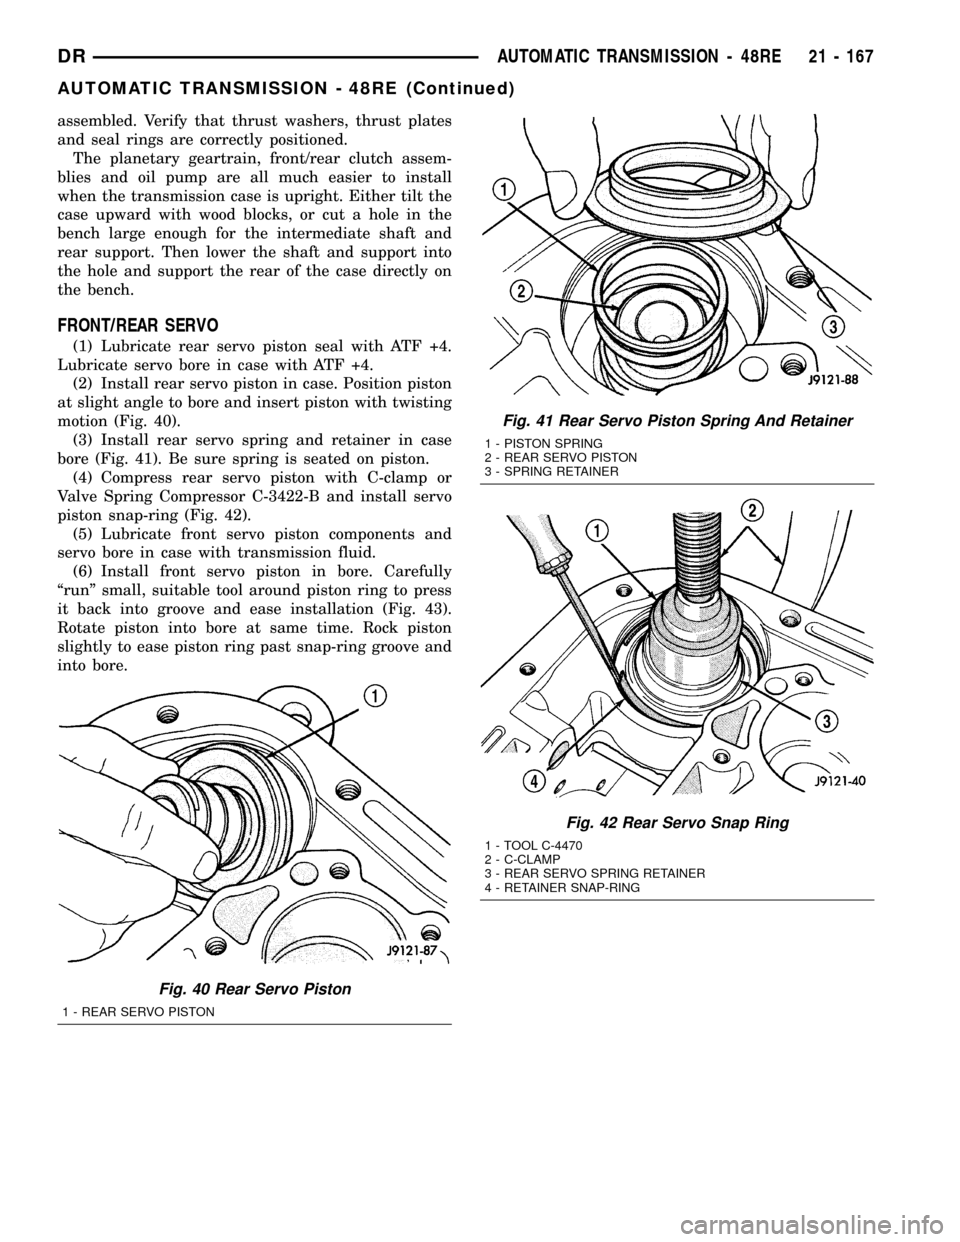
FRONT/REAR SERVO
(1) Lubricate rear servo piston seal with ATF +4.
Lubricate servo bore in case with ATF +4.
(2) Install rear servo piston in case. Position piston
at slight angle to bore and insert piston with twisting
motion (Fig. 40).
(3) Install rear servo spring and retainer in case
bore (Fig. 41). Be sure spring is seated on piston.
(4) Compress rear servo piston with C-clamp or
Valve Spring Compressor C-3422-B and install servo
piston snap-ring (Fig. 42).
(5) Lubricate front servo piston components and
servo bore in case with transmission fluid.
(6) Install front servo piston in bore. Carefully
ªrunº small, suitable tool around piston ring to press
it back into groove and ease installation (Fig. 43).
Rotate piston into bore at same time. Rock piston
slightly to ease piston ring past snap-ring groove and
into bore.
Fig. 40 Rear Servo Piston
1 - REAR SERVO PISTON
Fig. 41 Rear Servo Piston Spring And Retainer
1 - PISTON SPRING
2 - REAR SERVO PISTON
3 - SPRING RETAINER
Fig. 42 Rear Servo Snap Ring
1 - TOOL C-4470
2 - C-CLAMP
3 - REAR SERVO SPRING RETAINER
4 - RETAINER SNAP-RING
DRAUTOMATIC TRANSMISSION - 48RE 21 - 167
AUTOMATIC TRANSMISSION - 48RE (Continued)
Page 1872 of 2627
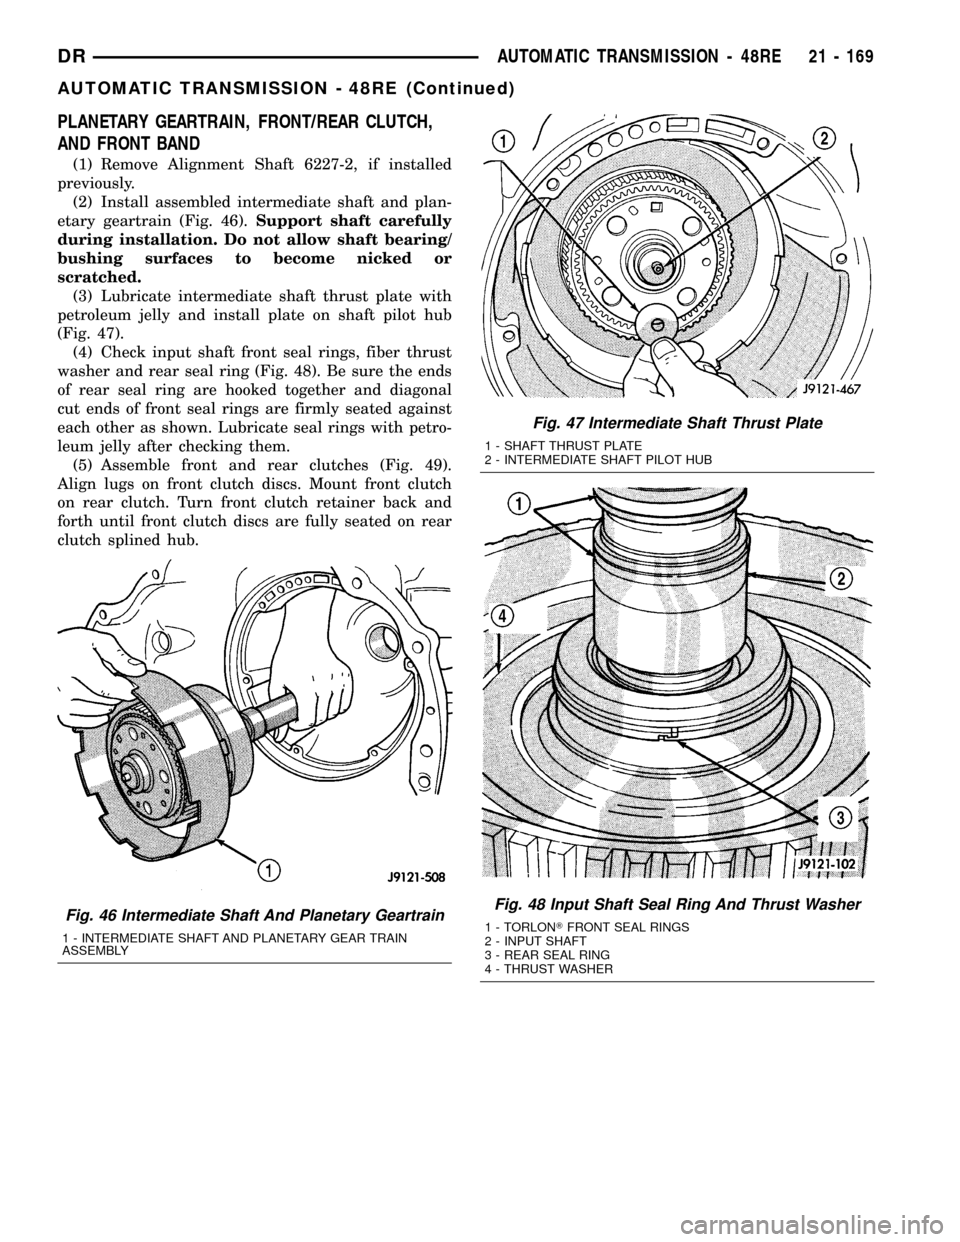
PLANETARY GEARTRAIN, FRONT/REAR CLUTCH,
AND FRONT BAND
(1) Remove Alignment Shaft 6227-2, if installed
previously.
(2) Install assembled intermediate shaft and plan-
etary geartrain (Fig. 46).Support shaft carefully
during installation. Do not allow shaft bearing/
bushing surfaces to become nicked or
scratched.
(3) Lubricate intermediate shaft thrust plate with
petroleum jelly and install plate on shaft pilot hub
(Fig. 47).
(4) Check input shaft front seal rings, fiber thrust
washer and rear seal ring (Fig. 48). Be sure the ends
of rear seal ring are hooked together and diagonal
cut ends of front seal rings are firmly seated against
each other as shown. Lubricate seal rings with petro-
leum jelly after checking them.
(5) Assemble front and rear clutches (Fig. 49).
Align lugs on front clutch discs. Mount front clutch
on rear clutch. Turn front clutch retainer back and
forth until front clutch discs are fully seated on rear
clutch splined hub.
Fig. 46 Intermediate Shaft And Planetary Geartrain
1 - INTERMEDIATE SHAFT AND PLANETARY GEAR TRAIN
ASSEMBLY
Fig. 47 Intermediate Shaft Thrust Plate
1 - SHAFT THRUST PLATE
2 - INTERMEDIATE SHAFT PILOT HUB
Fig. 48 Input Shaft Seal Ring And Thrust Washer
1 - TORLONTFRONT SEAL RINGS
2 - INPUT SHAFT
3 - REAR SEAL RING
4 - THRUST WASHER
DRAUTOMATIC TRANSMISSION - 48RE 21 - 169
AUTOMATIC TRANSMISSION - 48RE (Continued)