1998 CHEVROLET VENTURE turn signal
[x] Cancel search: turn signalPage 370 of 474
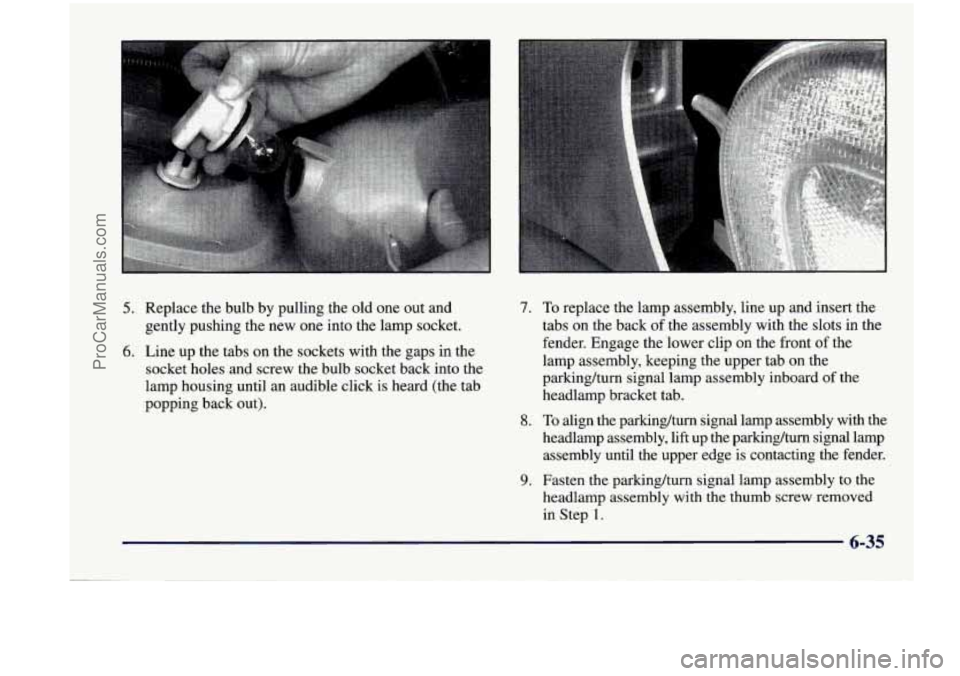
5. Replace the bulb by pulling the old one out and
gently pushing the new one into the lamp socket.
6. Line up the tabs on the sockets with the gaps in the
socket holes and screw the bulb socket back into the
lamp housing until an audible click
is heard (the tab
popping back out).
7.
8.
9.
To replace the lamp assembly, line up and insert the
tabs on the back of the assembly with the slots in the
fender. Engage the lower clip on the front
of the
lamp assembly, keeping the upper tab on the
parking/turn signal lamp assembly inboard
of the
headlamp bracket tab.
To align the parking/turn signal lamp assembly with the
headlamp assembly, lift up the parking/turn signal lamp assembly until the upper edge is contacting the fender.
Fasten the parking/tum signal lamp assembly to the
headlamp assembly with the thumb screw removed
in Step
1.
K -_ 6-35
ProCarManuals.com
Page 371 of 474
Front Sidemarker
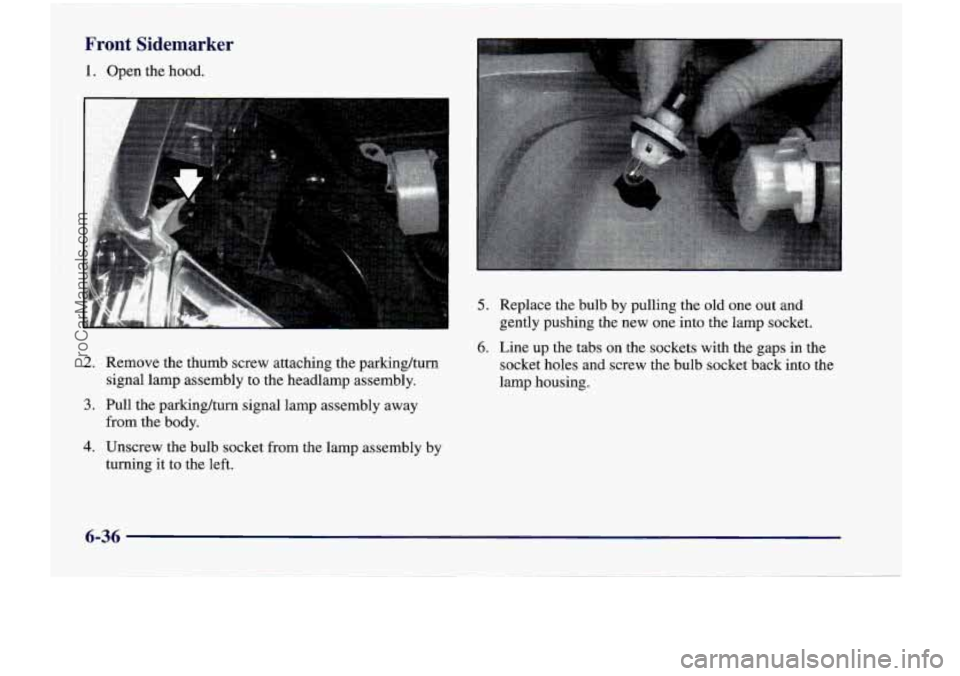
1. Open the hood.
2. Remove the thumb screw attaching the parking/turn
signal lamp assembly to the headlarnp assembly.
3. Pull the parking/turn signal lamp assembly away
from the body.
5. Replace the bulb by pulling the old one out and
gently pushing the new one into the lamp socket.
6. Line up the tabs on the sockets with the gaps in the
socket holes and screw the bulb socket back into the
lamp housing.
4. Unscrew the bulb socket from the lamp assembly by
turning it to the left.
6-36
ProCarManuals.com
Page 372 of 474
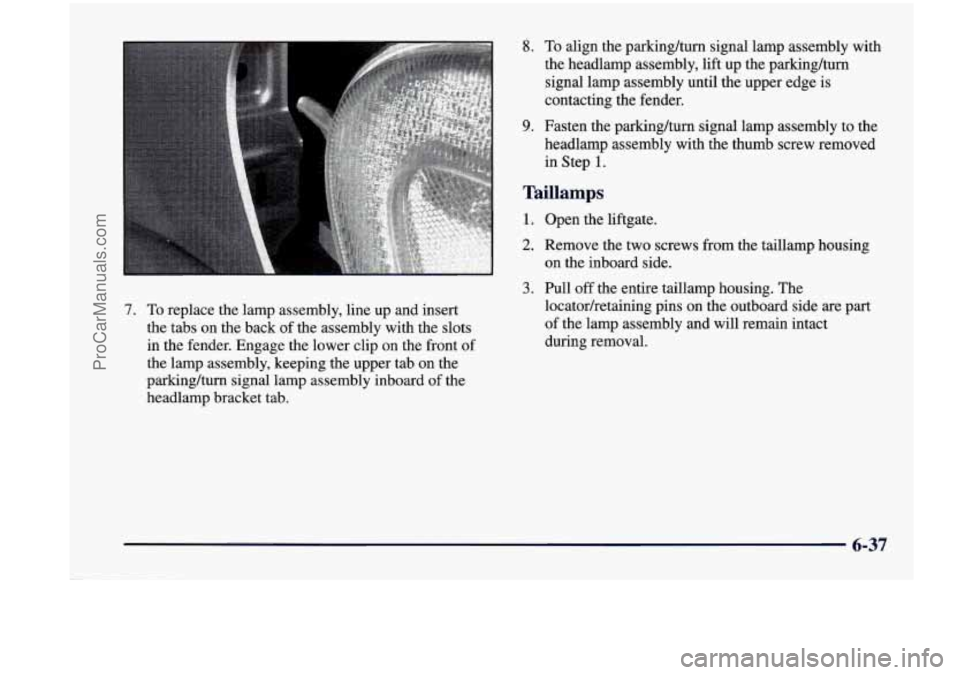
7. To replace the lamp assembly, line up and insert
the tabs on the back of the assembly with the slots
in the fender. Engage the lower clip on the front of
the lamp assembly, keeping the upper tab on the
parkinghrn signal lamp assembly inboard
of the
headlamp bracket tab.
8. To align the parking/turn signal lamp assembly with
the headlamp assembly, lift up the parking/turn
signal lamp assembly until the upper edge is
contacting the fender.
9. Fasten the parkinghrn signal lamp assembly to the
headlamp assembly with the thumb screw removed
in Step
1.
Taillamps
1. Open the liftgate.
2. Remove the two screws from the taillamp housing
on the inboard side.
3. Pull off the entire taillamp housing. The
locator/retaining pins on the outboard side are part of the lamp assembly and will remain intact
during removal.
6-37
ProCarManuals.com
Page 373 of 474
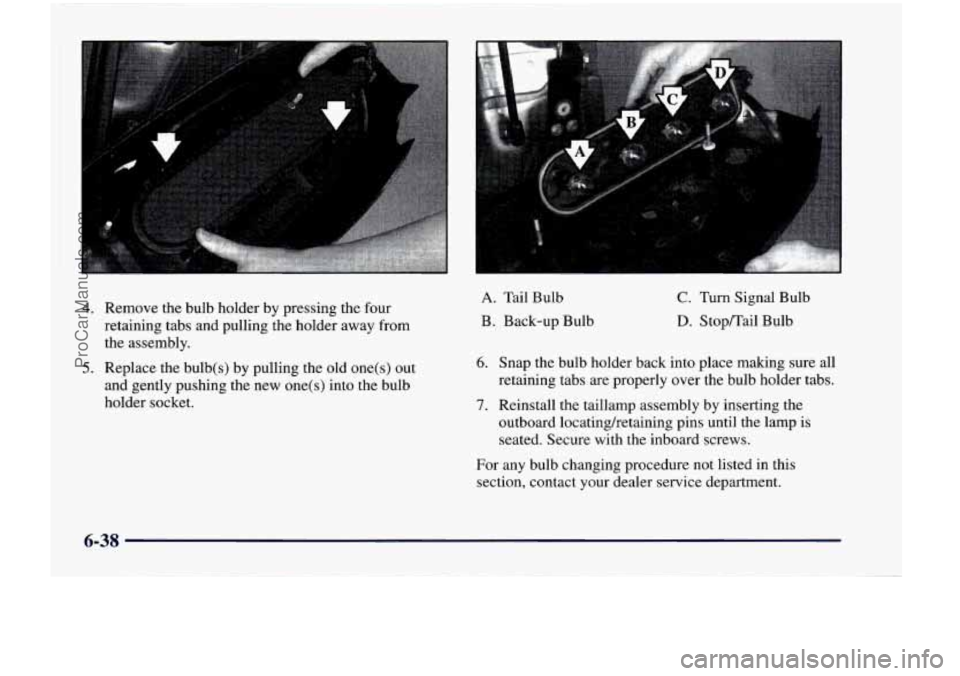
4. Remove the bulb holder by pressing the four
retaining tabs and pulling the holder away from the assembly.
5. Replace the bulb(s) by pulling the old one(s) out
and gently pushing the new one(s) into the bulb
holder socket.
A. Tail Bulb
B. Back-up Bulb C. Turn Signal Bulb
D. StoplI'ail Bulb
6. Snap the bulb holder back into place making sure all
retaining tabs are properly over the bulb holder tabs.
7. Reinstall the taillamp assembly by inserting the
outboard locatinghetaining pins until the lamp is
seated. Secure with the inboard screws.
For any bulb changing procedure not listed in this section, contact your dealer service department.
6-38
ProCarManuals.com
Page 394 of 474
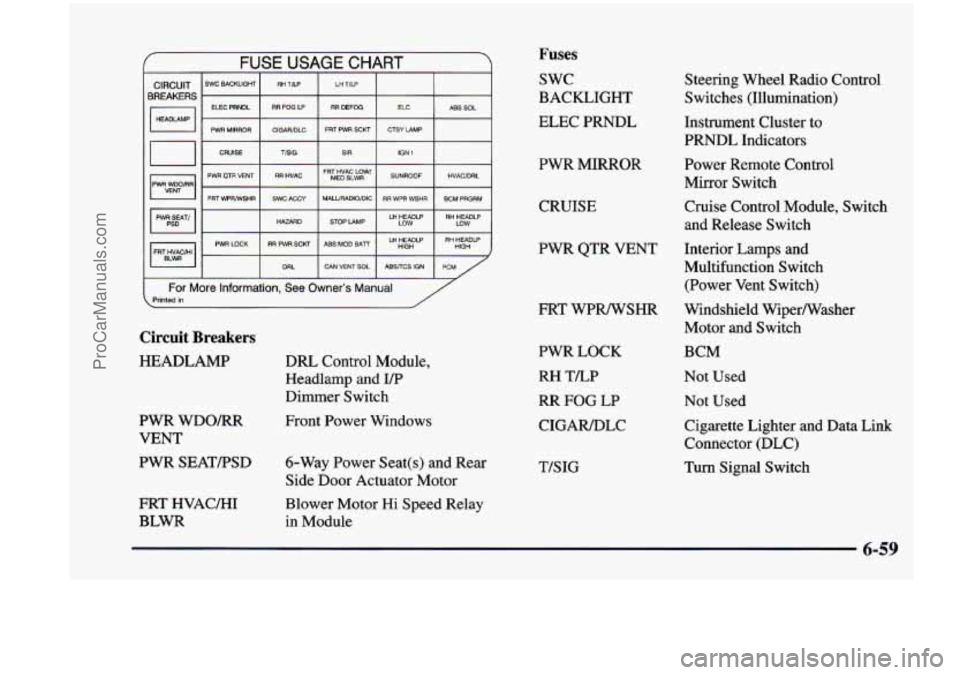
CIRCUIT BREAKERS
FUSE USAGE CHART
SWC BACKLIGHT RH TLP LH TILP
ELEC PRNDL RR
FOG LP RR DEFOG ELC ABS SOL
PWR
MIRROR ClGARiDLC FRT PWR SCU CTSY LAMP
CRUISE TBIG
SIR IGN 1
PWR am VENT RR HVAC MED BLWR SUNROOF HVACIDRL FRT HVAC Low’
FRT WRNSHR SWC ACCY MALURADIO/DIC RR WPR WSHR BCM PRGRM I I I I
HAZARD LAMP LH HEADLP RH HEADLP
LOW LOW
I I I I I
I- I DRL 1 CAN VENTSOL I ABSflCS IGN I PCM /
For More Information, See Owner’s Manual Printed in /
Circuit Breakers
HEADLAMP
PWR
WDOm
VENT
PWR SEATPSD
FRT HVAC/HI
BLWR DRL
Control Module,
Headlamp and
UP
Dimmer Switch
Front Power Windows
6-Way Power Seat(s) and Rear
Side Door Actuator Motor
Blower Motor
Hi Speed Relay
in Module
Fuses
swc
BACKLIGHT
ELEC PRNDL
PWR MIRROR
CRUISE Steering Wheel
Radio Control
Switches (Illumination)
Instrument Cluster to
PRNDL Indicators
Power Remote Control
Mirror Switch
Cruise Control Module, Switch
and Release Switch
PWR QTR VENT Interior Lamps and
Multifunction Switch
(Power Vent Switch)
Motor
and Switch
FRT
WPWSHR Windshield Wiperwasher
PWR LOCK
RH TLP
RR FOG LP
CIGAR/DLC
T/SIG BCM
Not Used
Not Used
Cigarette Lighter and Data Link
Connector
(DLC)
Turn Signal Switch
ProCarManuals.com
Page 395 of 474

Fuses
RR HVAC
SWC ACCY
HAZARD
RR PWR SCKT
DRL
LH TLP
RR DEFOG
FRT PWR SCKT
SIR
FRT HVAC
LOWMED BLWR
MALL/RADIO/DIC Rear Blower Motor,
Rear
Heater-NC
Control,
and Temperature Door
Actuator (Rear)
Steering Wheel Radio
Control Switches
Turn Signal Switch
Rear Electric Accessory
Plug Housing
DRL Control Module
Not Used
Rear Window Defogger Relay
Front Electric Accessory
Plug Housing
Inflatable Restraint
Control Module
Heater-A/C Control
BCM, Driver Information
Display, Radio
and Radio Rear
Speaker Amplifier
Fuses
STOP LAMP
ABS MOD BATT
CAN VENT
SOL
ELC
CTSY LAMP
IGN 1
SUNROOF
Stoplamp Switch to Stoplamps
Electronic Brake Control
ModuleElectronic Brake
Traction Control Module
(EBCMEBTCM)
Evaporative Emissions (EVAP)
Canister Vent Solonoid Valve
Electronic Level Control (ELC)
Air Compressor and ELC
Relay, Trailer Harness
BCM
ALC Sensor, BCM, Electronic
Brake Control Indicator Lamp
Driver Module, Instrument
Panel Cluster, Rear Window
Wipermasher and
Multifunction Switch (Fog Lamp SwitcWTraction Control Switch) and Stoplamp/Torque
Converter Clutch (TCC) Switch
Sunroof Control Module
6-60
ProCarManuals.com
Page 467 of 474
Seats (Continued) Restraint Systems
.............................. 1 . 1
Seat Controls ............................. 1.2. 1.6
Second Row Safety Belt Stowage ................. 1-7
Securing a Child Restraint ...................... 1-89
SecondGe ar ................................... 2-32
Second Row Solid Bench Seat ...................... 1-8
Folding the Seatback ........................... 1-8
Removing .................................... 1-8
Replacing ................................... 1-10
Center Rear Seat Position
................. 1-91, 1-93
Rear Outside Seat Position ...................... 1-89
Right Front Seat Position ....................... 1-95
Service ........................................ 6-2
Bulletins, Ordering ............................ 8- 12
Engine Soon Light ............................ 2-93
Manuals, Ordering ............................ 8- 12
Parts Identification Label ....................... 6-56
Publications, Ordering ......................... 8- 12
Work, Doing Your Own ......................... 6-2
Service and Appearance Care ...................... 6-1
Service and Owner Publications ................... 8- 12
Servicing
Your Air Bag-Equipped Vehicle ........... 1-58
Sheet Metal Damage ............................ 6-53
Shifting
Automatic Transaxle
.......................... 2-30
Into PARK (P) ............................... 2-35
Shoulder Belt Height Adjuster
..................... 1-43
SideAshtrays .................................. 2-78
Side Convenience Net ........................... 2-73
SignalingTurns ................................ 2-53
Securing a Child Restraint
Out
of PARK (P) ............................. 2-37 Skidding
...................................... 4-15
Smaller Children
and Babies ...................... 1-68
Sound Equipment. Adding ........................ 3-29
Spare Tire. Compact ............................. 5-34
Specifications and Capacities ...................... 6-65
Specifications. Engine ........................... 6-65
Speech Impaired. Customer Assistance ............... 8-4
Speedometer ................................... 2-85
SplitBenchSeat
................................ 1-18
Adjusting ................................... 1-19
Folding or Reclining the Seatbacks ............... 1-18
Removing ................................... 1-20
Replacing ................................... 1-22
Stains. Cleaning
................................ 6-49
Starter Switch Check ............................ 7-31
Starting Your Engine ............................ 2-27
Steam
........................................ 5-14
Steering ...................................... 4-11
In Emergencies ............................... 4-12
Power ...................................... 4-11
Tips ........................................ 4-11
Wheel. Tilt .................................. 2-52
Storage Compartments
........................... 2-66
Frontseat ................................... 2-71
Storage. Vehicle ................................ 6-30
Storing a Flat or Spare Tire ....................... 5-33
Stuck: In Sand. Mud. Ice or Snow .................. 5-35
SunVisors .................................... 2-78
Supplemental Restraint System .................... 1-50
Switchbanks ................................... 2-12
Symbols. Vehicle ................................ VIII
StorageBin .................................... 2-70
...
9-10
ProCarManuals.com
Page 468 of 474
Taillamp Bulb Replacement ...................... 6-37
TapePlayerCare
............................... 3-30
Temperature Knob. Climate Control System
........... 3-2
Theft
......................................... 2-22
Theft-Deterrent Feature. CD Player
................ 3-26
THEFTLOCK
................................. 3-26
Thermostat
.................................... 6-24
Third Gear
.................................... 2-32
Third Row Solid Bench Seat
...................... 1 - 13
Adjusting ................................... 1-13
Folding the Seatback
.......................... 1 - 13
Removing
................................... 1-14
Replacing
................................... 1 - 16
Tilt Steering Wheel
............................. 2-52
Time. Setting the
................................ 3-9
Tirechains
.................................... 6-47
Tire Loading
................................... 4-30
Tire-Loading Information Label
................... 4-30
Tires
......................................... 6-40
Alignment and Balance
........................ 6-46
BuyingNew
................................. 6-43
Chains
..................................... 6-47
ChangingaFlat
.............................. 5-24
Cleaning
.................................... 6-53
Compact Spare ............................... 5-34
Inflation
.................................... 6-41
Inflation Check ............................... 7-29
Inspection and Rotation
........................ 6-42
Loading
.................................... 4-30
Pressure
.................................... 6-41
Storing
a Flat or Spare ......................... 5-33
TemDerature ................................. 6-45 Treadwe ar
................................... 6-45
Uniform Quality Grading
....................... 6-44
Used Wheel Replacement
...................... 6-47
Wear Indicators
.............................. 6-43
Wheel Replacement
........................... 6-46
When It’s Time for New
....................... 6-43
TopStrap
..................................... 1-88
TorqueLock ................................... 2-37
Torque, Wheel Nut
......................... 5-32, 6-65
Towing a Trailer
................................ 4-33
Towing Your Vehicle
............................. 5-8
Traction Control System .......................... 4-9
Traction Control System Warning Light
........ 2-90, 4-10
Trailer Brakes
..................................... 4-37
Driving on Grades
............................ 4-40
Drivingwith
................................. 4-37
Hitches
..................................... 4-36
Maintenance When Towing
..................... 4-41
ParkingonHills
.............................. 4-40
Safety Chains
................................ 4-37
Tongue Weight
............................... 4-35
Total Weight on Tires
.......................... 4-36
Turnsignals
................................. 4-39
Weight
..................................... 4-34
Towing
..................................... 4-33
Transaxle Fluid, Automatic
....................... 6-18
Transmitters, Keyless Entry
........................ 2-8
Transportation, Courtesy
.......................... 8-8
Trip Computer ................................ 2- 100
Trip Odometer ................................. 2-85
TTYUsers ..................................... 8-4
Turn Signal and Lane Change Signals ............... 2-53 Traciion .................................... 6-45 . 1 .
9-11
_. .
ProCarManuals.com