Page 72 of 378
Downloaded from www.Manualslib.com manuals search engine When the PASS-Key system senses that someone is
using the wrong key, it shuts down the vehicle’s starter
and fuel systems. For about three minutes, the starter
won’t work and fuel won’t go to the engine.
If someone
tries to start your vehicle again or uses another key
during this time, the shutdown period will start over
again. This discourages someone from randomly trying
different keys with different resistor pellets in an attempt
to make a match.
The key must be clean and dry before it’s inserted in the
ignition or the engine may not start. If the SECURITY
light comes on, the key may be dirty or wet.
If this happens and the starter won’t work, turn the
ignition
off. Clean and dry the key, wait three minutes
and try again. If the starter still won’t work, wait
three minutes and try the other ignition key. At this time,
you may
also want to check the fuses (see “Fuses and
Circuit Breakers” in the Index). If the starter won’t work
with the other key, your vehicle needs service. If your
vehicle does start, the first ignition key may be faulty.
See your dealer or a locksmith who can service the
PASS-Key. If
you accidentally use a key that has a damaged or
missing resistor pellet, you will see no SECURITY
light. You don’t have to wait three minutes before trying
the proper key.
If the resistor pellet is damaged or missing, the starter
won’t work. Use the other ignition key, and see your
dealer or a locksmith who can service the PASS-Key to
have a new key made.
If the SECURITY light comes on while driving, have
your vehicle serviced as soon as possible.
If you lose or damage a PASS-Key ignition key, see
your dealer or a locksmith who can service PASS-Key.
In an emergency, call the Chevrolet Roadside Assistance
Center at 1-800-CHEV-USA
(1-800-243-8872). In
Canada, call 1-800-268-6800.
2-19
Page 83 of 378
Downloaded from www.Manualslib.com manuals search engine Shift Speeds (Manual Transmission)
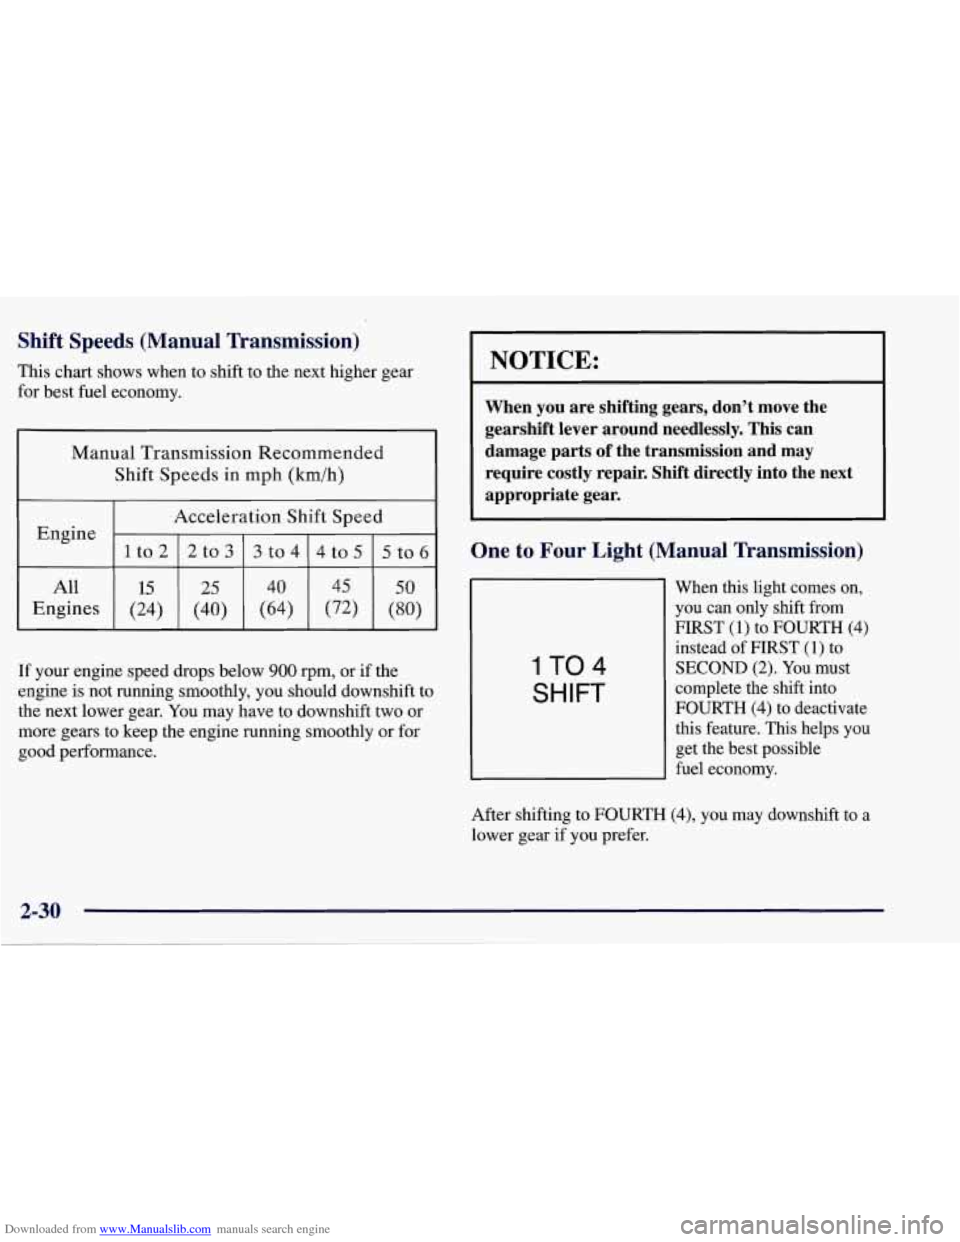
This chart shows when to shift to the next higher gear
for best fuel economy.
Manual Transmission Recommended Shift Speeds in mph (kmih)
Engine
Engines .Acceleration Shift Speed
If your engine speed drops below
900 rpm, or if the
engine is not running smoothly, you should downshift to
the next lower gear. You may have to downshift two
or
more gears to keep the engine running smoothly or for
good performance.
NOTICE:
When you are shifting gears, don't move the
gearshift lever around needlessly. This can
damage parts of the transmission and may
require costly repair. Shift directly into the next
appropriate gear.
One to Four Light (Manual Transmission)
IT04
SHIFT
When this light comes on,
you
can only shift from
F'IRST
(1) to FOURTH (4)
instead of FIRST (1) to
SECOND (2). You must
complete the shift into
FOURTH
(4) to deactivate
this feature. This helps you
get the best possible
fuel economy.
After shifting
to FOURTH (4), you may downshift to a
lower gear if you prefer.
2-30
Page 84 of 378
Downloaded from www.Manualslib.com manuals search engine NOTICE:
Do not try to force the shift lever into
SECOND (2) or THIRD (3) when the ONE TO
FOUR light comes on.
Do not try to re-engage
FIRST
(1) after starting to shift into
FOURTH
(4). You will damage your
transmission. Shift only from FIRST
(1) to
FOURTH
(4) when the light comes on.
This light will come on when:
0 The engine coolant temperature is higher than 120°F
0 You are going 15 to 19 mph (24 to 31 km/h) and
0 You are at 21 percent throttle or less.
(49"C),
and
Downshifting (Manual Transmission)
Do not downshift into the gear shown below at a speed
greater than shown in the table:
FIRST (1)
.................... 50 mph (80 km/h)
SECOND (2) ................ 74 mph (1 19 km/h)
THIRD (3) ................. 101 mph (163 km/h)
FOURTH (4) ............... 130 mph (209 km/h)
NOTICE:
If you skip more than one gear when you
downshift, or
if you race the engine when you
downshift, you can damage the clutch, driveshaft
or transmission.
2-31
Page 85 of 378
Downloaded from www.Manualslib.com manuals search engine The six-speed transmission has a spring that centers the - Parking Brake
shift lever near THIRD (3) and FOURTH (4). This
spring helps you know which gear you are
in when you
are shifting. Be careful when shifting from FIRST
(1) to
SECOND (2) or downshifting from SIXTH (6) to
FIFTH
(5). The springs will try to pull the gearshift
lever toward FOURTH
(4) and THIRD (3). Make sure
you move the lever into
SECOND (2) or FIFTH (5). If
you let the lever move in the direction of the pulling,
you may end up shifting from FIRST
(1) to
FOURTH
(4) or from SIXTH (6) to THIRD (3).
..
If you skip more than one gear when you
downshift, you could lose control of your vehicle.
And you could injure yourself or others. Don’t shift from
SIXTH (6) to THIRD (3), FIFTH (5) to
SECOND (2) or FOURTH (4) to FIRST (1).
1
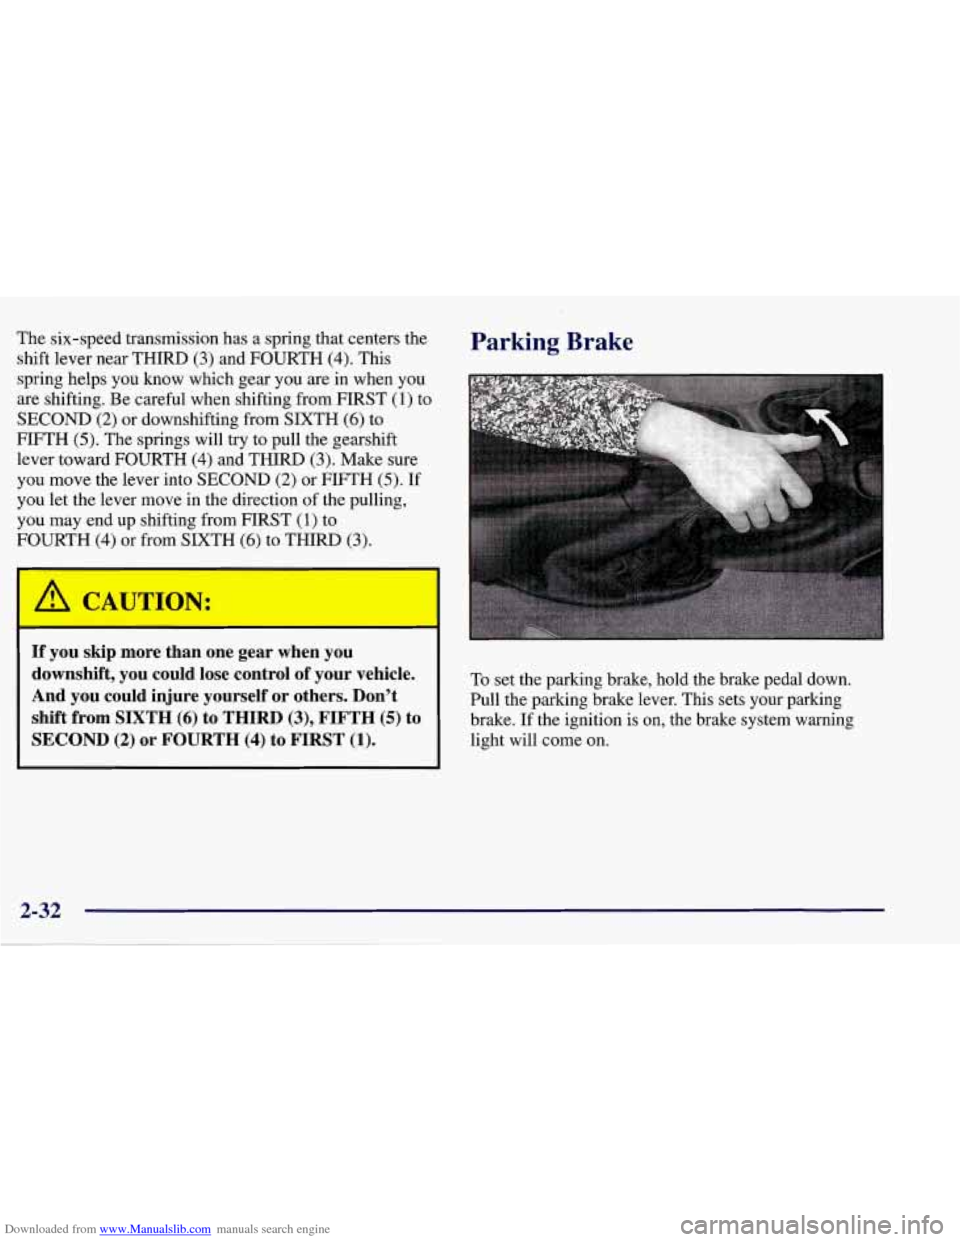
To set the parking brake, hold the brake pedal down.
Pull the parking brake lever. This sets your parking
brake.
If the ignition is on, the brake system warning
light will come on.
Page 86 of 378
Downloaded from www.Manualslib.com manuals search engine NOTICE:
Driving with the parking brake on can cause your rear brakes to overheat. You may have to
replace them, and
you could also damage other
parts of your vehicle. Make sure the brake warning light is not on before driving.
To release the parking brake, hold the brake pedal down.
Hold the release button in as
you move the brake lever
all the
way down.
2-33
Page 98 of 378
Downloaded from www.Manualslib.com manuals search engine Headlamp High/Low-Beam Changer
To change the headlamps
signal lever all the
from
low beam to high or
high to low, push the turn
-
- way forward.
When the high beams are on, this light on the instrument
panel also will be
on. To change the headlamps from
high to low, pull the lever rearward.
Flash-To-Pass
Momentarily pull the turn signal lever toward you. The
high-beam indicator will flash to indicate to the other
driver that you intend to pass. If the low-beam
headlamps are off and you have the optional fog lamps
on, the fog lamps will flash.
Windshield Wipers
You can control the windshield wipers by moving the
lever with the wiper symbol
on it. This lever is located
on the right side
of your steering column.
For a single wiping cycle, push the lever down to MIST.
Hold it there until the wipers start, then let go. The
wipers will stop after one cycle. If you want more
cycles, hold the lever on MIST longer.
2-45
Page 99 of 378
Downloaded from www.Manualslib.com manuals search engine You can set the wiper speed for a long or short delay
between wipes. This can be very useful in light rain or
snow. Push the lever up to INT (intermittent), then turn
the band, located on the lever, to adjust the delay time.
Rotate the band up for a shorter delay, down for a longer
delay. The wiper speed can only be adjusted when the
lever is in the INT position, not in HI or
LO.
For steady wiping at low speed, move the lever up to the
LO position. For steady high-speed wiping, move the
lever up further, to HI. To stop the wipers, move the
lever down to
OFF.
Be sure to clear ice and snow from the wiper blades
before using them. If they’re frozen to the windshield,
carefully loosen or thaw them. If your blades do become
damaged, get new blades or blade inserts.
Heavy snow or ice can overload your wipers.
A circuit
breaker will stop them until the motor cools. Clear away
snow or ice to prevent an overload.
Windshield Washer
The lever on the right side of your steering column also
controls your windshield washer. There is a push button
at the end
of the lever. To spray washer fluid on the
windshield, push the button and hold it. The washer will
spray until you release the button. The wipers will
continue to clear the window for about six seconds after
the button is released and then stop or return to your
preset speed.
In freezing weather, don’t use your washer until
the windshield is warmed. Otherwise the washer
fluid can form ice
on the windshield, blocking
your vision.
If the fluid in the windshield washer fluid reservoir is
low, the message LOW WASHER FLUID will appear
on the Driver Information Center (DIC) display. It will
take
60 seconds after the bottle is refilled for this
message to turn off. For information on the correct
washer fluid mixture to use, see “Windshield Washer
Fluid” and “Recommended Fluids and Lubricants”
in
the Index.
Page 103 of 378
Downloaded from www.Manualslib.com manuals search engine Passing Another Vehicle While Using Cruise Control
Use the accelerator pedal to increase your speed. When
you take your foot
off the pedal, your vehicle will slow
down to
the cruise control speed you set earlier.
Using Cruise Control on Hills
How well your cruise control will work on hills depends
upon your speed, load and the steepness of the hills.
When going downhill, you may have to brake or shift to
a lower gear to keep your speed down.
Of course,
applying the brake takes you out of cruise control. Many
drivers find this to be too much trouble and don’t use
cruise control on steep hills.
Getting Out of Cruise Control
There are two ways to turn off the cruise control:
0 Step lightly on the brake pedal or push the clutch
pedal,
if you have a manual transmission vehicle; or
0 Move the cruise switch to OFF.
The DIC will display the message “CRUISE
DISENGAGED.”
Erasing Speed Memory
When you turn off the cruise control or the ignition,
your cruise control set speed memory is erased.
Exterior Lamps
Daytime Running Lamps
Daytime Running Lamps (DRL) can make it easier for
others to see the front of your vehicle during the day.
DRL can be helpful in many different driving
conditions, but they can be especially helpful in the
short periods after dawn and before sunset.
The DRL system will make your front turn signal lamps
come on when:
0 the ignition is on,
the headlamp switch is off and
0 the parking brake is released.
When the DRL
are on, only your front turn signal lamps
will be on. The taillamps, sidemarker and other lamps
will not be
on.
Y’JV