1998 CADILLAC SEVILLE torque
[x] Cancel search: torquePage 89 of 378
Downloaded from www.Manualslib.com manuals search engine Torque Lock
If you are parking on a hill and you don’t shift your
transaxle into
PARK (P) properly, the weight of the
vehicle may put too much force on the parking pawl in
the transaxle.
You may find it difficult to pull the shift
lever out of
PARK (P). This is called “torque lock.” To
prevent torque lock, set the parking brake and then shift into
PARK (P) properly before you leave the driver’s
seat. To find out how, see “Shifting Into
PARK (P)” in
the Index.
If torque lock does occur, you may need to have another
vehicle push yours a little uphill to take some of the
pressure from the parking pawl in the transaxle,
so you
can pull the shift lever out
of PARK (P).
Shifting Out of PARK (P)
Your vehicle has a Brake-Transaxle Shift Interlock
(BTSI). You have to fully
apply your regular brakes
before you can shift from PARK (P) when the ignition is
in
ON. See “Automatic Transaxle” in the Index.
If you cannot shift out
of PARK (P), ease pressure on
the shift lever. Push the shift lever all the way into
PARK (P) as you maintain brake application. Then
move the shift lever into the gear you want. If you ever
hold
the brake pedal down but still can’t shift out of
PARK (P), try this:
1. Turn the ignition key to OFF. Open and close the
2. Apply and hold the brake until the end of Step 4.
driver’s door to turn off the RAP feature.
3. Shift to NEUTRAL (N).
4. Start the vehicle and then shift to the drive gear
you want.
5. Have the vehicle fixed as soon as you can.
2-28
Page 208 of 378
Downloaded from www.Manualslib.com manuals search engine Suppose you’re steering through a sharp curve.
Then you suddenly accelerate. Both control
systems
-- steering and acceleration -- have to do
their work where the tires meet the road. Adding the
sudden acceleration can demand too much of those
places. You can lose control. Refer to “Traction
Control System” in the Index.
What should you do if this ever happens? Ease up on the
accelerator pedal, steer the vehicle the way you want it
to
go, and slow down.
Since your vehicle is equipped with Stabilitrak, you will
see the STABILITY SYS ENGAGED message
on the
Driver Information Center. See “Stability Sys Engaged
Message” in the Index.
Speed limit signs near curves warn that you should
adjust your speed. Of course, the posted speeds are
based on good weather and road conditions. Under less
favorable conditions you’ll want to
go slower.
If you need to reduce your speed as you approach a
curve, do it before you enter the curve, while your
front wheels are straight ahead.
Try to adjust your speed
so you can “drive” through
the curve. Maintain a reasonable, steady speed. Wait
to accelerate until
you are out of the curve, and then
accelerate gently into the straightaway.
To help you steer in the direction you want to go, during
certain sharp or sudden cornering maneuvers, gear selection
is controlled. This will maximize the available
drive wheel torque and minimize the transaxle response
time and shift activity. During this kind of maneuver, the
transaxle shifts automatically as vehicle speed changes.
Steering in Emergencies
There are times when steering can be more effective
than braking. For example, you come over a hill and
find a truck stopped in your lane, or
a car suddenly pulls
out from nowhere, or a child darts
out from between
parked cars and stops right in front
of you. You can
avoid these problems by braking
-- if you can stop in
time. But sometimes you can’t; there isn’t room.
That’s the time for evasive action
-- steering around
the problem.
Your vehicle can perform very well in emergencies
like these. First apply your brakes. (See “Braking in
Emergencies” earlier in this section.) It is better to
remove as much speed as you can from a possible
collision. Then steer around the problem, to the left
or right depending on the space available.
4-11
Page 269 of 378
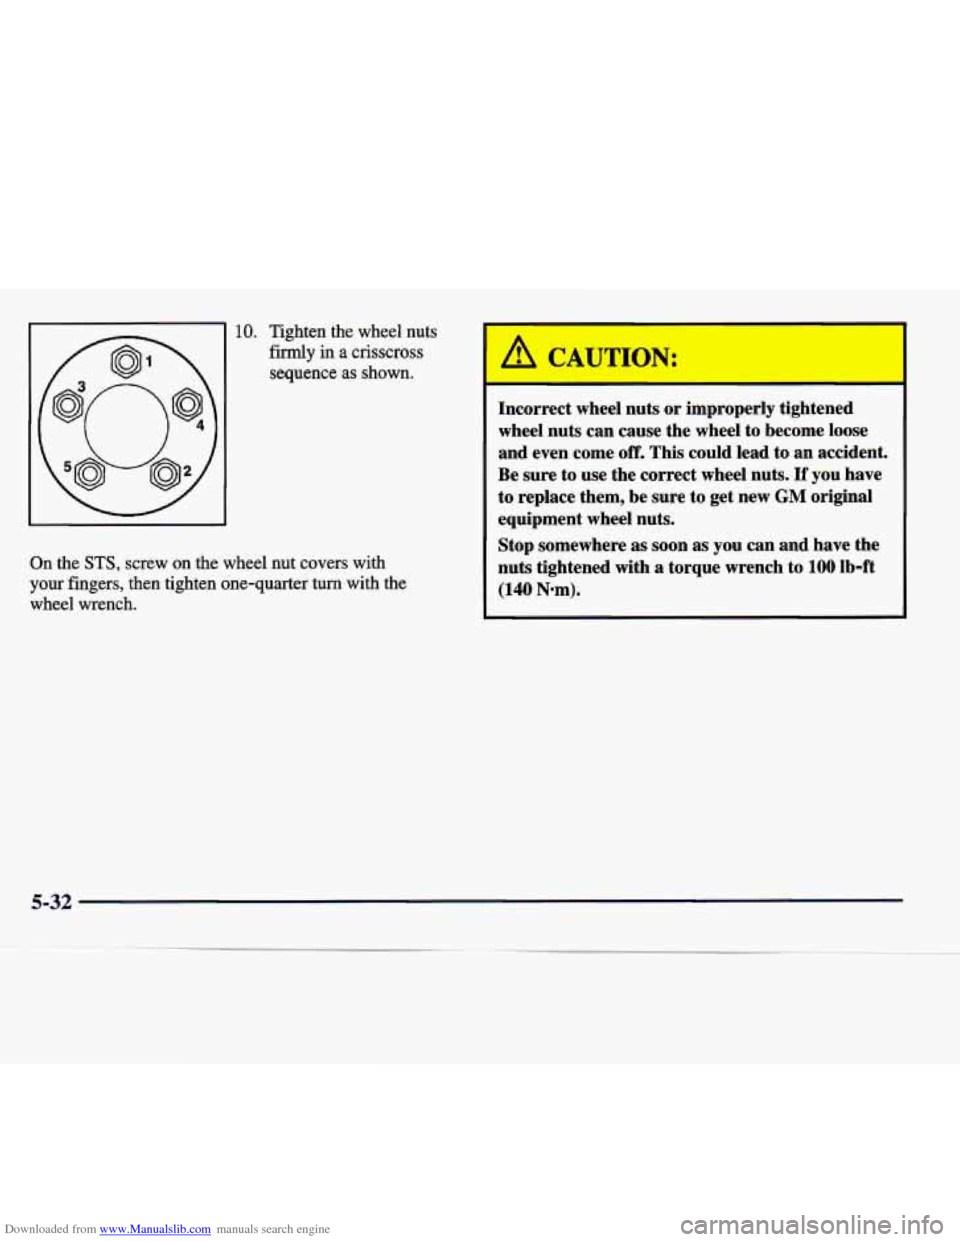
Downloaded from www.Manualslib.com manuals search engine 10. Tighten the wheel nuts
firmly
in a crisscross
sequence
as shown.
On the STS, screw on the wheel nut covers with
your fingers, then tighten one-quarter turn with the
wheel wrench.
A, CAUT-ON:
Incorrect wheel nuts or improperly tightened
wheel nuts can cause the wheel
to become loose
and even come
off. This could lead to an accident.
Be sure to use the correct wheel nuts.
If you have
to replace them, be sure to get new GM original
equipment wheel nuts.
Stop somewhere
as soon as you can and have the
nuts tightened with a torque wrench to
100 lb-ft
(140 N-m).
5-32
Page 270 of 378
Downloaded from www.Manualslib.com manuals search engine NOTICE:
Improperly tightened wheel nuts can lead to
brake pulsation and rotor damage.
To avoid
expensive brake repairs, evenly tighten the wheel
nuts in the proper sequence and to the proper
torque specification.
Don’t try to put a wheel cover on your compact spare
tire.
It won’t fit. Store the wheel cover and lug nut caps
in the trunk until you have the flat tire repaired
or replaced.
I NOTICE:
Wheel covers won’t fit on your compact. spare. If
you try to put a wheel cover on your compact
spare, you could damage the cover or the spare.
Storing the Flat Tire and Tools
,A CAUTION:
Storing a jack, a tire or other equipment in the
passenger compartment
of the vehicle could
cause injury. In
a sudden stop or collision, loose
equipment could strike someone. Store all these
in the proper place.
After you’ve put the compact spare tire on your vehicle,
you’ll need to store the flat tire in your trunk.
Store the flat tire as far forward in the trunk as possible.
Store the jack and wheel wrench in their compartment in
the trunk. For storage, the
jack must be raised until the
screw end is flush with the edge of the jack.
5-33
.~ .~
Page 306 of 378
Downloaded from www.Manualslib.com manuals search engine NOTICE:
Brake Adjustment
Every time you apply the brakes, with or without the vehicle moving, your brakes adjust for wear.
Continuing to drive with worn-out brake pads
could result in costly brake repair.
Replacing Brake System Parts
The braking system on a modern vehicle is complex. Its
Some driving conditions or climates may cause a brake
squeal when the brakes are first applied or lightly
applied. This does not mean something is wrong with
your brakes.
Properly torqued wheel nuts are necessary to help
prevent brake pulsation. When tires are rotated, inspect
brake pads for wear and evenly torque wheel nuts in the
proper sequence to GM specifications.
Brake linings should always be replaced as complete
axle sets.
See “Brake System Inspection’’ in the Maintenance
Schedule booklet under Part
C “Periodic Maintenance
Inspections.”
Brake Pedal navel
See your dealer if the brake pedal does not return to
normal height, or if there is a rapid increase in pedal
travel.
This could be a sign of brake trouble. many parts have to be
of top quality and work well
together if the vehicle is to have really good braking.
Your vehicle was designed and tested with top-quality
GM brake parts. When you replace parts
of your braking
system
-- for example, when your brake linings wear
down and you have to have new ones put in
-- be sure
you get new approved GM replacement parts. If you
don’t, your brakes may no longer work properly. For
example, if someone puts in brake linings that are wrong
for your vehicle, the balance between your front and
rear brakes can change
-- for the worse. The braking
performance you’ve come to expect can change in many other ways
if someone puts in the wrong replacement
brake parts.
6-31
Page 319 of 378
Downloaded from www.Manualslib.com manuals search engine Tire Inspection and Rotation
Tires should be rotated every 6,000 to S,O00 miles
(10 000 to 13 OOO km). Any time you notice unusual wear,
rotate
your tires as soon as possible and check wheel
alignment.
Also check for damaged tires or wheels. See
“When It’s Time for New Tires” and “Wheel
Replacement” later in
this section for more information.
The purpose of regular rotation is to achieve more
uniform wear for all tires on the vehicle. The first
rotation is the most important. See “Scheduled
Maintenance Services” in the Maintenance Schedule
booklet
for scheduled rotation intervals.
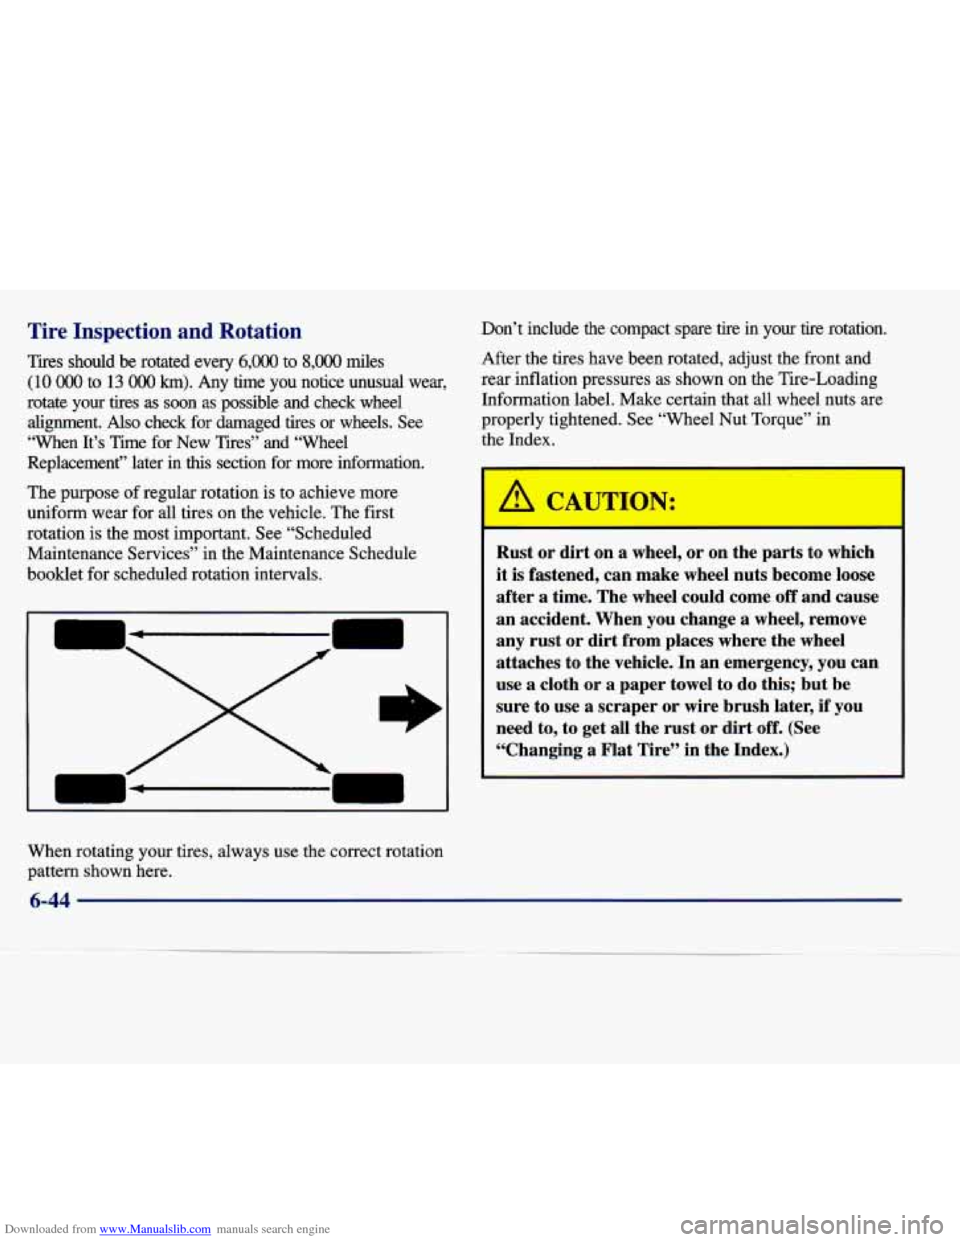
When rotating
your tires, always use the correct rotation
pattern shown here. Don’t include the compact spare tire in
your tire rotation.
After the tires have been rotated, adjust the front and
rear inflation pressures as shown on the Tire-Loading Information label. Make certain that all wheel nuts are
properly tightened. See “Wheel Nut Torque” in
the Index.
I
Rust or dirt on a wheel, or on the parts to which
it is fastened, can make wheel nuts become loose
after a time. The wheel could come
off and cause
an accident. When you change
a wheel, remove
any rust or dirt from places where the wheel
attaches to the vehicle. In an emergency, you can
use a cloth or
a paper towel to do this; but be
sure to use
a scraper or wire brush later, if you
need to, to get all the rust or dirt
off. (See
“Changing
a Flat Tire” in the Index.)
1
6-44
Page 341 of 378
Downloaded from www.Manualslib.com manuals search engine Replacement Bulbs
Application Number
Headlamps Composite High Beam
....................... 9005 HB3
Low Beam ........................ 9006 HB4
Front Turn Signal ..................... 2357 NA
Stop/Taillamp ........................... 3057
Rear Turn Signal
........................ 3057
Capacities and Specifications
Engine Specifications
Displacement ......... 279 cubic inches (4.565 cc)
Type
......................... 4.6 L DOHC V8
VIN Engine Code
SLS .................................... Y
STS .................................... 9
Horsepower
SLS ................... 275 (bhp) @ 5600 rpm
STS
................... 300 (bhp) @ 6000 rpm
205 (kW)
@ 5600 rpm
224 (kW)
@ 6000 rpm
Torque
SLS .................. 300 (lb-ft) @ 4000 rpm
407 (N-m)
@ 4000 rpm STS
.................. 295 (lb-ft) 63 4400 rpm
Firing Order
................... 1-2-7-3-4-5-6-8
400
(N-m)
@ 4400 rpm
Thermostat Starts To Open
, , 177- 184°F (8 1-85 “C)
Capacities
Please refer to “Recommended Fluids and Lubricants”
in your Maintenance Schedule booklet for more
information.
Transaxle
(4T80-E) .......... 15.0 quarts (14.2 L)
Crankcase (Engine Oil with Filter Change)
............... 7.5 quarts (7.1 L)
Engine Cooling System ........ 12.5 quarts (1 1.8 L)
R- 134a Refrigerant ............. 2.0 lbs. (0.9 1 kg)
Vehicle Dimensions
Wheel Base ............... 112.2 inches (285 cm)
Length
................. 200.9 inches (510.5 cm)
Height
................... 55.6 inches (141.4 cm)
Width
................... 74.9 inches (190.4 cm)
Front Tread
............... 62.7 inches (1 59.3 cm)
Rear Tread
............... 62.4 inches (158.6 cm)
Wheel Nut Torque .......... 100 lb-ft (140 N-m)
Fuel Tank
.................. 18.5 gallons (70.0 L)
6-66
Page 371 of 378
Downloaded from www.Manualslib.com manuals search engine Steam ........................................ 5-16
Steering
...................................... 4- 10
In Emergencies ............................... 4- 11
Magnasteer
................................ 4- 10
Power
...................................... 4-10
Tips
........................................ 4-10
Wheel. Telescopic
............................ 2-32
Wheel. Tilt
.................................. 2-32
Steering Wheel Controls
.................... 3-10. 3-42
Storage Compartments
........................... 2-5 1
Storage. Vehicle ................................ 6-33
Straps. Assist
.................................. 2-54
Stuck:
In Sand. Mud. Ice or Snow .................. 5-36
SunVisors
.................................... 2-53
Sunroof.
...................................... 2-55
Supplemental Inflatable Restraint
.................. 1 - 19
Surge Tank. Coolant
............................. 5-20
Surge Tank Pressure Cap
......................... 6-25
Symbols. Vehicle
.................................. v
Tachometer .................................. 2-64
Taillamps. Bulb Replacement
..................... 6-39
Tape Player Care
............................... 3-44
Telephone. Cellular
............................. 2-54
Telescopic Wheel
............................... 2-32
Temperature Controls
......................... 3-2. 3-3
Temperature Knob. Passenger’s Side
................. 3-3
Theft
......................................... 2-14
Theft Attempted Message
........................ 2-88
Theft-Deterrent System
.......................... 2- 14
Thermostat .................................... 6-25
Third Gear. Automatic Transaxle
................... 2-23
Tilt Steering Wheel
............................. 2-32
Time. Setting the
............................... 3-11
Tire Loading
................................... 4-29
Tire-Loading Information Label
................... 4-29
Tires
......................................... 6-41
Alignment and Balance
........................ 6-48
Buying New ................................. 6-45
Chains
..................................... 6-49
Changing a Flat
.............................. 5-24
Cleaning
.................................... 6-55
Compactspare ............................... 5-35
Inflation
.................................... 6-42
Inspection and Rotation
........................ 6-44
Loading .................................... 4-29
Pressure
.................................... 6-42
Temperature
................................. 6-47
Traction
.................................... 6-47
Treadwe
ar ................................... 6-47
Uniform Quality Grading
....................... 6-46
Wear Indicators
.............................. 6-45
When It’s Time for New
....................... 6-45
Top Speed Fuel Cut-Off Message
.................. 2-88
TorqueLock
................................... 2-28
Wheel Replacement
........................... 6-48
TopStrap
..................................... 1-39
Torque. Wheel Nut
.................... 5-32.5-33. 6-66
Towing a Trailer ................................ 4-31
Towing Your Vehicle
............................. 5-8
8-10