1998 BMW 740I tow
[x] Cancel search: towPage 103 of 211
102n
Automatic climate controlTips for pleasant drivingUse the automatic system, i.e., press
AUTO button 4. Select an interior tem-
perature that is comfortable for you -
we recommend 707 (226) as a com-
fortable setting. When the outside tem-
perature is above 427 (56), you can
also use the air conditioning system 14.
This will dry the air and prevent window
fogging, for example if people are wear-
ing damp clothes in the vehicle. Set the
outlets 2 so that the air flows past you
and does not flow directly at you. Set
the rotary dial between the air outlets 2
for the upper body to a medium posi-
tion, since air that is somewhat cooler
promotes driving without fatigue.
The following description will guide you
through additional individual settings.
You can make the settings of your
vehicle in such a manner that,
when you unlock the car with your per-
sonalized remote control, your own per-
sonalized setting of the automatic cli-
mate control is initiated.<
Automatic air distribution
The AUTO program as-
sumes the adjustment of
the air distribution and the air supply for
you and in addition adapts the tempera-
ture to external influences (summer,
winter) to meet preferences you can
specify. This program maintains a com-
fortable in-car climate regardless of the
season. Select an interior temperature
that is comfortable for you - we recom-
mend 707 (226) as a comfortable
setting.
The temperature setting and the word
"AUTO" for the air flow appear in the
display 7 (refer to the overview on
page 100). Open the ventilation outlet
for the upper body area. Switch on the
air conditioner in warm weather. The
maximum cooling capacity is achieved
when you set the rotary dial 3 (refer to
page 104) to cold.
Individual air distribution
You can cancel the AUTO
program by selecting spe-
cific distribution patterns to
suit your own individual re-
quirements. You can direct
air to flow onto the windows , toward
the upper body , and into the footwell
.
To defrost windshield and door
windows
This program quickly removes
ice and condensation from the
windshield and the side windows.
Air conditioner
The air is cooled and dehumidi-
fied and - depending on the tem-
perature setting - warmed again when
the air conditioner system is switched
on.
Depending on the weather, the wind-
shield may fog over briefly when the en-
gine is started.
At outside temperatures below approx.
427 (56), switch off the air condi-
tioner. This will help to prevent the win-
dows from fogging up.
If the windows fog over immediately af-
ter the air conditioner is switched off,
switch it back on.
Condensation forms in the air con-
ditioner system during operation,
which then exits under the vehicle.
Traces of condensed water of this kind
are thus normal.<
Page 105 of 211
104n
Automatic climate controlResidual heat mode
The heat which is stored in
the engine is utilized for
heating of the interior when the engine
has been switched off (while waiting at
a railroad crossing, for instance).
In ignition key position 1, you can alter
the settings of the automatic climate
control. In ignition key position 0, the
system automatically directs heated air
to the windshield, side windows and
footwells.
This function may be activated
when the outside temperature is
below approx. 597 (156), the engine
is at operating temperature, and the
battery is adequately charged.<
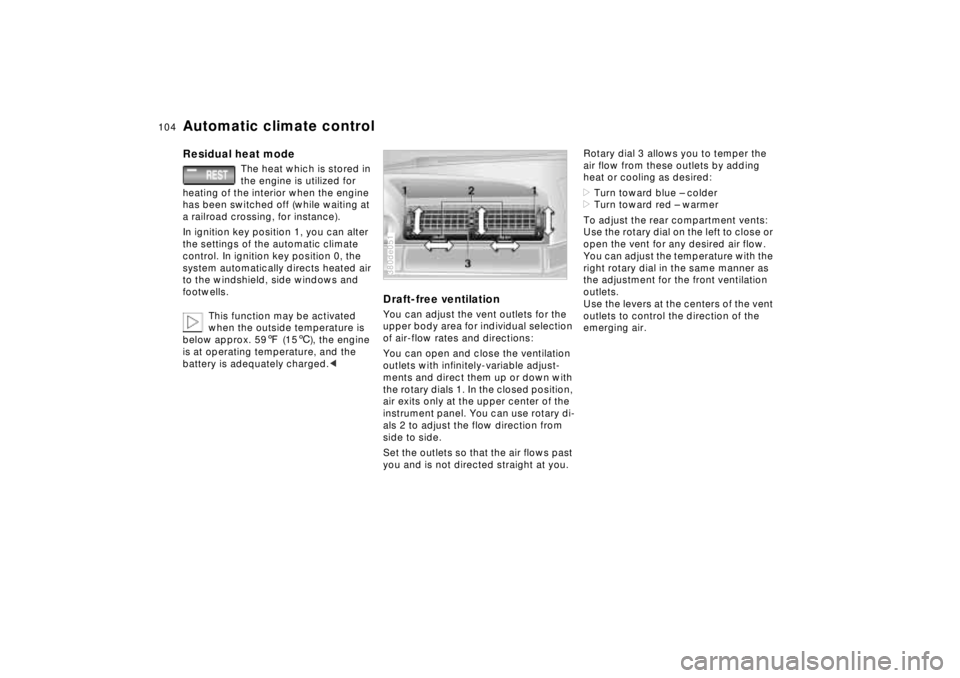
Draft-free ventilationYou can adjust the vent outlets for the
upper body area for individual selection
of air-flow rates and directions:
You can open and close the ventilation
outlets with infinitely-variable adjust-
ments and direct them up or down with
the rotary dials 1. In the closed position,
air exits only at the upper center of the
instrument panel. You can use rotary di-
als 2 to adjust the flow direction from
side to side.
Set the outlets so that the air flows past
you and is not directed straight at you.380de051
Rotary dial 3 allows you to temper the
air flow from these outlets by adding
heat or cooling as desired:
>Turn toward blue – colder
>Turn toward red – warmer
To adjust the rear compartment vents:
Use the rotary dial on the left to close or
open the vent for any desired air flow.
You can adjust the temperature with the
right rotary dial in the same manner as
the adjustment for the front ventilation
outlets.
Use the levers at the centers of the vent
outlets to control the direction of the
emerging air.
Page 110 of 211
109n
RepairsIndexOverview Controls Car care Technology Data
Integrated Universal Remote Control
*
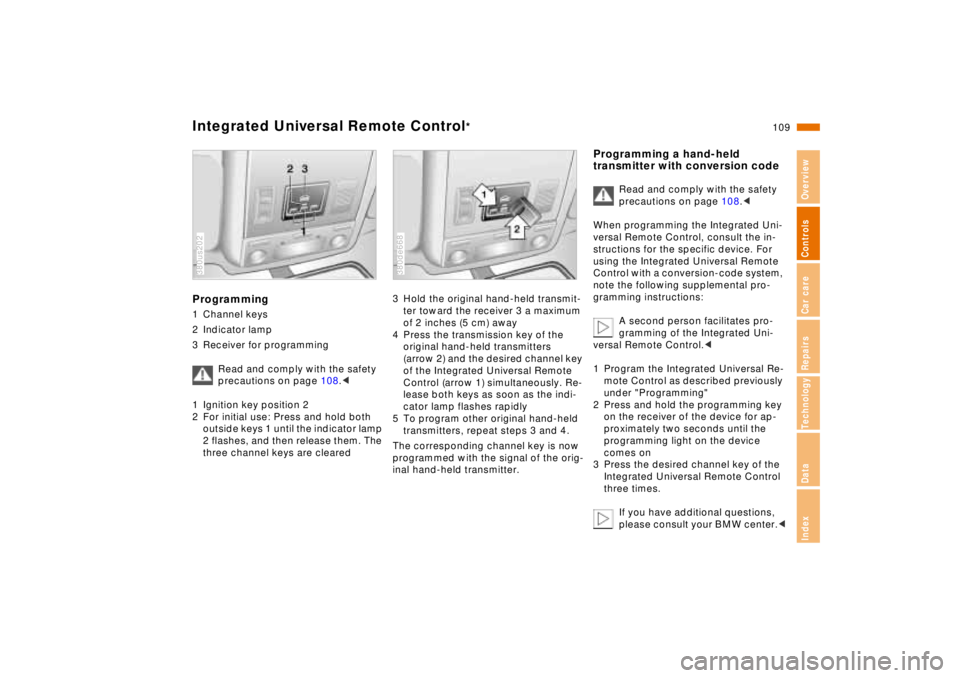
Programming1 Channel keys
2 Indicator lamp
3 Receiver for programming
Read and comply with the safety
precautions on page 108.<
1 Ignition key position 2
2 For initial use: Press and hold both
outside keys 1 until the indicator lamp
2 flashes, and then release them. The
three channel keys are cleared380us202
3 Hold the original hand-held transmit-
ter toward the receiver 3 a maximum
of 2 inches (5 cm) away
4 Press the transmission key of the
original hand-held transmitters
(arrow 2) and the desired channel key
of the Integrated Universal Remote
Control (arrow 1) simultaneously. Re-
lease both keys as soon as the indi-
cator lamp flashes rapidly
5 To program other original hand-held
transmitters, repeat steps 3 and 4.
The corresponding channel key is now
programmed with the signal of the orig-
inal hand-held transmitter.380de668
Programming a hand-held
transmitter with conversion code
Read and comply with the safety
precautions on page 108.<
When programming the Integrated Uni-
versal Remote Control, consult the in-
structions for the specific device. For
using the Integrated Universal Remote
Control with a conversion-code system,
note the following supplemental pro-
gramming instructions:
A second person facilitates pro-
gramming of the Integrated Uni-
versal Remote Control.<
1 Program the Integrated Universal Re-
mote Control as described previously
under "Programming"
2 Press and hold the programming key
on the receiver of the device for ap-
proximately two seconds until the
programming light on the device
comes on
3 Press the desired channel key of the
Integrated Universal Remote Control
three times.
If you have additional questions,
please consult your BMW center.<
Page 119 of 211
118n
Cargo loading Roof-mounted luggage rack
*
Securing the load>Secure smaller, light pieces with the
retaining straps or with a luggage
compartment net or elastic straps (re-
fer to page 39)
>For large, heavy pieces, see your
BMW center for load-securing de-
vices
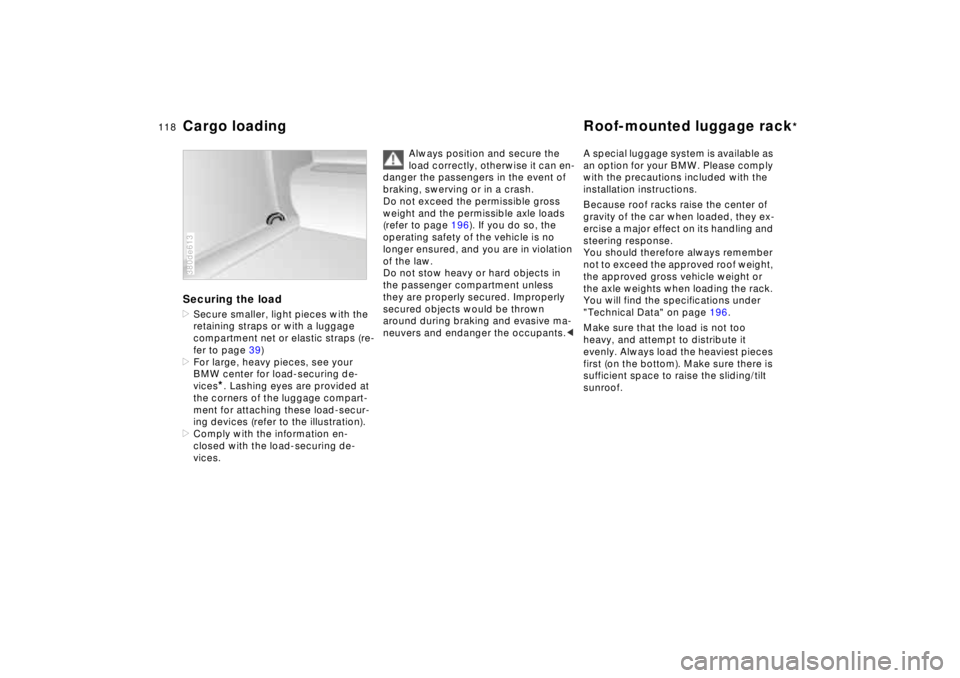
*. Lashing eyes are provided at
the corners of the luggage compart-
ment for attaching these load-secur-
ing devices (refer to the illustration).
>Comply with the information en-
closed with the load-securing de-
vices.
380de613
Always position and secure the
load correctly, otherwise it can en-
danger the passengers in the event of
braking, swerving or in a crash.
Do not exceed the permissible gross
weight and the permissible axle loads
(refer to page 196). If you do so, the
operating safety of the vehicle is no
longer ensured, and you are in violation
of the law.
Do not stow heavy or hard objects in
the passenger compartment unless
they are properly secured. Improperly
secured objects would be thrown
around during braking and evasive ma-
neuvers and endanger the occupants.<
A special luggage system is available as
an option for your BMW. Please comply
with the precautions included with the
installation instructions.
Because roof racks raise the center of
gravity of the car when loaded, they ex-
ercise a major effect on its handling and
steering response.
You should therefore always remember
not to exceed the approved roof weight,
the approved gross vehicle weight or
the axle weights when loading the rack.
You will find the specifications under
"Technical Data" on page 196.
Make sure that the load is not too
heavy, and attempt to distribute it
evenly. Always load the heaviest pieces
first (on the bottom). Make sure there is
sufficient space to raise the sliding/tilt
sunroof.
Page 123 of 211

122n
To ensure that your vehicle provides
maximum economy throughout a long
service life, we request that you comply
with the following:
Engine and differentialUp to 1,200 miles (2,000 km):
Drive at varying engine speeds and
road speeds, but do not exceed
4500 rpm and/or 105 mph (170 km/h)
during this initial period. Comply with
the legal speed limit at all times.
Refrain from using full throttle and avoid
pressing the accelerator beyond the
kickdown point.
Once 1,200 miles (2,000 km) have
elapsed, engine speeds and road
speeds can gradually be increased.
You should also comply with these
break-in procedures if the engine or dif-
ferential is replaced later in the course
of the vehicle service life.TiresDue to technical factors associated with
their manufacture, tires do not achieve
their full traction potential until an initial
break-in period has elapsed.
Thus drive with extra care during the
initial 200 miles (300 km).When the vehicle is operated on
wet or slushy roads, a wedge of
water may form between the tire and
the road surface. This phenomenon is
referred to as aquaplaning, or hydro-
planing, and can lead to partial or com-
plete loss of traction, vehicle control
and braking effectiveness. Reduce your
speed on wet roads.<
Brake systemApproximately 300 miles (500 km) must
elapse before the brake pads and rotors
achieve the optimal pad-surface and
wear patterns required for trouble-free
operation and long service life later on.
To break-in the separate parking brake
drums, apply the parking brake lightly
when coasting to a standstill (at a traffic
signal, for instance), provided that traf-
fic conditions allow you to do so.
To avoid corrosion, repeat this proce-
dure from time to time.
The brake lamps do not come on
when the parking brake is applied.
Vacuum for the brake system servo unit
on your BMW is available only when the
engine is running. When you move the
car with the engine shut off – when tow-
ing, for instance – substantially higher
levels of pedal force will be required to
brake the vehicle.<
Break-in procedure
Page 125 of 211

124n
Catalytic converterThe catalytic converter reduces harmful
exhaust emissions, and is designed for
use with unleaded fuel only.
Even minute quantities of lead would be
enough to permanently damage both
the catalytic converter and the system's
oxygen sensor.
To ensure efficient, trouble-free engine
operation and avoid potential damage:
>Be sure to comply with the scheduled
maintenance requirements
>Fill the fuel tank well before it is
empty
>If you have problems starting the en-
gine, use jumper cables (you cannot
tow-start the vehicle with an auto-
matic transmission)>Avoid other situations in which the
fuel is not burned, or burns incom-
pletely, such as engaging the starter
frequently or for extended periods, or
repeated start attempts in which the
engine does not start (stopping and
restarting an engine which is running
properly does not present a problem).
Never let the engine run with any of
the spark plug cables disconnected.Be sure to comply with the in-
structions above to prevent un-
burned fuel from reaching the catalytic
converter. Otherwise there is danger of
overheating and damage to the cata-
lytic converter.
Extreme temperatures occur at the
catalytic converter on this and every
catalyst-equipped vehicle. Heat shields
are installed adjacent to some sections
of the exhaust system. Never remove
these shields; do not apply undercoat-
ing to their surfaces. When driving,
standing at idle, and parking the vehi-
cle, take care to avoid contact between
the exhaust system and flammable ma-
terials (grass, hay, leaves, etc.). Such
contact could lead to a fire, resulting in
personal injury and property damage.<
Page 133 of 211
132n
Tire inflation pressure Tire conditionInformation for your safetyThe factory-approved radial tires are
matched to the car and have been se-
lected to provide optimum safety and
driving comfort on your car.
It is not merely the tire's service life, but
also driving comfort and - above all else
- driving safety which depend on the
condition of the tires and the mainte-
nance of the specified tire pressure.
Incorrect inflation pressure is a frequent
cause of tire damage. They also influ-
ence the roadholding ability of your
BMW.
Check tire inflation pressures – in-
cluding the spare tire – regularly,
at least every two weeks and before be-
ginning a longer trip. If this is not done,
incorrect tire pressures can cause driv-
ing instability and tire damage, ulti-
mately resulting in accidents.<
Tire tread
– tire damage
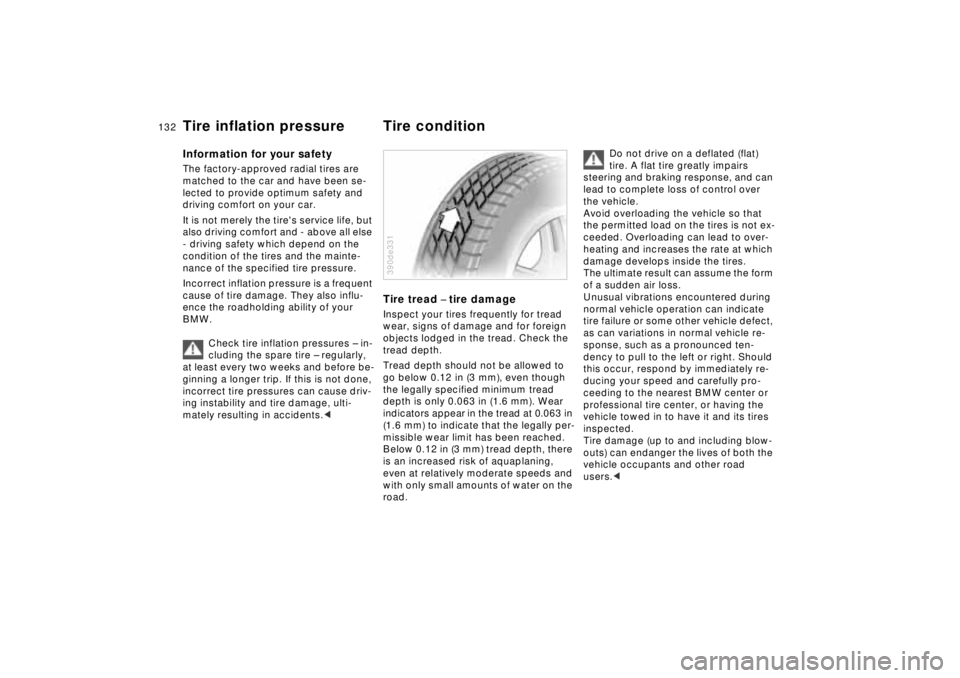
Inspect your tires frequently for tread
wear, signs of damage and for foreign
objects lodged in the tread. Check the
tread depth.
Tread depth should not be allowed to
go below 0.12 in (3 mm), even though
the legally specified minimum tread
depth is only 0.063 in (1.6 mm). Wear
indicators appear in the tread at 0.063 in
(1.6 mm) to indicate that the legally per-
missible wear limit has been reached.
Below 0.12 in (3 mm) tread depth, there
is an increased risk of aquaplaning,
even at relatively moderate speeds and
with only small amounts of water on the
road.390de331
Do not drive on a deflated (flat)
tire. A flat tire greatly impairs
steering and braking response, and can
lead to complete loss of control over
the vehicle.
Avoid overloading the vehicle so that
the permitted load on the tires is not ex-
ceeded. Overloading can lead to over-
heating and increases the rate at which
damage develops inside the tires.
The ultimate result can assume the form
of a sudden air loss.
Unusual vibrations encountered during
normal vehicle operation can indicate
tire failure or some other vehicle defect,
as can variations in normal vehicle re-
sponse, such as a pronounced ten-
dency to pull to the left or right. Should
this occur, respond by immediately re-
ducing your speed and carefully pro-
ceeding to the nearest BMW center or
professional tire center, or having the
vehicle towed in to have it and its tires
inspected.
Tire damage (up to and including blow-
outs) can endanger the lives of both the
vehicle occupants and other road
users.<
Page 144 of 211
143n
RepairsIndexOverview Controls Car care Technology Data
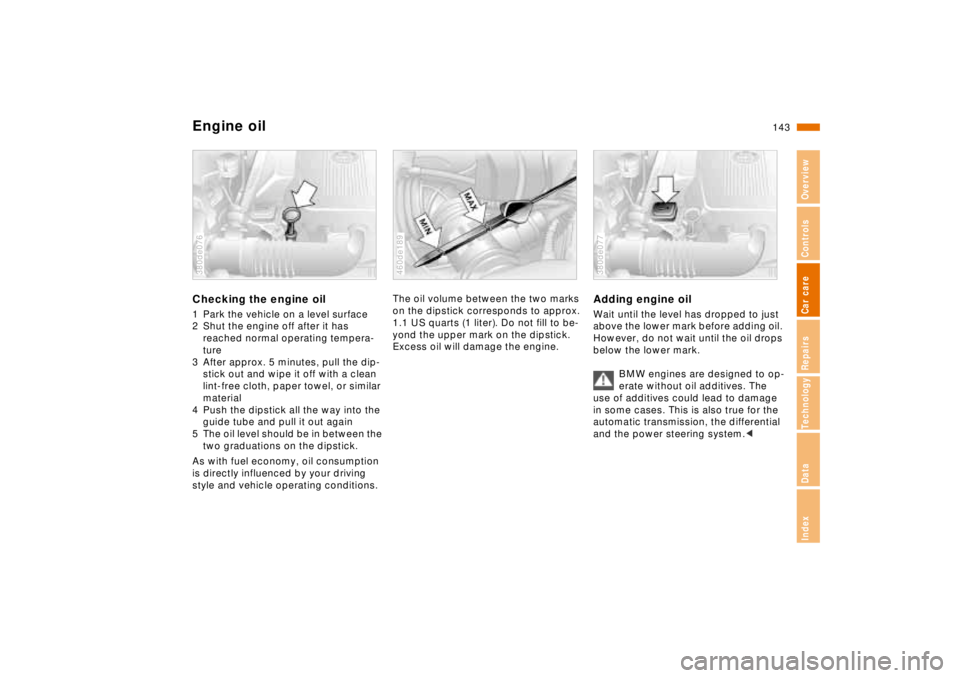
Engine oilChecking the engine oil1 Park the vehicle on a level surface
2 Shut the engine off after it has
reached normal operating tempera-
ture
3 After approx. 5 minutes, pull the dip-
stick out and wipe it off with a clean
lint-free cloth, paper towel, or similar
material
4 Push the dipstick all the way into the
guide tube and pull it out again
5 The oil level should be in between the
two graduations on the dipstick.
As with fuel economy, oil consumption
is directly influenced by your driving
style and vehicle operating conditions.380de076
The oil volume between the two marks
on the dipstick corresponds to approx.
1.1 US quarts (1 liter). Do not fill to be-
yond the upper mark on the dipstick.
Excess oil will damage the engine.460de189
Adding engine oilWait until the level has dropped to just
above the lower mark before adding oil.
However, do not wait until the oil drops
below the lower mark.
BMW engines are designed to op-
erate without oil additives. The
use of additives could lead to damage
in some cases. This is also true for the
automatic transmission, the differential
and the power steering system.< 380de077