Page 951 of 1680
Clock removal:
Carefully pry the clock at the lett edge, then pull it out.
Disconnect the connecto..
CONNECTOE
t:
o
Glove box removal:
1. Open the glove box.
2. Remove the screw, then remove the damper from
the glove box.
3. Remove the screw, then remove the glove box.
: Bolt, scrow
Al : Bolt, 2
A
ql
locations
B<: Scr€w, 1
)
il
4. Remove the damper and striker.
>: Nut, screw locations
A>: Nul, 1 B : Screw, 2
9;
E
e_)
5. Installation is the reverse of the removal procedure.
20-137
Page 953 of 1680
Replacement
1. To remove the dashboard, tirst remove the:
a Front seats {see page 20-'103)
a Front and rear consoles (see page 20-130)
a Oashboard lower cover {see page 20-133)
a Knee bolster (see page 20-134)
. Glove box (see page 20-137). Clock (see page 20-1371
. Moonroof switch (see page 20-136)
a Stereo radio/cassette (see page 20-134)
2. Lower the steering column (see section 17).
NOTE: To prevent damage to the steering column,
wrap it with a shop towel.
l ; Boh, nut locations
AA : Bolr, 28
: Nut, 2
8 x 1.25 mm22 N.m 12.2 kgl.n,16 tbf.ft)o21 13 N m 11.3 kgl m,
\€J' Prbl rll
_Urr'rr,t __)
STEERING JOINTCOVER
STEERING COLUMN
3. Remove the nuts, then remove the front passenger's
airbag bracket.
: Nut locations, 4
6 x 1.0 mm L9.8Nm
{1.o kgt m,7.2tbt.rrUFRONT PASSENGEB'SAIRBAG
PASSENGER'S
SRS MAINAIRBAG BRACKET
HARNESS
4. Disconnect the air mix control cable and connectors.
AIR MIX CONTROLCABLE
HEATERCONTROLPANELCONNECTORS
(cont'd)
20-139
Page 960 of 1680
Hood
Replacement
NOTE:
a An assistant is helplul when removing the hood.
a Take care not to damage the hood and body.
a When removing the clips, use a clip remover.
a Open the hood.
'L IJ necessary, remove the hood edge protector.
A : Clip locations, l6
NOTE: lf necessary, remove the hood hinge.
V: Bolt locations, 4
,G,, 6 r t.o -,n\Yz s e N.- {1.o kot.m.E z.z rur.rtr - i
2. Remove the bolts, then remove the hood.
i Bolt locations, 4
3.Installation is the reverse of the removal procedure.
NOTE:
a lf necessary, replace any damaged clips.
a Make sure the hood locks securely.
a Make sure the hood opens properly.
a Adjust the hood alignment.
6 x 1.O mm9.8 N.m{1.0 kgl m,7.2 tbf ft)
HOOD IIINGE
HOOD
!
D
HOOD
Page 963 of 1680

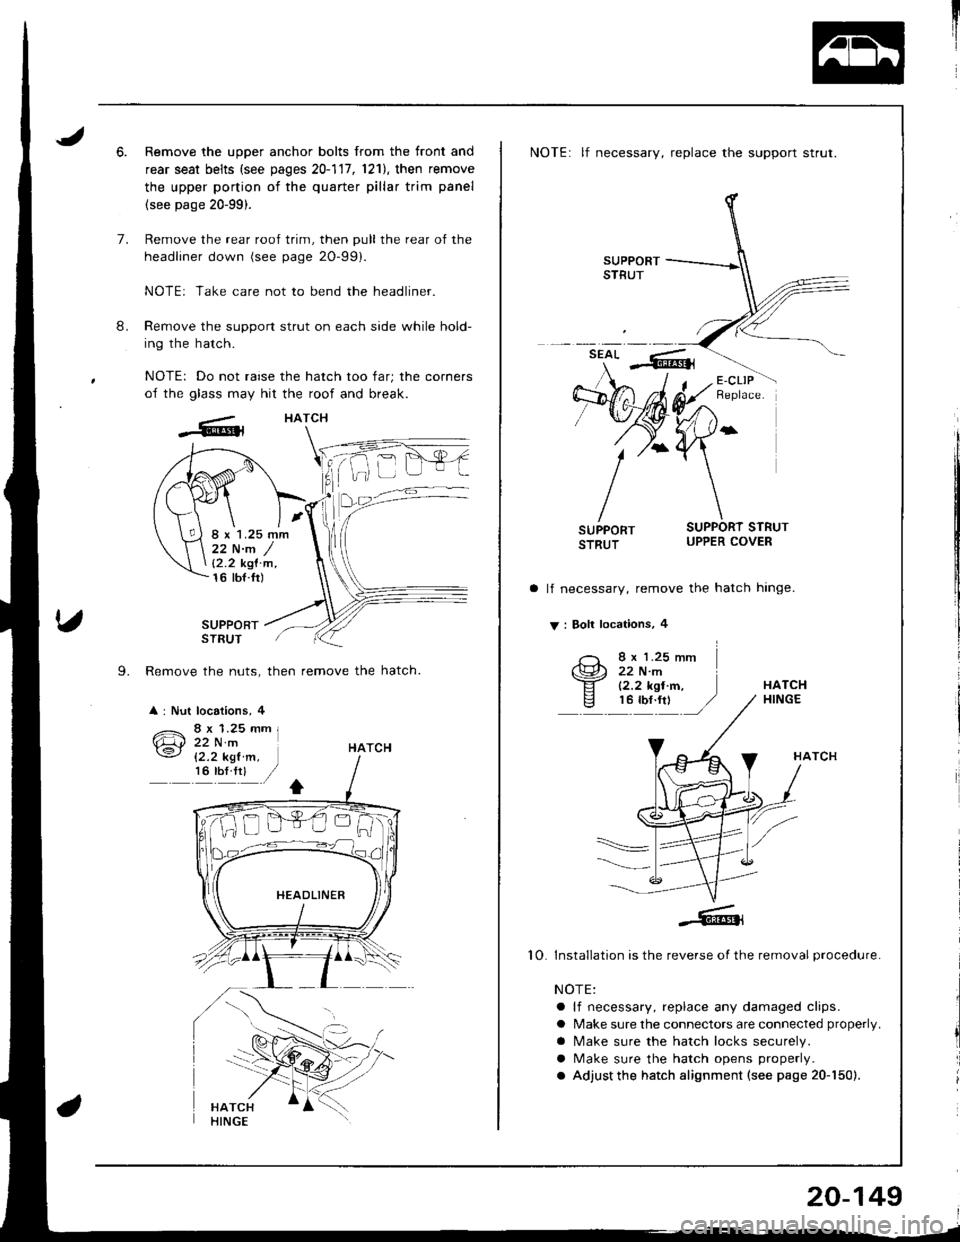
6.Remove the upper anchor bolts from the front and
rear seat belts (see pages 20-111,1211, then remove
the upper portion of the quarter pillar trim panel
(see page 20-99).
Remove the rear roof trim, then pull the rear of the
headliner down (see page 2O-99).
NOTE: Take care not to bend the headliner.
Remove the support strut on each side while hold-
ing the hatch.
NOTE: Do not raise the hatch too far; the corners
of the glass may hit the roof and break.
HATCH
8.
7.
SUPPORTSTRUT
L Remove the nuts, then remove the hatch.
: Nut locations, 4
22 N.m /12.2 kgl'm,16 tbt.fr)
HATCH
NOTE: lf necessary, replace the support strut.
lf necessary, remove the hatch hinge.
V : Boll locations, 4
I x 1.25 mm22 N.m(2.2 kgl.m,HATCH
10
HATCH
Installation is the reverse of the removal procedure.
NOTE:
a lf necessary, replace any damaged clips.
a Make sure the connectors are connected properly.
a N4ake sure the hatch locks securely.
a Make sure the hatch opens properly.
. Adjust the hatch alignment (see page 20-150).
20-149
Page 966 of 1680
Trunk Lid
Replacement (cont'dl
i
I
a Remove the bolts, then remove the trunk
nrnge.
V: Bolt locations, 4
tid
6x 1.0 mm9.8 N m {'1.0 kgt m,7.2 lbr'ftl
)
NOTE: Take care notto hit the rear wrndowwhen removing the bolts.
4. Installation is the reverse o{ the removal procedure.
NOTE:
a Make sure the connectors are connected properly.
a Adjust the torsion bars lore or aft with the tor
sion bar assembly tool as shown.
O =Normal PositionO = Higher tension
a Make sure the trunk lid locks securely.a Make sure the trunk lid opens properlv.a Adiust the trunk lid alignment.
Page 970 of 1680
Opener and Latch
Replacement
Hood Release Handle:
< : Bolt locations, 2
HANDLE
NOTE: Take care not to bend the opener cables.
Hood Latch:
< | Bolt locations
6 x 1.0 mm9.8 N.m(1 .0 kgf m,7 .2 thl ltlHOODOPENERCAELE
Pull up on thehandle while removingthe bolt.HOOD OPENERCABLE(see page 20-154)
NOTE: Grease each location ofthe hood latch indicated bvthe arrows.
Pry the lid.
OPENERCOVER
Remove the kickpanel (see page20-9r ).
Fuel Lid Opener {Hstchbackl:
<: Bolt. screw locdionsA <: Boh.2
6x1.0mm9.8 N m 11.0 kgf m,
7 .2 lbl lrl
BV: Screw, 1
FUEL LIDRELEASEHANDLE
@
Ib
t
lnstallation is the reverse of the removal procedure.
NOTE:
a Make sure each opener cable is connected properly.
a Make sure the hood locks securely.
a Make sure the hood and lid door open properly.
FUEL LIDOPENER CAELE(see page 20-154)
20-156
Page 971 of 1680

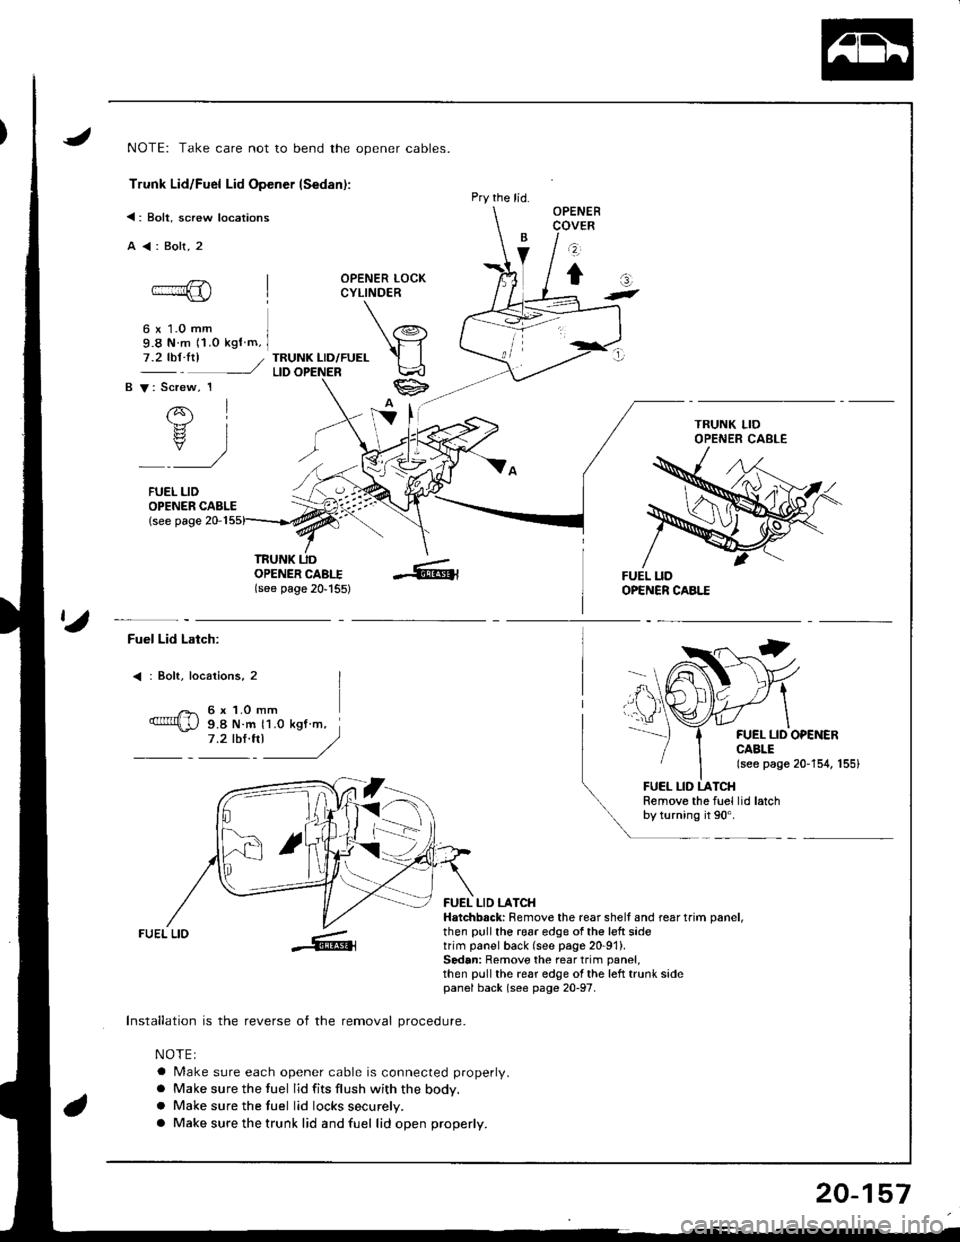
NOTE: Take care not to bend the opener cables.
Trunk Lid/Fuel Lid Opener lSedan):
<: Bolt, screw locations
A<:Bolt,2
OPENER LOCKCYLINDER
6 x 1.0 mm9.8 N m 11.o kgf m,
TRUNK LID/FUELLID
OPENER CABLE{see page 20-1
OPENERCOVER
z
tat-
7.2 tbt.trl /
B V: Screw, 1
rql.b.rz
rs? IY)
FUEL LID
TRUNK UDOPENER CABI.I(see page 20'155)
Pry the lid.
ta
Fuel Lid Latch:
: Bolt, locaiions, 2
6 x 1.O mm9.8 N.m 11.0 kgt m,7.2 tbl.trl J/)
FUEL LID OPEiIERCABLE(see page 20-154, 155)
FUEL LID LATCHRemove the fuel lid latchby turning it 90'.
FUEL LIO
Installation is the reverse of the removal procedure.
NOTEI
a Make sure each opener cable is connected properly.
a Make sure the fuel lid fits flush with the body.
a Make sure the tuel lid locks securely.
a Make sure the trunk lid and fuel lid open properly.
FUEL LID LATCHHatchbsck: Remove the rear shell and rear trim oanel,then pull the 196r edge of the left sidetrim panel back (see page 20-91).Sedan: Remove the rear trim panel,then pull the rear edge ol the left trunk sidepanel back (s€e page 20-97.
20-157
Page 972 of 1680
Hatch Latch and Lock Cylinder
Replacement
NOTE: Take care not to bend the cylinder rod and actua-
tor rod.
1. Remove the rear trim panel (see page 20-921.
2. Disconnect the cylinder rod and each connector.
CONNECTOR
3. Remove the bolts. then disconnect actuator rod.
Remove the hatch latch and actuator.
>: Screw loc6tion3
A>:3I >:3
ACTUATOR
20-158
4. Remove the lock cylinder by turning it 45".
>: Bolt location, 1
6x1.omm I9.8 N.m 11,0 kst m, il.ztb$ft| .)
lt: /
LOCKCYLINDEB
Installation is the reverse of the removal procedure.
NOTE:
a Apply grease to the hatch latch
a
a
a
Make sure the hatch locks securely.
Make sure the hatch opens properly.
N4ake sure the connector is connected properlV.