Page 936 of 1680
Seat Belts
Rear Seat Belt Replacement (cont'dl
Sedan
Rem ove I
a Rear seat (see page 20-1'l2l
a Rear pillar trim panel (see page 20'95)
a Rear shelf trim panel (see page 20-95)
. Rear shelf (see page 20-961
2. Remove all the anchor bolts, the retractor bolt and the retractor mounting bolts, then remove the rear seat belts
and center belts.
3. Check that the retractor locking mechanism functions as described on page 20-124
a Trunk mat {see page 20 97}
a Rear trim panel (see page 20-971
a Trunk side panel (see page 20 97)
UPPER ANCHOR BOLT7/16,20 UNF
32 N m 13.3 kgt m, 24 lbt ltl
RETRACTOR MOUNTINGBOLT6 x 1.0 mm9.8 N m (1.0 kgf .m,
7 .2 tbl.ltlRETRACTOR BOLT7/16-20 UNF32 N.m {3.3 kgl'm,24 tbt,ttl
RETRACTOR
CENTER ANCHOR EOLTS7/16-20 UNF32 N m {3.3 kgf m,24 tbf.td
LOWER ANCHOR BOLT7/16-20 UNF32 N.m 13.3 kgf.m,24 lbf.It)
SEAT EELTBUCKLES
CENTER EELTS
20-122
Page 937 of 1680
Upper anchor bolt construction:
Hatchback
Lower and center anchor bolt construction:
Sedan
UPPER ANCHORBOLT
TOOTHEDLOCK WASHER
I
0
SPRING WASHER
Retractol mounting bolt construction:
RETRACTORMOUNTING BOLT
TOOTHEDLOCK WASHER(SedanlLOWER ANCHOR BOLT/CENTER ANCHOR BOLT
RETRACTORBOLTTOOTHEDLOCK WASI{ER
,l
/Blnrmi !r L6\\h/*vJv)
WASHERUPPER ANCHOR
\\,..--. t
W/
ANCHOR/Retractor boh construction:CENTER ANCHOR
lnstallation is the reverse of the removal orocedure.
NOTE:
o Make sure you assemble the washers and collars on the upper anchor bolt as shown.
a Betore attaching the side trim panel (Hatchback) or rear shelf (Sedan), make sure there are no twists or kinks
in the rear seat belt.
a Betore attaching the seat'back, side bolsters {Sedan) and seat cushion, make sure there are no twists or kinks
in the rear seat belts.
a When installing the seat cushion, slip the seat belt buckles through the slits in the seat cushion.
20-123
Page 938 of 1680

Seat Belts
tor.
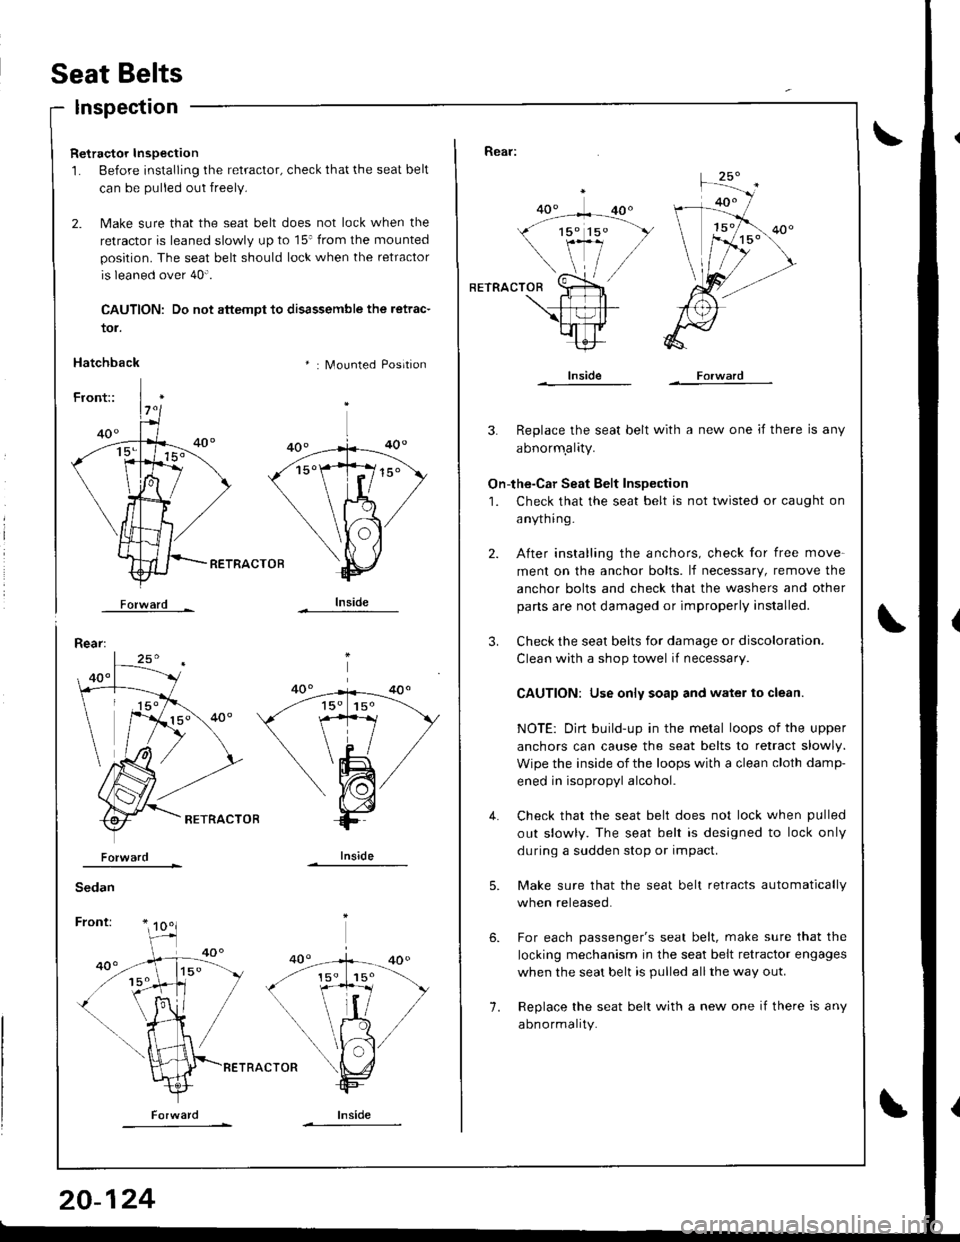
Hatchback
lnspection
Retractor Inspection
1. Before installing the retractor, check that the seat belt
can be pulled out freely.
2. Make sure that the seat belt does not lock when the
retractor is leaned slowly up to 15' from the mounted
position. The seat belt should lock when the retractor
is leaned over 40".
CAUTION: Do not attempt to disassemble the retrac-
* : Mounted Position
RETRACTOB
Forward -
Rear:
lnside
Rear:
RETRACTOR
lnside
3. Replace the seat belt with a new one if there is any
abnorm.ality.
On-the-Car Seat Belt Inspection
1. Check that the seat belt is not twisted or caught on
anytnrng-
After installing the anchors, check for free move-
ment on the anchor bolts. lf necessary, remove the
anchor bolts and check that the washers and other
parts are not damaged or improperly installed.
Check the seat belts for damage or discoloration.
Clean with a shop towel if necessary
CAUTION: Use only soap and water to clean.
NOTE: Dirt build-up in the metal loops of the upper
anchors can cause the seat belts to retract slowly.
Wipe the inside of the loops with a clean cloth damp-
ened in isopropyl alcohol.
Check that the seat belt does not lock when pulled
out slowly. The seat belt is designed to lock only
during a sudden stop or impact.
Make sure that the seat belt retracts automatically
when released.
For each passenger's seat belt, make sure that the
locking mechanism in the seat belt retractor engages
when the seat belt is pulled allthe way out.
Replace the seat belt with a new one if there is any
abnormality.
4.
1.
6.
Page 939 of 1680

Child Seat Anchor Plate
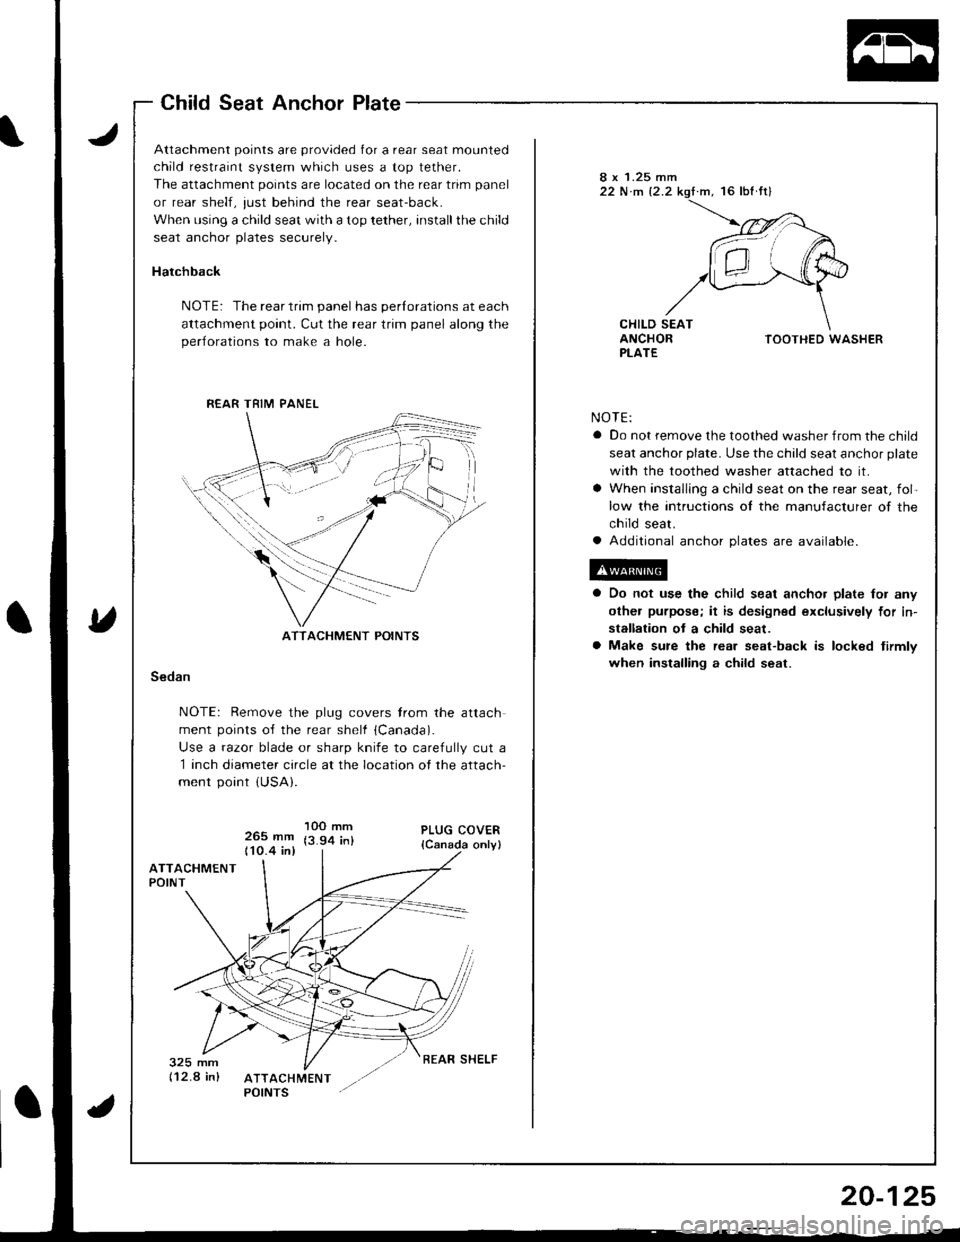
Attachment points are provided for a rear seat mounted
child restraint system which uses a top tether.
The attachment points are located on the rear trim panel
or rear shelf, just behind the rear seat-back.
When using a child seat with a top tether, installthe child
seat anchor plates securely.
Hatchback
NOTE: The rear trim panel has perlorations at each
attachment point. Cut the rear trim panel along the
perlorations to make a hole.
8 x 1.25 mm22 N.m 12.2.m, 16 lbf fr)
CHILD SEATANCHORPLATETOOTHED WASHER
NOTE:
a Do not remove the toothed washer from the child
seat anchor plate. Use the child seat anchor plate
with the toothed washer attached to it.
a When installlng a child seat on the rear seat, fol-
low the intructions ol the manufacturer of the
child seat.
a Additional anchor plates are available.
Do not use the child seat ancho. plate lor any
othel purpose; it is designed exclusively for in-
stallation ot a child seat.
Make sure the rear seat-back is locked tirmlv
when installing a child seat.Sedan
NOTE: Remove the plug covers trom the attach
ment points o{f the rear shelf {Canada).
Use a razor blade or sharp knife to carefully cut a
1 inch diameter circle at the location of the attach-
ment point {USA}.
265 mm110.4 in)
1OO mm(3.94 in)
R€AR TRIM PANEL
ATTACHMENT POINTS
REAR SHELF
Page 962 of 1680

Hatch
Replacement
NOTE:
a An assistant is helpful when removing the hatch.
a Take care not to damage the hatch and body.
a Take care not to scratch the hatch side trim and hatch
trim panel.
a Open the hatch.
a Remove the high mount brake Iight {see section 23).
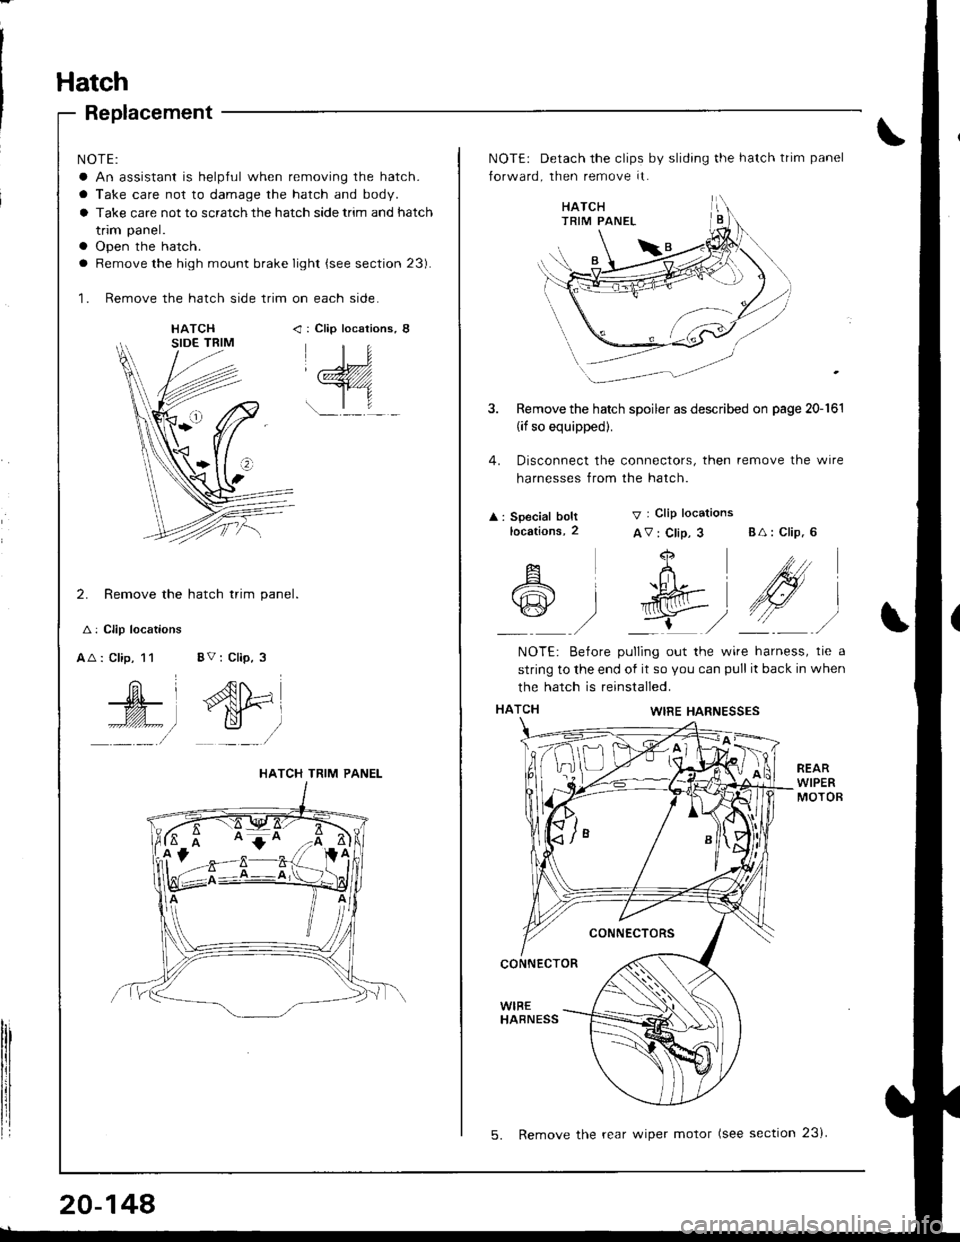
'1. Remove the hatch side trim on each side.
: Clip locaiions,
_);(zZZ////1
r.-lf
2. Remove the hatch trim panel
A: Clip locations
AA : Clip, 11 8V : Clip, 3
Ar^{N
# fN#=l*l y /
lrl
HATCH TRIM PANEL
20-148
5. Remove the rear wiper motor (see section 23i
NOTE: Detach the clips by sliding the hatch trim panel
forward, then remove it.
Remove the hatch spoiler as described on page 20-161
(if so equipped).
Disconnect the connectors, then remove the wire
harnesses from the hatch.
4.
A : Special boltlocations,2
V I Clip locations
AV: Clip, 3 BA: Clip. 6
i
I
A
A
w
+
..h [-
g)
bll
/\
NOTE: Betore pulling out the wire harness, tie a
string to the end of it so you can pull it back in when
the hatch is reinstalled.
WIRE HARNESSES
CONNECTORS
CONNECTOR
WIBEHABNESS
Page 964 of 1680

Adjustment
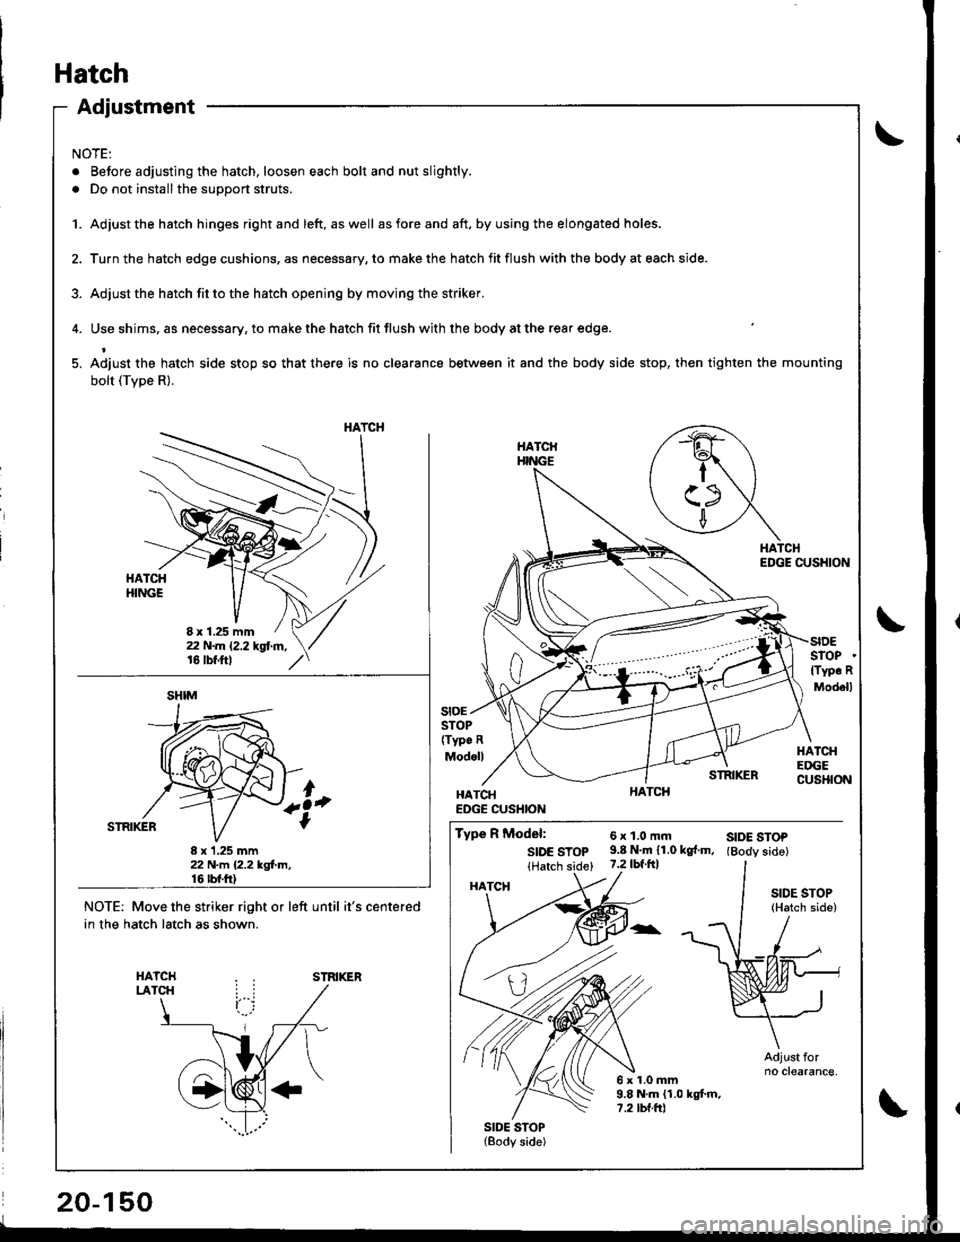
NOTE:
. Before adjusting the hatch, loosen each bolt and nut slightly.
. Do not installthe support struts.
1. Adjust the hatch hinges rightand left, aswell asforeand aft. byusing the elongated holes.
2. Turn the hatch edge cushions, as necessary, to make the hatch fit flush with the body at each side.
3. Adjust the hstch fit to the hatch opening by moving the striker.
4. Use shims. as necessary, to make the hatch fit flush with the body at the rear edge.
5. Adiust the hatch side stop so that there is no clearance between it and the body side stop, then tighten the mounting
bolt (Tvpe R).
HATCHEDGE CUSHION
STOP(Typ. R
Modoll
SIDESTOPlTyp. R
Modell
HATCHEDGECUSHION
stoE
STRIKER
HATCHEDGE CUSHION
Type R Model:
SIDE STOP(Hatch side)
SIDE STOP(Body side)
6xl,0mft9.8 N.m 11.0 kg{.m,7.2 tbf.ftl
6x1.0mm9.8 N.m (1.0 kgt m,?.2 tbf.ftl
SIDE STOP(Hatch side)
Adjust forno clearance,
SIDE STOP(Body side)
NOTE: Move the striker right or left until it's centered
in the hatch latch as shown.
STRIKER
HATCH
8 x 1.25 mm
SHIM
8 x 1.25 mm22 N.m 12.2 kgl.m,16 rbt.ft)
HATCH
Page 983 of 1680
Sub-frame Torque Sequence:
CAUTION: Atter loosening the lea. beam mounting bolts. be sure to replace them with new ones.
6 x 1,0 mm9.8 N m (1.0 kgf m,7.2 rbf.ft)REAB BEAM BRACE
REAR BEAMCOLLAR
'10 x 1.25 mm44 N.m (4.5 kgl.m.33 tbf.ft)
REAR BEAM
REAR BEAM14 x 1.5 mm89 N m {9.1 kgf m.66 tbt.frlReplace.
Sub-frame
20-169
Page 1006 of 1680
Blower Unit
Replacement
NOTEr The blower motor, recirculation control motor
and blower resistor can be replaced without removjng
the blower unit (see page 21-21).
Remove the glove box {see section 20}.
Remove the four bolts and the glove box frame.
Without Air Conditioning
3-a. Remove the wire harness clips trom the heater duct.
Remove the tour self-tapping screws and the heat-
er duct.
1.
2.
HEATER DUCT
21-20
With Air Conditioning
3-b. Remove the evaporator (see page 22-26).
CLIPS
9.8 N.m 11.0 kgf.m,7.2 rbf.ftl
4. Disconnect the connectors from the blower motor,
the blower resistor and the recirculation control
motor,
5. Remove the wire harness clip from the recirculation
control motor, and release the wire harness from the
clamp on the blower unit.
Remove the two mounting bolts, the mounting nut
and the blower unit.
6 x 1.0 mm
6.
6 x 1.O mm9.8 N.m (1.0 kgf'm,7.2 rbr.ftl
Install in the reverse order of removal. and make sure
there are no air leaks.
9.8 N.m (1.0 kgl'm,