1997 TOYOTA TACOMA buttons
[x] Cancel search: buttonsPage 16 of 221

162. To remove the fuel tank cap, turn
the cap slowly counterclockwise,
then pause slightly before remov-
ing it. after removing the cap, hang
it on the cap hanger.
It is not unusual to hear a slight swoosh
when the cap is opened. When installing,
turn the cap clockwise till you hear a click.
If the cap is not tightened securely, the malfunction indicator lamp comes on.
Make sure the cap is tightened securely.
The indicator lamp goes off after driving several times. If the indicator lamp does
not go off, contact your Toyota dealer as soon as possible.
CAUTION!
� Make sure the cap is tightened se-
curely to prevent fuel spillage in
case of an accident.
� Use only a genuine Toyota fuel tankcap for replacement. It has a built incheck valve to reduce fuel tank vac- uum.
CAUTION!
To avoid serious personal injury, you
must do the following. � While the vehicle is moving, always
keep the head, hands and other
parts of the body of all occupants away from the roof opening. Other-
wise, you could be seriously in-
jured if the vehicle stops suddenly
or if the vehicle is involved in an ac- cident.
� Never sit on top of the vehicle
around the roof opening.
� Never attempt to remove the moon
roof panel while driving. Other-
wise, the panel may become a haz-ard by falling into or flying off the vehicle.
� After installing the moon roof pan-
el, make sure they are firmly se-
cured by pushing up on the under-
side of the panel.
� Never put your hands between the
moon roof panel and the surround-
ing roof.
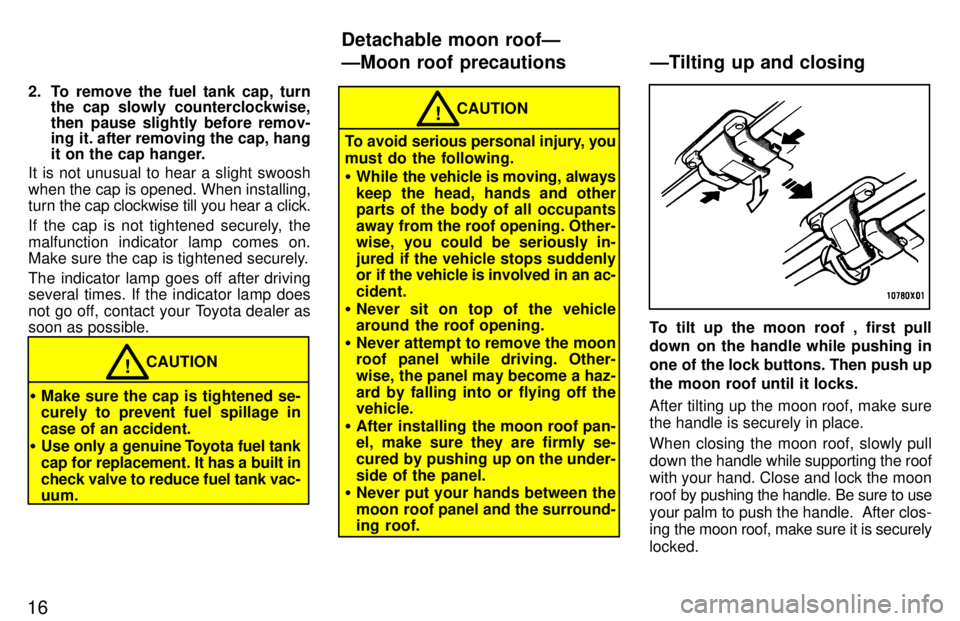
To tilt up the moon roof , first pull
down on the handle while pushing in
one of the lock buttons. Then push up
the moon roof until it locks. After tilting up the moon roof, make sure the handle is securely in place.
When closing the moon roof, slowly pull
down the handle while supporting the roof
with your hand. Close and lock the moon
roof by pushing the handle. Be sure to use
your palm to push the handle. After clos-
ing the moon roof, make sure it is securely locked. ÐTilting up and closing
Detachable moon roofÐ ÐMoon roof precautions
Page 17 of 221

17
1. Pull the handle down while push-ing in one of the lock buttons.2. Push in the retaining springs armsas shown and push up the moon roof.3. Push back the auxiliary catch to re-lease it from the hook. Then lift the
moon roof panel and pull it out.
ÐRemoving
Page 30 of 221

30
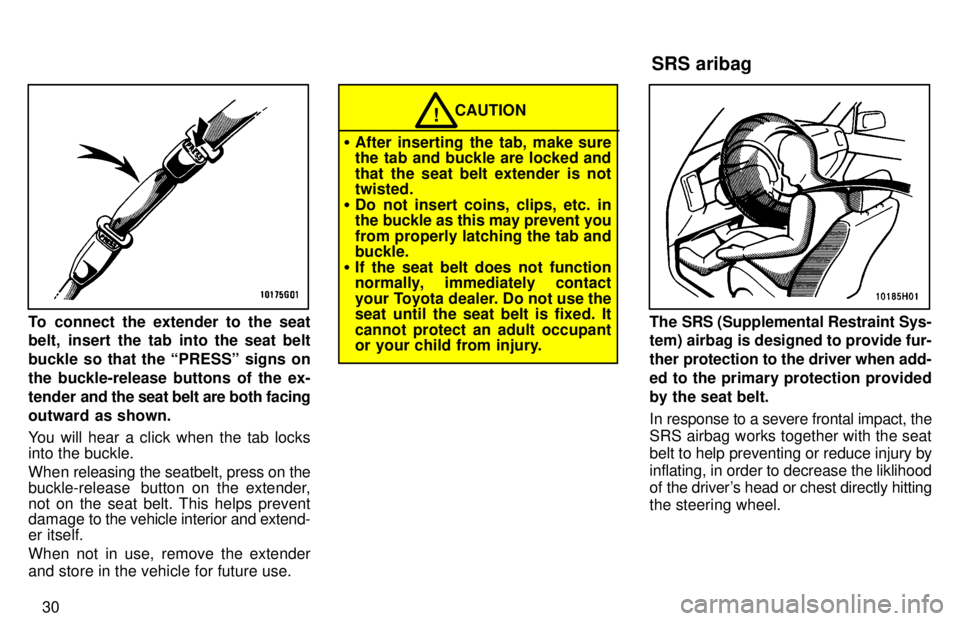
To connect the extender to the seat
belt, insert the tab into the seat belt
buckle so that the PRESSº signs onthe buckle-release buttons of the ex-
tender and the seat belt are both facing
outward as shown.
You will hear a click when the tab locks into the buckle.
When releasing the seatbelt, press on the
buckle-release button on the extender,not on the seat belt. This helps prevent
damage to the vehicle interior and extend- er itself.
When not in use, remove the extender
and store in the vehicle for future use.
CAUTION!
� After inserting the tab, make sure
the tab and buckle are locked and
that the seat belt extender is not twisted.
� Do not insert coins, clips, etc. in
the buckle as this may prevent you
from properly latching the tab and buckle.
� If the seat belt does not function
normally, immediately contact
your Toyota dealer. Do not use the
seat until the seat belt is fixed. It cannot protect an adult occupant
or your child from injury.
The SRS (Supplemental Restraint Sys-
tem) airbag is designed to provide fur-
ther protection to the driver when add-
ed to the primary protection providedby the seat belt.
In response to a severe frontal impact, the
SRS airbag works together with the seat
belt to help preventing or reduce injury byinflating, in order to decrease the liklihood
of the driver's head or chest directly hitting the steering wheel. SRS aribag
Page 96 of 221

95
Details of specific buttons, controls, and
features are described in
the alphabetical
listing that follows.
ÐUsing your audio system: controls and features �
Type 1
Page 97 of 221

961 2 3 4 5 6 (Preset buttons)
These buttons are used to preset and tune in radio stations.
To preset a station to a button: Tune in the
desired station (see TUNEº). Push and
hold down
the button until you hear a beep
Ð this will set the station to the button.
The button number will appear on the dis-
play.
To tune in to a preset station: Push the
button for the station you want. The button
number and station frequency will appear
on the display.
These systems can store one AM and one
FM station for each button. The preset
station memory will be canceled out if the
power source is interrupted (battery dis-
connected or fuse blown). AM V FM
Push AM VFMº to switch between the AM
and FM bands. AMº or FMº will appear
on the display.
If the audio system is off, you can turn on the radio by pushing AM VFMº. BAL (Balance)
This knob lets you adjust the balance be- tween the right and left speakers.
Move the BALº ring around TONEº to adjust the right/left balance PWR
VVOL (Power VVolume)
Push PWR VVOLº to turn the audio sys-
tem on and off. Turn the PWR VVOLº knob
to adjust the volume.ST (Stereo reception) display
Your radio automatically changes to ste-
reo reception when a stereo broadcast is
received. STº appears on the display. Ifthe signal becomes weak, the radio re-
duces the amount of channel separation to prevent the weak signal from creating
noise. If the signal becomes extremely weak, the radio switches from stereo to mono reception.
TONE
Turn TONEº to adjust the tone. TUNE
Tuning
Your Toyota has an electronic tuning radio (ETR). Push and release the
~º (up) or !º
(down) side of TUNEº to step up or down
the station band. If you hear a beep, you
held the button too long and the radio will
go into the seek mode. Seeking
In the seek mode, the radio finds and plays the next station up or down the sta- tion band.
To seek a station, push and hold the ~º or
! º side of TUNEº until you hear a beep.
Do this again to find another station.
Page 98 of 221

97
Details of specific buttons, controls and
features are described in
the alphabetical
listing that follows.
�
Type 2
Page 99 of 221

981 2 3 4 5 6 (Preset buttons)
These buttons are used to preset and tune in radio stations.
To preset a station to a button: Tune in the
desired station (see TUNEº). Push and
hold down the button until you hear a beepÐthis will set the station to the but-
ton.
The button number will appear on the
display.
To tune in to a preset station: Push the
button for the station you want. The button
number and station frequency will appear
on the display.
These systems can store one AM and one
FM station for each button. The preset
station memory will be canceled out if the
power source is interrupted (battery dis-
connected or fuse blown).
(Eject Button)
Push this button to eject a cassette.
After you turn the ignition to LOCKº, you
will be able to eject a cassette but you will
not be able to reinsert it. AM
VFM
Push AM VFMº to switch between the AM
and FM bands. AMº or FMº will appear
on the display.
If the audio system is off, you can turn on
the radio by pushing AM VFMº. Also, push
the AM VFMº button to switch from cas-
sette operation to radio operation. BAL (Balance)
This knob lets you adjust the balance be- tween the right and left speakers.
Pull out PWR/VOL/BALº . Turn the knob
to adjust the right/left balance. Push the
knob back into its normal position. BASS This knob lets you adjust the bass level. Push BASS/TREBº so that it pops out of
its retracted position. Turn the knob to ad-
just the bass. Push the knob back into its
retracted position. Dolby
)
NR*
If you are listening to a tape that was re-
corded with Dolby )
Noise Reduction,
push the button marked with the
double-D symbol. The double-D symbol
will appear on the display. Push the button
again to turn off Dolby )
NR.
The Dolby NR mode reduces tape noise
by about 10 dB. For best sound reproduc-tion, play your tapes with this button on or
off according to the mode used for record-
ing the tape. *: Dolby noise reduction manufactured under license from Dolby
Laboratories Licensing Corporation. DOLBYº and the
double-D symbol are tradenmarks of Dolby Labratories Licens-
ing Corporation.
FADE
Move the FADEº knob around PWR/
VOLº to adjust the front/rear balance. PROG (Program)
Push PROGº to select the other side of
a cassette tape. The display indicates
which side is currently selected ( ~º indi-
cates top side, !º indicates bottom side).
Auto-reverse featureÐAfter the cassette
player reaches the end of a tape side, itautomatically reverses and begins to play
the other side. This is true whether the
cassette was playing or fast forwarding.
Page 101 of 221

100Seeking
In the seek mode, the radio finds and plays the next station up or down the sta-tion band.
To seek a station, push and hold the
~º or
vº side of TUNEº until you hear a beep. Do this again to find another station.
NOTICE
To ensure the correct audio system operation:
�Be careful not to spill beveragesover the audio system.
�Do not put anything other than acassette tape into the slot.
ILLUMINATION CONTROL LOGIC
On some audio-units, when the instru-
ment panel lights are on, the letters on op-
erable buttons of the mode in current use
light up together with the mode selection and eject buttons. RADIO RECEPTION
Usually, a problem with radio reception
does not mean there is a problem with
your radioÐit is just the normal result of
conditions outside the vehicle.
For example, nearby buildings and terrain
can interfere with FM reception. Power
lines or telephone wires can interfere with
AM signals. And of course, radio signals
have a limited range, and the farther you are from a station, the weaker its signal
will be. In addition, reception conditions
change constantly as your vehicle moves. Here are some common reception prob- lems
that probably do not indicate a prob-
lem with your radio: FM
Fading and drifing stationsÐGenerally,
the effective range of FM is about 40 km
(25 miles). Once outside this range, you
may notice fading and drifting, which in- crease with the distance from the radio
transmitter. They are often accompanied by distortion.
Multi-pathÐFM signals are reflective,
making it possible for two signals to reach
your antenna at the same time. If this hap-
pens, the signals will cancel each other
out, causing a momentary flutter or loss of
reception.
Static and flutteringÐThese occur when
signals are blocked by buildings, trees, or other large objects. Increasing the bass
level may reduce static and fluttering.
Station swappingÐIf the FM signal you are listening to is interrupted or weak-
ened, and there is another strong station
nearby on the FM band, your radio may
tune in the second station until the original
signal can be picked up again.
ÐCar audio system operating hints