Page 4 of 223
3
1. Clutch start cancel switch
2. Headlight and turn signal switch
3. Wiper and washer switches
4. Back window defogger switch
5. Emergency flasher switch
6. Clock
7. Cup holder
8. Air conditioning controls
9. Car audio
10. Ashtray 11. Cigarette lighter
12. Ignition switch
13. Cruise control switch
14. Rear differential lock button
15. Instrument panel light control knob
16. Power rear view mirror control switch (without power windows)
17. Power back window lock switch (without power windows)
Page 14 of 223

13
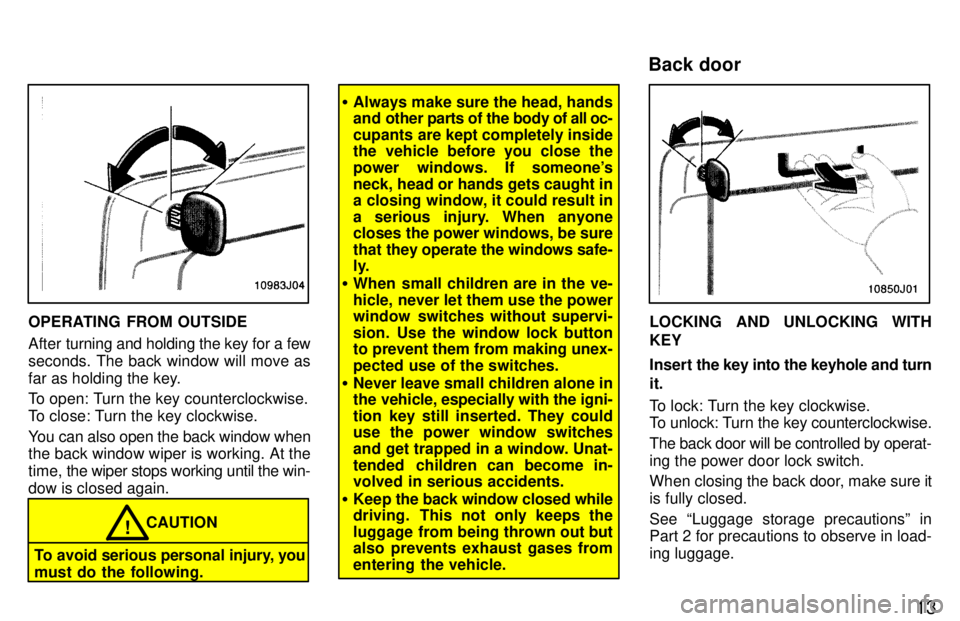
OPERATING FROM OUTSIDE
After turning and holding the key for a few
seconds. The back window will move as
far as holding the key.
To open: Turn the key counterclockwise.
To close: Turn the key clockwise.
You can also open the back window when the back window wiper is working. At the
time, the wiper st ops working until the win-
dow is closed again.
CAUTION!
To avoid serious personal injury, you
must do the following.
� Always make sure the head, hands
and other parts of the body of all oc-
cupants are kept completely inside
the vehicle before you close the
power windows. If someone's
neck, head or hands gets caught in
a closing window, it could result in
a serious injury. When anyone
closes the power windows, be sure
that they operate the windows safe-
ly.
� When small children are in the ve-
hicle, never let them use the power
window switches without supervi-
sion. Use the window lock button
to prevent them from making unex-
pected use of the switches.
� Never leave small children alone in
the vehicle, especially with the igni-
tion key still inserted. They could
use the power window switches
and get trapped in a window. Unat-
tended children can become in-
volved in serious accidents.
� Keep the back window closed while
driving. This not only keeps the
luggage from being thrown out but
also prevents exhaust gases from
entering the vehicle.
LOCKING AND UNLOCKING WITH KEY
Insert the key into the keyhole and turn
it.
To lock: Turn the key clockwise.
To unlock: Turn the key counterclockwise. The back door will be controlled by operat-
ing the power door lock switch.
When closing the back door, make sure it is fully closed. See Luggage storage precautionsº in
Part 2 for precautions to observe in load- ing luggage.
Back door
Page 17 of 223

16
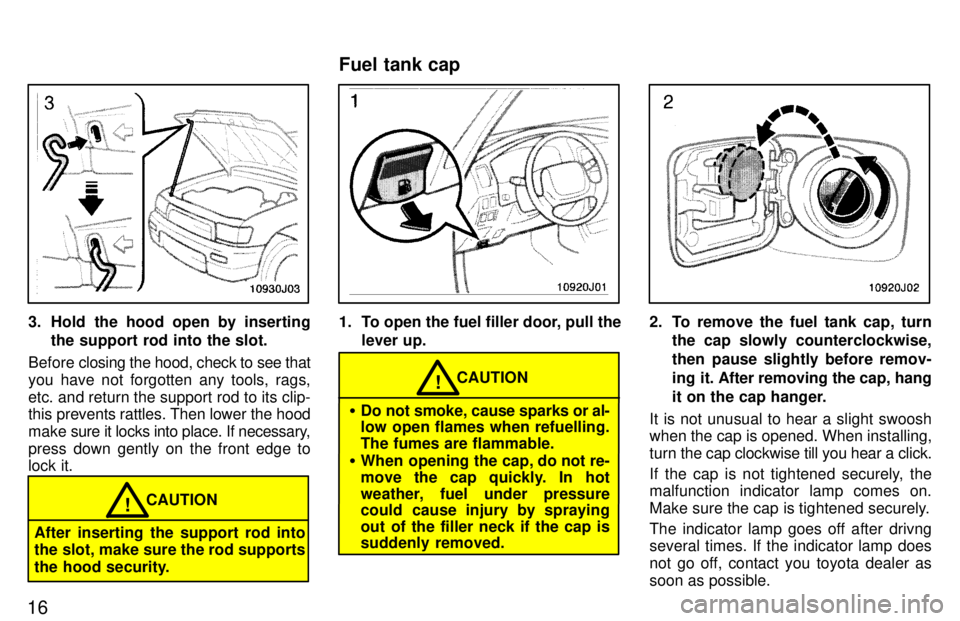
3. Hold the hood open by insertingthe support rod into the slot.
Before closing the hood, check to see that
you have not forgotten any tools, rags,
etc. and return the support rod to its clip-
this prevents rattles. Then lower the hood
make sure it locks into place. If necessary,
press down gently on the front edge to lock it.
CAUTION!
After inserting the support rod into
the slot, make sure the rod supports
the hood security.
1. To open the fuel filler door, pull the lever up.
CAUTION!
� Do not smoke, cause sparks or al-
low open flames when refuelling. The fumes are flammable.
� When opening the cap, do not re-
move the cap quickly. In hot
weather, fuel under pressure
could cause injury by spraying
out of the filler neck if the cap is
suddenly removed.
2. To remove the fuel tank cap, turn
the cap slowly counterclockwise,
then pause slightly before remov-
ing it. After removing the cap, hang
it on the cap hanger.
It is not unusual to hear a slight swoosh
when the cap is opened. When installing,
turn the cap clockwise till you hear a click.
If the cap is not tightened securely, the malfunction indicator lamp comes on.
Make sure the cap is tightened securely.
The indicator lamp goes off after drivng
several times. If the indicator lamp does
not go off, contact you toyota dealer as
soon as possible.
Fuel tank cap
Page 126 of 223
Part 1Clock
129
OPERATION OF INSTRUMENTSAND CONTROLSÐ
Chapter 1-8 Other equipment �
Clock
�Cigarette lighter and ashtray
�Glovebox
�Auxiliary holder
�Auxiliary box
�Cup holder
�Tie-down hooks
�Luggage cover
�Floor mat
The digital clock indicates the time.
The key must be in the ``ACCº or ``ON'' position.
To reset the hour: Push the Hº button.
To reset the minutes: Push the Mº button.
If quick adjustment to a full hour is de- sired, push the :00º button. When the instrument panel lights are turned
on, the brightness of the time indi-
cation will be reduced.
For example, if the :00º button is de-
pressed when the time is between
1:01Ð1:29, the time will change to 1:00.
If the time is between 1:30Ð1:59, the time
will change to 2:00. Once the electrical power source has
been disconnected from the clock, the
time is automatically set to 1:00 (oneo'clock). When the instrument panel lights turned
on, the brightness of the time indication
will be reduced.
Page 127 of 223

130
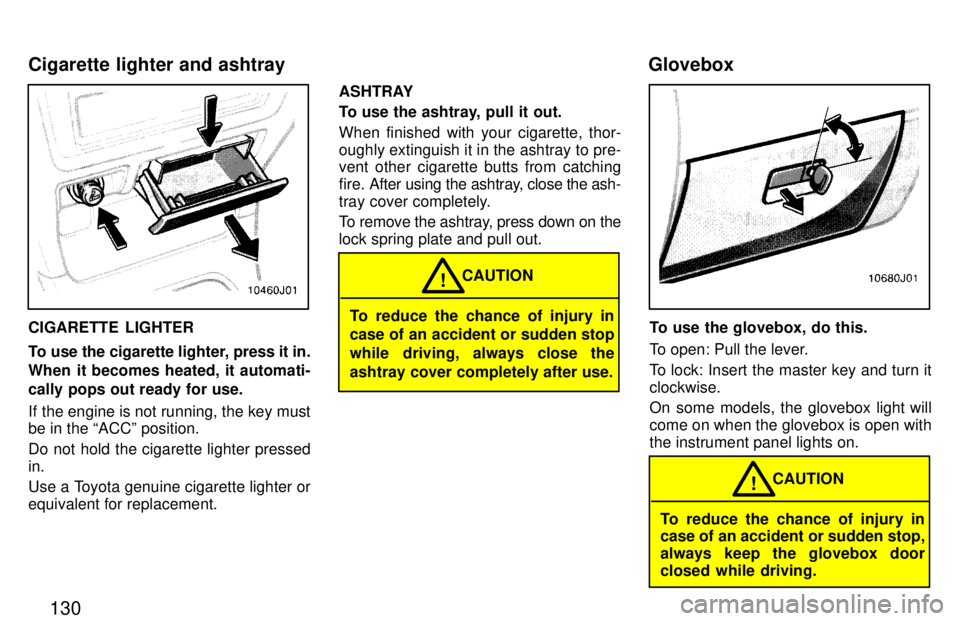
CIGARETTE LIGHTER
To use the cigarette lighter, press it in.
When it becomes heated, it automati-
cally pops out ready for use.
If the engine is not running, the key must be in the ACCº position.
Do not hold the cigarette lighter pressed in.
Use a Toyota genuine cigarette lighter or equivalent for replacement.ASHTRAY
To use the ashtray, pull it out. When finished with your cigarette, thor-
oughly extinguish it in the ashtray to pre-
vent other cigarette butts from catching
fire. After using the
ashtray, close the ash-
tray cover completely.
To remove the ashtray, press down on the lock spring plate and pull out.To reduce the chance of injury in
case of an accident or sudden stop
while driving, always close theashtray cover completely after use. CAUTION
!
To use the glovebox, do this.
To open: Pull the lever.
To lock: Insert the master key and turn it clockwise.
On some models, the glovebox light will come on when the glovebox is open withthe instrument panel lights on.
To reduce the chance of injury in
case of an accident or sudden stop,
always keep the glovebox door
closed while driving.
CAUTION
!
Cigarette lighter and ashtray
Glovebox
Page 164 of 223
167
Turn the jack joint by hand.
To remove: Turn the joint in direction 1 un- til the jack is free.
To store: Turn the joint in direction 2 until the jack is firmly secured to prevent it fly-
ing forward during a collision or suddenbraking.To remove the spare tire:
1. Insert the end of the jack handle intothe lowering screw and turn it counter- clockwise.
2. After the tire is lowered completely to the ground, remove the holding brack-et.
When storing the spare tire, put it in placewith the outer side of the wheel facing up.Then secure the tire taking care that the
tire goes straight up without catching on
any other part, to prevent it from flying for-ward during a collision or sudden braking.2. Block the wheel diagnoally oppo- site the flat tire to keep the vehicle from rolling when it is jacked up.
When blocking the wheel, place a wheel
block from the front for the front wheels or
from the rear for the rear wheels.
ÐBlocking the wheel
Page 165 of 223
168
Steel wheels
Aluminum wheels3. Remove the wheel ornament.
Pry off the wheel ornament, using the bev-
eled end of the wheel nut wrench asshown.
Do not try to pull the ornament by
hand. Take due care in handling the
ornament to avoid unexpected
personal injury.
CAUTION
!
4. Loosen all the wheel nuts. Always l
oosen the wheel nuts before rais-
ing the vehicle.
The nuts turn counterclockwise to loosen.
To get maximum leverage, fit the wrench
to the nut so that the handle is on the right
side, as shown above. Grab the wrench
near the end of the handle and pull up on
the handle. Be careful that the wrench
does not slip off the nut.
Do not remove the nuts yetÐjust unscrew
them about one-half turn.
ÐRemoving wheel ornament
ÐLoosening wheel nuts
Page 166 of 223
169
5. Position the jack at the correct jack
points as shown
Make sure the jack is positioned on a level
and solid place.6. After making sure that no one is in
the vehicle, raise it high enough so
that the spare tire can be installed.
Remember you will need more ground
clearance when putting in the spare tire than when removing the flat tire.
To raise the vehicle, insert the jack handle
extension in to the jack (it is a loose fit) and
turn it clockwise with the handle, makingsure the handle remains firmly fitted onto
the jack handle extension. As the jack touches the vehicle and begins to lift,
double-check that it is properly posi-tioned.
Never get under the vehicle when it is supported by the jack alone. CAUTION
!
ÐPositioning the jack ÐRaising your vehicle