Page 168 of 223

171
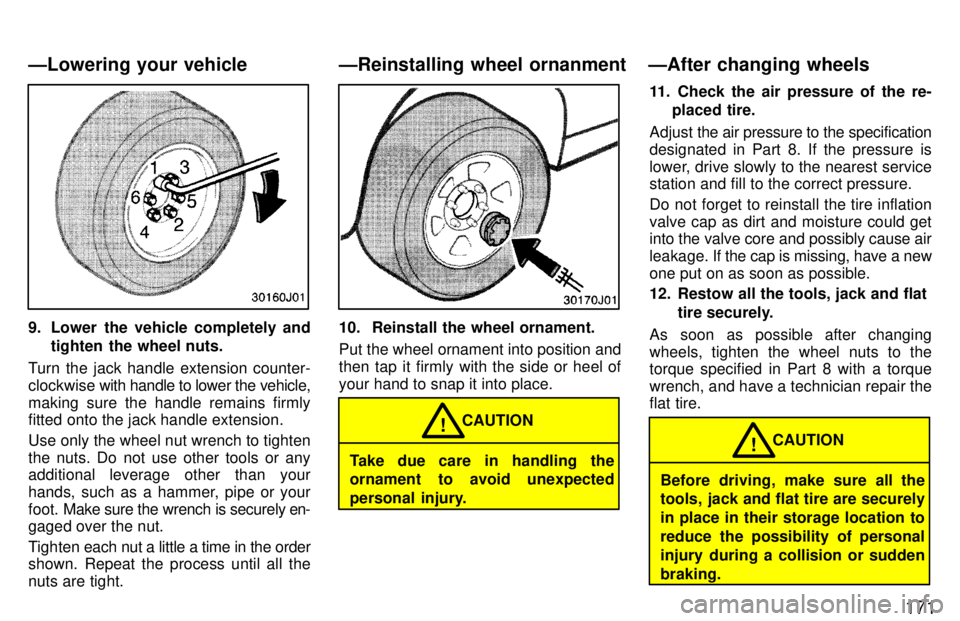
9. Lower the vehicle completely andtighten the wheel nuts.
Turn the jack handle extension counter-
clockwise with handle to lower the vehicle,
making sure the handle remains firmly
fitted onto the jack handle extension. Use only the wheel nut wrench to tighten the nuts. Do not use other tools or any
additional leverage other than your
hands, such as a hammer, pipe or your
foot. Make sure the wrench is securely en-
gaged over the nut.
Tighten each nut a little a time in the order
shown. Repeat the process until all the
nuts are tight.10. Reinstall the wheel ornament.
Put the wheel ornament into position and
then tap it firmly with the side or heel ofyour hand to snap it into place.
Take due care in handling the
ornament to avoid unexpected
personal injury. CAUTION
! 11. Check the air pressure of the re-
placed tire.
Adjust the air pressure to the specification
designated in Part 8. If the pressure is
lower, drive slowly to the nearest service station and fill to the correct pressure.
Do not forget to reinstall the tire inflation valve cap as dirt and moisture could get into the valve core and possibly cause air
leakage. If the cap is missing, have a new
one put on as soon as possible.
12. Restow all the tools, jack and flat
tire securely.
As soon as possible after changing
wheels, tighten the wheel nuts to the torque specified in Part 8 with a torque wrench, and have a technician repair the flat tire.
Before driving, make sure all the
tools, jack and flat tire are securely in place in their storage location to
reduce the possibility of personal
injury during a collision or suddenbraking. CAUTION
!
ÐLowering your vehicle ÐReinstalling wheel ornanment ÐAfter changing wheels
Page 199 of 223

202Remove and replace the reservoir cover by hand.
Use only newly opened brake fluid. Once
opened, brake fluid absorbs moisture
from the air, and excess moisture can cause a dangerous loss of braking.
CAUTION!
Take care when filling the reservoir
because brake fluid can harm your
eyes and damage painted surfaces. If
fluid gets in your eyes, flush your
eyes with clean water.
If you spill the fluid, be sure to wash
it off with water to prevent it from
damaging the parts or paint.
NOTICE
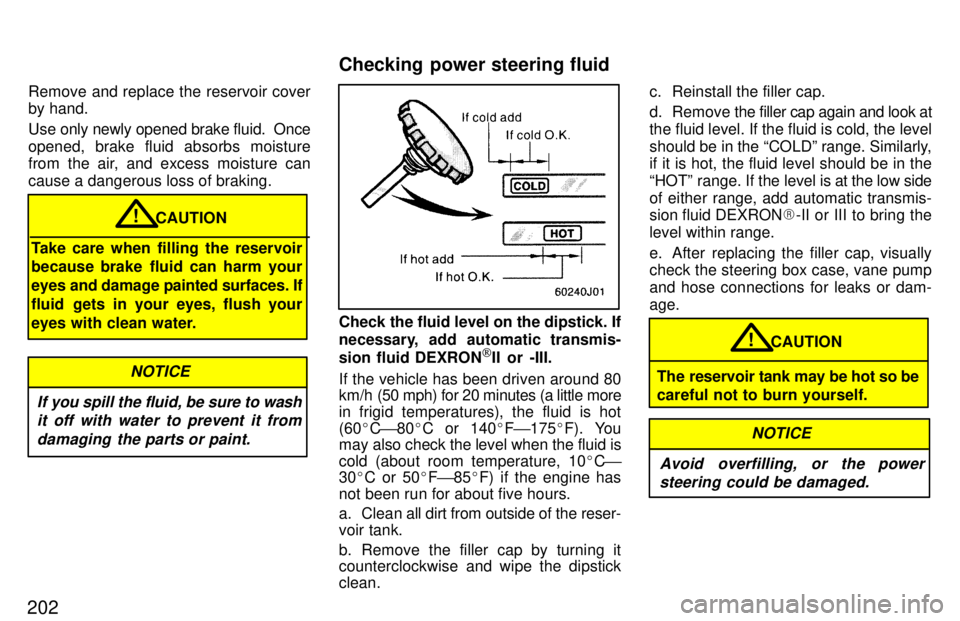
Check the fluid level on the dipstick. If
necessary, add automatic transmis-
sion fluid DEXRON [
II or -III.
If the vehicle has been driven around 80
km/h (50 mph) for 20 minutes (a little more
in frigid temperatures), the fluid is hot (60 �C ' 80 �C or 140 �F ' 175 �F). You
may also check the level when the fluid is
cold (about room temperature, 10 �C '
30 �C or 50 �F ' 85 �F) if the engine has
not been run for about five hours.
a. Clean all dirt from outside of the reser-
voir tank.
b. Remove the filler cap by turning it
counterclockwise and wipe the dipstick clean. c. Reinstall the filler cap.
d. Remove the filler cap again and look at the fluid level. If the fluid is cold, the level
should be in the COLDº range. Similarly, if it is hot, the fluid level should be in the
HOTº range. If the level is at
the low side
of either range, add automatic transmis-
sion fluid DEXRON �-II or III to bring the
level within range.
e. After replacing the filler cap, visually check the steering box case, vane pump
and hose connections for leaks or dam-age.
CAUTION!
The reservoir tank may be hot so be
careful not to burn yourself.
Avoid overfilling, or the power steering could be damaged.
NOTICE
Checking power steering fluid
Page 219 of 223

222
Engine compartment (U.S.A.) Fuses (type A)
1. DEFOG 15 A: Back window defogger
2. STOP 10 A: Stop lights, high-
mounted stoplight
3. ALT-S 7.5 A: Charging system
4. OBD 7.5 A: On-board diagnosis sys-
tem
5. EFI 15 A: Multiport fuel injection sys-
tem/sequential multiport fuel injection systemEngine compartment (Canada)
6. HORN 15 A: Horns
7. DOME 15 A: Interior lights, personal
lights, luggage compartment light
8. TAIL 10 A: Tail lights, parking lights, li-
cense plate lights
9. A.C. 10 A: Air conditioning control
system
10. RR HTR 10 A: Rear air conditioning
control system
11. HEAD (RH) 10 A: Right-hand head-
light
12. HEAD (LH) 10 A: Left-hand headlightInstrument panel
13. DRL 7.5 A: Daytime running light sys-
tem
14. HEAD (HI RH) 10 A: Right-hand
headlight (high beam)
15. HEAD (HI LH) 10 A: Left-hand head-
light (high beam)
16. HEAD 10 A: Right-hand headlight
(low beam)
17. HEAD 10 A: Left-hand headlight (low
beam)
18. ACC 15 A: Car audio system, power
antenna, clock, power rear view mirror
control
Fuses