Page 506 of 3342
B2M0358
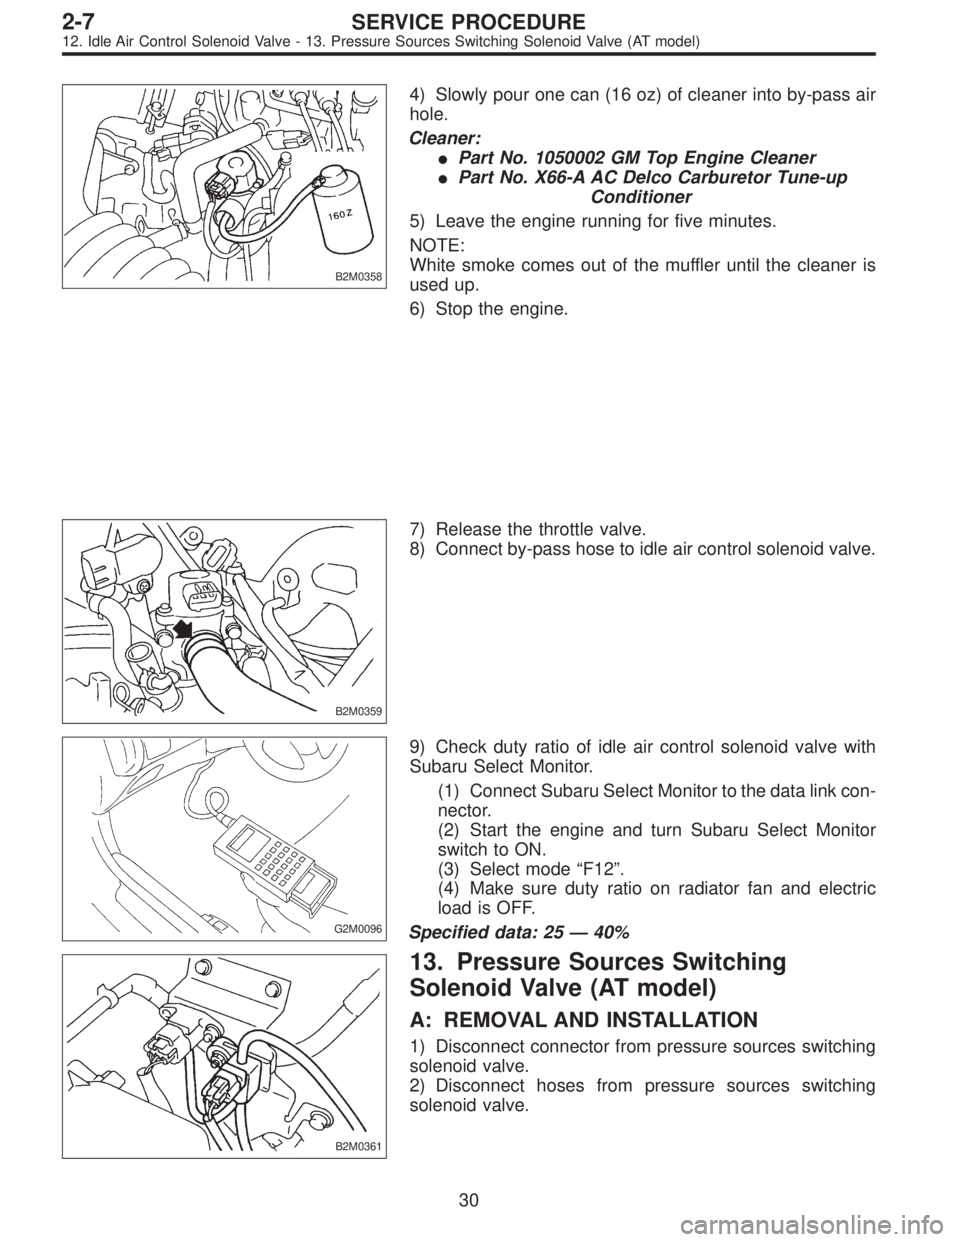
4) Slowly pour one can (16 oz) of cleaner into by-pass air
hole.
Cleaner:
�Part No. 1050002 GM Top Engine Cleaner
�Part No. X66-A AC Delco Carburetor Tune-up
Conditioner
5) Leave the engine running for five minutes.
NOTE:
White smoke comes out of the muffler until the cleaner is
used up.
6) Stop the engine.
B2M0359
7) Release the throttle valve.
8) Connect by-pass hose to idle air control solenoid valve.
G2M0096
9) Check duty ratio of idle air control solenoid valve with
Subaru Select Monitor.
(1) Connect Subaru Select Monitor to the data link con-
nector.
(2) Start the engine and turn Subaru Select Monitor
switch to ON.
(3) Select mode“F12”.
(4) Make sure duty ratio on radiator fan and electric
load is OFF.
Specified data: 25—40%
B2M0361
13. Pressure Sources Switching
Solenoid Valve (AT model)
A: REMOVAL AND INSTALLATION
1) Disconnect connector from pressure sources switching
solenoid valve.
2) Disconnect hoses from pressure sources switching
solenoid valve.
30
2-7SERVICE PROCEDURE
12. Idle Air Control Solenoid Valve - 13. Pressure Sources Switching Solenoid Valve (AT model)
Page 597 of 3342
1) Set the vehicle on lift arms.
2) Open front hood fully and support with stay.
G2M0341
3) Release fuel pressure.
(1) Disconnect fuel tank connector.
(2) Start the engine, and run until it stalls.
(3) After the engine stalls, crank it for five seconds
more.
(4) Turn ignition switch to“OFF”.
G6M0095
4) Disconnect battery cables and remove battery from
vehicle.
B2M0015A
5) Drain coolant.
Set container under the vehicle, and remove drain cock
from radiator.
G2M0263
6) Remove cooling system.
(1) Disconnect radiator fan motor connector.
(2) Disconnect radiator outlet hose from thermostat
cover.
9
2-11SERVICE PROCEDURE
2. Engine
Page 598 of 3342
B2M0016A
(3) Disconnect ATF cooler hoses from pipes. (AT
model)
B2M0017
(4) Remove V-belt cover.
G2M0267
(5) Disconnect radiator inlet hose from radiator.
G2M0220
(6) Remove radiator upper bracket, and remove radia-
tor assembly from vehicle.
7) Collect refrigerant, and remove pressure hoses. (With
A/C)
(1) Place and connect the attachment hose to the
refrigerant recycle system.
(2) Collect refrigerant from A/C system.
10
2-11SERVICE PROCEDURE
2. Engine
Page 613 of 3342
B2M0307A
15) Install cooling system.
(1) Attach radiator mounting cushions to body.
G2M0220
(2) Install radiator while fitting radiator pins to cush-
ions.
B2M0320
(3) Install radiator brackets and tighten bolts.
Tightening torque:
13.7±1.5 N⋅m (1.4±0.15 kg-m, 10.1±1.1 ft-lb)
G2M0263
(4) Connect radiator fan motor connector.
G2M0267
(5) Connect radiator inlet hose.
25
2-11SERVICE PROCEDURE
2. Engine
Page 614 of 3342
B2M0016A
(6) Connect radiator outlet hose.
(7) Connect ATF cooler hoses. (AT model)
B2M0017
(8) Install V-belt cover.
16) Install battery in the vehicle, and connect cables.
17) Fill coolant.
18) Check ATF level and correct if necessary. (AT model)
19) Charge A/C system with refrigerant.
20) Remove front hood stay, and close front hood.
21) Take off the vehicle from lift arms.
26
2-11SERVICE PROCEDURE
2. Engine
Page 709 of 3342
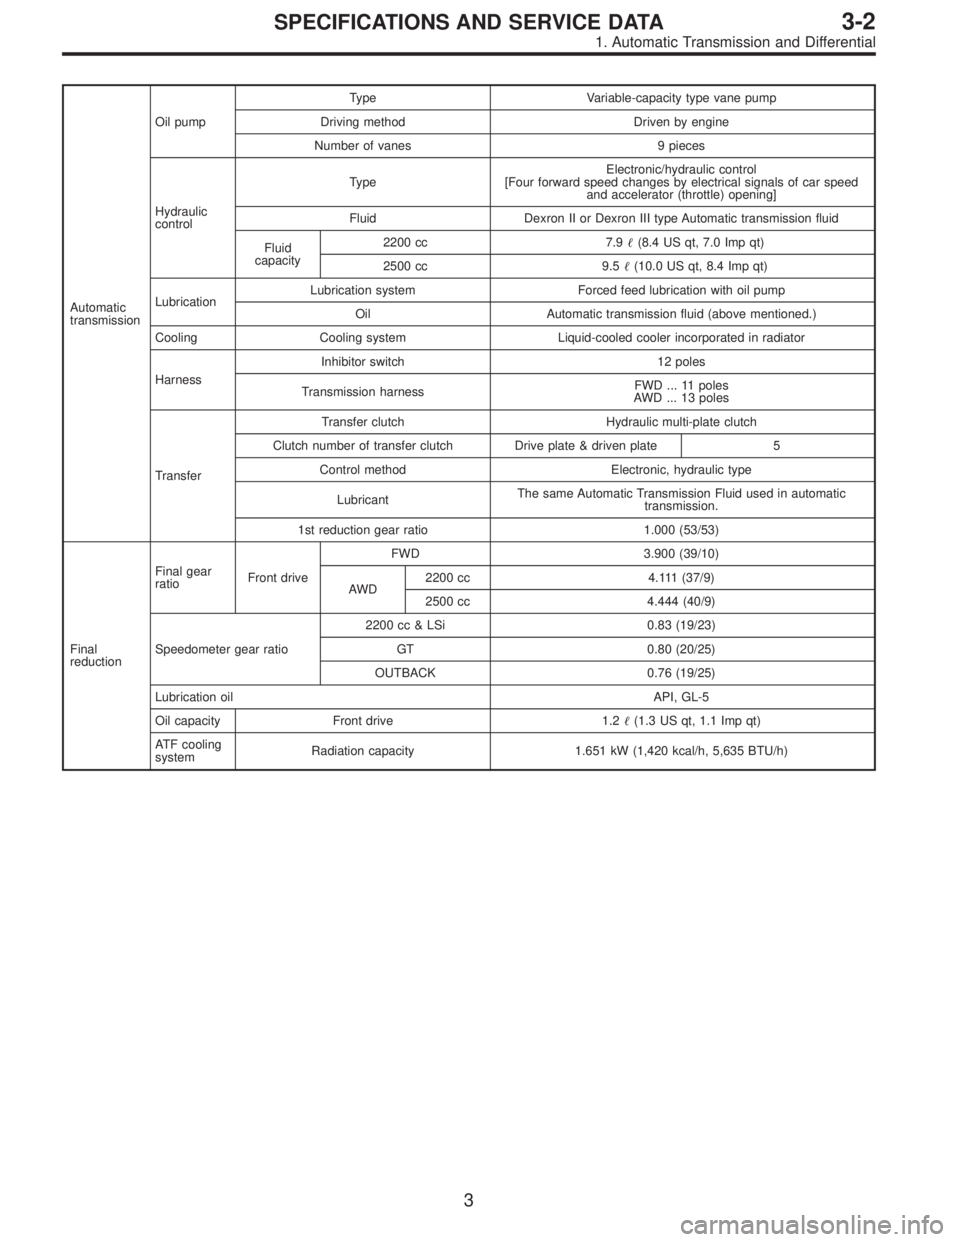
Automatic
transmissionOil pumpType Variable-capacity type vane pump
Driving method Driven by engine
Number of vanes 9 pieces
Hydraulic
controlTy p eElectronic/hydraulic control
[Four forward speed changes by electrical signals of car speed
and accelerator (throttle) opening]
Fluid Dexron II or Dexron III type Automatic transmission fluid
Fluid
capacity2200 cc 7.9�(8.4 US qt, 7.0 Imp qt)
2500 cc 9.5�(10.0 US qt, 8.4 Imp qt)
LubricationLubrication system Forced feed lubrication with oil pump
Oil Automatic transmission fluid (above mentioned.)
Cooling Cooling system Liquid-cooled cooler incorporated in radiator
HarnessInhibitor switch 12 poles
Transmission harnessFWD ... 11 poles
AWD ... 13 poles
TransferTransfer clutch Hydraulic multi-plate clutch
Clutch number of transfer clutch Drive plate & driven plate 5
Control method Electronic, hydraulic type
LubricantThe same Automatic Transmission Fluid used in automatic
transmission.
1st reduction gear ratio 1.000 (53/53)
Final
reductionFinal gear
ratioFront driveFWD 3.900 (39/10)
AWD2200 cc 4.111 (37/9)
2500 cc 4.444 (40/9)
Speedometer gear ratio2200 cc & LSi 0.83 (19/23)
GT 0.80 (20/25)
OUTBACK 0.76 (19/25)
Lubrication oilAPI, GL-5
Oil capacity Front drive 1.2�(1.3 US qt, 1.1 Imp qt)
ATF cooling
systemRadiation capacity 1.651 kW (1,420 kcal/h, 5,635 BTU/h)
3
3-2SPECIFICATIONS AND SERVICE DATA
1. Automatic Transmission and Differential
Page 1455 of 3342
1. Air Conditioning System
A: SPECIFICATIONS
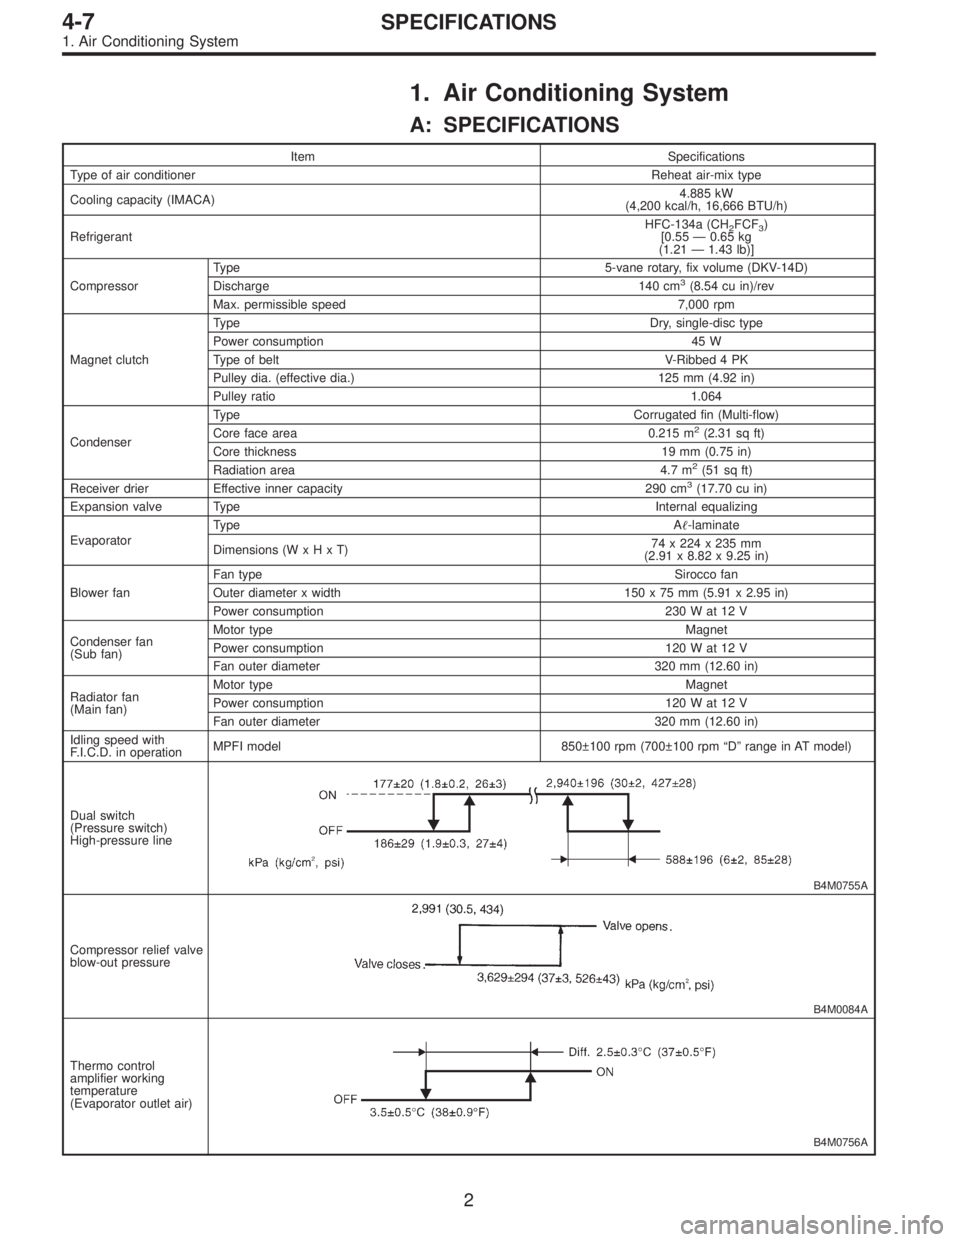
Item Specifications
Type of air conditionerReheat air-mix type
Cooling capacity (IMACA)4.885 kW
(4,200 kcal/h, 16,666 BTU/h)
RefrigerantHFC-134a (CH
2FCF3)
[0.55 — 0.65 kg
(1.21 — 1.43 lb)]
CompressorType 5-vane rotary, fix volume (DKV-14D)
Discharge 140 cm
3(8.54 cu in)/rev
Max. permissible speed 7,000 rpm
Magnet clutchTy p eDry, single-disc type
Power consumption 45 W
Type of belt V-Ribbed 4 PK
Pulley dia. (effective dia.) 125 mm (4.92 in)
Pulley ratio1.064
CondenserType Corrugated fin (Multi-flow)
Core face area 0.215 m
2(2.31 sq ft)
Core thickness 19 mm (0.75 in)
Radiation area 4.7 m
2(51 sq ft)
Receiver drier Effective inner capacity 290 cm3(17.70 cu in)
Expansion valve TypeInternal equalizing
EvaporatorTy p eA�-laminate
Dimensions (W x H x T)74 x 224 x 235 mm
(2.91 x 8.82 x 9.25 in)
Blower fanFan typeSirocco fan
Outer diameter x width 150 x 75 mm (5.91 x 2.95 in)
Power consumption 230 W at 12 V
Condenser fan
(Sub fan)Motor typeMagnet
Power consumption 120 W at 12 V
Fan outer diameter 320 mm (12.60 in)
Radiator fan
(Main fan)Motor typeMagnet
Power consumption 120 W at 12 V
Fan outer diameter 320 mm (12.60 in)
Idling speed with
F.I.C.D. in operationMPFI model 850±100 rpm (700±100 rpm “D” range in AT model)
Dual switch
(Pressure switch)
High-pressure line
B4M0755A
Compressor relief valve
blow-out pressure
B4M0084A
Thermo control
amplifier working
temperature
(Evaporator outlet air)
B4M0756A
2
4-7SPECIFICATIONS
1. Air Conditioning System
Page 1488 of 3342
9) Install belt cover.
10) Connect ground cable to negative terminal of battery.
11) Charge refrigerant.
B4M0095
12. Condenser
A: REMOVAL AND INSTALLATION
1) Disconnect battery negative terminal.
2) Discharge refrigerant using refrigerant recovery system.
3) Remove front grille.
G2M0375
4) Remove canister from bracket.
CAUTION:
�Do not disconnect hose from canister.
�Insert air vent hose of canister into the hole on body.
B4M0096A
5) Remove the radiator upper bracket of both side.
6) Disconnect high-pressure hose�
1and high-pressure
pipe�
2from condenser.
B4M0097
7) Remove the two bolts which secure condenser. While
lifting condenser, remove it through space between radia-
tor and radiator panel.
34
4-7SERVICE PROCEDURE
11. Compressor - 12. Condenser


