Page 1312 of 2053

SSANGYONG MY2002
5B-4 MANUAL TRANSMISSION
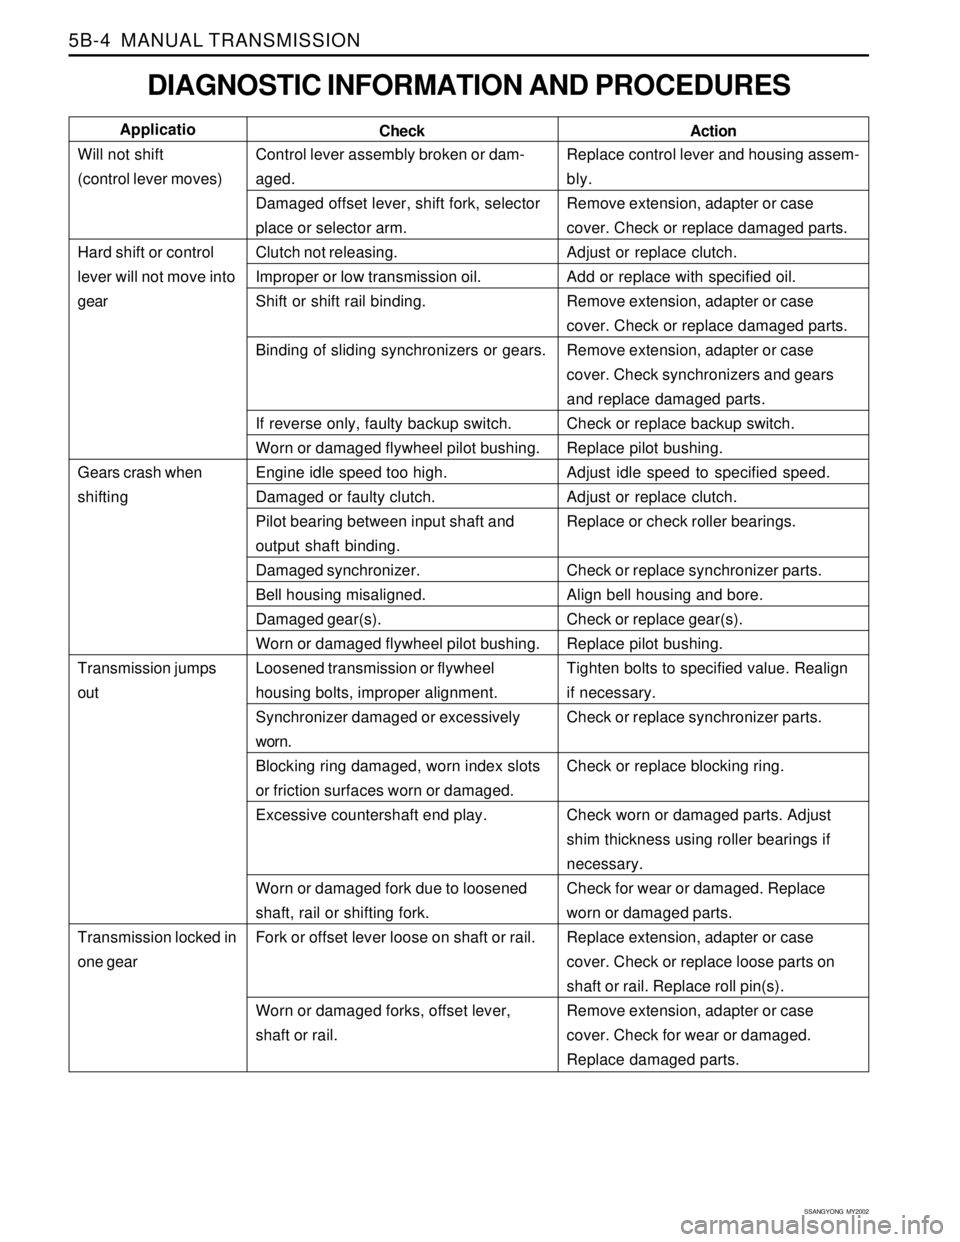
DIAGNOSTIC INFORMATION AND PROCEDURES
Control lever assembly broken or dam-
aged.
Damaged offset lever, shift fork, selector
place or selector arm.
Clutch not releasing.
Improper or low transmission oil.
Shift or shift rail binding.
Binding of sliding synchronizers or gears.
If reverse only, faulty backup switch.
Worn or damaged flywheel pilot bushing.
Engine idle speed too high.
Damaged or faulty clutch.
Pilot bearing between input shaft and
output shaft binding.
Damaged synchronizer.
Bell housing misaligned.
Damaged gear(s).
Worn or damaged flywheel pilot bushing.
Loosened transmission or flywheel
housing bolts, improper alignment.
Synchronizer damaged or excessively
worn.
Blocking ring damaged, worn index slots
or friction surfaces worn or damaged.
Excessive countershaft end play.
Worn or damaged fork due to loosened
shaft, rail or shifting fork.
Fork or offset lever loose on shaft or rail.
Worn or damaged forks, offset lever,
shaft or rail.Replace control lever and housing assem-
bly.
Remove extension, adapter or case
cover. Check or replace damaged parts.
Adjust or replace clutch.
Add or replace with specified oil.
Remove extension, adapter or case
cover. Check or replace damaged parts.
Remove extension, adapter or case
cover. Check synchronizers and gears
and replace damaged parts.
Check or replace backup switch.
Replace pilot bushing.
Adjust idle speed to specified speed.
Adjust or replace clutch.
Replace or check roller bearings.
Check or replace synchronizer parts.
Align bell housing and bore.
Check or replace gear(s).
Replace pilot bushing.
Tighten bolts to specified value. Realign
if necessary.
Check or replace synchronizer parts.
Check or replace blocking ring.
Check worn or damaged parts. Adjust
shim thickness using roller bearings if
necessary.
Check for wear or damaged. Replace
worn or damaged parts.
Replace extension, adapter or case
cover. Check or replace loose parts on
shaft or rail. Replace roll pin(s).
Remove extension, adapter or case
cover. Check for wear or damaged.
Replace damaged parts. Check Applicatio
Will not shift
(control lever moves)
Hard shift or control
lever will not move into
gear
Gears crash when
shifting
Transmission jumps
out
Transmission locked in
one gear
Action
Page 1314 of 2053

SSANGYONG MY2002
5B-6 MANUAL TRANSMISSION
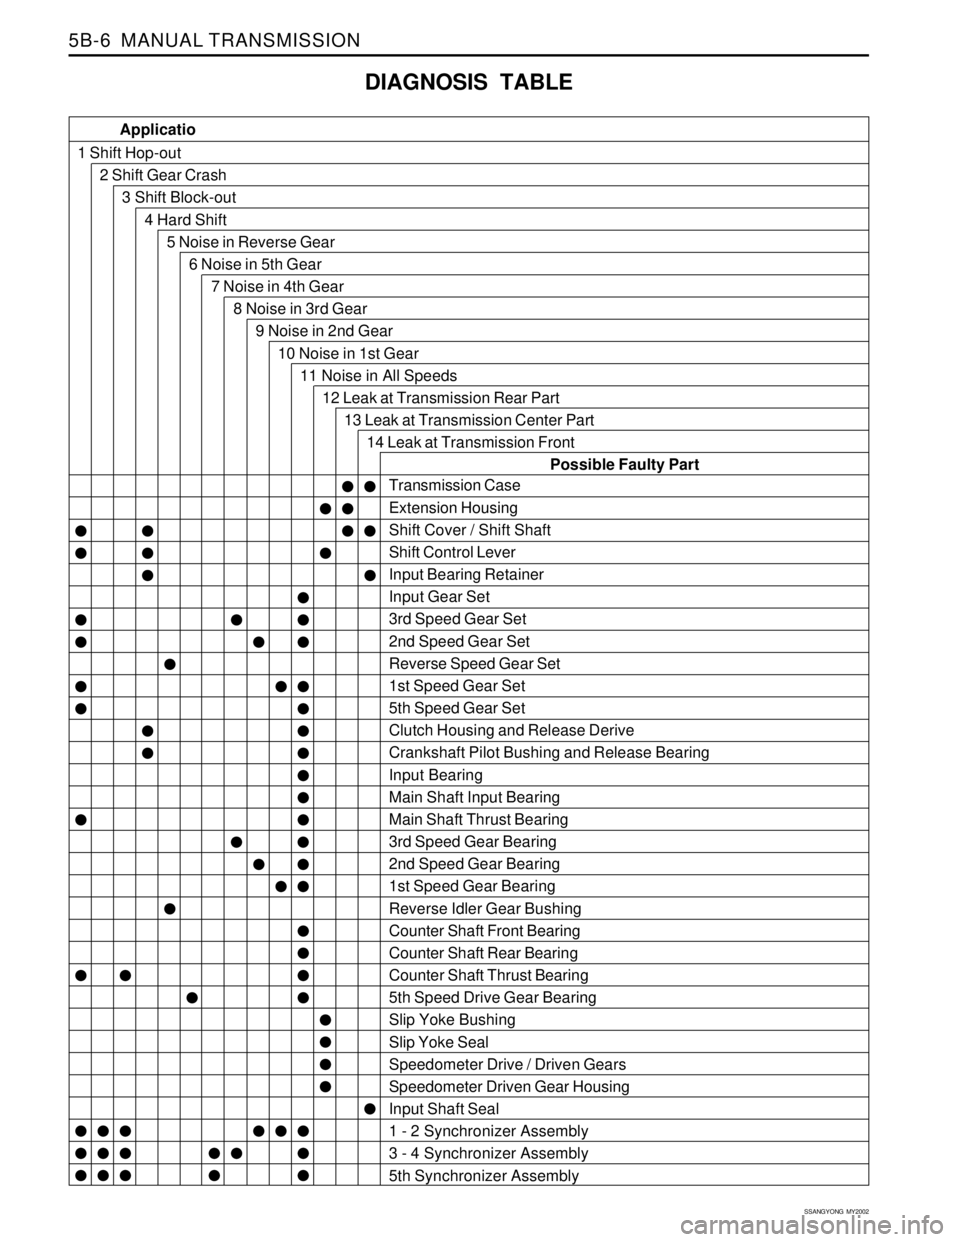
DIAGNOSIS TABLE
Transmission Case
Extension Housing
Shift Cover / Shift Shaft
Shift Control Lever
Input Bearing Retainer
Input Gear Set
3rd Speed Gear Set
2nd Speed Gear Set
Reverse Speed Gear Set
1st Speed Gear Set
5th Speed Gear Set
Clutch Housing and Release Derive
Crankshaft Pilot Bushing and Release Bearing
Input Bearing
Main Shaft Input Bearing
Main Shaft Thrust Bearing
3rd Speed Gear Bearing
2nd Speed Gear Bearing
1st Speed Gear Bearing
Reverse Idler Gear Bushing
Counter Shaft Front Bearing
Counter Shaft Rear Bearing
Counter Shaft Thrust Bearing
5th Speed Drive Gear Bearing
Slip Yoke Bushing
Slip Yoke Seal
Speedometer Drive / Driven Gears
Speedometer Driven Gear Housing
Input Shaft Seal
1 - 2 Synchronizer Assembly
3 - 4 Synchronizer Assembly
5th Synchronizer Assembly Applicatio
1 Shift Hop-out
2 Shift Gear Crash
3 Shift Block-out
4 Hard Shift
5 Noise in Reverse Gear
6 Noise in 5th Gear
7 Noise in 4th Gear
8 Noise in 3rd Gear
9 Noise in 2nd Gear
10 Noise in 1st Gear
11 Noise in All Speeds
12 Leak at Transmission Rear Part
13 Leak at Transmission Center Part
14 Leak at Transmission Front
Possible Faulty Part
Page 1320 of 2053

SSANGYONG MY2002
5B-12 MANUAL TRANSMISSION
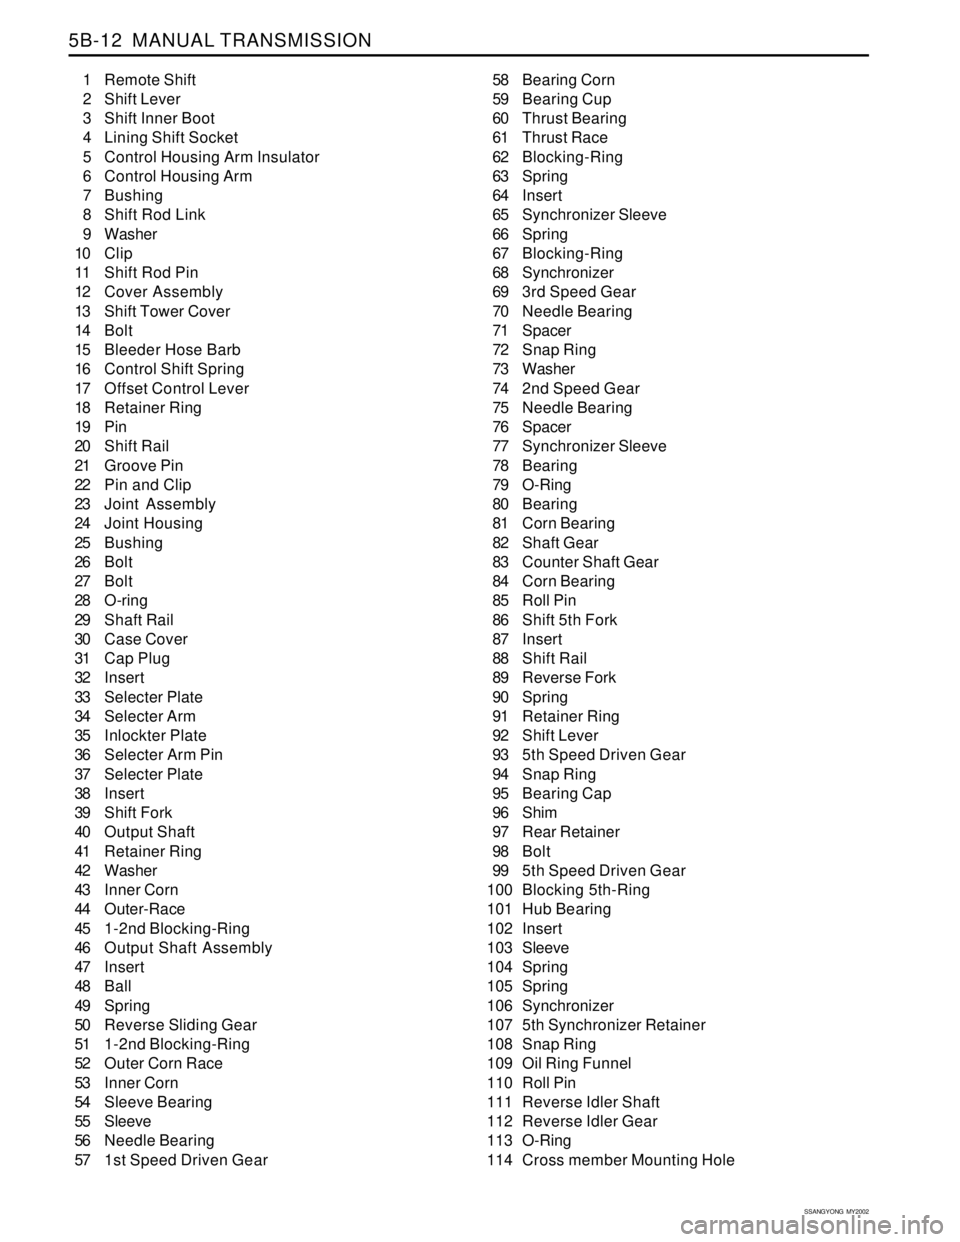
1 Remote Shift
2 Shift Lever
3 Shift Inner Boot
4 Lining Shift Socket
5 Control Housing Arm Insulator
6 Control Housing Arm
7 Bushing
8 Shift Rod Link
9 Washer
10 Clip
11 Shift Rod Pin
12 Cover Assembly
13 Shift Tower Cover
14 Bolt
15 Bleeder Hose Barb
16 Control Shift Spring
17 Offset Control Lever
18 Retainer Ring
19 Pin
20 Shift Rail
21 Groove Pin
22 Pin and Clip
23 Joint Assembly
24 Joint Housing
25 Bushing
26 Bolt
27 Bolt
28 O-ring
29 Shaft Rail
30 Case Cover
31 Cap Plug
32 Insert
33 Selecter Plate
34 Selecter Arm
35 Inlockter Plate
36 Selecter Arm Pin
37 Selecter Plate
38 Insert
39 Shift Fork
40 Output Shaft
41 Retainer Ring
42 Washer
43 Inner Corn
44 Outer-Race
45 1-2nd Blocking-Ring
46 Output Shaft Assembly
47 Insert
48 Ball
49 Spring
50 Reverse Sliding Gear
51 1-2nd Blocking-Ring
52 Outer Corn Race
53 Inner Corn
54 Sleeve Bearing
55 Sleeve
56 Needle Bearing
57 1st Speed Driven Gear58 Bearing Corn
59 Bearing Cup
60 Thrust Bearing
61 Thrust Race
62 Blocking-Ring
63 Spring
64 Insert
65 Synchronizer Sleeve
66 Spring
67 Blocking-Ring
68 Synchronizer
69 3rd Speed Gear
70 Needle Bearing
71 Spacer
72 Snap Ring
73 Washer
74 2nd Speed Gear
75 Needle Bearing
76 Spacer
77 Synchronizer Sleeve
78 Bearing
79 O-Ring
80 Bearing
81 Corn Bearing
82 Shaft Gear
83 Counter Shaft Gear
84 Corn Bearing
85 Roll Pin
86 Shift 5th Fork
87 Insert
88 Shift Rail
89 Reverse Fork
90 Spring
91 Retainer Ring
92 Shift Lever
93 5th Speed Driven Gear
94 Snap Ring
95 Bearing Cap
96 Shim
97 Rear Retainer
98 Bolt
99 5th Speed Driven Gear
100 Blocking 5th-Ring
101 Hub Bearing
102 Insert
103 Sleeve
104 Spring
105 Spring
106 Synchronizer
107 5th Synchronizer Retainer
108 Snap Ring
109 Oil Ring Funnel
110 Roll Pin
111 Reverse Idler Shaft
112 Reverse Idler Gear
113 O-Ring
114 Cross member Mounting Hole
Page 1505 of 2053

SSANGYONG MY2002
7A-4 HEATING AND VENTILATION SYSTEM
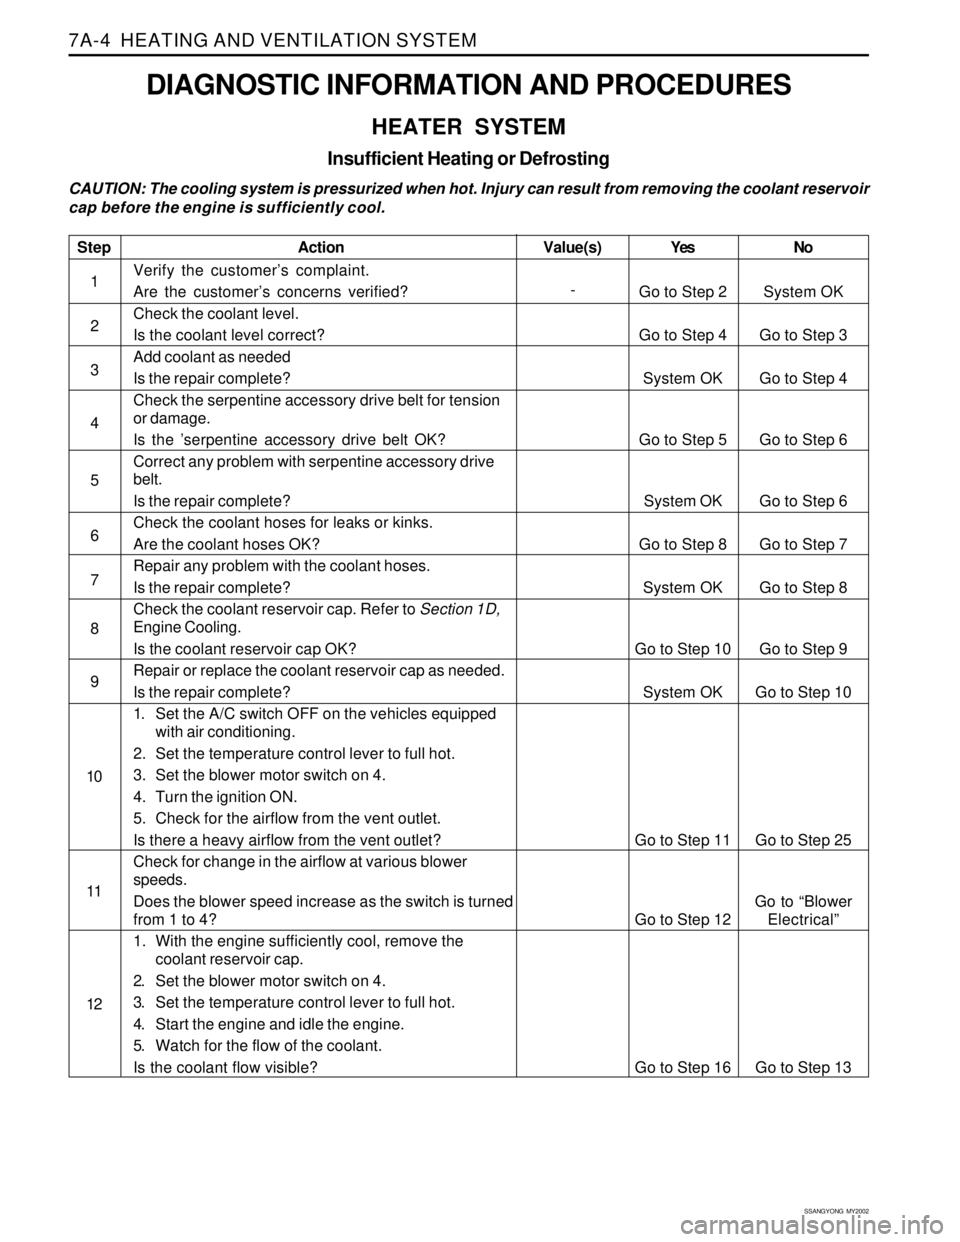
DIAGNOSTIC INFORMATION AND PROCEDURES
HEATER SYSTEM
Insufficient Heating or Defrosting
CAUTION: The cooling system is pressurized when hot. Injury can result from removing the coolant reservoir
cap before the engine is sufficiently cool.
Step
1
2
3
4
5
6
7
8
9
10
11
12
Action
Verify the customer’s complaint.
Are the customer’s concerns verified?
Check the coolant level.
Is the coolant level correct?
Add coolant as needed
Is the repair complete?
Check the serpentine accessory drive belt for tension
or damage.
Is the ’serpentine accessory drive belt OK?
Correct any problem with serpentine accessory drive
belt.
Is the repair complete?
Check the coolant hoses for leaks or kinks.
Are the coolant hoses OK?
Repair any problem with the coolant hoses.
Is the repair complete?
Check the coolant reservoir cap. Refer to Section 1D,
Engine Cooling.
Is the coolant reservoir cap OK?
Repair or replace the coolant reservoir cap as needed.
Is the repair complete?
1. Set the A/C switch OFF on the vehicles equipped
with air conditioning.
2. Set the temperature control lever to full hot.
3. Set the blower motor switch on 4.
4. Turn the ignition ON.
5. Check for the airflow from the vent outlet.
Is there a heavy airflow from the vent outlet?
Check for change in the airflow at various blower
speeds.
Does the blower speed increase as the switch is turned
from 1 to 4?
1. With the engine sufficiently cool, remove the
coolant reservoir cap.
2. Set the blower motor switch on 4.
3. Set the temperature control lever to full hot.
4. Start the engine and idle the engine.
5. Watch for the flow of the coolant.
Is the coolant flow visible?Yes
Go to Step 2
Go to Step 4
System OK
Go to Step 5
System OK
Go to Step 8
System OK
Go to Step 10
System OK
Go to Step 11
Go to Step 12
Go to Step 16No
System OK
Go to Step 3
Go to Step 4
Go to Step 6
Go to Step 6
Go to Step 7
Go to Step 8
Go to Step 9
Go to Step 10
Go to Step 25
Go to “Blower
Electrical”
Go to Step 13 Value(s)
-
Page 1547 of 2053
SSANGYONG MY2002
7C-18 MANUAL & SEMIAUTO-HVAC
Total Oil Capacity 265 cc
COMPRESSOR OIL
REPLACEMENT
Before Oil Replacement
When any part is replaced or there are a lot of gas
leaks in the A/C system, you should add the specified
amount of the oil to keep the approval oil capacity
because the oil for lubricating the compressor
circulates through the A/C system during operating
the compressor.
Handling Oil
Be careful that moistures, dusts etc. must not flow
into the oil.
Do not mix with any other material.
If the oil leaves outside for long time, it’s possible
to mix it with the moistures and so keep the oil
sealed with a container.
Circulating Oil
For checking or adjusting the oil level, set the control
unit to full cold and max blower speed with keeping
the engine run at idle for 20 - 30 minutes in order to
circulate the oil through the compressor.