1997 OLDSMOBILE BRAVADA clock
[x] Cancel search: clockPage 215 of 358
Storing a Flat or Spare Tire and Tools
' CAT' I ION:
Storing a jack, a tire or other equipment in the
passenger compartment of the vehicle could
cause in.jury. In a sudden stop
or collision, loose
equipment could strike someone. Store
all these
in the proper place.
An aluminum wheel with a flat tire should always
be stored under the vehicle with the hoist.
However, storing it that way for an extended
period could damage the wheel.
To avoid this,
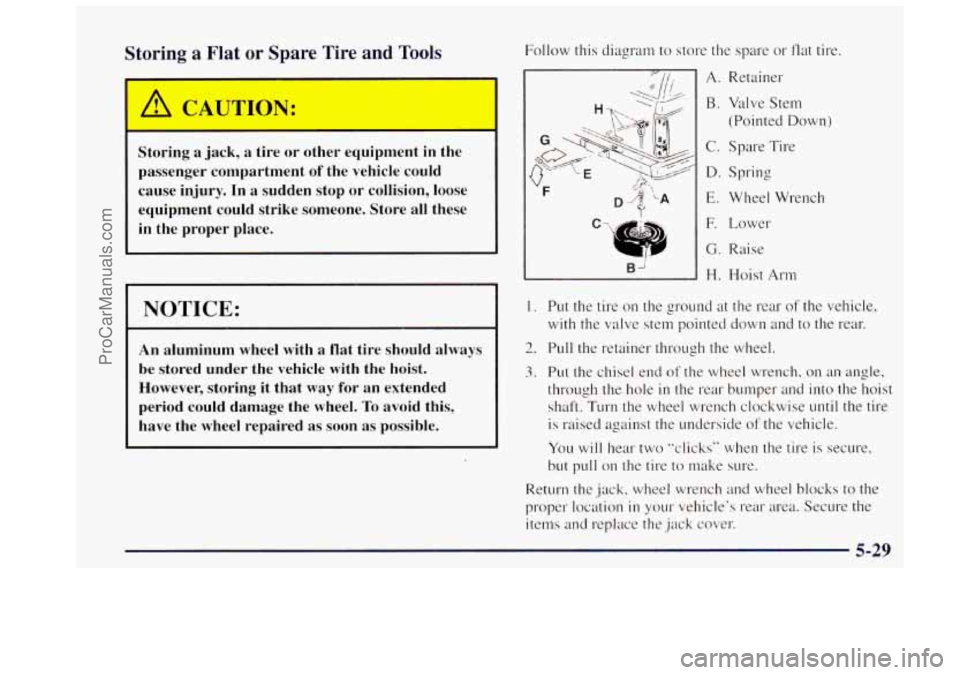
have the wheel repaired as soon as possible. Follow this diagram
to store the spare or flat tire.
BJ
A. Retainer
B. Valve
Stem
(Pointed Down)
C. Spare Tire
D. Spring
E. Wheel Wrench
F. Lower
G. Raise
H. Hoist
Arm
1. Put the tire on the ground at the rear of the vehicle.
with the valve stem pointed down and to the rear.
2. P~dl the retainer through the wheel.
3. Put the chisel end of the wheel wrench. on an angle,
through the hole
in the rear bumper and into the hoist
shaft. Turn the wheel wrench clockwise
until the tire
is raised against the underside of the vehicle.
You will hear two "clicks" when the tire is secure,
but pull on the tire to make sure.
Return
the jack. wheel wrench and wheel blocks to the
proper location
in your vehicle's rear area. Secure the
items and replace the
jack cove]:
5-29
- _-
ProCarManuals.com
Page 225 of 358
Filling Your Tank
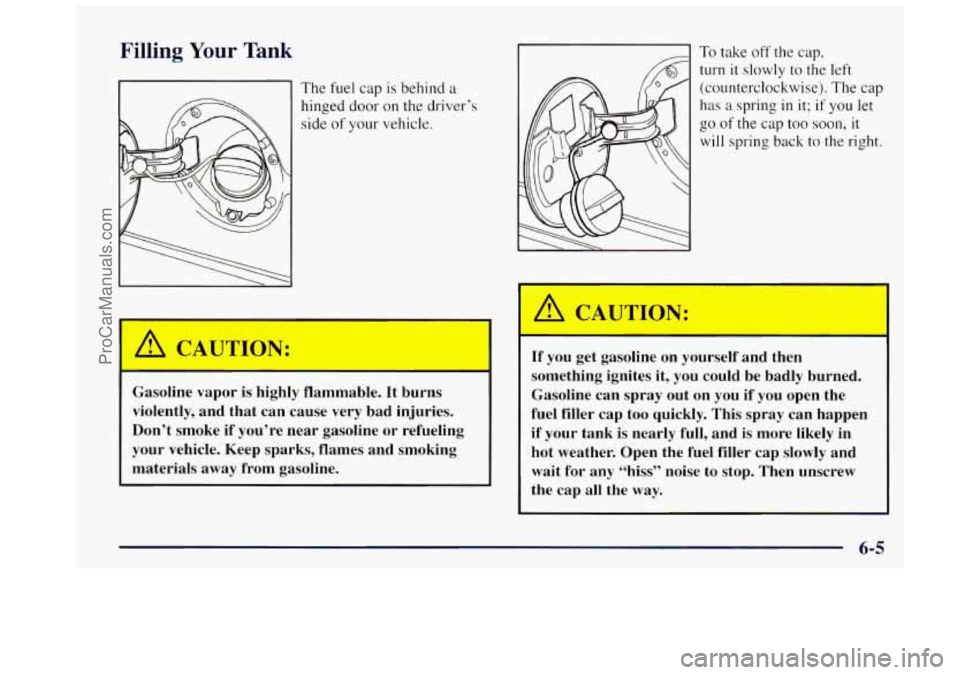
The fuel cap is behind a
hinged door
on the driver’s
side
of your vehicle.
’
I A CAUTION: I
Gasoline vapor is highly flammable. It burns
violently, and that can cause very bad injuries.
Don’t smoke
if you’re near gasoline or refueling
your vehicle. Keep sparks, flames and smoking
materials away from gasoline.
To take off the cap,
turn
it slowly to the left
(counterclockwise). The cap
has a spring in it; if you let
go of the cap too soon, it
will
spring back to the right.
I A CAUTION:
If you get gasoline on yourself and then
something ignites it, you could be badly burned.
Gasoline can spray out on you if you open the
fuel filler cap too quickly. This spray can happen
if your tank is nearly full, and is more likely in
hot weather. Open the fuel filler cap slowly and
wait for any “hiss” noise to stop. Then unscrew
the cap
all the way.
ProCarManuals.com
Page 226 of 358
Be careful not to spill gasoline, Clean gasoline from
painted surfaces as soon
as possible. See “Cleaning the
Outside
of Your Oldsmobile” in the Index.
When you put
the cap back on, turn it to the right
(clockwise) until
you hear a clicking sound. Make sure
you fully install the cap. The diagnostic system can
determine
if the fuel cap has been left off or improperly
installed.
This would allow fuel to evaporate into the
atmosphere. See “Malfunction Indicator Lamp” in
the Index.
I I
I NOTICE:
If you need a new cap, be sure to get the right
type. Your retailer can get one for you.
If you get
the wrong type, it may not fit properly. This may
cause your malfunction indicator lamp to light and your fuel tank and emissions system may be
damaged. See “Malfunction Indicator Lamp’’ in
the Index.
Checking Things Under the Hood
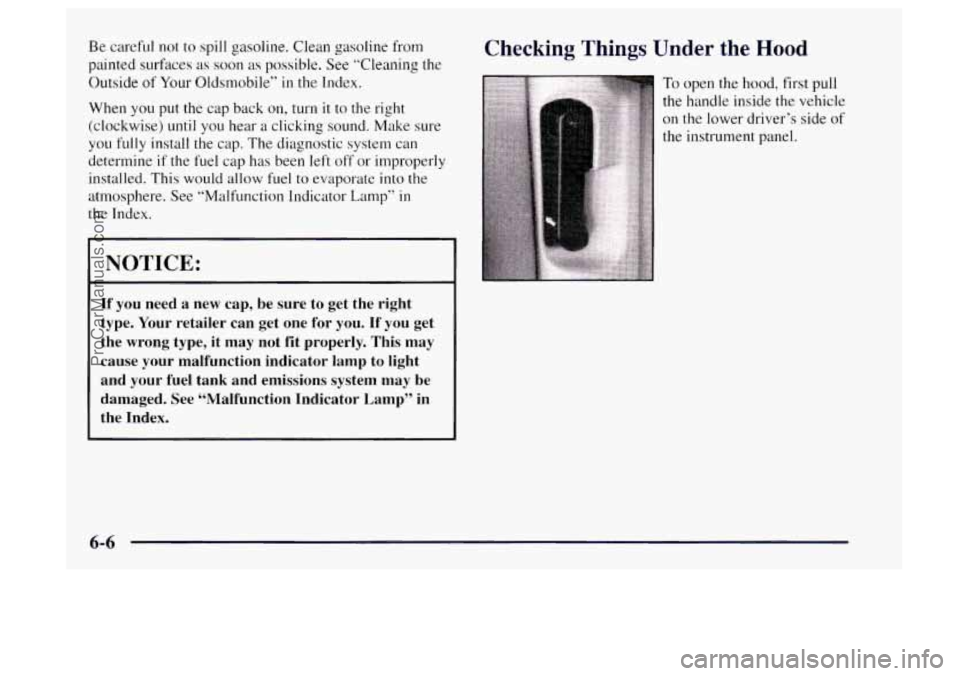
To open the hood, first pull
the handle inside the vehicle
on the lower driver’s side
of
the instrument panel.
6-6
ProCarManuals.com
Page 251 of 358

5. Turn the bulb
counterclockwise to
remove it.
6. Put the new bulb into the headlarnp lens assembly
and turn
it clockwise until it is tight.
7. Plug in the electrical connector.
8. Put the headlamp lens assembly back into the
vehicle. Install and tighten the screws.
Front Turn Signal Lamps
1. Remove the headlamp assembly.
2. Reach down and behind the turn signal
lamp assembly.
3. Turn the socket counterclockwise and pull it out.
4. Holding the base of the bulb, pull the bulb straight
out
of the socket.
5. Push the new bulb into the socket until it clicks.
6. Put the socket back into the turn signal lamp assembly
and
turn it clockwise until it locks into place.
6-31
ProCarManuals.com
Page 252 of 358
Center High-Mounted Stoplamp
1. Remove the two screws.
2. Pull the lamp assembly out.
3. Turn the socket counterclockwise and pull it out.
4. Holding the base of the bulb, pull the bulb straight
out
of the socket.
5. Reverse the steps to install a new bulb.
Taillamps
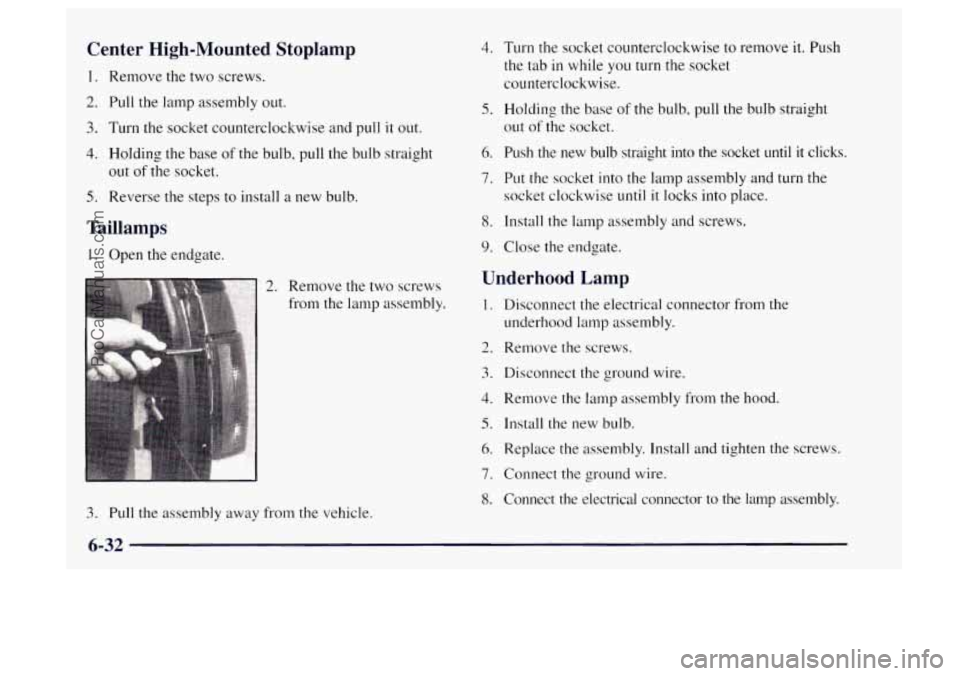
1. Open the endgate.
2. Remove the two screws
from the lamp assembly.
4.
5.
6.
7.
8.
9.
Turn the socket counterclockwise to remove it. Push
the tab
in while you turn the socket
counterclockwise.
Holding the base
of the bulb, pull the bulb straight
out
of the socket.
Push the new bulb straight into the socket until it clicks.
Put the socket into the lamp assembly and turn the
socket clockwise
until it locks into place.
Install the lamp assembly and screws.
Close the endgate.
Underhood Lamp
1. Disconnect the electrical connector from the
underhood lamp assembly.
2. Remove the screws.
3. Disconnect the ground wire.
4. Remove the lamp assembly from the hood.
5. Install the new bulb.
6. Replace the assembly. Install and tighten the screws.
7. Connect the ground wire.
8. Connect the electrical connector to the lamp assembly.
3. Pull the assembly away from the vehicle.
6-32
ProCarManuals.com
Page 275 of 358
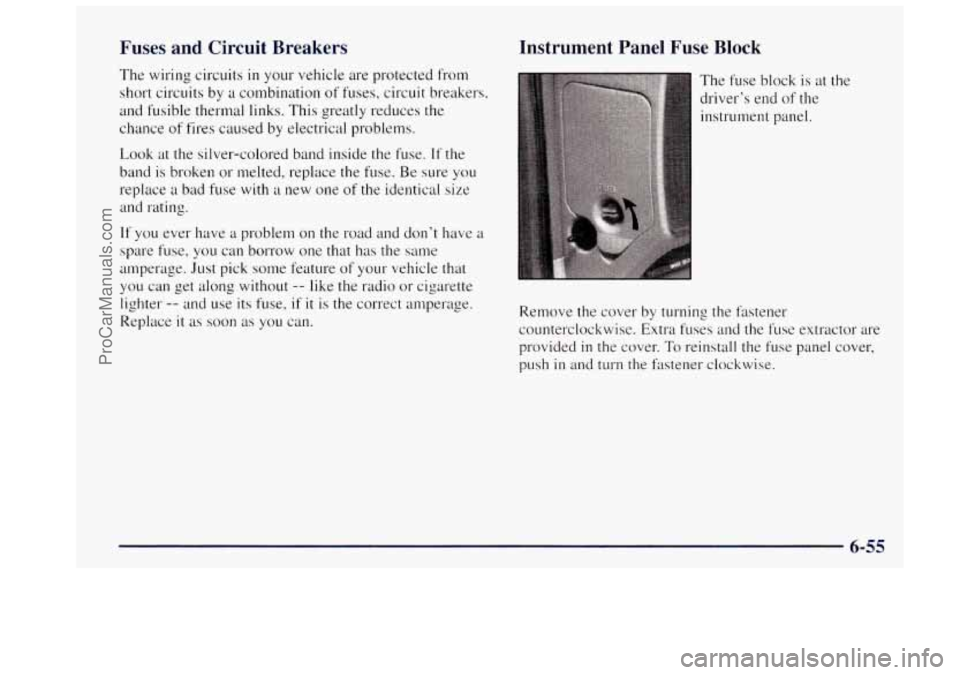
Fuses and Circuit Breakers
The wiring circuits in your vehicle are protected from
short circuits by a combination of fuses, circuit breakers,
and fusible thermal links. This greatly reduces the
chance of fires caused by electrical problems.
Look at the silver-colored band inside the fuse.
If the
band
is broken or melted, replace the fuse. Be sure you
replace a bad fuse
with a new one of the identical size
and rating.
If you ever have a problem on the road and don’t have a
spare fuse, you can borrow one that has the
same
amperage. Just pick some feature of your vehicle that
you can get along without
-- like the radio or cigarette
lighter
-- and use its fuse, if it is the correct amperage.
Replace
it as soon as you can.
Instrument Panel Fuse Block
The fuse block is at the
driver’s end
of the
instrument panel.
Remove the cover by turning the fastener
counterclockwise. Extra fuses and
the fuse extractor are
provided
in the cover. To reinstall the fuse panel cover,
push
in and turn the fastener clockwise.
6-55
ProCarManuals.com
Page 277 of 358

FuseKircuit Breaker Usage
4
5
6
7
A/C Compressor Relay, Cluster
Chime Module, DRL Relay Coil,
Four-Wheel-Drive Indicator Lamp,
DRL Module, Rear Defog Timer,
Transfer Case Control Module Ignition, SIR Redundant Ignition,
RKE Ignition, Fuel Sender Module
Oxygen Sensor Heater, Exhaust Gas
Recirculation, Cam Sensor, CANN.
Purge, Canister Vent Solenoid, Mass
Airflow Sensor, Cam Shaft Sensor
Blower Motor, Temperature Door
Motor, HI Blower Relay Coil
Power Auxiliary Outlets, Assembly
Line Diagnostic Link
FuseKircuit
Breaker Usage
8
9
10
11
12
13
14
15
Rear Window Defogger
PCMNCM Battery, Fuel Pump
PCMNCM Ignition, Injectors, Crank
Sensor, Coil Driver Module
Radio, Inside Rearview Mirror Map
Lamp, Overhead Console Reading
Lamps, Rear Wiper, Rear Washer,
Overhead Console Display
Anti-Lock Braking System,
VCM IGN-3
Clock, Radio Battery, CD Player
A/C Compressor Battery Feed
Daytime Running Lamps, Fog Lamps,
Fog Lamp Relay
6-57
ProCarManuals.com
Page 345 of 358

Climate Control System ........................... 3-2
Clock.Setting
................................... 3-6
Comfort Controls
................................ 3- 1
Compact Disc Care ............................. 3- 16
Compass
...................................... 2-37
Control of a Vehicle
.............................. 4-6
Convenience Net
............................... 2-40
Convex Outside Mirror
.......................... 2-35
Coolant
....................................... 6-20
Coolant Heater. Engine .......................... 2- 14
Courtesy Transportation
........................... 8-6
Cruise Control
................................. 2-28
Customer Assistance Information
................... 8- 1
Customer Satisfaction Procedure .................... 8-2
Damage. Finish
............................... 6-51
Damage. Sheet Metal
............................ 6-50
Daytime Running Lamps
......................... 2-32
Indicator Light
............................... 2-60
Dead Battery ................................... 5-3
Defects. Reporting Safety
......................... 8-8
Defensive Driving
............................... 4-2
Defogging and Defrosting
......................... 3-5
Dimensions. Vehicle
............................ 6-6 1
Dome Lamps .................................. 2-34 Door
Locks ....................................... 2-4
Storage
..................................... 2-39
Driver Info~-mation System
....................... 2-37
Driver Position ................................. 1 . 12
Driving
........................................ 4-1
Cily ........................................ 4-33
Defensive
.................................... 4-2
Drunken
..................................... 4-3
Foreign Countries
.............................. 6-4
Freeway .................................... 4-34
Guidelines
.................................. 4-15
Hill and Mountain Roads
....................... 4-36
In a Blizzard ................................. 4-40
Night ...................................... 4-28
On Curves
.......................... : ........ 4-9
Rainy Conditions
............................. 4-30
Snowy and Icy Conditions
...................... 4-38
Through Deep Standing Water
................... 4-32
WetRoads
.................................. 4-30
Winter
...................................... 4-38
With
a Trailer ................................ 4-49
Driving On Grades While Towing
a Trailer ........... 4-51
Drunken Driving
................................ 4-3
Off-Road
................................... 4-15
ProCarManuals.com