1997 NISSAN QUEST seat adjustment
[x] Cancel search: seat adjustmentPage 14 of 247
mains on, see your NISSAN dealer imme-
diately.
CAUTION
Do not continue driving if the belt is
loose, broken or missing.
Low fuel warning light
This light comes on when the fuel level in
the fuel tank is getting low. Refuel as soon
as it is convenient, preferably before the fuel
gauge reaches E. There should be a small
reserve of fuel in the tank when the fuel
gauge needle reaches E.
Door ajar warning light
This light comes on when any of the doors
are not closed securely while the ignition
key is ON.
Seat belt warning light and
chime
The light and chime remind you to fasten
your seat belts. If the driver's seat belt is
NOT securely fastened when the ignition
key is turned to ON or START, the chime
sounds four times and the light illuminates.Refer to ``Seat belts'' in the ``Pre-driving
checks and adjustments'' section for pre-
cautions on seat belt usage.
Supplemental air bag
warning light
When the ignition key is in the ON or START
position, the supplemental air bag warning
light illuminates for about 7 seconds and
then turns off. This means the Air Bag
Supplemental Restraint System is opera-
tional.
If any of the following conditions occur, the
supplemental air bag system needs servic-
ing and your vehicle should be taken to your
nearest authorized NISSAN dealer as soon
as practical:
1. The supplemental air bag warning light
does not come on for 7 seconds and then
go off as described above.
2. The supplemental air bag warning light
flashes intermittently or remains on.
3. The supplemental air bag warning light
does not come on at all.
Unless checked and repaired, the Air Bag
Supplemental Restraint System may not
function properly. For additional details, see``Supplemental restraint system'' in the ``Pre-
driving checks and adjustments'' section.
WARNING
If the supplemental air bag warning
light is on, it could mean that the
supplemental air bag will not operate in
an accident.
Low washer fluid warning
light
This light comes on when the washer res-
ervoir fluid is at a low level. Add washer fluid
as necessary. See the ``Do-it-yourself op-
erations'' section.
Brake warning light
This light functions for both the parking
brake and the foot brake systems.
The light comes on when the parking brake
is applied, and also warns of a low brake
fluid level. If the light comes on while the
engine is running with the parking brake not
applied, stop the vehicle and perform the
following:
1. Check the brake fluid level. Add brake
fluid as necessary. See ``Brake fluid'' in
1-7
ZX
Page 33 of 247

2Pre-driving checks and adjustments
Key .........................................................................2-2
Door locks ..............................................................2-2
Manual door lock ....................................................2-2
Child safety sliding door lock .................................2-4
Power door lock (if so equipped) ...........................2-5
Multi-remote control system (if so equipped).........2-7
Battery replacement ...............................................2-8
Illuminated entry system ........................................2-9
Hood release ........................................................2-10
Rear door lock ......................................................2-11
Cargo net (if so equipped) ...................................2-13
Luggage rack (if so equipped) .............................2-14
Fuel filler lid and cap ............................................2-15
Seats/floor mats ...................................................2-15
Seating arrangements ..........................................2-15
Floor mat positioning ............................................2-17
Seven passenger seating ....................................2-17Three-passenger bench seat in storage
position .................................................................2-17
Five passenger seating ........................................2-18
Five passenger seating with cargo room .............2-18
Three-passenger bench seat in fully forward
position .................................................................2-19
Floor mat positioning aid ......................................2-20
Seat positions .......................................................2-21
With second row bench seat................................2-21
With second row bucket seats .............................2-24
Seats ....................................................................2-26
Manual front seat adjustment...............................2-26
Power front seat adjustment
(if so equipped) ....................................................2-28
Head restraints .....................................................2-30
Armrests ...............................................................2-30
Underseat storage tray.........................................2-31
Tabletop seats ......................................................2-31
ZX
Page 59 of 247
MANUAL FRONT SEAT
ADJUSTMENT
WARNING
cDo not adjust the driver's seat while
driving. The seat may move sud-
denly and could cause loss of con-
trol of the vehicle.
cAfter adjustment, gently rock in the
seat to make sure it is securely
locked.
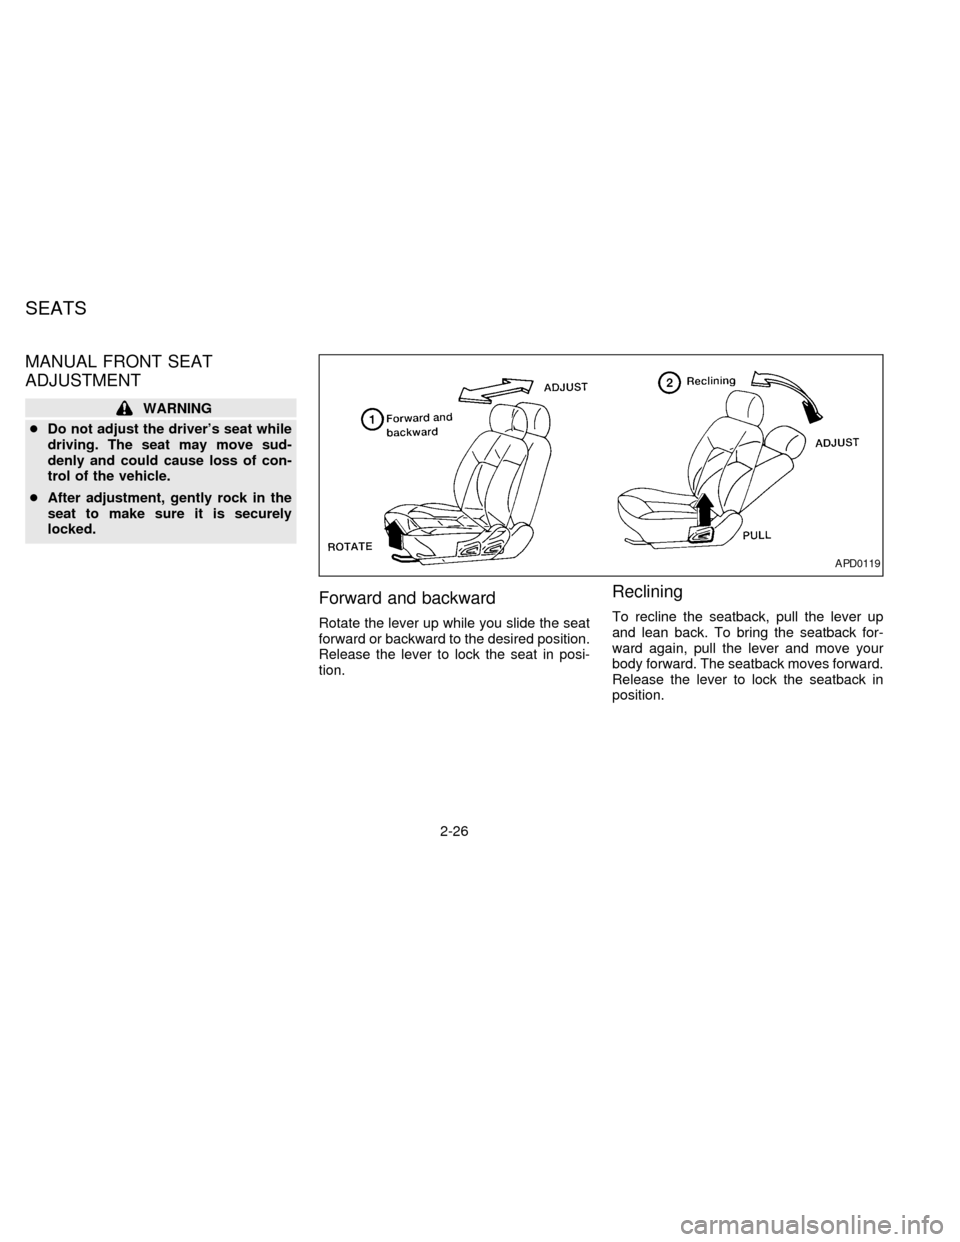
Forward and backward
Rotate the lever up while you slide the seat
forward or backward to the desired position.
Release the lever to lock the seat in posi-
tion.
Reclining
To recline the seatback, pull the lever up
and lean back. To bring the seatback for-
ward again, pull the lever and move your
body forward. The seatback moves forward.
Release the lever to lock the seatback in
position.
APD0119
SEATS
2-26
ZX
Page 61 of 247
POWER FRONT SEAT
ADJUSTMENT (if so equipped)
WARNING
Do not adjust the driver's seat while driv-
ing. The seat may move suddenly and
could cause loss of control of the vehicle.
cDo not leave children unattended in-
side the vehicle. They could unknow-
ingly activate switches or controls. Un-
attended children could become
involved in serious accidents.
Operating tips
cThe motor has an auto-reset overload
protection circuit. If the motor stops dur-
ing operation, wait 30 seconds, then re-
activate the switch.
cDo not operate the power support seat
for a long period of time when the engine
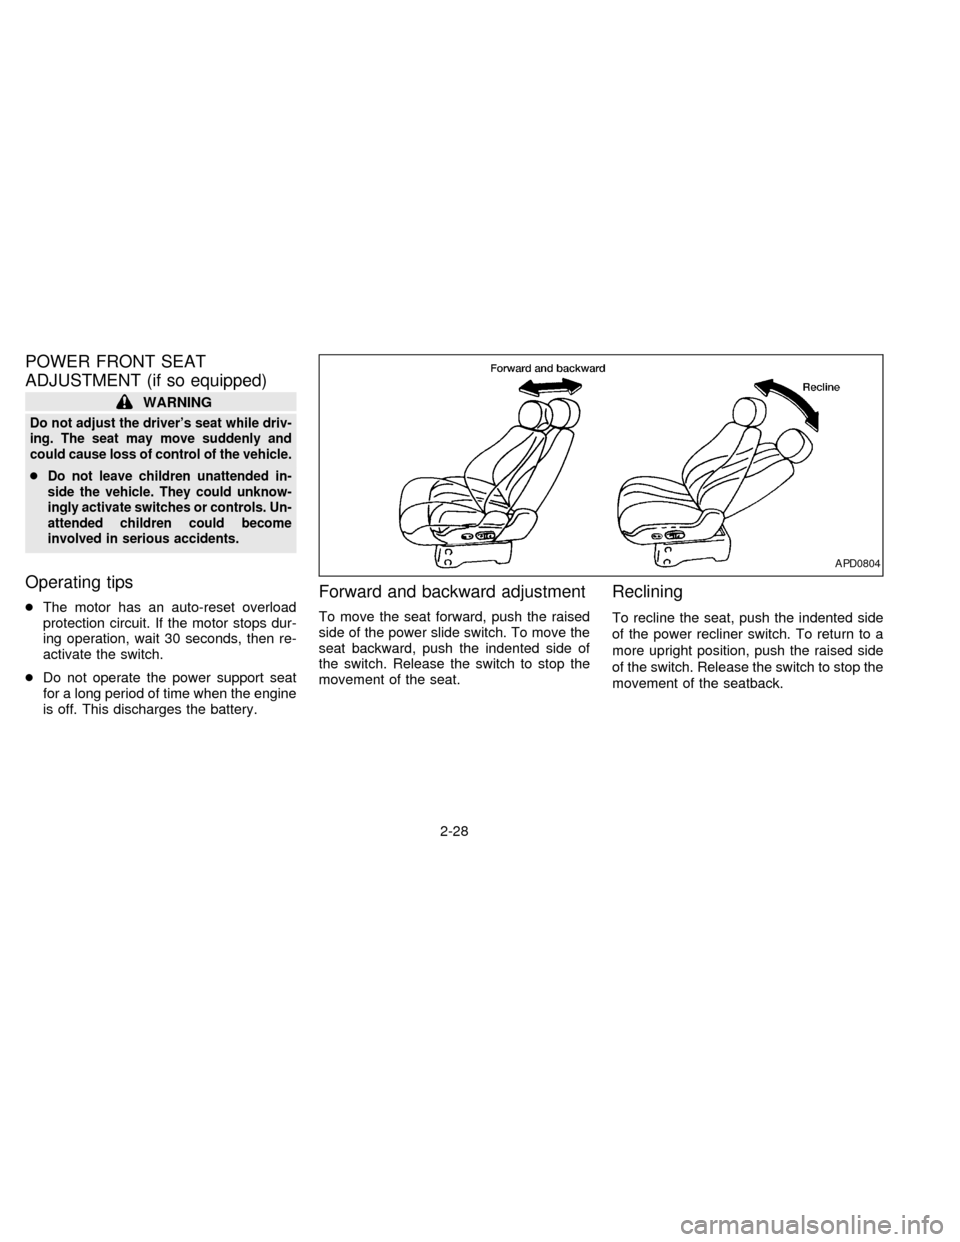
is off. This discharges the battery.Forward and backward adjustment
To move the seat forward, push the raised
side of the power slide switch. To move the
seat backward, push the indented side of
the switch. Release the switch to stop the
movement of the seat.
Reclining
To recline the seat, push the indented side
of the power recliner switch. To return to a
more upright position, push the raised side
of the switch. Release the switch to stop the
movement of the seatback.
APD0804
2-28
ZX
Page 62 of 247

Seat height adjustment
To raise the height of the seat, push the
raised side of the power seat height switch
and release it when the desired position has
been reached. To lower the height of the
seat, push the indented side of the switch
and release it when the desired position has
been reached.
Lumbar support
To inflate the lumbar support, push the
raised side of the power lumbar switch and
release it when the desired position has
been reached. To deflate the lumbar sup-
port, push the indented side of the switch.
The power lumbar pump motor continues to
operate after the lumbar support is fully
inflated. Release the switch when the lum-
bar stops inflating.
APD0555APD0805APD0806
2-29
ZX
Page 63 of 247
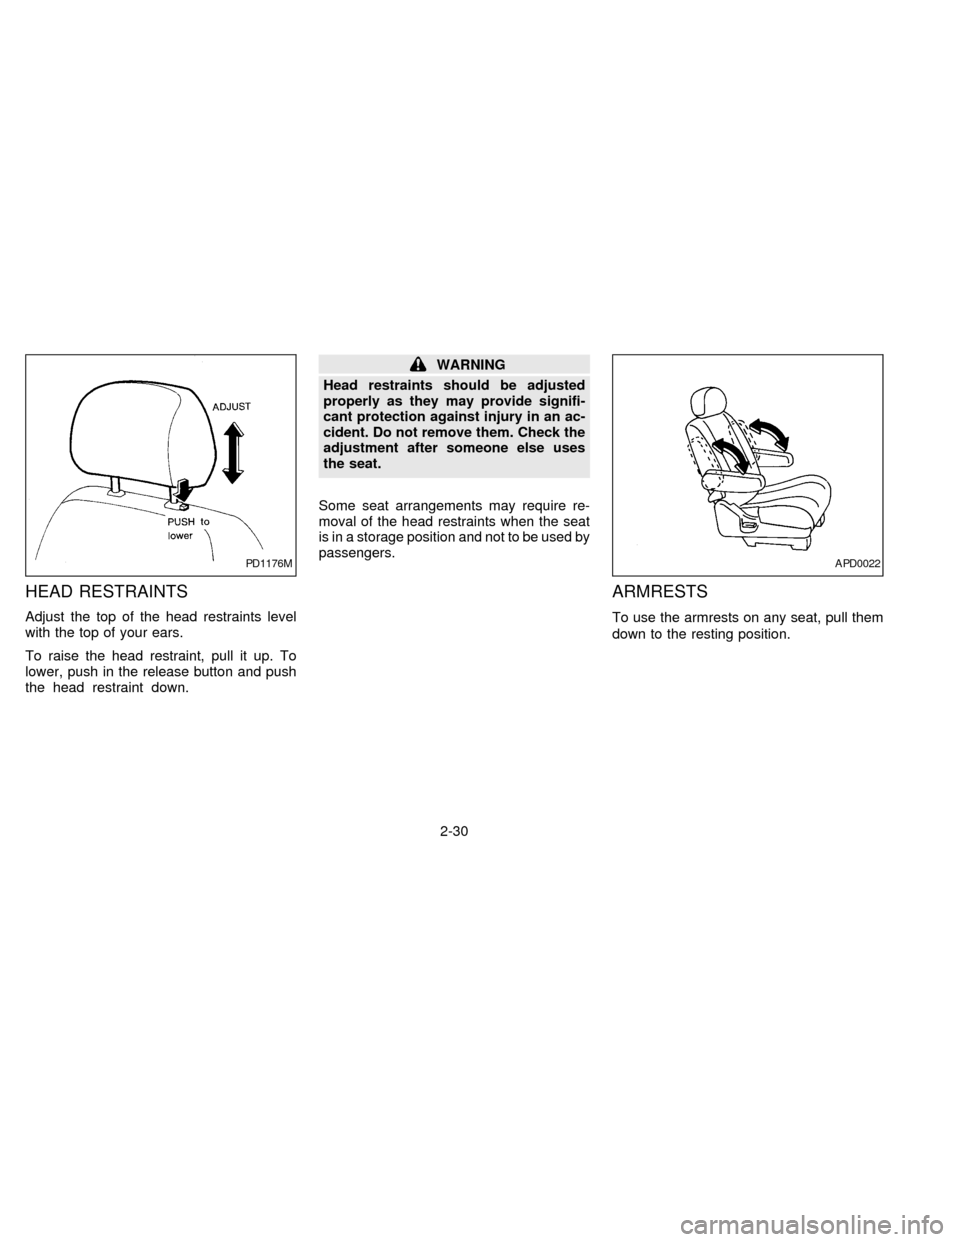
HEAD RESTRAINTS
Adjust the top of the head restraints level
with the top of your ears.
To raise the head restraint, pull it up. To
lower, push in the release button and push
the head restraint down.
WARNING
Head restraints should be adjusted
properly as they may provide signifi-
cant protection against injury in an ac-
cident. Do not remove them. Check the
adjustment after someone else uses
the seat.
Some seat arrangements may require re-
moval of the head restraints when the seat
is in a storage position and not to be used by
passengers.
ARMRESTS
To use the armrests on any seat, pull them
down to the resting position.
PD1176MAPD0022
2-30
ZX
Page 65 of 247
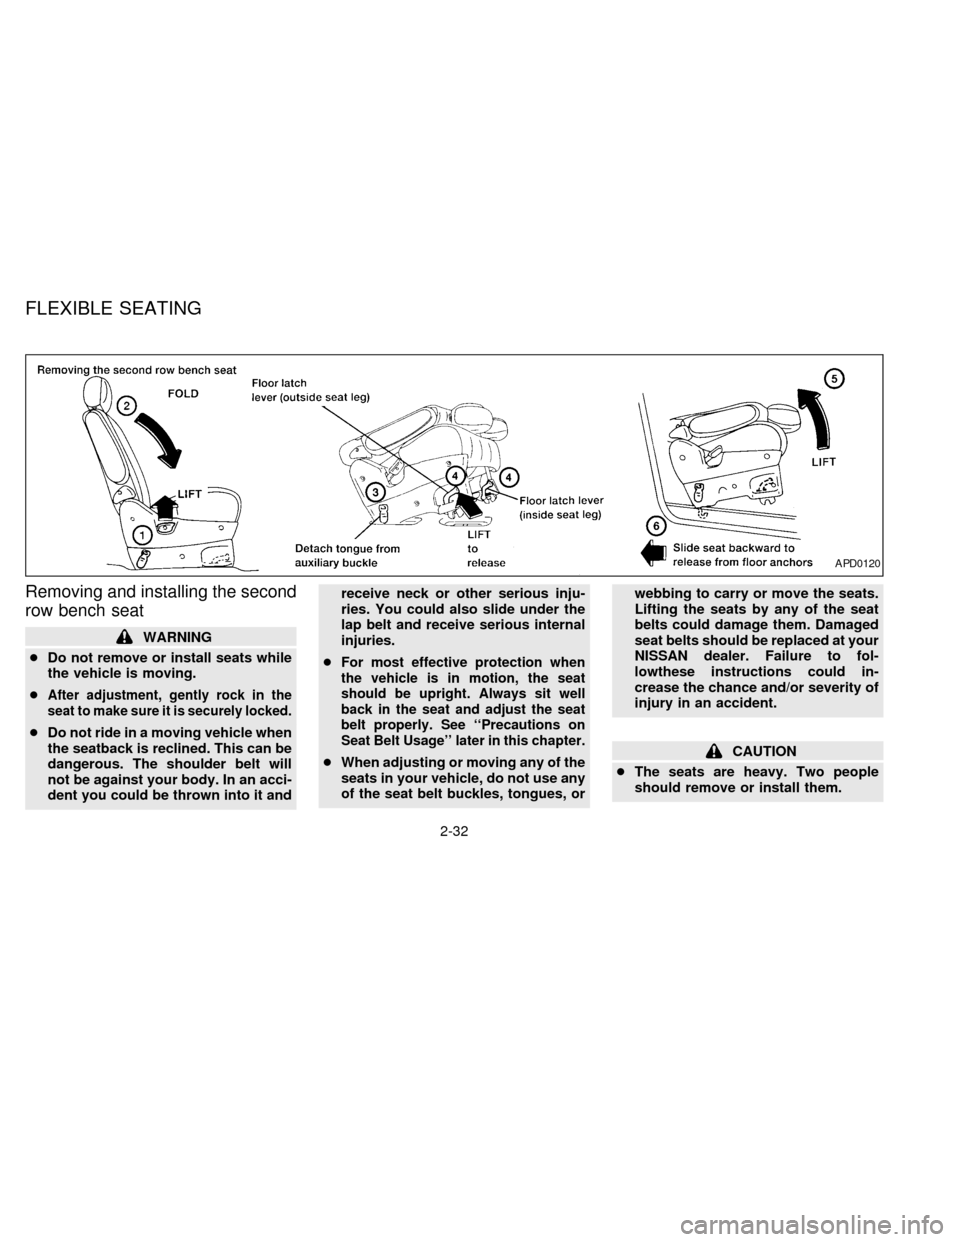
Removing and installing the second
row bench seat
WARNING
cDo not remove or install seats while
the vehicle is moving.
c
After adjustment, gently rock in the
seat to make sure it is securely locked.
cDo not ride in a moving vehicle when
the seatback is reclined. This can be
dangerous. The shoulder belt will
not be against your body. In an acci-
dent you could be thrown into it andreceive neck or other serious inju-
ries. You could also slide under the
lap belt and receive serious internal
injuries.
c
For most effective protection when
the vehicle is in motion, the seat
should be upright. Always sit well
back in the seat and adjust the seat
belt properly. See ``Precautions on
Seat Belt Usage'' later in this chapter.
cWhen adjusting or moving any of the
seats in your vehicle, do not use any
of the seat belt buckles, tongues, orwebbing to carry or move the seats.
Lifting the seats by any of the seat
belts could damage them. Damaged
seat belts should be replaced at your
NISSAN dealer. Failure to fol-
lowthese instructions could in-
crease the chance and/or severity of
injury in an accident.CAUTION
cThe seats are heavy. Two people
should remove or install them.
APD0120
FLEXIBLE SEATING
2-32
ZX
Page 67 of 247
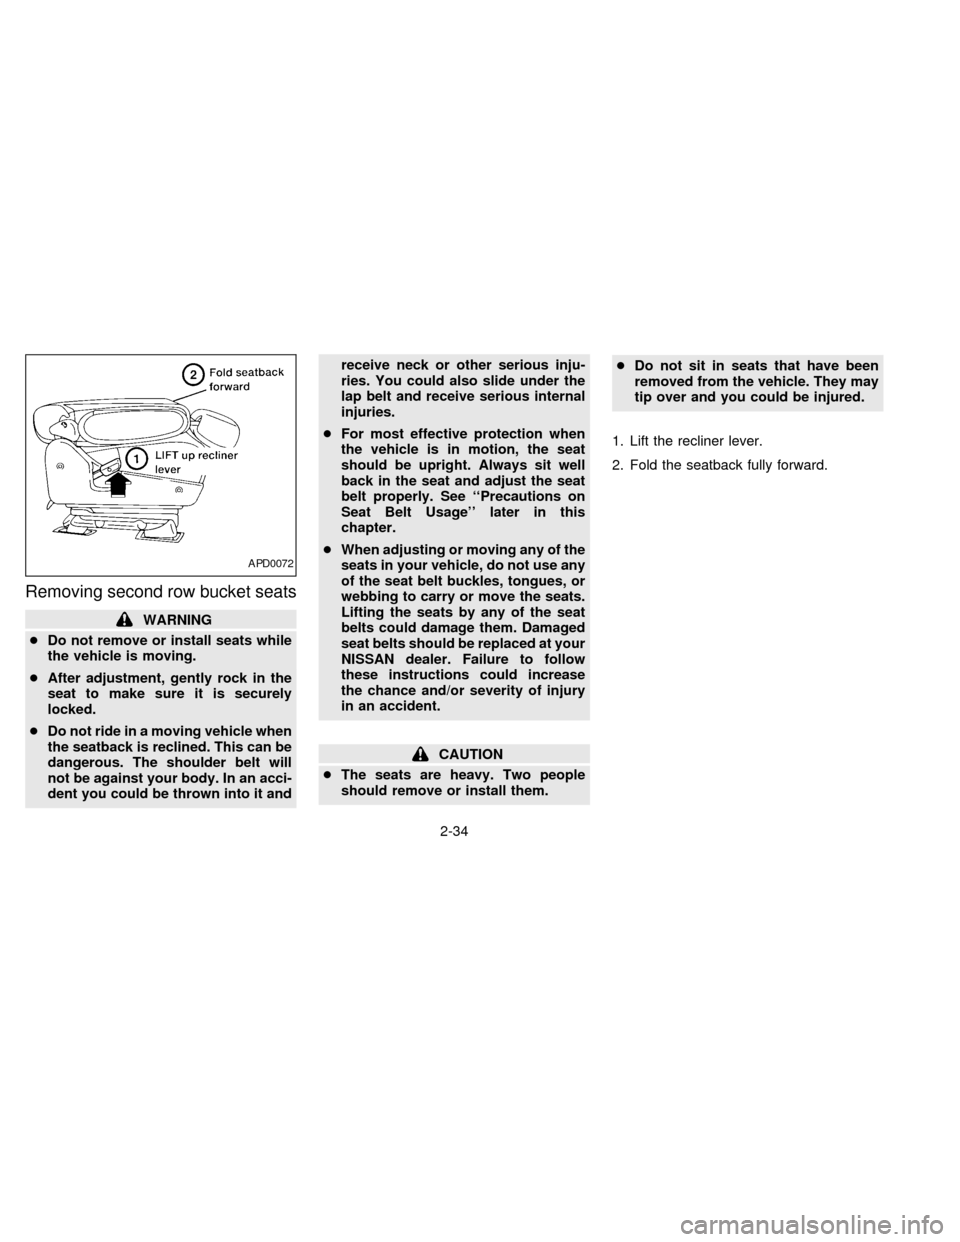
Removing second row bucket seats
WARNING
cDo not remove or install seats while
the vehicle is moving.
cAfter adjustment, gently rock in the
seat to make sure it is securely
locked.
cDo not ride in a moving vehicle when
the seatback is reclined. This can be
dangerous. The shoulder belt will
not be against your body. In an acci-
dent you could be thrown into it andreceive neck or other serious inju-
ries. You could also slide under the
lap belt and receive serious internal
injuries.
cFor most effective protection when
the vehicle is in motion, the seat
should be upright. Always sit well
back in the seat and adjust the seat
belt properly. See ``Precautions on
Seat Belt Usage'' later in this
chapter.
cWhen adjusting or moving any of the
seats in your vehicle, do not use any
of the seat belt buckles, tongues, or
webbing to carry or move the seats.
Lifting the seats by any of the seat
belts could damage them. Damaged
seat belts should be replaced at your
NISSAN dealer. Failure to follow
these instructions could increase
the chance and/or severity of injury
in an accident.
CAUTION
cThe seats are heavy. Two people
should remove or install them.cDo not sit in seats that have been
removed from the vehicle. They may
tip over and you could be injured.
1. Lift the recliner lever.
2. Fold the seatback fully forward.
APD0072
2-34
ZX