1997 NISSAN QUEST ESP
[x] Cancel search: ESPPage 37 of 247
WARNING
c
Always have the doors locked while
driving. Along with the use of seat
belts, this provides greater safety in
the event of an accident by helping to
prevent persons from being thrown
from the vehicle. This also helps keep
children and others from unintention-
ally opening the doors, and will help
keep out intruders.
cBefore opening any door, always look
for and avoid oncoming traffic.
cDo not leave children unattended in-
side the vehicle. They could unknow-
ingly activate switches or controls. Un-
attended children could become
involved in serious accidents.
CAUTION
c
Always use the door handle to open or
close the sliding door. Do not attempt to
open or close the door by merely plac-
ing your hand on the door edge or door
slide roller, as this may cause injury.
cWhen opening the sliding door on a
slope, ensure that it is fully open and
that it does not close by itself.
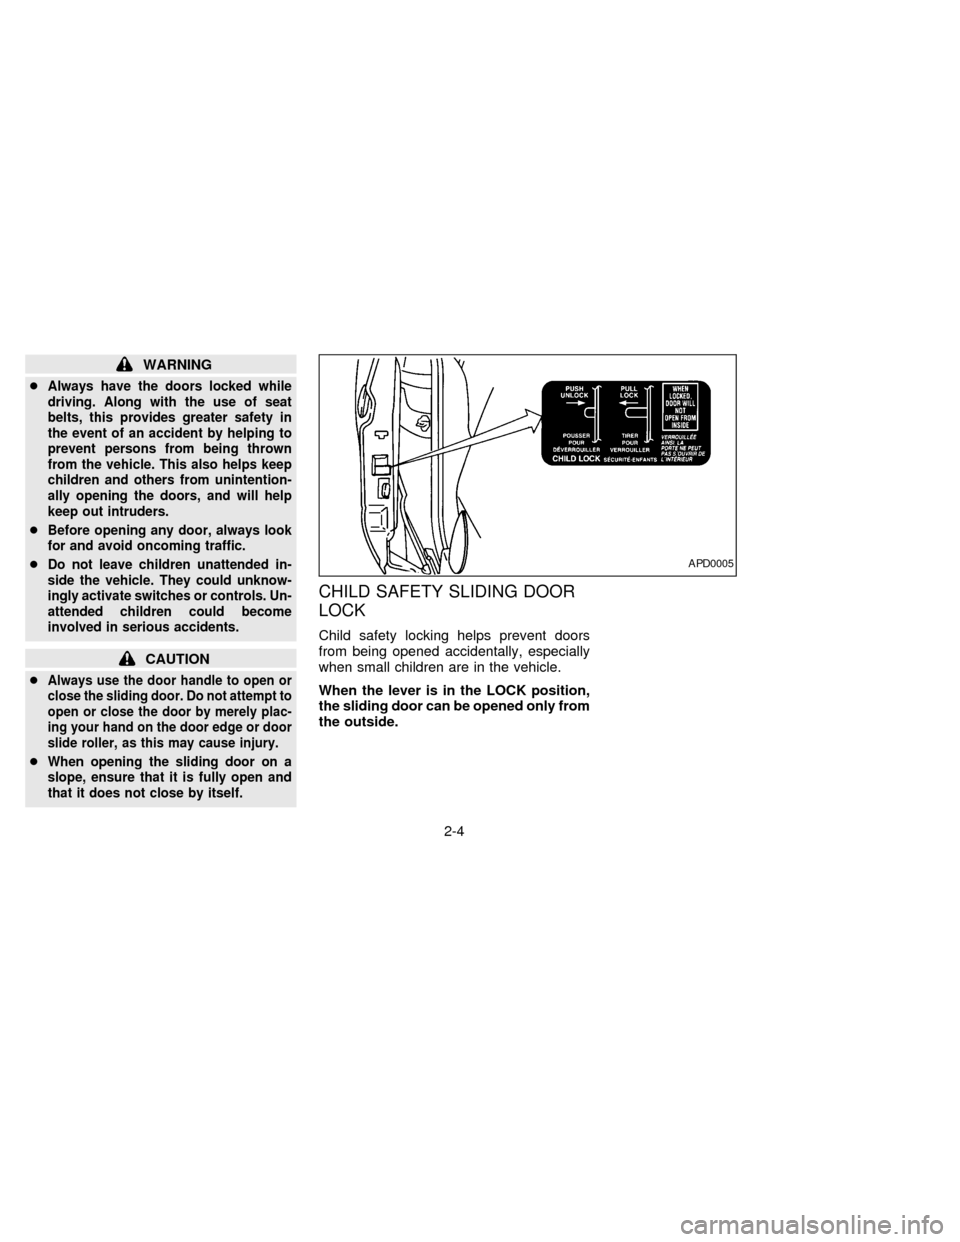
CHILD SAFETY SLIDING DOOR
LOCK
Child safety locking helps prevent doors
from being opened accidentally, especially
when small children are in the vehicle.
When the lever is in the LOCK position,
the sliding door can be opened only from
the outside.
APD0005
2-4
ZX
Page 110 of 247
child safety seat, allow the right shoul-
der harness to retract over the right
shoulder and securely restrain the child.
A clicking sound is heard as the har-
ness retracts, indicating that the retrac-
tor is in the automatic locking mode. Be
sure the left shoulder harness is also
properly positioned over the child's left
shoulder.
11. Check that the shoulder harness is in
the automatic locking mode by trying to
pull the shoulder harness out of the
retractor. If you cannot pull any of the
shoulder harness webbing out of the
retractor, the shoulder harness is in the
automatic locking mode. If the shoulder
harness is not locked, repeat step 10. If,
after repeated attempts, the integrated
child safety seat shoulder harness can-
not be placed in the automatic locking
mode, do not use the integrated child
safety seat and have it inspected by
your NISSAN dealer.
To cancel the automatic locking mode, un-
buckle the chest clip and both shoulder
harness tongues. Allow the shoulder har-
nesses to retract completely. The automatic
locking mode is now canceled and theshoulder harness retractor is in the emer-
gency locking mode.
WARNING
The automatic locking mode (child re-
straint mode) must be reactivated each
time you place a child in the integrated
child safety seats.
In addition to the automatic locking retrac-
tors, the integrated child safety seat shoul-
der harnesses are equipped with emer-
gency locking retractors. The automatic
locking mode is best to use, especially for
children who need help staying properly
positioned in the seat and its harnesses (for
example, children who are younger and
smaller), because the belts are always
locked. In the emergency locking mode, the
shoulder belts only lock in a sudden stop or
accident, allowing a child more freedom of
movement. Use the emergency locking
mode only if you judge your child able to
remain properly positioned in the integrated
child safety seat.
Removing the child
1. Release the chest clip.
2. Release the left and right shoulder har-ness tongues from the belt buckle by
pressing the red belt buckle button.
3. Move the left and right shoulder har-
nesses aside and assist the child from
the integrated child safety seat.
Storing the Integrated Child Safety
Seat
1. Be sure the shoulder harnesses are fully
retracted and resting inside the inte-
grated child safety seat recess. It is not
necessary to reconnect the shoulder har-
nesses and belt buckle prior to storing
the integrated child safety seat.
2. While holding onto, but not pulling, the
cushion release strap, rotate the cushion
upward until it fits flush with the second
row seat back cushion and locks into
position.
3. Be sure the integrated child safety seat is
locked in the stowed position by grasping
the safety seat cushion and attempting to
lower it without pulling the cushion re-
lease strap. If the integrated child safety
seat is not locked in the stowed position,
repeat steps 1 through 3.
2-77
ZX
Page 126 of 247

To operate the rear seat heater and air
conditioner, the engine must be running.
The rear seat heater and air conditioner can
be turned on and off from the front controls. If
the rear seat fan control lever on the front
panel is set to OFF, the rear heater and air
conditioner is turned off. If it is set to any of
the fan speed positions, air is discharged
from the rear vents at the corresponding
speed. When the rear seat fan control lever
on the front panel is set to REAR, the rear
seat passengers control their own fan speed.
The rear seat air conditioner only works when
the front seat air conditioner is operating.
CONTROLS
Fan control dial
This dial turns the fan on and off, and
controls fan speed.
Temperature control dial
This dial allows you to adjust the tempera-
ture of the outlet air. A slight delay in
temperature change may be experienced
while the climate control system warms up.
c
On vehicles equipped with Electronic Au-
tomatic Temperature Control (EATC), out-
let air temperature is automatically con-trolled when the rear seat fan control lever
on the front panel is set to 1, 2, 3, or 4.
Vent switch
The vent switch allows you to select air flow
from the upper or lower vents.
cA slight delay may be experienced when
changing the vent selection. This is not a
problem; the delay is only the system
motors and solenoids switching from one
outlet to another.
AHA0555
REAR SEAT HEATER AND AIR
CONDITIONER (if so equipped)
3-13
ZX
Page 129 of 247
TUNING
WARNING
The radio should not be tuned while
driving in order that full attention may
be given to the driving operation.
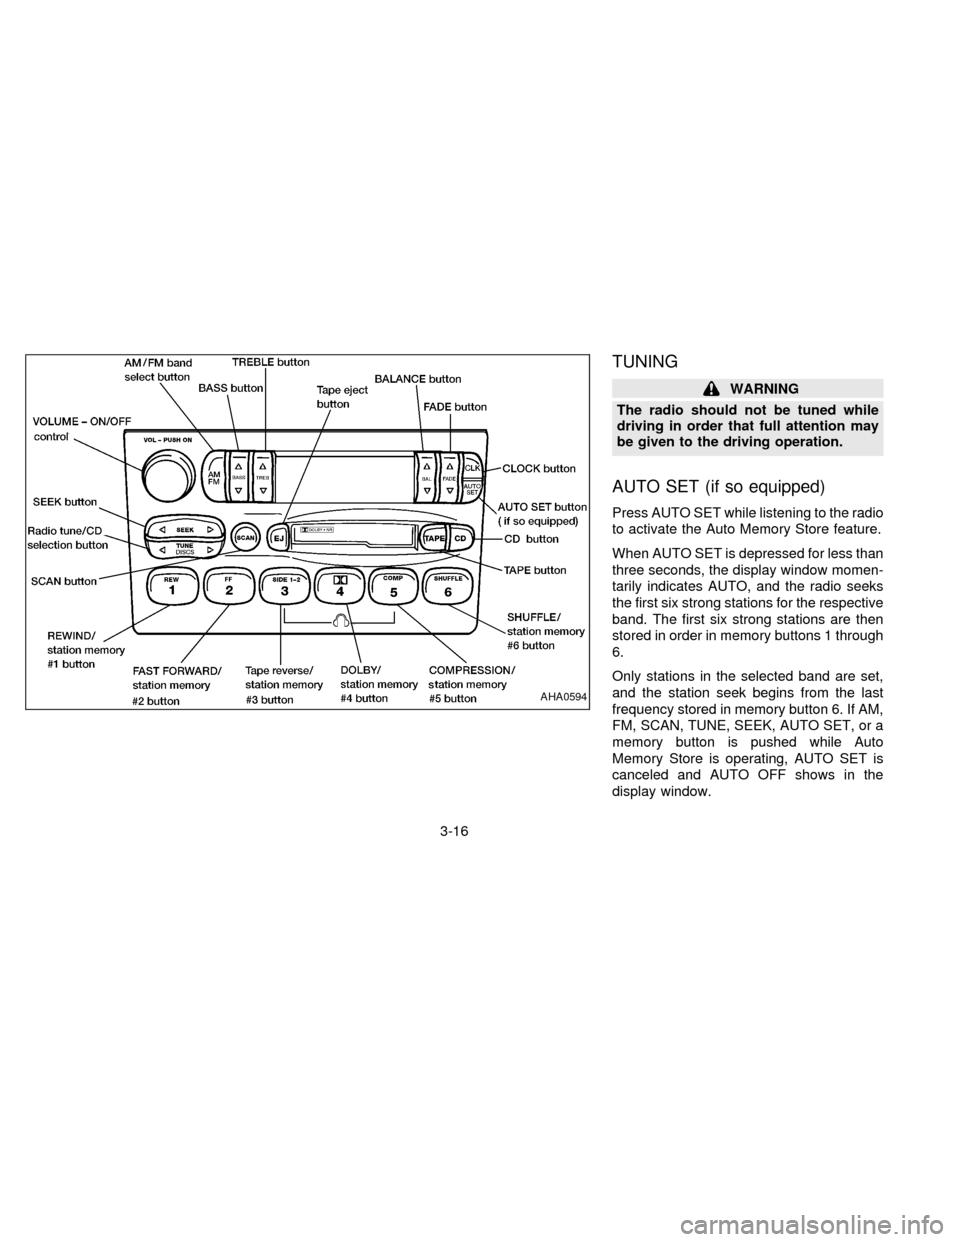
AUTO SET (if so equipped)
Press AUTO SET while listening to the radio
to activate the Auto Memory Store feature.
When AUTO SET is depressed for less than
three seconds, the display window momen-
tarily indicates AUTO, and the radio seeks
the first six strong stations for the respective
band. The first six strong stations are then
stored in order in memory buttons 1 through
6.
Only stations in the selected band are set,
and the station seek begins from the last
frequency stored in memory button 6. If AM,
FM, SCAN, TUNE, SEEK, AUTO SET, or a
memory button is pushed while Auto
Memory Store is operating, AUTO SET is
canceled and AUTO OFF shows in the
display window.
AHA0594
3-16
ZX
Page 133 of 247
Manual antenna
The manual antenna on your vehicle re-
mains in the up position at all times. The
antenna cannot be shortened, but can be
removed. When you need to remove the
antenna, turn its base counterclockwise.
Power antenna (if so equipped)
The power antenna automatically extends
when the radio is turned on, and retracts
when turned off or when a tape or CD is
played. If the radio is left on, the antenna
retracts and extends with the ignition key
OFF-ON operation.
CAUTION
cBefore turning the radio on, make
sure that there is no one near the
antenna outlet and there is enough
space for it to extend.
cTo prevent damage, be sure that the
power antenna is fully retracted be-
fore the vehicle enters an automated
car wash.cDirt and other foreign matter on the
power antenna rod may interrupt its
operation. Clean the rod periodically
with a damp cloth. This type of
cleaning is especially important dur-
ing the winter seasons in areas
where road salt and other chemicals
may be spread on the road surfaces
and splashed onto the antenna rod.
ANTENNA
3-20
ZX
Page 147 of 247
nates. When cruising at a low speed
or climbing a gentle slope, you may
feel uncomfortable shift shocks as
the transmission shifts between 3rd
and overdrive repeatedly. In this
case, press the overdrive switch.
The O/D OFF indicator light comes
on at this time.
When driving conditions change, press the
overdrive switch again. The O/D OFF indi-
cator light goes out.
Remember not to drive at high speeds for
extended periods of time with the O/D OFF
light illuminated. This reduces the fuel
economy.1. Apply the parking brake.
2. Move the selector lever to P (Park) or N
(Neutral). (P preferred.)
The shift lever cannot be moved out of
P and into any of the other gear posi-
tions under the following conditions:
cThe ignition key is turned to the
OFF position.
cThe ignition key is turned to the ON
position without depressing the
foot brake pedal.
The starter is designed not to operate
if the selector lever is in one of the
driving positions.
3. Crank the enginewith your foot off the
accelerator pedalby turning the ignition
key to START. Release the key when the
engine starts. If the engine starts, but
fails to run, repeat the above procedure.
Ð If the engine is very hard to start in
extremely cold or hot weather, de-
press the accelerator pedal and hold it
to help start the engine.Ð In the summer, when restarting the
engine within 30 minutes after it has
been stopped, keep the accelerator
pedal slightly depressed while start-
ing.
CAUTION
Do not operate the starter for more than
15 seconds at a time. If the engine does
not start, turn the key off and wait 10
seconds before cranking again, other-
wise the starter could be damaged.
4. Warm-up
Allow the engine to idle for at least 30
seconds after starting. Drive at moderate
speeds for a short distance first, espe-
cially in cold weather.
STARTING THE ENGINE
4-8
ZX
Page 153 of 247
The power assisted steering is designed to
use a hydraulic pump, driven by the engine,
to aid steering.
If the engine stops or the drive belt breaks,
you still have control of the vehicle. How-
ever, much greater steering effort is
needed, especially in sharp turns or at low
speeds.The brake system has two separate hydrau-
lic circuits. If one circuit develops a problem
you will still have braking at two wheels.
Vacuum assisted brake
The brake booster aids braking by using
engine vacuum. If the engine stops, you can
stop the vehicle by depressing the brake
pedal. However, greater foot pressure on
the brake pedal is required to stop the
vehicle, and the stopping distance is longer.
Wet brakes
When the vehicle is washed or driven
through water, the brakes may get wet. As a
result, your braking distance is longer and
the vehicle may pull to one side during
braking.
To dry brakes, drive the vehicle at a safe
speed while lightly pressing the brake pedal
to heat up the brakes. Do this until the
brakes return to normal. Avoid driving the
vehicle at high speeds until the brakes
function correctly.
Using the brakes
Avoid resting your foot on the brake pedal
while driving. This overheats the brakes,
wears out the brake linings and pads fasterand reduces gas mileage.
To help save the brakes and to prevent the
brakes from overheating, reduce speed and
downshift to a lower gear before going down
a slope or long grade. Overheated brakes
may reduce braking performance and could
result in loss of vehicle control.
WARNING
While driving on a slippery surface, be
careful when braking, accelerating or
downshifting. Abrupt braking actions
or sudden acceleration could cause the
wheels to skid and result in an acci-
dent.
POWER STEERING SYSTEM BRAKE SYSTEM
4-14
ZX
Page 154 of 247
The anti-lock brake system controls the
brakes at each wheel so the wheels do not
lock when braking abruptly or when braking
on slippery surfaces. The system detects the
rotation speed at each wheel and varies the
brake fluid pressure to prevent each wheel
from locking and sliding. By preventing wheel
lockup, the system helps the driver maintain
steering control and helps to minimize swerv-
ing and spinning on slippery surfaces.
Using the system
Depress the brake pedal and hold it down.
WARNING
Do not pump the brake pedal. Doing so
may result in increased stopping dis-
tances.
Normal operation
The anti-lock brake system does not operate
at speeds below 3 to 6 MPH (5 to 10 km/h) to
completely stop the vehicle. (The speeds vary
according to road conditions.) When the anti-
lock system senses one or more wheels are
close to locking up, the actuator (under the
hood) rapidly applies and releases hydraulic
pressure (like pumping the brakes veryquickly). While the actuator is working, you
may feel a pulsation in the brake pedal and
hear a noise or vibration from the actuator
under the hood. This is normal and indicates
the anti-lock system is working properly. How-
ever, the pulsation may indicate road condi-
tions are hazardous and extra care is required
while driving.
Self-test feature
The anti-lock brake system consists of elec-
tronic sensors, electric pumps, and hydraulic
solenoids controlled by a computer. The com-
puter has a built-in diagnostic feature that
tests the system each time you start the
engine and move the vehicle at a low speed in
forward or reverse. When the self-test occurs,
you may hear a ``clunk'' noise and/or feel a
pulsation in the brake pedal. This is normal
and is not an indication of any malfunction. If
the computer senses any malfunction, it
switches the anti-lock brake system OFF and
turns on the ABS brake warning light in the
dashboard. The brake system then operates
normally, but without anti-lock assistance.
If the light comes on during the self-test, or
while driving, take your vehicle to your NIS-
SAN dealer for repair at your earliest conve-
nience.
WARNING
The anti-lock brake system is a sophis-
ticated device, but it cannot prevent
accidents resulting from careless or
dangerous driving techniques. It can
help maintain vehicle control during
braking on slippery surfaces, but re-
member that the stopping distance on
slippery surfaces will be longer than on
normal surfaces, even with the anti-
lock system. Stopping distances may
also be longer on rough, gravel or
snow covered roads, or if you are using
tire chains. Always maintain a safe dis-
tance from the vehicle in front of you.
Ultimately, the responsibility for safety
of self and others rests in the hands of
the driver.
Tire type and condition of tires may
also affect braking effectiveness.
cWhen replacing tires, install the
specified size of tires on all 4 wheels.
ANTI-LOCK BRAKE SYSTEM
(ABS) (if so equipped)
4-15
ZX