1997 NISSAN QUEST bulb
[x] Cancel search: bulbPage 13 of 247
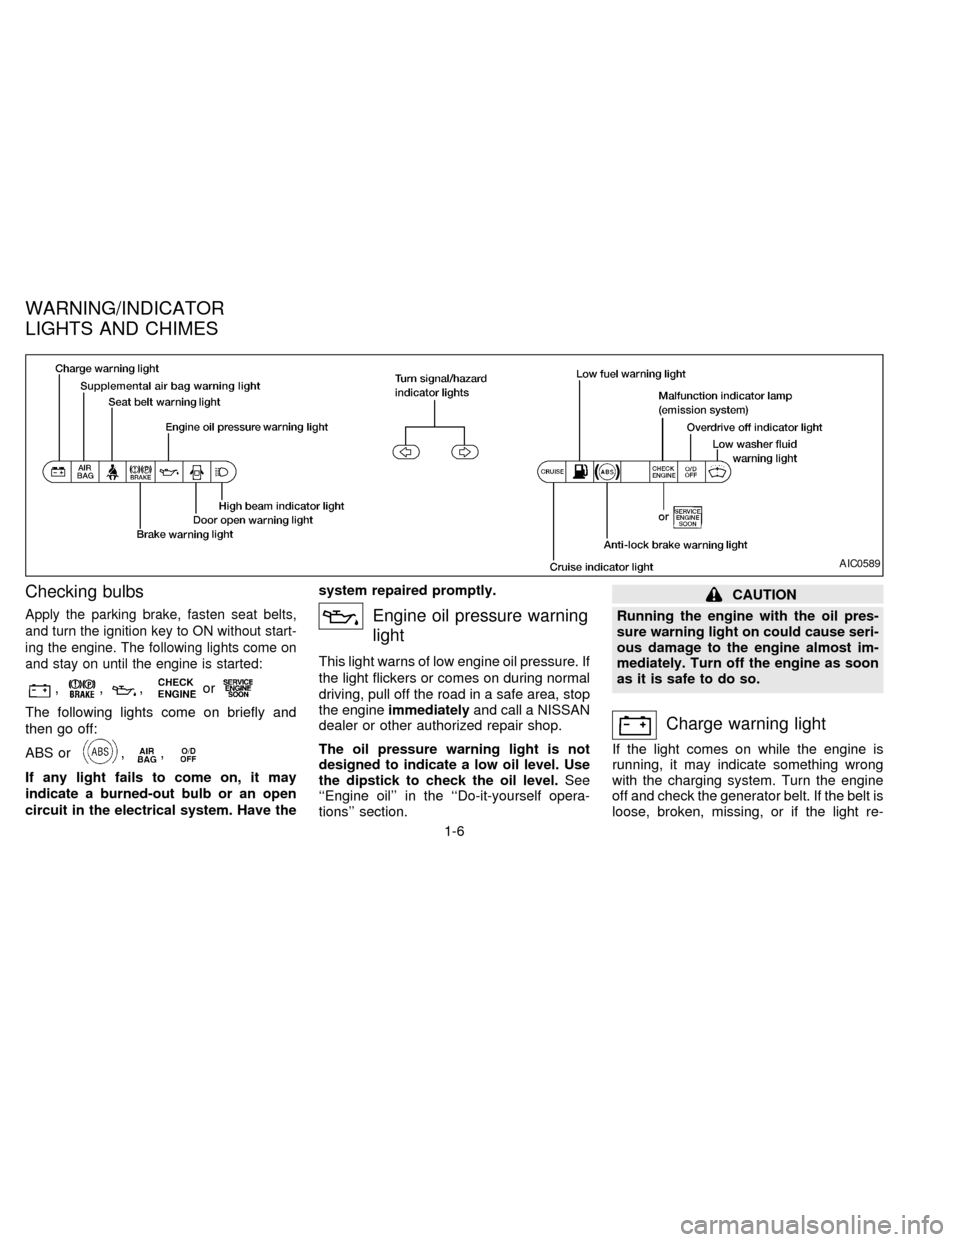
Checking bulbs
Apply the parking brake, fasten seat belts,
and turn the ignition key to ON without start-
ing the engine. The following lights come on
and stay on until the engine is started:
,,,or
The following lights come on briefly and
then go off:
ABS or
,,
If any light fails to come on, it may
indicate a burned-out bulb or an open
circuit in the electrical system. Have thesystem repaired promptly.
Engine oil pressure warning
light
This light warns of low engine oil pressure. If
the light flickers or comes on during normal
driving, pull off the road in a safe area, stop
the engineimmediatelyand call a NISSAN
dealer or other authorized repair shop.
The oil pressure warning light is not
designed to indicate a low oil level. Use
the dipstick to check the oil level.See
``Engine oil'' in the ``Do-it-yourself opera-
tions'' section.
CAUTION
Running the engine with the oil pres-
sure warning light on could cause seri-
ous damage to the engine almost im-
mediately. Turn off the engine as soon
as it is safe to do so.
Charge warning light
If the light comes on while the engine is
running, it may indicate something wrong
with the charging system. Turn the engine
off and check the generator belt. If the belt is
loose, broken, missing, or if the light re-
AIC0589
WARNING/INDICATOR
LIGHTS AND CHIMES
1-6
ZX
Page 178 of 247
7Do-it-yourself operations
Maintenance precautions .......................................7-2
Engine compartment check locations ....................7-3
Engine cooling system ...........................................7-4
Checking engine coolant level ...............................7-4
Changing engine coolant .......................................7-5
Engine oil ...............................................................7-5
Checking engine oil level .......................................7-5
Changing engine oil ...............................................7-6
Changing engine oil filter .......................................7-7
Automatic transmission fluid (ATF) ........................7-8
Temperature conditions for checking ATF .............7-8
Power steering fluid................................................7-9
Brake fluid ............................................................7-10
Window washer fluid ............................................7-10
Battery ..................................................................7-11
Jump starting ........................................................7-12Drive belts ............................................................7-12
Spark plug replacement .......................................7-12
Air cleaner housing filter ......................................7-13
Wiper blades ........................................................7-14
Parking brake check.............................................7-16
Brake pedal ..........................................................7-16
Brake booster .......................................................7-17
Fuses ....................................................................7-17
Fusible links..........................................................7-18
Light bulbs ............................................................7-19
Headlights ............................................................7-19
Bulb replacement .................................................7-21
Wheels and tires ..................................................7-25
Types of tires........................................................7-26
Tire chains ............................................................7-26
ZX
Page 196 of 247
Passenger compartment
CAUTION
Never use a fuse of a higher amperage
rating than that specified on the fuse
box cover. This could damage the elec-
trical system or cause a fire.
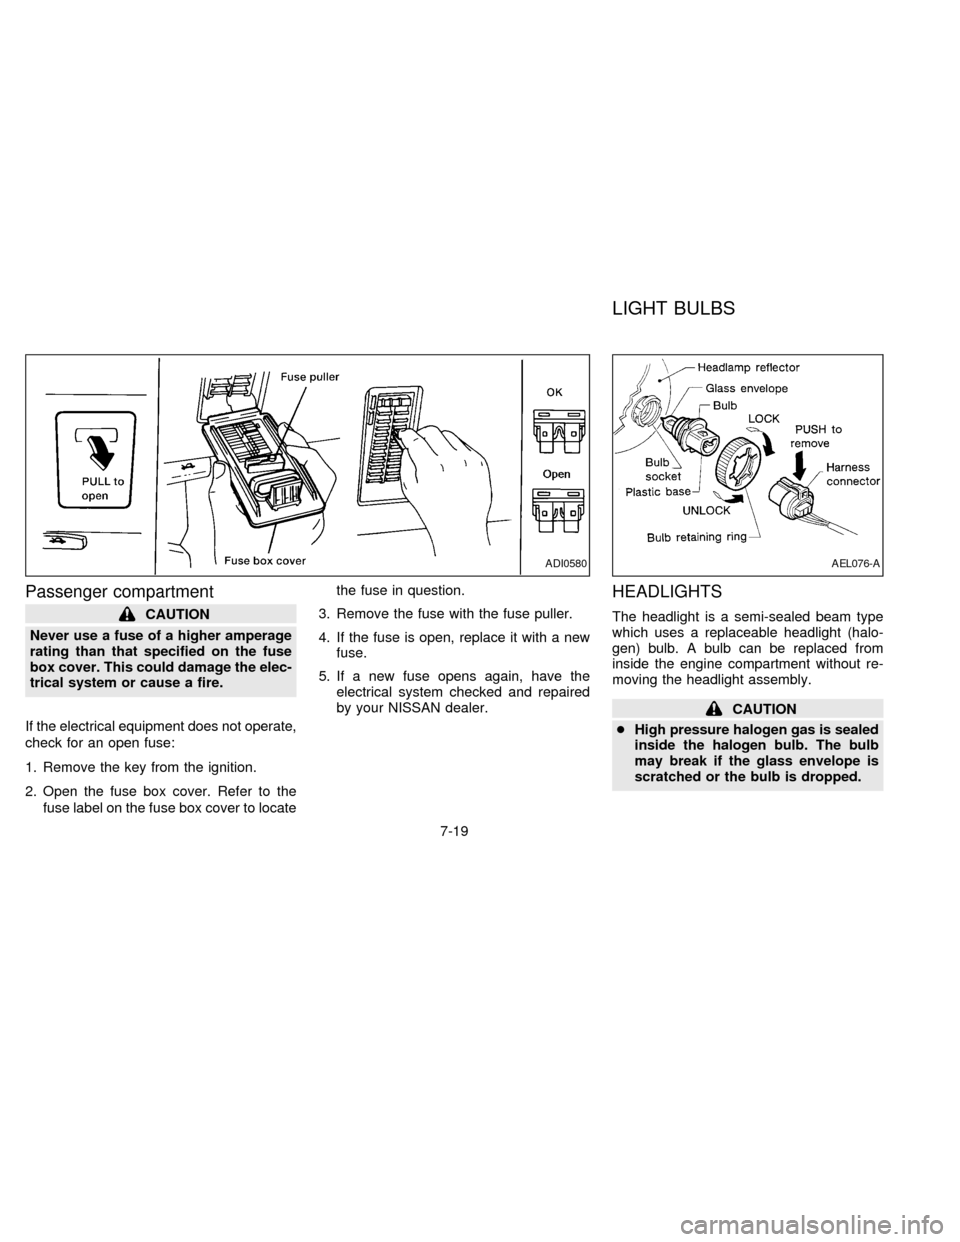
If the electrical equipment does not operate,
check for an open fuse:
1. Remove the key from the ignition.
2. Open the fuse box cover. Refer to the
fuse label on the fuse box cover to locatethe fuse in question.
3. Remove the fuse with the fuse puller.
4. If the fuse is open, replace it with a new
fuse.
5. If a new fuse opens again, have the
electrical system checked and repaired
by your NISSAN dealer.
HEADLIGHTS
The headlight is a semi-sealed beam type
which uses a replaceable headlight (halo-
gen) bulb. A bulb can be replaced from
inside the engine compartment without re-
moving the headlight assembly.
CAUTION
cHigh pressure halogen gas is sealed
inside the halogen bulb. The bulb
may break if the glass envelope is
scratched or the bulb is dropped.
ADI0580AEL076-A
LIGHT BULBS
7-19
ZX
Page 197 of 247
cWhen handling the bulb, do not
touch the glass envelope.
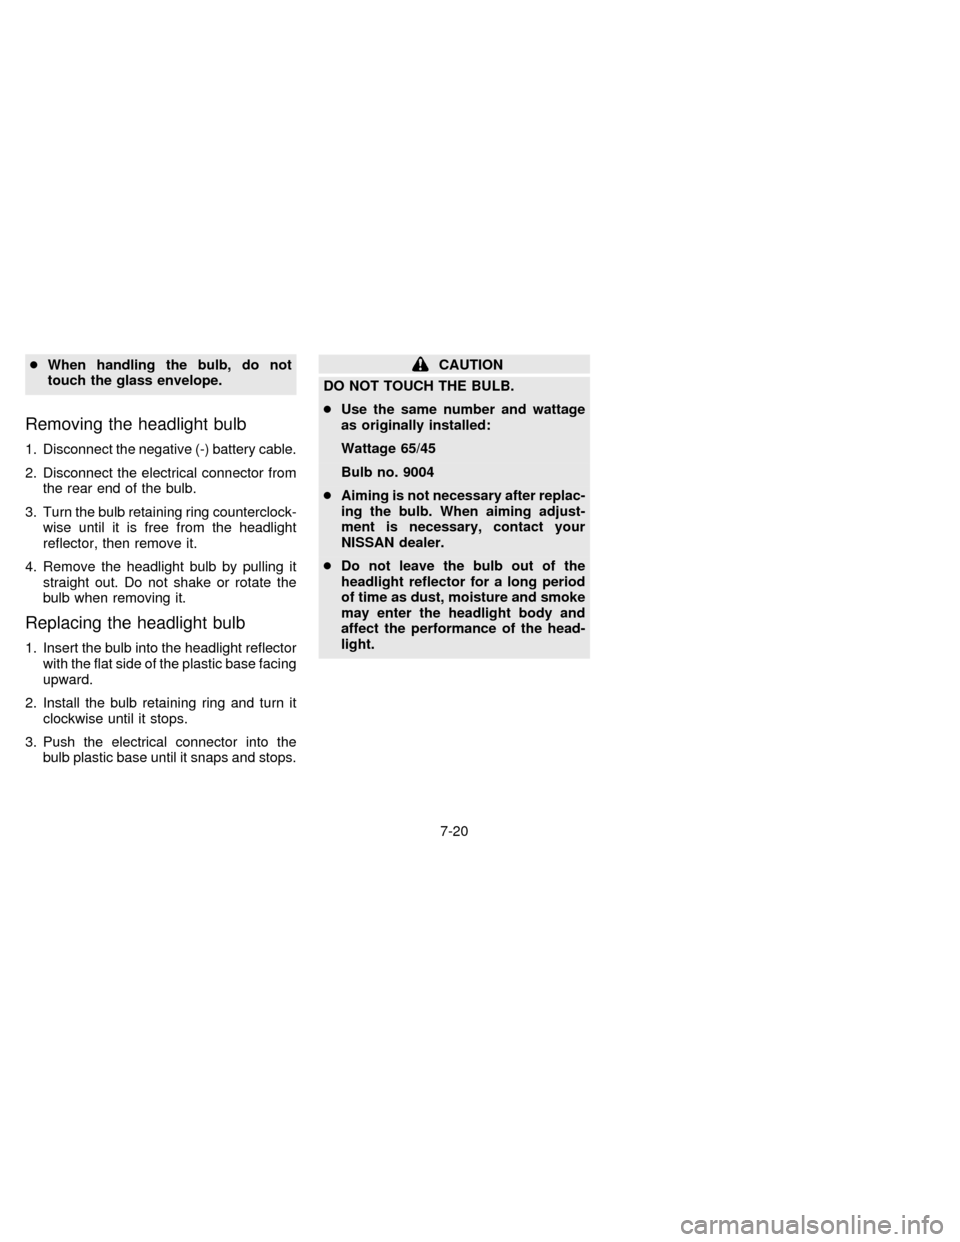
Removing the headlight bulb
1. Disconnect the negative (-) battery cable.
2. Disconnect the electrical connector from
the rear end of the bulb.
3. Turn the bulb retaining ring counterclock-
wise until it is free from the headlight
reflector, then remove it.
4. Remove the headlight bulb by pulling it
straight out. Do not shake or rotate the
bulb when removing it.
Replacing the headlight bulb
1. Insert the bulb into the headlight reflector
with the flat side of the plastic base facing
upward.
2. Install the bulb retaining ring and turn it
clockwise until it stops.
3. Push the electrical connector into the
bulb plastic base until it snaps and stops.
CAUTION
DO NOT TOUCH THE BULB.
cUse the same number and wattage
as originally installed:
Wattage 65/45
Bulb no. 9004
cAiming is not necessary after replac-
ing the bulb. When aiming adjust-
ment is necessary, contact your
NISSAN dealer.
cDo not leave the bulb out of the
headlight reflector for a long period
of time as dust, moisture and smoke
may enter the headlight body and
affect the performance of the head-
light.
7-20
ZX
Page 198 of 247
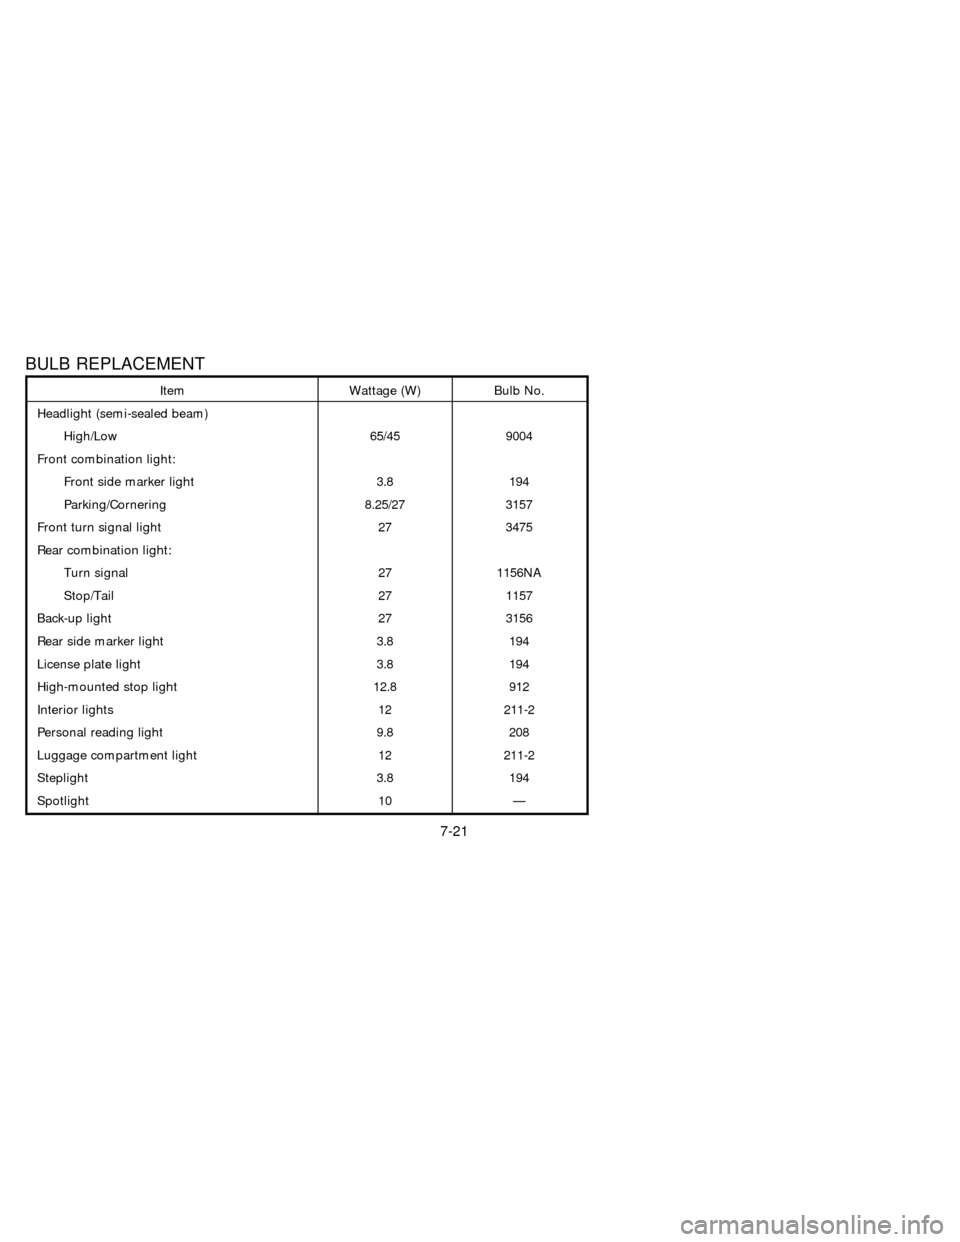
BULB REPLACEMENT
Item Wattage (W) Bulb No.
Headlight (semi-sealed beam)
High/Low 65/45 9004
Front combination light:
Front side marker light 3.8 194
Parking/Cornering 8.25/27 3157
Front turn signal light 27 3475
Rear combination light:
Turn signal 27 1156NA
Stop/Tail 27 1157
Back-up light 27 3156
Rear side marker light 3.8 194
License plate light 3.8 194
High-mounted stop light 12.8 912
Interior lights 12 211-2
Personal reading light 9.8 208
Luggage compartment light 12 211-2
Steplight 3.8 194
Spotlight 10 Ð
7-21
ZX
Page 199 of 247
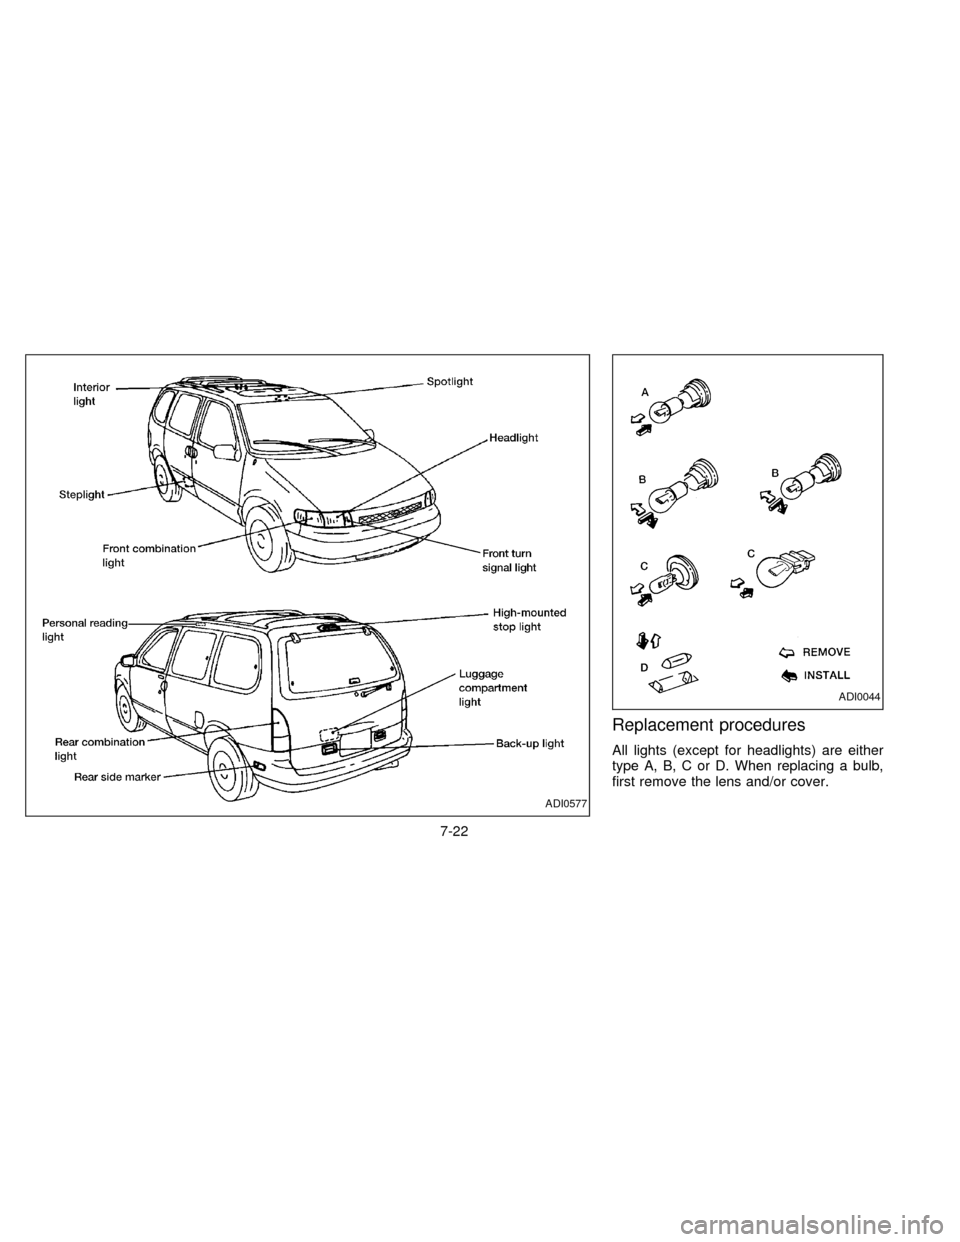
Replacement procedures
All lights (except for headlights) are either
type A, B, C or D. When replacing a bulb,
first remove the lens and/or cover.
ADI0577
ADI0044
7-22
ZX
Page 234 of 247
cTo reduce the possibility of addi-
tional damage if your vehicle is
struck from the rear, where practical
remove the hitch when not in use.
Remove the receiver when not in
use. After the hitch is removed, seal
the bolt holes to prevent exhaust
fumes, water or dust from entering
the passenger compartment.
cRegularly check that all hitch mount-
ing bolts are securely mounted.
Tire pressures
cWhen towing a trailer, inflate the vehicle
tires to the recommended cold tire pres-
sure indicated on the tire placard (located
on the inside of the glove box lid).
cTrailer tire condition, size, load rating and
proper inflation pressure should be in
accordance with the trailer and tire
manufacturer's specifications.
Safety chain
Always use suitable safety chains between
your vehicle and the trailer. Safety chains
should be crossed and should be attached
to the hitch, not to the vehicle bumper oraxle. Be sure to leave enough slack in the
chain to permit turning corners.
Trailer lights
Trailer lights should comply with Federal
and/or local regulations. When wiring the
vehicle for towing, connect the stop and tail
light pickup into the vehicle electrical circuit.
Class I Trailer Tow electrical wiring provides
two circuits (right and left hand) to operate
trailer stop/turn tail lamps. Each individual
stop/turn circuit will operate only one com-
bination stop/turn light bulb (#1157, 3157,
2357, or 3357) on the trailer. Never add
more than one trailer light bulb to one
circuit.
9-15
ZX
Page 241 of 247
10 Index
A
After an accident........................................ 5-11
Air bag (See supplemental restraint
system) ...................................................... 2-42
Air bag warning light .................................. 2-47
Air cleaner housing filter ............................ 7-13
Air conditioner
Air conditioner operation ............... 3-20, 3-5
Air conditioner service .......................... 3-14
Air conditioner specification label ......... 9-11
Air conditioner system refrigerant and
lubrication recommendations.................. 9-6
Heater and air conditioner (automatic)
(if so equipped)..................................... 3-10
Heater and air conditioner (manual)....... 3-3
Rear seat heater and air
conditioner ............................................ 3-13
Air flow charts .............................................. 3-7
Alarm system (See theft warning) ............. 1-10
Anchor point locations ............................... 2-69
Antenna
Manual .................................................. 3-20
Power.................................................... 3-20
Anti-lock brake system (ABS).................... 4-15
Anti-lock brake warning light ....................... 1-8
Armrests..................................................... 2-30Ashtray (See cigarette lighter and
ashtray) ...................................................... 1-16
Audio system
AM-FM radio with cassette player ........ 3-14
Compact disc (CD) player .................... 3-21
Autolamp switch......................................... 1-13
Automatic
Automatic power window switch .......... 1-20
Automatic transmission fluid (ATF) ........ 7-8
Driving with automatic transmission ....... 4-5
B
Battery........................................................ 7-11
Before starting the engine ........................... 4-5
Brake
Anti-lock brake system (ABS) .............. 4-15
Brake booster ....................................... 7-17
Brake fluid ..................................... 7-10, 9-2
Brake light (See stop light) ................... 7-21
Brake pedal .......................................... 7-16
Brake system ........................................ 4-14
Brake warning light ................................. 1-7
Brake wear indicators ............................. 1-9
Parking brake check ............................. 7-16
Parking brake operation ......................... 4-9
Self-adjusting brakes ............................ 7-16
Break-in schedule ...................................... 4-12Bulb check/instrument panel ....................... 1-6
Bulb replacement ....................................... 7-21
C
Capacities and recommended fuel/
lubricants...................................................... 9-2
Cargo net ................................................... 2-13
Cargo (See vehicle loading
information) ................................................ 9-12
Cassette player (See audio system) ......... 3-14
CB radio or car phone ............................... 3-25
Check engine indicator light
(See malfunction indicator light) .................. 1-9
Child restraint with top tether strap ........... 2-65
Child restraints for infants and small
children ...................................................... 2-60
Child safety sliding door lock....................... 2-4
Cigarette lighter (accessory)
and ashtray ................................................ 1-16
Cleaning exterior and interior ...................... 6-2
Clock .......................................................... 1-23
Coin tray .................................................... 1-17
Cold weather driving .................................. 4-16
Compact disc (CD) player ......................... 3-21
Controls
Audio controls ....................................... 3-14
Audio controls (rear) ............................. 3-24
ZX