1997 NISSAN FRONTIER door lock
[x] Cancel search: door lockPage 16 of 204

orRear anti-lock brake
warning light
If the light comes on while the engine is
running, it may indicate a potential problem
with the rear anti-lock brake system. Have the
system checked by your NISSAN dealer.
If an abnormality occurs in the system, the
rear anti-lock function ceases but the ordi-
nary brakes continue to operate normally.
If the light comes on while you are driving,
contact your NISSAN dealer for repair.
The rear anti-lock brake system may only
be effective when driving in the 2-wheel
drive mode.
When driving in the 4-wheel drive mode, if the
front wheels lock, the rear wheels also lock. If
this happens, the rear anti-lock brake system
may stop functioning, but the ordinary brakes
operate normally. The warning light then
comes on. The above condition is not a mal-
function, and the rear anti-lock brake system
recovers once the engine is turned off and
restarted. The warning light then goes off. For
further description of the rear anti-lock brake
system, refer to ``Rear anti-lock brake system''
in the ``Starting and driving'' section.
Overdrive off indicator light
(if so equipped)
This light comes on when the overdrive
switch is pushed to the OFF position.
Key reminder chime
The chime sounds when the driver's door is
opened and the key is left in the ignition
switch. Take the ignition key when you
leave the vehicle.
Light reminder chime
A chime sounds if the driver's door is opened
with the headlight switch on unless the ignition
key is in the ON position. Turn the headlight
switch off when you leave the vehicle.
Brake pad wear warning
The disc brake pads have audible wear
warnings. When a brake pad requires re-
placement, it makes a high pitched scraping
sound when the vehicle is in motion whether
or not the brake pedal is depressed. Have
the brakes checked as soon as possible if
the warning sound is heard.
orMalfunction indi-
cator light (MIL)
If the malfunction indicator light comes onsteady or blinks while the engine is running,
it may indicate a potential emission control
problem.
The malfunction indicator light will come on
in one of two ways:
cMalfunction indicator light on steady - -
An emission control system malfunction
has been detected. Have the vehicle
inspected by an authorized NISSAN
dealer. You do not need to have your
vehicle towed to the dealer.
cMalfunction indicator light blinking - - An
engine misfire has been detected which
may damage the emission control sys-
tem. To reduce or avoid emission control
system damage:
cdo not drive at speeds above 45 MPH
(72 km/h).
c
avoid hard acceleration or deceleration.
cavoid steep uphill grades.
cif possible, reduce the amount of cargo
being hauled or towed.
The malfunction indicator light may stop
blinking and come on steady.
Have the vehicle inspected by an autho-
rized NISSAN dealer. You do not need to
have your vehicle towed to the dealer.
1-9
ZX
Page 22 of 204

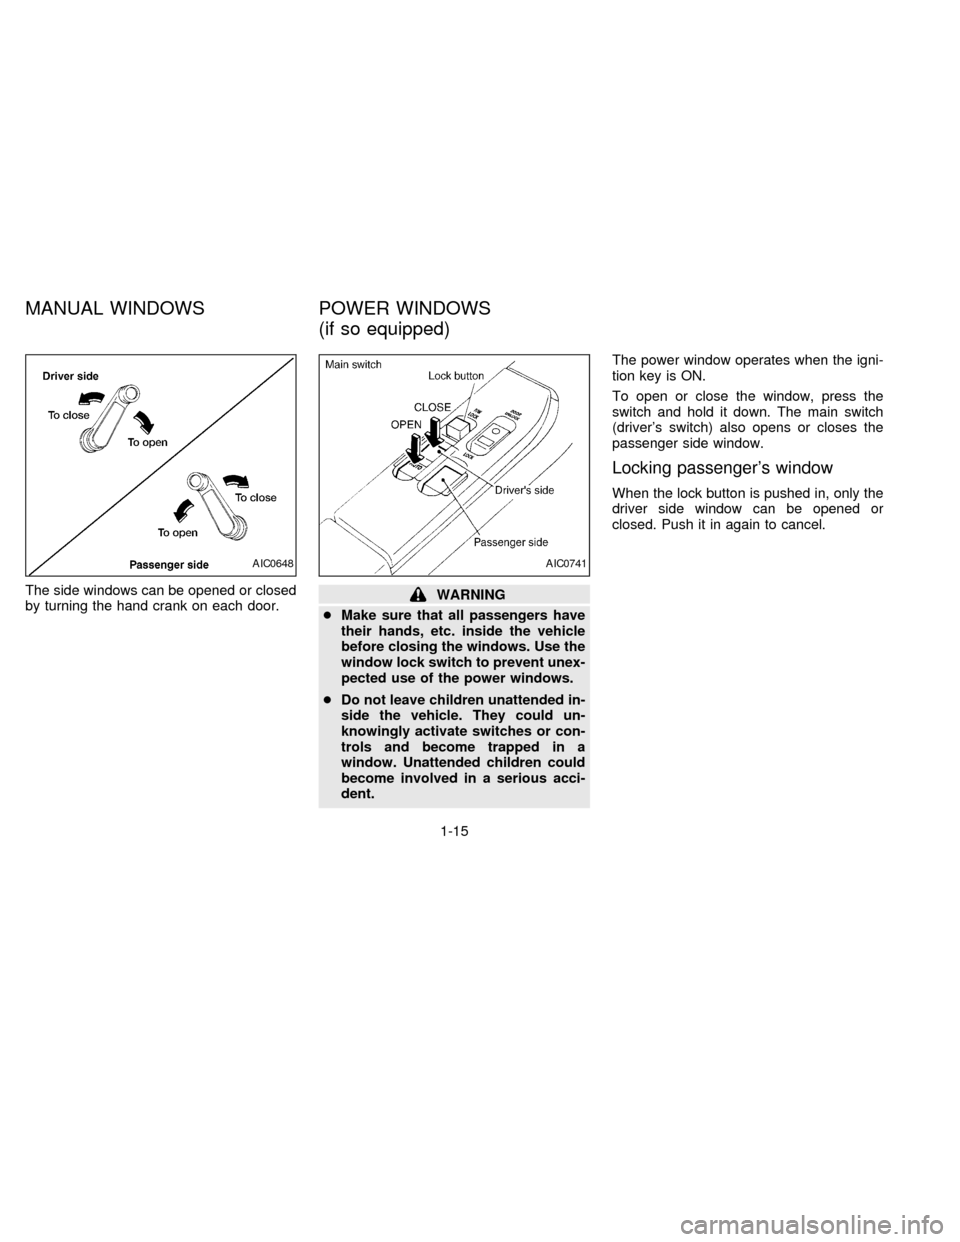
The side windows can be opened or closed
by turning the hand crank on each door.WARNING
cMake sure that all passengers have
their hands, etc. inside the vehicle
before closing the windows. Use the
window lock switch to prevent unex-
pected use of the power windows.
cDo not leave children unattended in-
side the vehicle. They could un-
knowingly activate switches or con-
trols and become trapped in a
window. Unattended children could
become involved in a serious acci-
dent.The power window operates when the igni-
tion key is ON.
To open or close the window, press the
switch and hold it down. The main switch
(driver's switch) also opens or closes the
passenger side window.
Locking passenger's window
When the lock button is pushed in, only the
driver side window can be opened or
closed. Push it in again to cancel.
AIC0648AIC0741
MANUAL WINDOWS POWER WINDOWS
(if so equipped)
1-15
ZX
Page 28 of 204

2Pre-driving checks and adjustments
Key .........................................................................2-2
Door locks ..............................................................2-2
Power door lock (if so equipped) ...........................2-3
Hood release ..........................................................2-4
Glove box lock (if so equipped) .............................2-4
Fuel filler cap ..........................................................2-5
Tailgate latch ..........................................................2-5
Tie down hooks ......................................................2-7
Front separate seats ..............................................2-8
Seat adjustment .....................................................2-8
Head restraints .....................................................2-11
Tilting front separate seat ....................................2-11
Bench seat ...........................................................2-12
Seat adjustment ...................................................2-12
Tilting bench seat .................................................2-12
Jump seat .............................................................2-13
Supplemental restraint system (supplemental
air bag system).....................................................2-14
Supplemental air bag system...............................2-15
Warning labels......................................................2-17
Supplemental air bag warning light......................2-17Seat belts .............................................................2-19
Precautions on seat belt usage ...........................2-19
Child safety...........................................................2-20
3-point type with retractor ....................................2-21
2-point type without retractor (center of bench
seat and jump seats)............................................2-23
Seat belt extenders ..............................................2-24
Seat belt maintenance .........................................2-24
Child restraints for infants and small children......2-24
Installation on front passenger seat (3-point
type with retractor) ...............................................2-26
Installation in center of bench seat (2-point
type without retractor) ..........................................2-27
Top strap child restraint .......................................2-28
Tilting steering wheel (if so equipped) .................2-29
Outside mirror remote control
(if so equipped) ....................................................2-30
Outside mirrors .....................................................2-30
Inside mirror .........................................................2-31
Vanity mirror (if so equipped)...............................2-31
ZX
Page 29 of 204

A key number plate is supplied with your key.
Record the key number found on the key
number plate and keep it in a safe place
(such as your wallet), NOT IN THE VEHICLE.
If you lose your keys, see your NISSAN
dealer for duplicates by using the key num-
ber. NISSAN does not record key numbers so
it is very important to keep track of your key
number plate.
A key number is only necessary when you
have lost all keys and do not have one to
duplicate from. If you still have a key, this
key can be duplicated by your NISSAN
dealer or locksmith.
Locking doors with key
To lock the door, turn the key towards the
back of the vehicle. To unlock, turn it to-
wards the front.
On power door lock equipped models, lock-
ing the driver's door simultaneously locks
the passenger's door.
Locking doors without key
To lock the doors from the outside without a
key, push the inside lock knob to the lock
position, then close the door.
When locking the door this way, be certain
not to leave the key inside the vehicle.
PD1296IC1309MIC0184
KEY DOOR LOCKS
2-2
ZX
Page 30 of 204

POWER DOOR LOCK
(if so equipped)
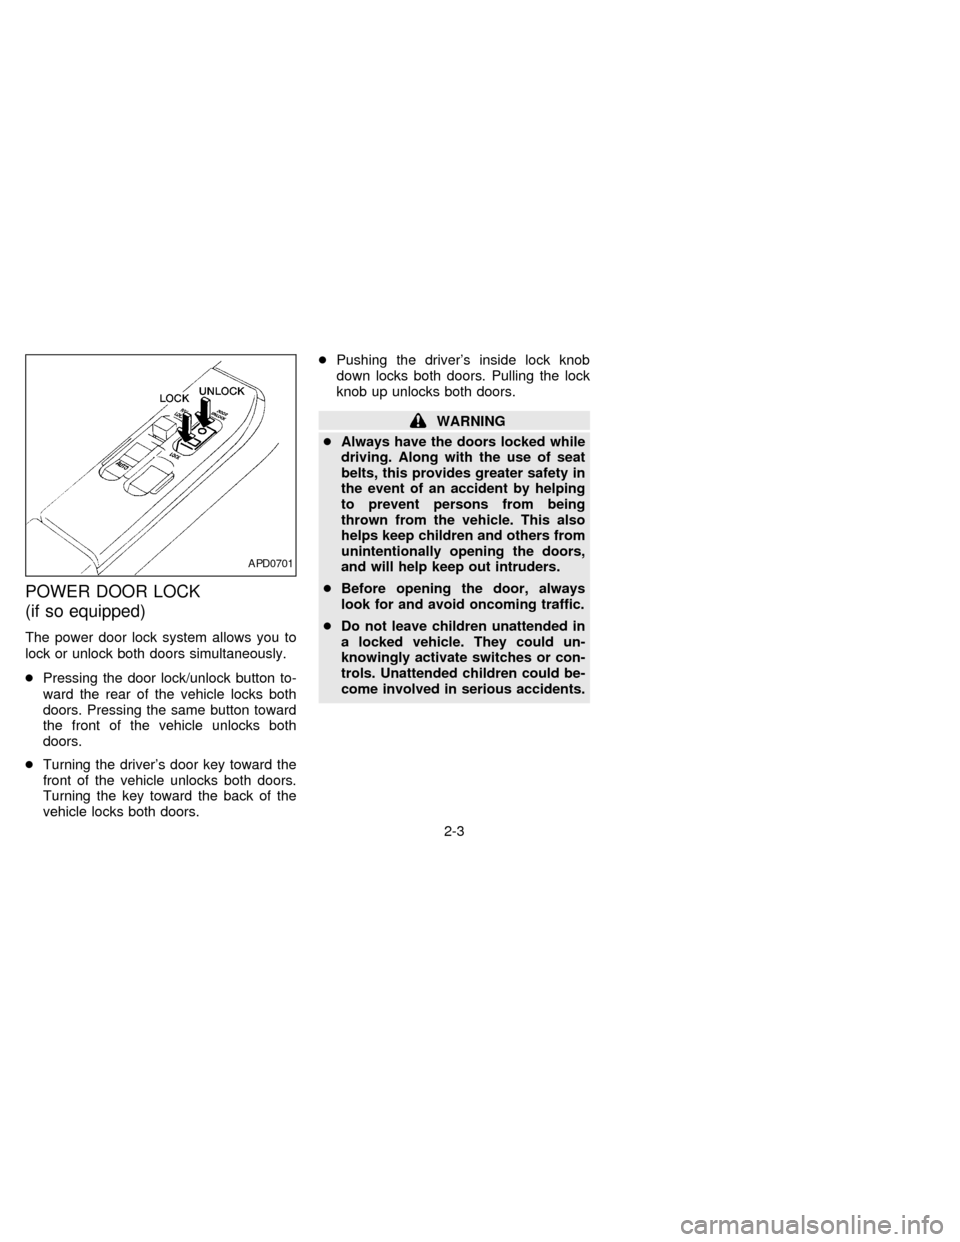
The power door lock system allows you to
lock or unlock both doors simultaneously.
cPressing the door lock/unlock button to-
ward the rear of the vehicle locks both
doors. Pressing the same button toward
the front of the vehicle unlocks both
doors.
cTurning the driver's door key toward the
front of the vehicle unlocks both doors.
Turning the key toward the back of the
vehicle locks both doors.cPushing the driver's inside lock knob
down locks both doors. Pulling the lock
knob up unlocks both doors.
WARNING
cAlways have the doors locked while
driving. Along with the use of seat
belts, this provides greater safety in
the event of an accident by helping
to prevent persons from being
thrown from the vehicle. This also
helps keep children and others from
unintentionally opening the doors,
and will help keep out intruders.
cBefore opening the door, always
look for and avoid oncoming traffic.
cDo not leave children unattended in
a locked vehicle. They could un-
knowingly activate switches or con-
trols. Unattended children could be-
come involved in serious accidents.
APD0701
2-3
ZX
Page 87 of 204

cMake sure the area around the vehicle is
clear.
cCheck fluid levels such as engine oil,
coolant, brake and clutch fluid, and win-
dow washer fluid as frequently as pos-
sible, at least whenever you refuel.
cCheck that all windows and lights are
clean.
cVisually inspect tires for their appearance
and condition. Also check tires for proper
inflation.
cLock all doors.
cPosition seat and adjust head restraints.
cAdjust inside and outside mirrors.
cFasten seat belts and ask all passengers
to do likewise.
cCheck the operation of warning lights
when key is turned to the ON (3) position.The automatic transmission in your vehicle
is electronically controlled by a microcom-
puter to produce maximum power and
smooth operation.
The recommended operating procedures
for this transmission are shown on the fol-
lowing pages. Follow these procedures for
maximum vehicle performance and driving
enjoyment.
If your vehicle is equipped with 4-wheel
drive, see ``
Transfer case shifting pro-
cedures for 4-wheel drive vehicles'' later in
this section.
Starting the vehicle
cAfter starting the engine, fully depress
the foot brake pedal and push the shift
lever button before shifting the selector
lever to the R, D, 2 or 1 position. Be sure
the vehicle is fully stopped before at-
tempting to shift the selector lever.
cKeep the foot brake pedal depressed and
push the shift lever button to shift into a
driving gear.
c
Release the parking brake and foot brake,
then gradually start the vehicle in motion.
This automatic transmission is designedso the foot brake pedal MUST be depressed
before shifting from P to any drive position
while the ignition switch is ON.
The shift lever cannot be moved out of P
and into any of the other gear positions if
the ignition key is turned to LOCK or if
the key is removed.
When the battery charge is low, the shift
lever can be moved if the ignition switch
is in the ACC position.
WARNING
cDo not depress the accelerator pedal
while shifting from P or N to R, D, 2
or 1. Always depress the brake pedal
until shifting is completed. Failure to
do so could cause you to lose con-
trol and have an accident.
cCold engine idle speed is high, so
use caution when shifting into a for-
ward or reverse gear before the en-
gine has warmed up.
cNever shift to P or R while the ve-
hicle is moving. This could cause an
accident.
BEFORE STARTING THE
ENGINEDRIVING WITH AUTOMATIC
TRANSMISSION (if so
equipped)
4-6
ZX
Page 108 of 204

Freeing a frozen door lock
To prevent a door lock from freezing, apply
de-icer or glycerin through the key hole. If
the lock becomes frozen, heat the key be-
fore inserting it into the key hole.
Anti-freeze
In the winter when it is anticipated that the
temperature will drop below 32ÉF (0ÉC),
check anti-freeze (ethylene glycol base) to
assure proper winter protection. For details,
see ``Engine cooling system'' in the ``Do-it-
yourself operations'' section.
Battery
If the battery is not fully charged during
extremely cold weather conditions, the bat-
tery fluid may freeze and damage the bat-
tery. To maintain maximum efficiency, the
battery should be checked regularly. For
details, see ``Battery'' in the ``Do-it-yourself
operations'' section.
Draining of coolant water
If the vehicle is to be left outside without
anti-freeze, drain the cooling system by
opening the drain valves located under the
radiator and on the engine block. Refillbefore operating the vehicle. For details,
see ``Changing engine coolant'' in the ``Do-
it-yourself operations'' section.
Tire equipment
1. SUMMER tires have a tread designed to
provide superior performance on dry
pavement. However, the performance of
these tires will be substantially reduced
in snowy and icy conditions. If you oper-
ate your vehicle on snowy or icy roads,
NISSAN recommends the use on all four
wheels of MUD & SNOW or ALL SEA-
SON tires. Please consult your NISSAN
dealer for the tire type, size, speed rating
and availability information.
2. For additional traction on icy roads, stud-
ded tires may be used. However, some
provinces and states prohibit their use.
Check local, state and provincial laws
before installing studded tires.
Skid and traction capabilities of studded
snow tires on wet or dry surfaces may be
poorer than that of non-studded snow
tires.
3. Tire chains may be used if desired. Use
of tire chains may be prohibited accord-
ing to location. Check the local lawsbefore installing tire chains. When install-
ing tire chains, make sure they are of
proper size for the tires on your vehicle
and are installed according to the chain
manufacturer's suggestions.Use only
SAE Class ``S'' chains.Other types
may damage your vehicle. Use chain
tensioners when recommended by the
tire chain manufacturer to ensure a tight
fit. Loose end links of the tire chain must
be secured or removed to prevent the
possibility of whipping action damage to
the fenders or undercarriage. If possible,
avoid fully loading your vehicle when
using tire chains. In addition, drive at a
reduced speed, otherwise, your vehicle
may be damaged and/or vehicle handling
and performance may be adversely af-
fected. Never install tire chains on a
TEMPORARY USE ONLY spare tire. Do
not use tire chains on dry roads.
Special winter equipment
It is recommended that the following items
be carried in the vehicle during winter:
1. A scraper and stiff-bristled brush to re-
move ice and snow from the windows
and wiper blades.
COLD WEATHER DRIVING
4-27
ZX
Page 162 of 204

make sure no nuts are missing, and check
for any loose nuts. Tighten if necessary.
Tire rotation*Tires should be rotated every
7,500 miles (12,000 km) for 2WD vehicles
and 3,750 miles (6,000 km) for 4WD ve-
hicles.
Wheel alignment and balanceIf the ve-
hicle should pull to either side while driving
on a straight and level road, or if you detect
uneven or abnormal tire wear, there may be
a need for wheel alignment.
If the steering wheel or seat vibrates at
normal highway speeds, wheel balancing
may be needed.
Windshield wiper blades*Check for
cracks or wear if they do not wipe properly.
Doors and engine hoodCheck that all
doors and the engine hood operate prop-
erly. Also ensure that all latches lock se-
curely. Lubricate hinges, latches, rollers and
links if necessary. Make sure that the sec-
ondary latch keeps the hood from opening
when the primary latch is released.
When driving in areas using road salt or
other corrosive materials, check lubrication
frequently.Lights*Make sure that the headlights, stop
lights, tail lights, turn signal lights, and other
lights are all operating properly and installed
securely. Also check headlight aim.
INSIDE THE VEHICLE
The maintenance items listed here should
be checked on a regular basis, such as
when performing periodic maintenance,
cleaning the vehicle, etc.
Additional information on the following
items with ``*'' is found in the ``Do-it-
yourself operations'' section.
Warning lights and chimesMake sure all
warning lights and chimes are operating
properly.
Windshield wiper and washer*Check that
the wipers and washer operate properly and
that the wipers do not streak.
Windshield defrosterCheck that the air
comes out of the defroster outlets properly
and in sufficient quantity when operating the
heater or air conditioner.
Steering wheelCheck for changes in the
steering conditions, such as excessive free-
play, hard steering or strange noises.SeatsCheck seat position controls such as
seat adjusters, seatback recliner, etc. to
ensure they operate smoothly and all
latches lock securely in every position.
Check that the head restraints move up and
down smoothly and the locks (if so
equipped) hold securely in all latched posi-
tions.
Seat beltsCheck that all parts of the seat
belt system (e.g., buckles, anchors, adjust-
ers and retractors) operate properly and
smoothly, and are installed securely. Check
the belt webbing for cuts, fraying, wear or
damage.
Accelerator pedalCheck the pedal for
smooth operation and make sure the pedal
does not catch or require uneven effort.
Keep the floor mats away from the pedal.
Clutch pedal*Make sure the pedal oper-
ates smoothly and check that it has the
proper free travel.
BrakesCheck that the brakes do not pull
the vehicle to one side when applied.
Brake pedal and booster*Check the pedal
for smooth operation and make sure it has
the proper distance under it when de-
pressed fully. Check the brake booster func-
8-3
ZX