1997 NISSAN FRONTIER recommended oil
[x] Cancel search: recommended oilPage 87 of 204
cMake sure the area around the vehicle is
clear.
cCheck fluid levels such as engine oil,
coolant, brake and clutch fluid, and win-
dow washer fluid as frequently as pos-
sible, at least whenever you refuel.
cCheck that all windows and lights are
clean.
cVisually inspect tires for their appearance
and condition. Also check tires for proper
inflation.
cLock all doors.
cPosition seat and adjust head restraints.
cAdjust inside and outside mirrors.
cFasten seat belts and ask all passengers
to do likewise.
cCheck the operation of warning lights
when key is turned to the ON (3) position.The automatic transmission in your vehicle
is electronically controlled by a microcom-
puter to produce maximum power and
smooth operation.
The recommended operating procedures
for this transmission are shown on the fol-
lowing pages. Follow these procedures for
maximum vehicle performance and driving
enjoyment.
If your vehicle is equipped with 4-wheel
drive, see ``
Transfer case shifting pro-
cedures for 4-wheel drive vehicles'' later in
this section.
Starting the vehicle
cAfter starting the engine, fully depress
the foot brake pedal and push the shift
lever button before shifting the selector
lever to the R, D, 2 or 1 position. Be sure
the vehicle is fully stopped before at-
tempting to shift the selector lever.
cKeep the foot brake pedal depressed and
push the shift lever button to shift into a
driving gear.
c
Release the parking brake and foot brake,
then gradually start the vehicle in motion.
This automatic transmission is designedso the foot brake pedal MUST be depressed
before shifting from P to any drive position
while the ignition switch is ON.
The shift lever cannot be moved out of P
and into any of the other gear positions if
the ignition key is turned to LOCK or if
the key is removed.
When the battery charge is low, the shift
lever can be moved if the ignition switch
is in the ACC position.
WARNING
cDo not depress the accelerator pedal
while shifting from P or N to R, D, 2
or 1. Always depress the brake pedal
until shifting is completed. Failure to
do so could cause you to lose con-
trol and have an accident.
cCold engine idle speed is high, so
use caution when shifting into a for-
ward or reverse gear before the en-
gine has warmed up.
cNever shift to P or R while the ve-
hicle is moving. This could cause an
accident.
BEFORE STARTING THE
ENGINEDRIVING WITH AUTOMATIC
TRANSMISSION (if so
equipped)
4-6
ZX
Page 126 of 204
choosing the proper product.
cWax your vehicle only after a thorough
washing. Follow the instructions supplied
with the wax.
cDo not use a wax containing any abra-
sives, cutting compounds or cleaners
that may damage the vehicle finish.
cIf the surface does not polish easily, use
a ``road tar'' remover and wax again.
Machine compounding or aggressive pol-
ishing on a base coat/clear coat paint finish
may dull the finish or leave swirl marks.
Only apply black wax or black shoe polish to
the black urethane or polypropylene
bumper.
Removing spots
Remove tar and oil spots, industrial dust,
insects and tree sap as quickly as possible
from the surface of the paint to avoid per-
manent damage or staining. Special clean-
ing products are available at your NISSAN
dealer or any automotive accessories store.
Underbody
In areas where road salt is used in winter, it
is necessary to clean the underbody regu-larly in order to prevent dirt and salt from
building up and causing corrosion on the
underbody and suspension. Before the win-
ter period and again in the spring, the
underseal must be checked and, if neces-
sary, retreated.
Cleaning glass
Use glass cleaner to remove smoke and
dust film from the glass surfaces. It is nor-
mal for glass to be coated with a film after
the vehicle is parked in the hot sun. Glass
cleaner and a soft cloth easily remove this
film.
CAUTION
When cleaning the inside of the win-
dow, do not use any sharp-edged tools
or abrasive cleaners or chlorine-based
disinfectant cleaners. They could dam-
age the electrical conductors, radio an-
tenna elements or rear window defog-
ger elements.
Cleaning aluminum alloy wheels
Wash regularly, especially during winter
months in areas where road salt is used.
Salt could discolor the wheel if not removed.
Chrome parts
Clean all chrome parts regularly with a
non-abrasive chrome polish to maintain the
finish.
Cleaning interior
Occasionally remove loose dust from the
interior trim, plastic parts and seats using a
vacuum cleaner or soft brush. Wipe the
vinyl and leather surfaces with a clean, soft
cloth dampened in mild soap solution, then
wipe clean with a dry soft cloth. Before
using any fabric protector, read the manu-
facturer's recommendations. Some fabric
protectors contain chemicals that stain or
bleach the seat material.
CAUTION
cNever use benzine, thinner or any
similar material.
cNever use fabric protectors unless
recommended by the manufacturer.
6-3
ZX
Page 136 of 204
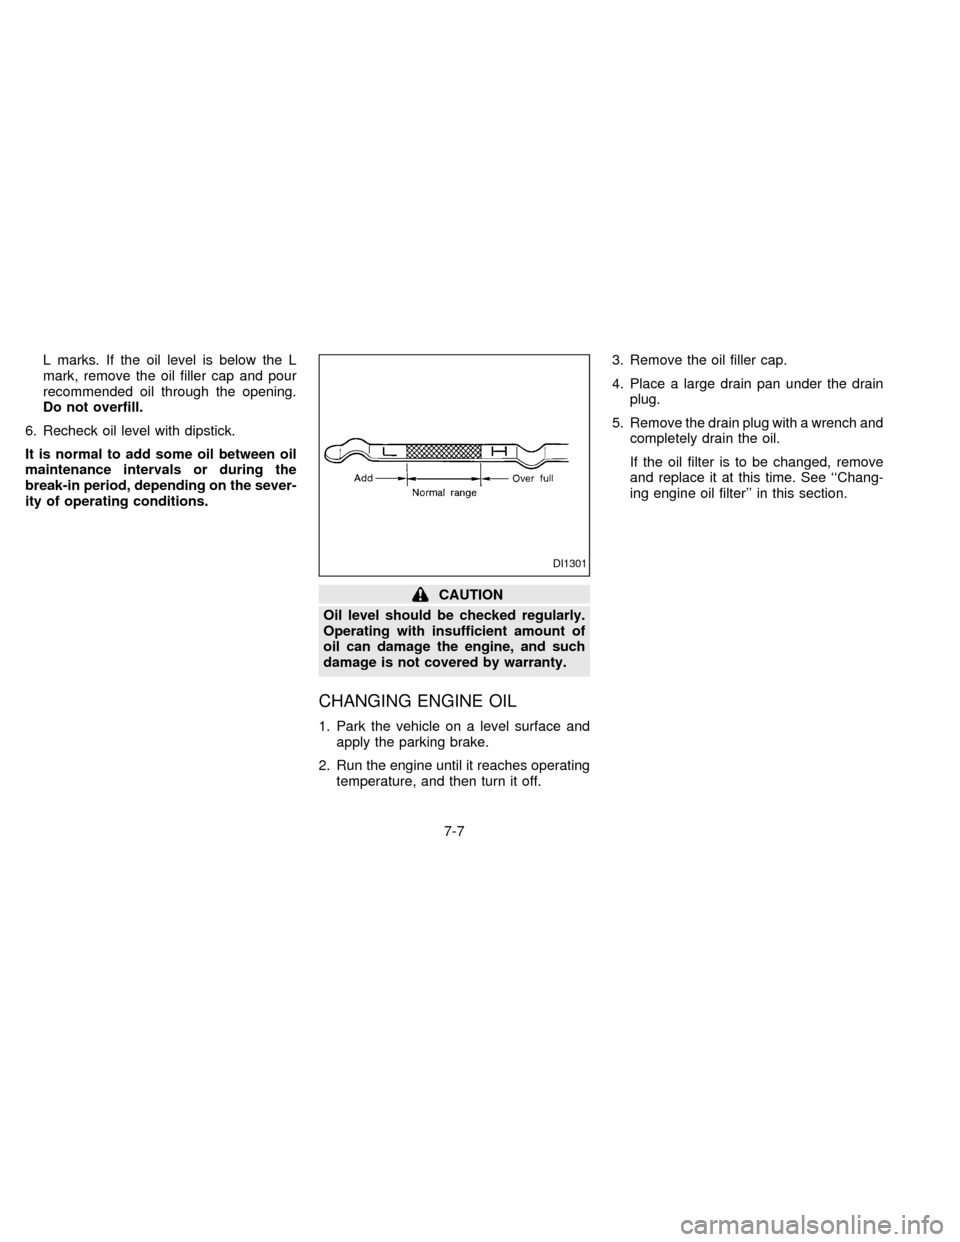
L marks. If the oil level is below the L
mark, remove the oil filler cap and pour
recommended oil through the opening.
Do not overfill.
6. Recheck oil level with dipstick.
It is normal to add some oil between oil
maintenance intervals or during the
break-in period, depending on the sever-
ity of operating conditions.
CAUTION
Oil level should be checked regularly.
Operating with insufficient amount of
oil can damage the engine, and such
damage is not covered by warranty.
CHANGING ENGINE OIL
1. Park the vehicle on a level surface and
apply the parking brake.
2. Run the engine until it reaches operating
temperature, and then turn it off.3. Remove the oil filler cap.
4. Place a large drain pan under the drain
plug.
5. Remove the drain plug with a wrench and
completely drain the oil.
If the oil filter is to be changed, remove
and replace it at this time. See ``Chang-
ing engine oil filter'' in this section.
DI1301
7-7
ZX
Page 137 of 204
WARNING
cProlonged and repeated contact with
used engine oil may cause skin
cancer.
cTry to avoid direct skin contact with
used oil. If skin contact is made,
wash thoroughly with soap or hand
cleaner as soon as possible.
cKeep used engine oil out of reach of
children.
CAUTION
Be careful not to burn yourself, as the
engine oil is hot.
Waste oil must be disposed of properly.
Check your local regulations.
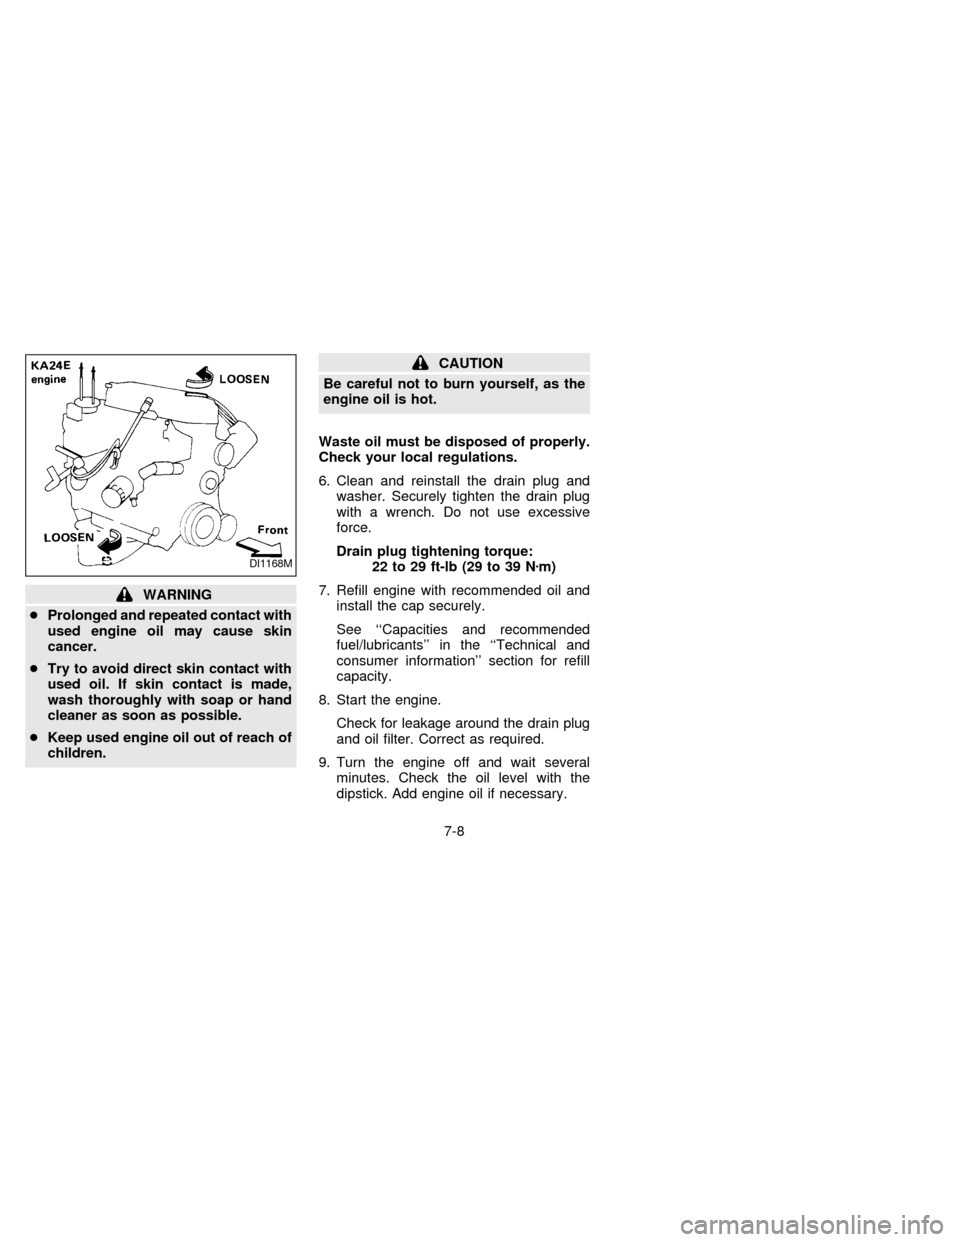
6. Clean and reinstall the drain plug and
washer. Securely tighten the drain plug
with a wrench. Do not use excessive
force.
Drain plug tightening torque:
22 to 29 ft-lb (29 to 39 Nzm)
7. Refill engine with recommended oil and
install the cap securely.
See ``Capacities and recommended
fuel/lubricants'' in the ``Technical and
consumer information'' section for refill
capacity.
8. Start the engine.
Check for leakage around the drain plug
and oil filter. Correct as required.
9. Turn the engine off and wait several
minutes. Check the oil level with the
dipstick. Add engine oil if necessary.
DI1168M
7-8
ZX
Page 165 of 204
![NISSAN FRONTIER 1997 D22 / 1.G Owners Manual Schedule 1
Abbreviations: R = Replace I = Inspect. Correct or replace if necessary. [ ]: At the mileage intervals only
MAINTENANCE OPERATIONMAINTENANCE INTERVAL
Perform at number of miles, kilometers NISSAN FRONTIER 1997 D22 / 1.G Owners Manual Schedule 1
Abbreviations: R = Replace I = Inspect. Correct or replace if necessary. [ ]: At the mileage intervals only
MAINTENANCE OPERATIONMAINTENANCE INTERVAL
Perform at number of miles, kilometers](/manual-img/5/601/w960_601-164.png)
Schedule 1
Abbreviations: R = Replace I = Inspect. Correct or replace if necessary. [ ]: At the mileage intervals only
MAINTENANCE OPERATIONMAINTENANCE INTERVAL
Perform at number of miles, kilometers or
months, whichever comes first.Miles ý 1,000 3.75 7.5 11.25 15 18.75 22.5 26.25 30 33.75 37.5 41.25 45 48.75 52.5 56.25 60
(km ý 1,000) (6) (12) (18) (24) (30) (36) (42) (48) (54) (60) (66) (72) (78) (84) (90) (96)
Months 3 6 9 12 15 18 21 24 27 30 33 36 39 42 45 48
Emission control system maintenance
Drive beltsI* I*
Air cleaner filter See NOTE (1) [R] [R]
Positive crankcase ventilation (PCV) filter See NOTE (2) [R] [R]
Vapor linesI* I*
Fuel linesI* I*
Fuel filter See NOTE (2)*
Engine coolant See NOTE (3)R*
Engine oilRRRRRRRRRRRRRRRR
Engine oil filterRRRRRRRRRRRRRRRR
Spark plugs[R] [R]
NOTE: (1) If operating mainly in dusty conditions, more frequent maintenance may be required.
(2) If vehicle is operated under extremely adverse weather conditions or in areas where ambient temperatures are either extremely low or
extremely high, the filters might become clogged. In such an event, replace them immediately.
(3) After 60,000 miles (96,000 km) or 48 months, replace every 30,000 miles (48,000 km) or 24 months.
* Maintenance items and intervals with ``*'' are recommended by NISSAN for reliable vehicle operation. The owner need not perform such
maintenance in order to maintain the emission warranty or manufacturer recall liability. Other maintenance items and intervals are
required.
8-6
ZX
Page 167 of 204
![NISSAN FRONTIER 1997 D22 / 1.G Owners Manual Schedule 2
Abbreviations: R = Replace I = Inspect. Correct or replace if necessary. [ ]: At the mileage intervals only
MAINTENANCE OPERATIONMAINTENANCE INTERVAL
Perform at number of miles, kilometers NISSAN FRONTIER 1997 D22 / 1.G Owners Manual Schedule 2
Abbreviations: R = Replace I = Inspect. Correct or replace if necessary. [ ]: At the mileage intervals only
MAINTENANCE OPERATIONMAINTENANCE INTERVAL
Perform at number of miles, kilometers](/manual-img/5/601/w960_601-166.png)
Schedule 2
Abbreviations: R = Replace I = Inspect. Correct or replace if necessary. [ ]: At the mileage intervals only
MAINTENANCE OPERATIONMAINTENANCE INTERVAL
Perform at number of miles, kilometers or
months, whichever comes first.Miles ý 1,000 7.5 15 22.5 30 37.5 45 52.5 60
(km ý 1,000) (12) (24) (36) (48) (60) (72) (84) (96)
Months 6 12 18 24 30 36 42 48
Emission control system maintenance
Drive beltsI* I*
Air cleaner filter[R] [R]
Positive crankcase ventilation (PCV) filter See NOTE (1) [R] [R]
Vapor linesI* I*
Fuel linesI* I*
Fuel filter See NOTE (1)*
Engine coolant See NOTE (2)R*
Engine oilRRRRRRRR
Engine oil filterRRRRRRRR
Spark plugs[R] [R]
NOTE: (1) If vehicle is operated under extremely adverse weather conditions or in areas where ambient temperatures are either extremely low
or extremely high, the filters might become clogged. In such an event, replace them immediately.
(2) After 60,000 miles (96,000 km) or 48 months, replace every 30,000 miles (48,000 km) or 24 months.
* Maintenance items and intervals with ``*'' are recommended by NISSAN for reliable vehicle operation. The owner need not perform such
maintenance in order to maintain the emission warranty or manufacturer recall liability. Other maintenance items and intervals are
required.
8-8
ZX
Page 172 of 204

9Technical and consumer information
Capacities and recommended fuel/lubricants ........9-2
Fuel recommendation.............................................9-4
Engine oil and oil filter recommendation................9-6
Recommended SAE viscosity number...................9-7
Air conditioner system refrigerant and
lubricant recommendations ....................................9-8
Engine ....................................................................9-9
Wheel/tire size ......................................................9-10
Dimensions and weights ......................................9-11
Registering your vehicle in another country ........9-12
Vehicle identification ............................................9-12
Vehicle identification number (VIN) plate.............9-12
Vehicle identification number (chassis
number) ................................................................9-12
Engine serial number ...........................................9-13Fmvss certification label .......................................9-13
Emission control information label .......................9-14
Tire placard ..........................................................9-14
Air conditioner specification label.........................9-14
Vehicle loading information ..................................9-15
Securing the load .................................................9-16
Truck-camper loading...........................................9-16
Trailer towing ........................................................9-18
Towing load/specification chart ............................9-20
Uniform tire quality grading ..................................9-23
Emission control system warranty .......................9-24
Reporting safety defects (USA) ...........................9-24
Readiness for inspection/maintenance (I/M)
test ........................................................................9-25
ZX
Page 173 of 204
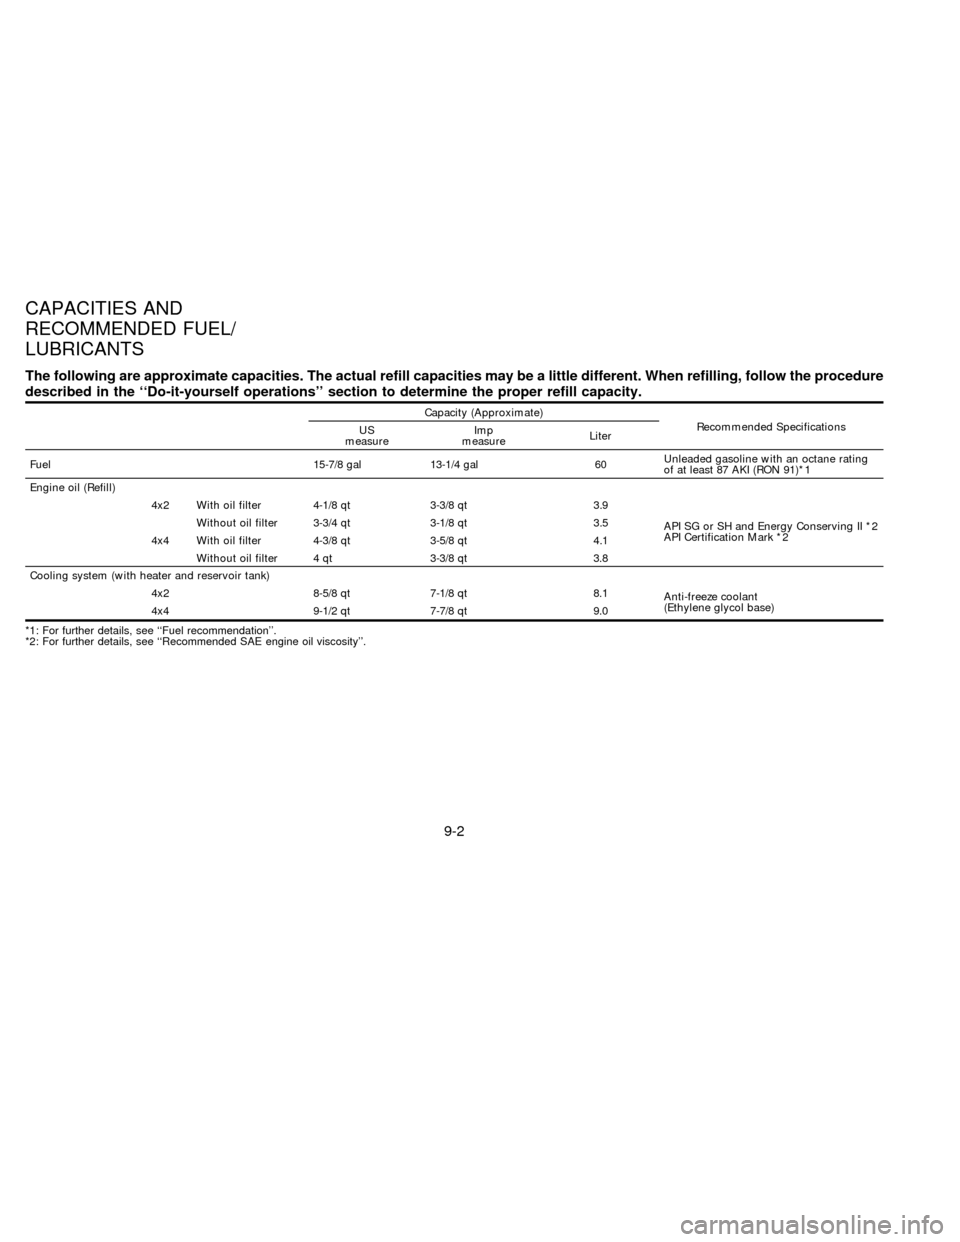
The following are approximate capacities. The actual refill capacities may be a little different. When refilling, follow the procedure
described in the ``Do-it-yourself operations'' section to determine the proper refill capacity.
Capacity (Approximate)
Recommended Specifications
US
measureImp
measureLiter
Fuel 15-7/8 gal 13-1/4 gal 60Unleaded gasoline with an octane rating
of at least 87 AKI (RON 91)*1
Engine oil (Refill)
4x2 With oil filter 4-1/8 qt 3-3/8 qt 3.9
API SG or SH and Energy Conserving II *2
API Certification Mark *2 Without oil filter 3-3/4 qt 3-1/8 qt 3.5
4x4 With oil filter 4-3/8 qt 3-5/8 qt 4.1
Without oil filter 4 qt 3-3/8 qt 3.8
Cooling system (with heater and reservoir tank)
4x2 8-5/8 qt 7-1/8 qt 8.1
Anti-freeze coolant
(Ethylene glycol base)
4x4 9-1/2 qt 7-7/8 qt 9.0
*1: For further details, see ``Fuel recommendation''.
*2: For further details, see ``Recommended SAE engine oil viscosity''.
CAPACITIES AND
RECOMMENDED FUEL/
LUBRICANTS
9-2
ZX