1997 NISSAN FRONTIER warning light
[x] Cancel search: warning lightPage 87 of 204
cMake sure the area around the vehicle is
clear.
cCheck fluid levels such as engine oil,
coolant, brake and clutch fluid, and win-
dow washer fluid as frequently as pos-
sible, at least whenever you refuel.
cCheck that all windows and lights are
clean.
cVisually inspect tires for their appearance
and condition. Also check tires for proper
inflation.
cLock all doors.
cPosition seat and adjust head restraints.
cAdjust inside and outside mirrors.
cFasten seat belts and ask all passengers
to do likewise.
cCheck the operation of warning lights
when key is turned to the ON (3) position.The automatic transmission in your vehicle
is electronically controlled by a microcom-
puter to produce maximum power and
smooth operation.
The recommended operating procedures
for this transmission are shown on the fol-
lowing pages. Follow these procedures for
maximum vehicle performance and driving
enjoyment.
If your vehicle is equipped with 4-wheel
drive, see ``
Transfer case shifting pro-
cedures for 4-wheel drive vehicles'' later in
this section.
Starting the vehicle
cAfter starting the engine, fully depress
the foot brake pedal and push the shift
lever button before shifting the selector
lever to the R, D, 2 or 1 position. Be sure
the vehicle is fully stopped before at-
tempting to shift the selector lever.
cKeep the foot brake pedal depressed and
push the shift lever button to shift into a
driving gear.
c
Release the parking brake and foot brake,
then gradually start the vehicle in motion.
This automatic transmission is designedso the foot brake pedal MUST be depressed
before shifting from P to any drive position
while the ignition switch is ON.
The shift lever cannot be moved out of P
and into any of the other gear positions if
the ignition key is turned to LOCK or if
the key is removed.
When the battery charge is low, the shift
lever can be moved if the ignition switch
is in the ACC position.
WARNING
cDo not depress the accelerator pedal
while shifting from P or N to R, D, 2
or 1. Always depress the brake pedal
until shifting is completed. Failure to
do so could cause you to lose con-
trol and have an accident.
cCold engine idle speed is high, so
use caution when shifting into a for-
ward or reverse gear before the en-
gine has warmed up.
cNever shift to P or R while the ve-
hicle is moving. This could cause an
accident.
BEFORE STARTING THE
ENGINEDRIVING WITH AUTOMATIC
TRANSMISSION (if so
equipped)
4-6
ZX
Page 90 of 204
uncomfortable shift shocks as the trans-
mission repeatedly shifts between 3rd
and overdrive. In this case, set the over-
drive switch in the OFF
position. The
indicator light in the instrument panel
comes on at this time.
When driving conditions change, reset the
overdrive switch in the ONposition.
Remember not to drive at high speeds for
extended periods of time with the overdrive
switch set in the OFF
position. This
reduces fuel economy.
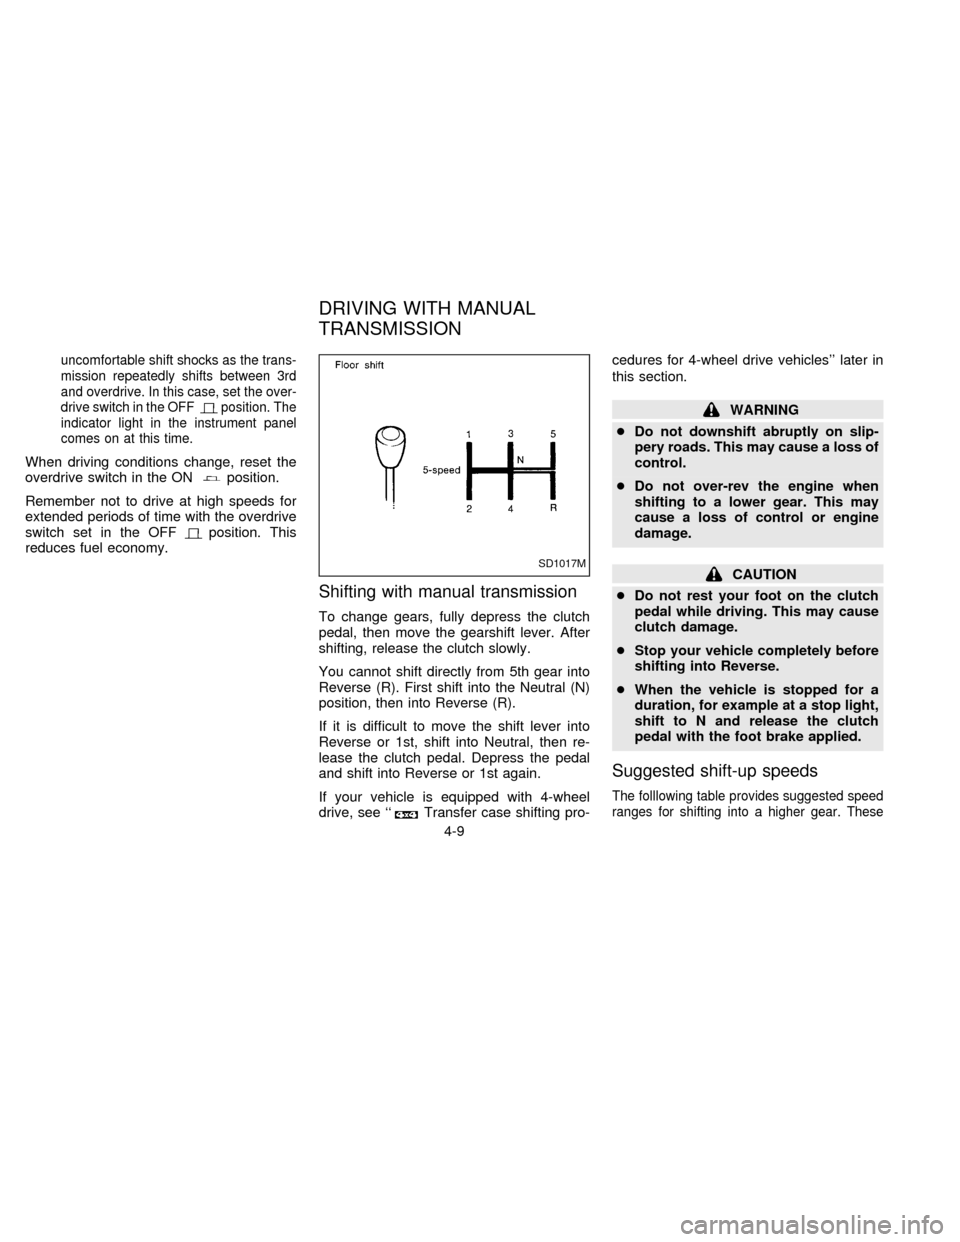
Shifting with manual transmission
To change gears, fully depress the clutch
pedal, then move the gearshift lever. After
shifting, release the clutch slowly.
You cannot shift directly from 5th gear into
Reverse (R). First shift into the Neutral (N)
position, then into Reverse (R).
If it is difficult to move the shift lever into
Reverse or 1st, shift into Neutral, then re-
lease the clutch pedal. Depress the pedal
and shift into Reverse or 1st again.
If your vehicle is equipped with 4-wheel
drive, see ``
Transfer case shifting pro-cedures for 4-wheel drive vehicles'' later in
this section.
WARNING
cDo not downshift abruptly on slip-
pery roads. This may cause a loss of
control.
cDo not over-rev the engine when
shifting to a lower gear. This may
cause a loss of control or engine
damage.
CAUTION
cDo not rest your foot on the clutch
pedal while driving. This may cause
clutch damage.
cStop your vehicle completely before
shifting into Reverse.
cWhen the vehicle is stopped for a
duration, for example at a stop light,
shift to N and release the clutch
pedal with the foot brake applied.
Suggested shift-up speeds
The folllowing table provides suggested speed
ranges for shifting into a higher gear. These
SD1017M
DRIVING WITH MANUAL
TRANSMISSION
4-9
ZX
Page 92 of 204
the accelerator pedal fully and hold it
to help start the engine.
cIn the summer, when restarting the
engine within 30 minutes after it has
been stopped, keep the accelerator
pedal fully depressed while starting.
CAUTION
Do not operate the starter for more than
15 seconds at a time. If the engine does
not start, turn the key off and wait 10
seconds before cranking again, other-
wise the starter could be damaged.
4.Warm-up
Always allow the engine to idle for at
least 30 seconds after starting. Drive at a
moderate speed for a short distance first,
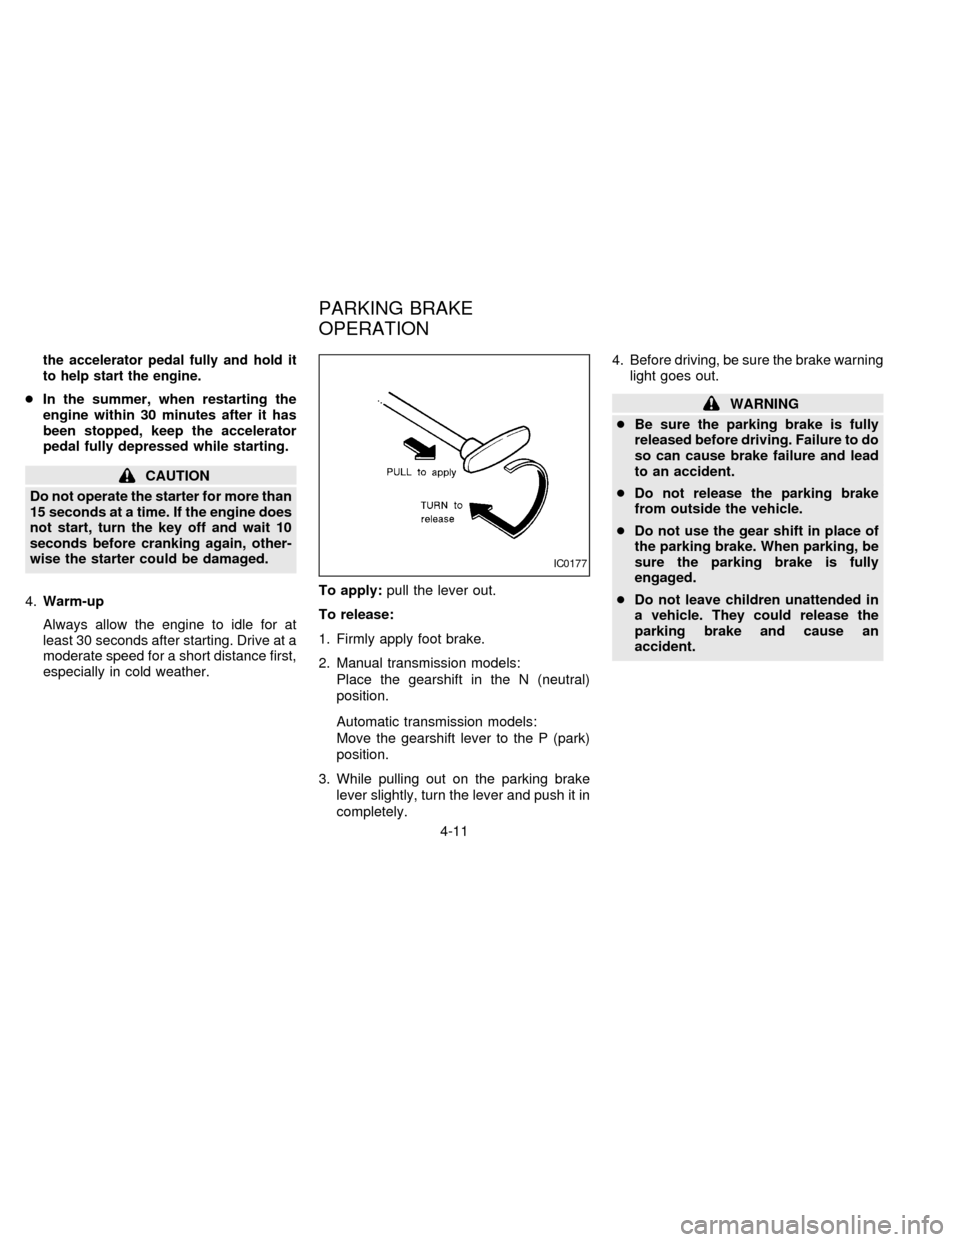
especially in cold weather.To apply:pull the lever out.
To release:
1. Firmly apply foot brake.
2. Manual transmission models:
Place the gearshift in the N (neutral)
position.
Automatic transmission models:
Move the gearshift lever to the P (park)
position.
3. While pulling out on the parking brake
lever slightly, turn the lever and push it in
completely.4. Before driving, be sure the brake warning
light goes out.
WARNING
cBe sure the parking brake is fully
released before driving. Failure to do
so can cause brake failure and lead
to an accident.
cDo not release the parking brake
from outside the vehicle.
cDo not use the gear shift in place of
the parking brake. When parking, be
sure the parking brake is fully
engaged.
cDo not leave children unattended in
a vehicle. They could release the
parking brake and cause an
accident.
IC0177
PARKING BRAKE
OPERATION
4-11
ZX
Page 94 of 204
To reset at a slower cruising speed,use
one of the following three methods:
a) Lightly tap the brake pedal. When the
vehicle attains the desired speed, push
the COAST/SET switch and release it.
b) Push and hold the COAST/SET switch.
Release the switch when the vehicle
slows down to the desired speed.
c) Push, then quickly release the
COAST/SET switch. Each time you do
this, the set speed decreases by about 1
MPH (1.6 km/h).
To resume the preset speed,push and
release the RESUME switch. The vehicle
returns to the last set cruising speed when
the vehicle speed is over 30 MPH (48 km/h).
Precautions
cThe cruise indicator light may blink when
the cruise control main switch is turned
ON while pushing the RESUME/ACCEL,
COAST/SET, or CANCEL switch. To
properly set the cruise control system,
perform the preceding steps in the order
indicated.
cIf the cruise control system malfunctions,
it cancels automatically. The CRUISEindicator in the instrument cluster then
blinks to warn the driver.
cIf the cruise indicator blinks, turn the
cruise control main switch off and have
the system checked by your NISSAN
dealer.
WARNING
Don't use the cruise control when driv-
ing under the following conditions:
cit is not possible to keep the vehicle
at a set speed.
cin heavy traffic or in traffic that var-
ies in speed.
con winding or hilly roads.
con slippery roads (rain, snow, ice,
etc.).
cin very windy areas.
Doing so could cause a loss of vehicle
control and result in an accident.
CAUTION
On manual transmission models, do
not shift into neutral without depress-
ing the clutch pedal when the cruise
control is on. Should this occur, de-
press the clutch pedal and turn the
main switch off immediately. Failure to
do so may cause engine damage.
4-13
ZX
Page 102 of 204
Your NISSAN is designed for both normal
and off-road use. It has a higher ground
clearance and a narrower track to make it
suitable for off-road use. These characteris-
tics give the vehicle a higher center of
gravity than ordinary passenger cars. An
advantage of the higher ground clearance is
a better view of your surroundings, allowing
you to anticipate problems. However, avoid
driving in deep water or mud as your
NISSAN is mainly designed for leisure use,
unlike a conventional off-road vehicle.
Please observe the following precautions:
WARNING
cDrive carefully when off the road and
avoid dangerous areas. Always wear
your seat belts to help keep you and
your passengers in position when
driving over rough terrain.
cDo not drive across steep slopes.
Instead drive either straight up or
straight down the slopes. Off-road
vehicles can tip over sideways much
more easily than they can forward or
backward.cMany hills are too steep for any ve-
hicle. If you drive up them, you may
stall. If you drive down them, you
may not be able to control your
speed. If you drive across them, you
may roll over.
cStay alert when driving to the top of
a hill. At the top there could be a
drop-off or other hazard that could
cause an accident.
cIf your engine stalls or you cannot
make it to the top of a steep hill,
never attempt to turn around. Your
vehicle could tip or roll over. Always
back straight down in reverse gear.
Never back down in neutral (N) or
with the clutch depressed, using
only the brake, as this could cause
loss of control.
c
Heavy braking going down a hill could
cause your brakes to overheat and
fade, resulting in loss of control and
an accident. Apply brakes lightly and
use a low gear to control your speed.
cIf at all possible, avoid sharp turning
maneuvers, particularly at high
speeds. Your NISSAN 4-wheel drive
vehicle has a higher center of gravitythan a 2-wheel drive vehicle and can
tip over more easily. The vehicle is
not designed for cornering at the
same speeds as conventional
2-wheel drive vehicles any more
than low-slung sports cars are de-
signed to perform satisfactorily un-
der off-road conditions. Failure to
operate this vehicle correctly could
result in loss of control and/or a
rollover accident.
cUnsecured cargo can be thrown
around when driving over rough ter-
rain. Properly secure it so that it will
not be thrown forward and cause
injury to you or your passengers.
cAvoid raising the center of gravity by
loading things on the roof or equip-
ping the vehicle with tires larger than
specified in this manual. This could
cause your vehicle to roll over. Put
heavy loads in the cargo area as far
forward and as low as possible.
cDo not grip the inside or spokes of
the steering wheel when driving off-
road. The steering wheel could jerk
and injure your hands. Instead drive
with your fingers and thumbs on the
outside of the rim.
DRIVING YOUR
4-WHEEL DRIVE SAFELY
4-21
ZX
Page 106 of 204
The brake system has two separate hydrau-
lic circuits. If one circuit develops a problem,
you will still have braking at two wheels.
Vacuum assisted brakes
The brake booster aids braking by using
engine vacuum. If the engine stops, you can
stop the vehicle by depressing the brake
pedal. However, greater foot pressure on
the brake pedal will be required to stop the
vehicle and the stopping distance will be
longer.
Wet brakes
When the vehicle is washed or driven
through water, the brakes may get wet. As a
result, your braking distance will be longer
and the vehicle may pull to one side during
braking.
To dry brakes, drive the vehicle at a safe
speed while lightly pressing the brake pedal
to heat the brakes. Do this until the brakes
return to normal. Avoid driving the vehicle at
high speeds until the brakes function cor-
rectly.Using the brakes
Avoid resting your foot on the brake pedal
while driving. This will overheat the brakes,
wear out the brake linings and pads faster,
and reduce gas mileage.
To help reduce brake wear, and to prevent
the brakes from overheating, reduce speed
and downshift to a lower gear before going
down a slope or long grade.
WARNING
While driving on a slippery surface, be
careful when braking, accelerating or
downshifting. Abrupt braking actions
or sudden acceleration could cause the
wheels to skid and result in an acci-
dent.
Normal Operation
The rear anti-lock brake system does not
operate at speeds below 3 to 6 MPH (5 to 10
km/h). (The speeds vary according to road
conditions.)
When driving in the 2-wheel drive mode, the
rear anti-lock brake system controls the rear
wheels so they will not lock when braking
abruptly or when braking on a slippery road.
Thus, difficult steering and swerving of the
vehicle due to locked rear wheels is mini-
mized. The system detects the rear wheel
rotation rate and electronically controls the
pressure applied to each rear brake. Slight
vibration on the brake pedal accompanied
by noise usually occurs while the ABS sys-
tem is operating. Such vibration and noise
encountered during abrupt braking is not a
problem, but indicates that the system is
functioning.
Even with the rear anti-lock brake sys-
tem, your front wheels can still lock. If
this happens, release the brake pedal
slightly and then reapply pressure.
Self-test feature
The rear anti-lock brake system consists of
an electronic sensor and two hydraulic so-
BRAKE SYSTEM REAR ANTI-LOCK BRAKE
SYSTEM (R-ABS)
4-25
ZX
Page 107 of 204
lenoids controlled by a computer. The com-
puter has a built-in diagnostic feature that
tests the system each time you start the
engine and move the vehicle at a low speed
in forward or reverse. When the self-test
occurs, you may hear a ``clunk'' noise
and/or feel a pulsation in the brake pedal.
This is normal and is not an indication of any
malfunction. If the computer senses any
malfunction, it switches the rear anti-lock
brake system off and turns on the ABS
brake warning light in the dashboard. The
brake system then operates normally, but
without anti-lock assistance.
If an abnormality occurs in the system, the rear
anti-lock function will cease but the ordinary
brakes will continue to operate normally. The
ABS brake warning light will then come on.
If the light comes on while you are driving,
contact your NISSAN dealer for repair.
The rear anti-lock brake system
may only be effective when driving in the
2-wheel drive mode.
When driving in the 4-wheel drive mode, the
rear anti-lock brake system may not be
effective in many cases because the front
axle is connected with the rear axle throughthe transfer gear. The rear wheels lock if the
front wheels lock. If this happens, the rear
anti-lock brake system may cease function-
ing but the ordinary brakes will continue to
operate normally. The ABS brake warning
light will then come on.
The above condition is not a malfunction
and the rear anti-lock brake system recov-
ers when the engine is started again. The
ABS brake warning light then goes off.
Using the System
Depress the brake pedal and hold it down.
WARNING
Do not pump the brake pedal. Doing so
may result in increased stopping dis-
tances.
WARNING
The rear anti-lock brake system is a
sophisticated device. But it cannot pre-
vent accidents resulting from careless
or dangerous driving techniques. It can
help maintain vehicle control undersome conditions, but remember that
the stopping distance on slippery sur-
faces will be longer than on normal
surfaces even with rear wheel ABS.
Stopping distances may also be longer
on rough, gravel, or snow covered
roads, or if you are using tire chains.
Always maintain a safe distance from
the vehicle in front of you. Ultimately,
the responsibility for safety of self and
others rests in the hands of the driver.
Tire type and condition may also affect
braking effectiveness.
cWhen replacing tires, install the
specified size of tires on all four
wheels.
cWhen installing a spare tire, make
sure it is the proper size and type as
specified on the tire placard. See
``Tire placard'' in the ``Technical and
consumer information'' section.
4-26
ZX
Page 117 of 204
To start your engine with a booster battery,
the instructions and precautions below must
be followed.
WARNING
cIf done incorrectly, jump starting can
lead to a battery explosion, resulting
in severe injury or death. It could
also damage your vehicle.
cExplosive hydrogen gas is always
present in the vicinity of the battery.
Keep all sparks and flames away
from the battery.
cDo not allow battery fluid to come
into contact with eyes, skin, cloth or
painted surfaces. Battery fluid is a
corrosive sulphuric acid solution
which can cause severe burns. If the
fluid should come into contact with
anything, immediately flush the con-
tacted area with water.
cKeep battery out of the reach of
children.
cThe booster battery must be rated at
12 volts. Use of an improperly rated
battery can damage your vehicle.c
Whenever working on or near a bat-
tery, always wear suitable eye protec-
tors (e.g., goggles or industrial safety
spectacles) and remove rings, metal
bands, or any other jewelry. Do not
lean over the battery when jump
starting.
cDo not attempt to jump start a frozen
battery. It could explode and cause
serious injury.
cYour vehicle has an automatic en-
gine cooling fan. It could come on at
any time. Keep hands and other ob-
jects away from it.
Always follow the instructions below
exactly. Failure to do so could result
in damage to the charging system and
cause personal injury.
1. If the booster battery is in another ve-
hicle, position the two vehicles to bring
their batteries into close proximity to
each other.
Do not allow the two vehicles to touch.
2. Apply the parking brake. Move the shift
lever to Neutral (N) (on automatic trans-
mission models, move the lever to P).Switch off all unnecessary electrical sys-
tems (lights, heater, air conditioner, etc.).
3. Remove vent caps on the battery (if so
equipped). Cover the battery with an old
cloth to reduce explosion hazard.
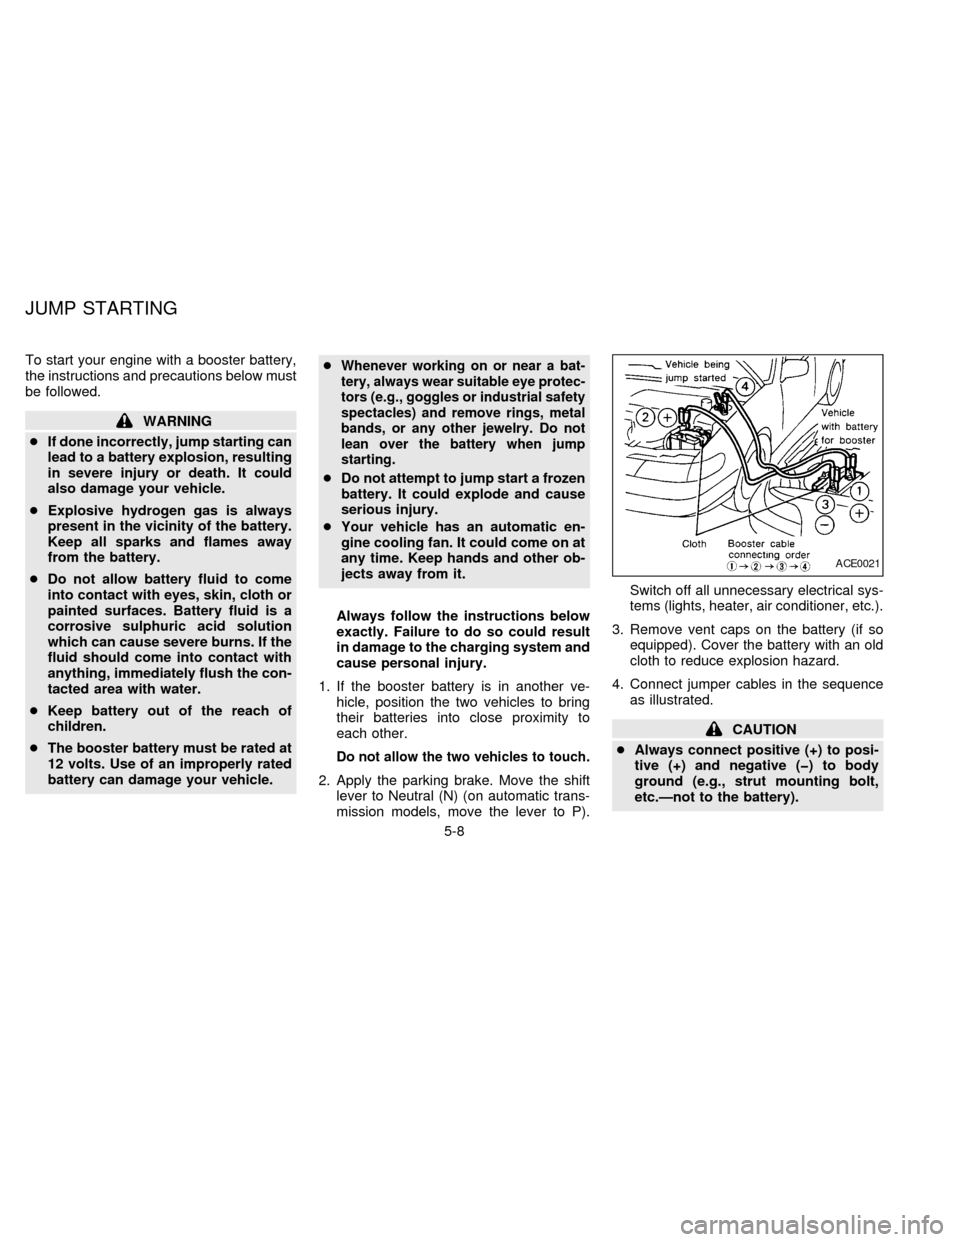
4. Connect jumper cables in the sequence
as illustrated.
CAUTION
cAlways connect positive (+) to posi-
tive (+) and negative (þ) to body
ground (e.g., strut mounting bolt,
etc.Ðnot to the battery).
ACE0021
JUMP STARTING
5-8
ZX