1997 NISSAN ALTIMA warning lights
[x] Cancel search: warning lightsPage 8 of 203

1Instruments and controls
Meters and gauges ................................................1-2
Speedometer and odometer ..................................1-3
Tachometer ............................................................1-3
Engine coolant temperature gauge and fuel
gauge .....................................................................1-4
Warning/indicator lights and chimes ......................1-5
Theft warning (if so equipped) ...............................1-9
Windshield wiper and washer switch ...................1-10
Rear window defogger switch ..............................1-11
Headlight and turn signal switch ..........................1-12
Daytime running light system (for Canada) .........1-13
Cornering light (if so equipped)............................1-13
Instrument brightness control ...............................1-14
Front fog light switch (if so equipped)..................1-14Hazard warning flasher switch .............................1-14
Cigarette lighter (accessory) and ash tray ...........1-15
Cup holder ............................................................1-16
Manual windows ...................................................1-16
Power windows ....................................................1-17
Automatic power window switch ..........................1-17
Rear power windows ............................................1-18
Sunroof (if so equipped).......................................1-18
If the sunroof does not close ...............................1-19
Clock instrument panel (if so equipped) ..............1-20
Interior light...........................................................1-20
Trunk light.............................................................1-21
Spotlight (if so equipped) .....................................1-21
ZX
Page 12 of 203
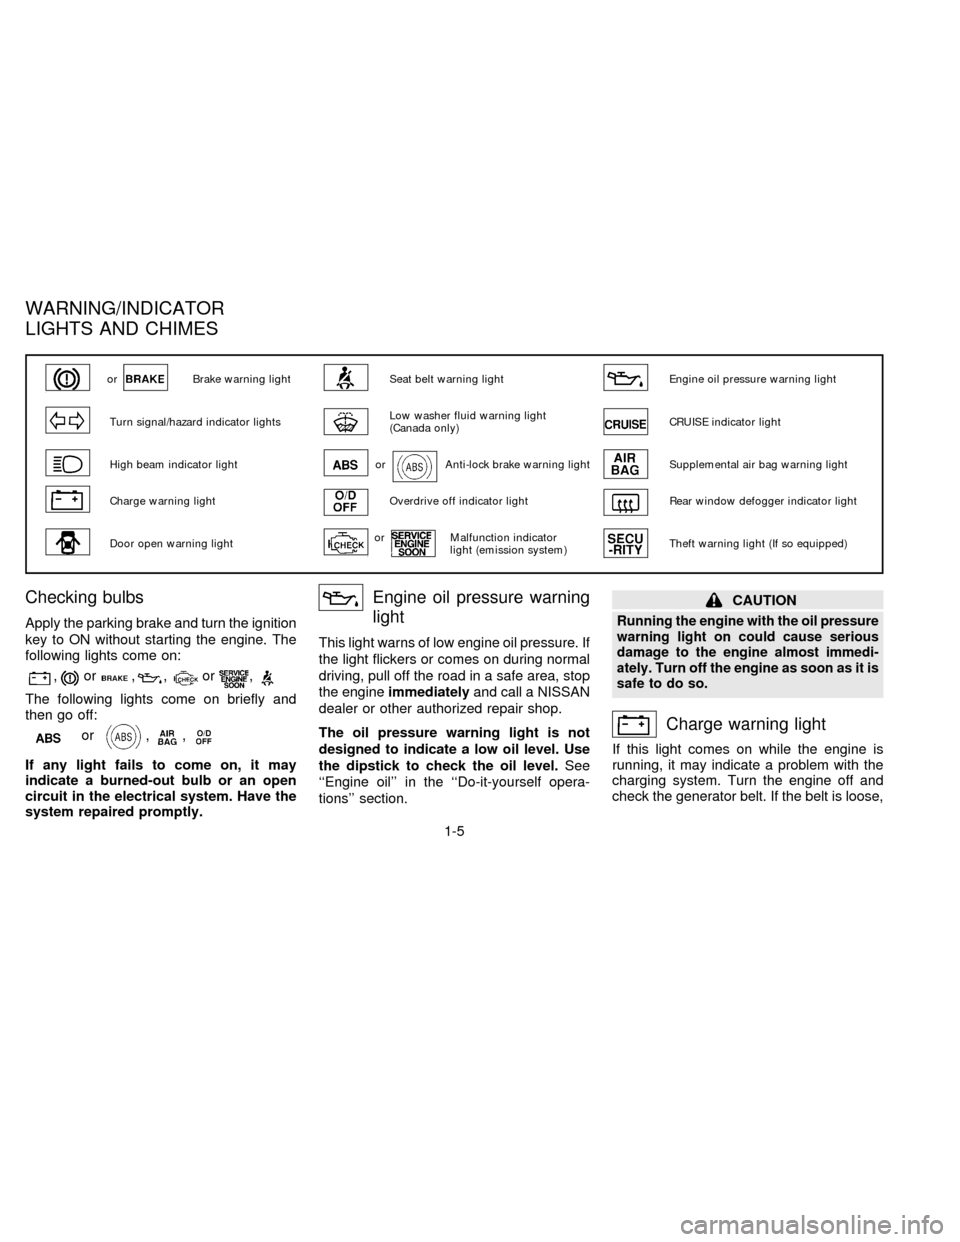
Checking bulbs
Apply the parking brake and turn the ignition
key to ON without starting the engine. The
following lights come on:
,or,,or,
The following lights come on briefly and
then go off:
or,,
If any light fails to come on, it may
indicate a burned-out bulb or an open
circuit in the electrical system. Have the
system repaired promptly.
Engine oil pressure warning
light
This light warns of low engine oil pressure. If
the light flickers or comes on during normal
driving, pull off the road in a safe area, stop
the engineimmediatelyand call a NISSAN
dealer or other authorized repair shop.
The oil pressure warning light is not
designed to indicate a low oil level. Use
the dipstick to check the oil level.See
``Engine oil'' in the ``Do-it-yourself opera-
tions'' section.
CAUTION
Running the engine with the oil pressure
warning light on could cause serious
damage to the engine almost immedi-
ately. Turn off the engine as soon as it is
safe to do so.
Charge warning light
If this light comes on while the engine is
running, it may indicate a problem with the
charging system. Turn the engine off and
check the generator belt. If the belt is loose,
orBrake warning lightSeat belt warning lightEngine oil pressure warning light
Turn signal/hazard indicator lightsLow washer fluid warning light
(Canada only)CRUISE indicator light
High beam indicator lightorAnti-lock brake warning lightSupplemental air bag warning light
Charge warning lightOverdrive off indicator lightRear window defogger indicator light
Door open warning lightorMalfunction indicator
light (emission system)Theft warning light (If so equipped)
WARNING/INDICATOR
LIGHTS AND CHIMES
1-5
ZX
Page 14 of 203
2. If the brake fluid level is correct, have the
warning system checked by your NIS-
SAN dealer.
WARNING
cYour brake system may not be work-
ing properly if the warning light is
on. Driving could be dangerous. If
you judge it to be safe, drive care-
fully to the nearest service station
for repairs. Otherwise, have your ve-
hicle towed.
cPressing the brake pedal with the
engine stopped and/or low brake
fluid level may increase your stop-
ping distance and braking will re-
quire greater pedal effort as well as
greater pedal travel.
cIf the brake fluid level is below the
minimum mark on the brake fluid
reservoir, do not drive until the brake
system has been checked at a NIS-
SAN dealer.
Brake pad wear warning
The disc brake pads have audible wear
warnings. When a brake pad requires re-
placement, it makes a high pitched scrapingsound when the vehicle is in motion,
whether or not the brake pedal is de-
pressed. Have the brakes checked as soon
as possible if the warning sound is heard.
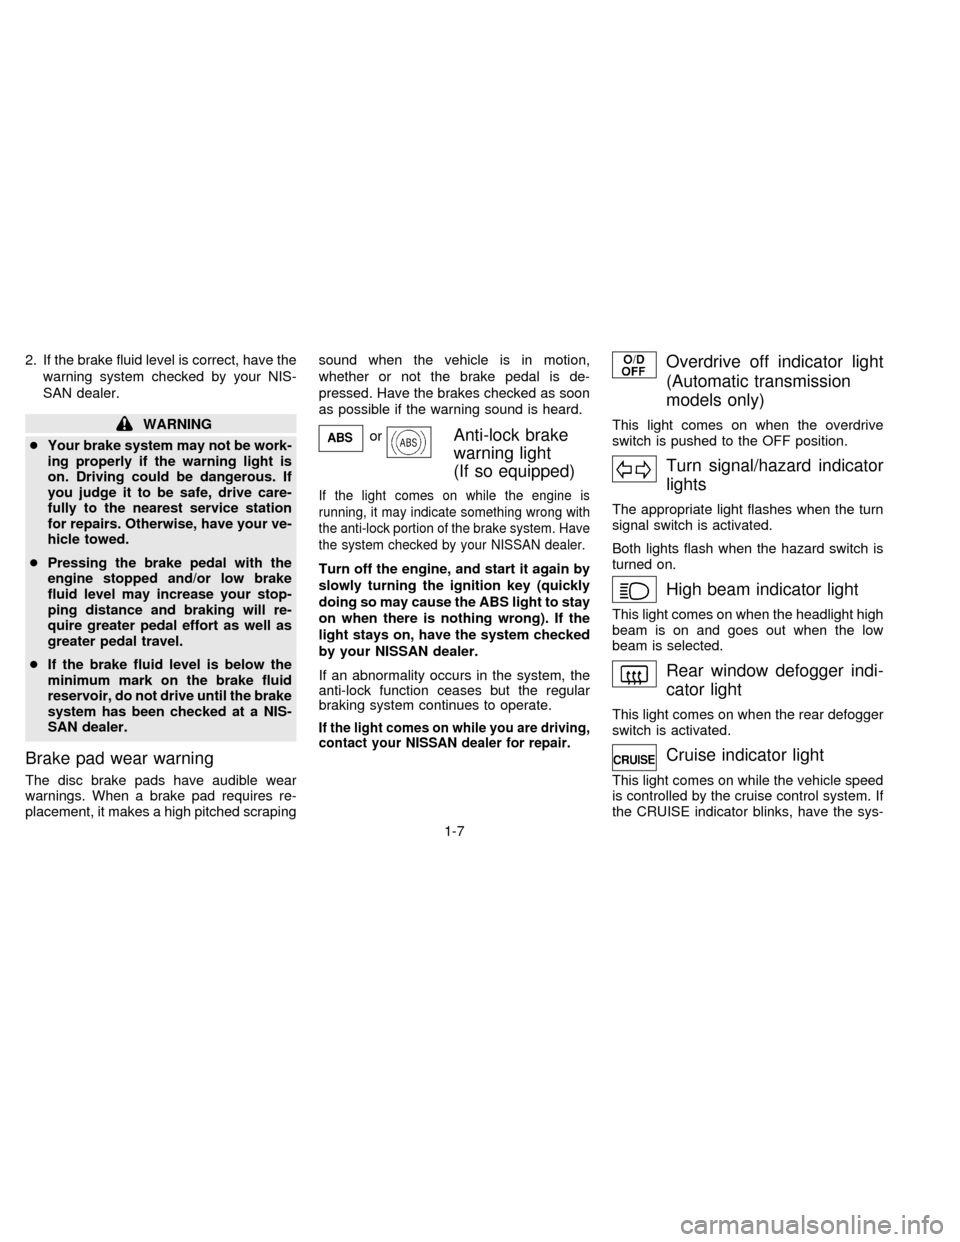
orAnti-lock brake
warning light
(If so equipped)
If the light comes on while the engine is
running, it may indicate something wrong with
the anti-lock portion of the brake system. Have
the system checked by your NISSAN dealer.
Turn off the engine, and start it again by
slowly turning the ignition key (quickly
doing so may cause the ABS light to stay
on when there is nothing wrong). If the
light stays on, have the system checked
by your NISSAN dealer.
If an abnormality occurs in the system, the
anti-lock function ceases but the regular
braking system continues to operate.
If the light comes on while you are driving,
contact your NISSAN dealer for repair.
Overdrive off indicator light
(Automatic transmission
models only)
This light comes on when the overdrive
switch is pushed to the OFF position.
Turn signal/hazard indicator
lights
The appropriate light flashes when the turn
signal switch is activated.
Both lights flash when the hazard switch is
turned on.
High beam indicator light
This light comes on when the headlight high
beam is on and goes out when the low
beam is selected.
Rear window defogger indi-
cator light
This light comes on when the rear defogger
switch is activated.
Cruise indicator light
This light comes on while the vehicle speed
is controlled by the cruise control system. If
the CRUISE indicator blinks, have the sys-
1-7
ZX
Page 16 of 203

The theft warning system provides visual
and audio alarm signals if parts of the
vehicle are disturbed.
How to activate the theft warning
system
1. Close all windows.
2. Remove the key from the ignition switch.
3. Close and lock all doors, hood and trunk
lid. Lock all doors by pressing the
button on the multi-remote controller. At
this time, the hazard indicators flash
twice to indicate all doors are locked.The system can be activated even if the
windows are open.
4.
Confirm that the SECURITY indicator light
comes on. The SECURITY light glows for
about 30 seconds and then begins to flash
once every three seconds. The system is
now activated. If, during this 30-second
time period, the door is unlocked by the
key or the multi-remote controller, or the
ignition key is turned to ACC or ON, the
system will not activate.
If the key is turned slowly when locking
the door, the system may not activate.
Furthermore, if the key is turned exces-
sively to the unlock position, the system
may be deactivated when the key is re-
moved. If the indicator light fails to glow
for 30 seconds, unlock the door once
and lock it again.
Even when the driver and/or passengers
are in the vehicle, the system will acti-
vate with all doors, hood and trunk lid
locked and ignition key off. Turn the
ignition key to ACC or ON to turn the
system off.
Theft warning system operation
The theft warning system emits the follow-
ing alarm:
cThe headlights blink and the horn sounds
intermittently. In addition, the starter mo-
tor does not operate.
cThe alarm automatically turns off after 2
to 3 minutes. However, the alarm reacti-
vates if the vehicle is tampered with
again. The alarm can be shut off by
unlocking a door or trunk lid with the key,
or by pressing the
button on the
multi-remote controller.
The alarm is activated by:
copening the door or trunk lid without
using the key (even if the door is un-
locked by releasing the door inside lock
switch) or opening the trunk lid by oper-
ating the opener lever.
copening the hood.
cpushing in or pulling out the key cylinder
on the door or trunk lid.
How to stop the alarm
The alarm stops only by unlocking a door or
the trunk lid with the key, or by pressing
IC0005
THEFT WARNING
(If so equipped)
1-9
ZX
Page 20 of 203
DAYTIME RUNNING LIGHT SYS-
TEM (for Canada)
The headlights automatically illuminate at a
reduced intensity when the engine is started
with the parking brake released. The day-
time running lights operate with the head-
light switch in the ``OFF'' position or in the
``
'' position. Turn the headlight switch
to the ``
'' position for full illumination
when driving at night.
If the parking brake is applied before the
engine is started, the daytime running lights
do not illuminate. The daytime running lights
illuminate once the parking brake is re-
leased. The daytime running lights will re-
main on until the ignition switch is turned off.
WARNING
When the daytime running light system
is active, tail lights on your vehicle are
not on. It is necessary at dusk to turn
on your headlights. Failure to do so
could cause an accident injuring your-
self and others.
Passing signal
Pulling and releasing the lever flashes the
headlight high beams on and off.
Turn signal
Move the lever up or down to signal the
turning direction. When the turn is com-
pleted, the turn signals cancel automati-
cally.
Lane change signal
To signal a lane change, move the lever up
or down to the point where the indicator light
begins to flash, but the lever does not latch.
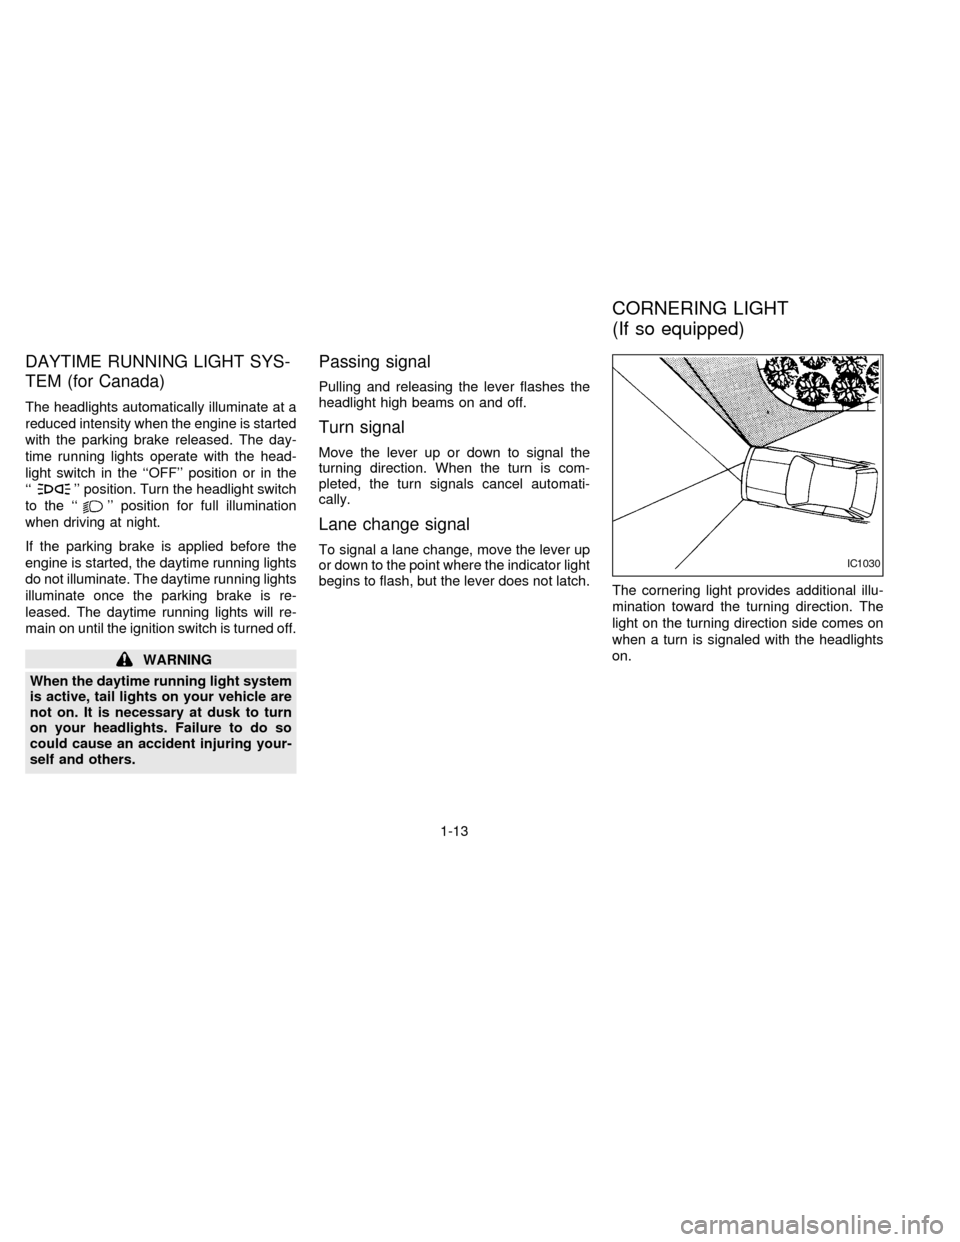
The cornering light provides additional illu-
mination toward the turning direction. The
light on the turning direction side comes on
when a turn is signaled with the headlights
on.IC1030
CORNERING LIGHT
(If so equipped)
1-13
ZX
Page 21 of 203
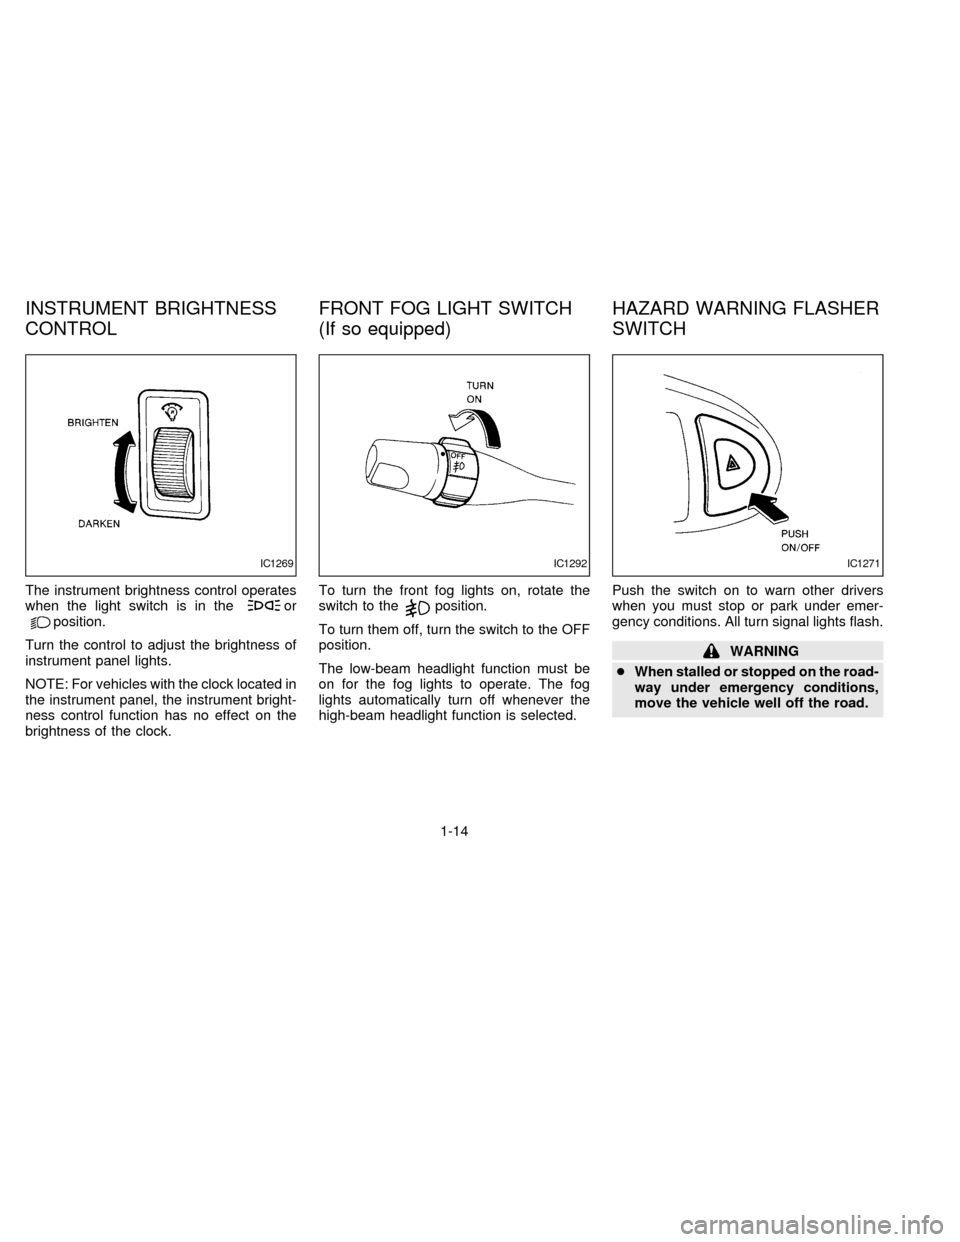
The instrument brightness control operates
when the light switch is in theorposition.
Turn the control to adjust the brightness of
instrument panel lights.
NOTE: For vehicles with the clock located in
the instrument panel, the instrument bright-
ness control function has no effect on the
brightness of the clock.To turn the front fog lights on, rotate the
switch to theposition.
To turn them off, turn the switch to the OFF
position.
The low-beam headlight function must be
on for the fog lights to operate. The fog
lights automatically turn off whenever the
high-beam headlight function is selected.Push the switch on to warn other drivers
when you must stop or park under emer-
gency conditions. All turn signal lights flash.
WARNING
cWhen stalled or stopped on the road-
way under emergency conditions,
move the vehicle well off the road.
IC1269IC1292IC1271
INSTRUMENT BRIGHTNESS
CONTROLFRONT FOG LIGHT SWITCH
(If so equipped)HAZARD WARNING FLASHER
SWITCH
1-14
ZX
Page 22 of 203
cDo not use the switch while moving
on the highway unless unusual cir-
cumstances force you to drive so
slowly that your vehicle might be-
come a hazard to other traffic.
cTurn signals do not work when the
hazard warning flasher lights are on.
The flashers can be actuated with the igni-
tion switch either OFF or ON.
Some state laws may prohibit the use of
the hazard warning flasher switch while
driving.
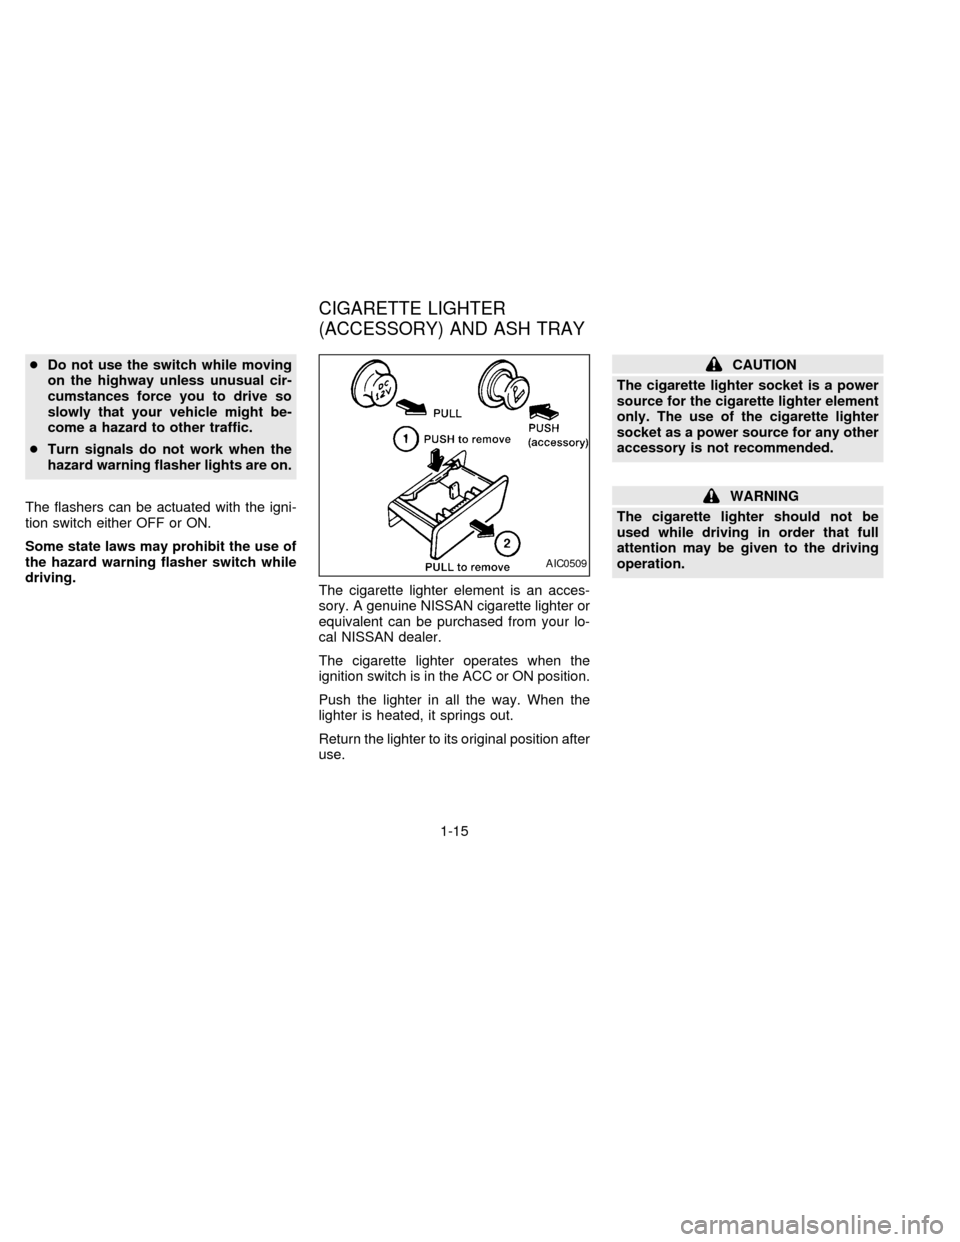
The cigarette lighter element is an acces-
sory. A genuine NISSAN cigarette lighter or
equivalent can be purchased from your lo-
cal NISSAN dealer.
The cigarette lighter operates when the
ignition switch is in the ACC or ON position.
Push the lighter in all the way. When the
lighter is heated, it springs out.
Return the lighter to its original position after
use.CAUTION
The cigarette lighter socket is a power
source for the cigarette lighter element
only. The use of the cigarette lighter
socket as a power source for any other
accessory is not recommended.
WARNING
The cigarette lighter should not be
used while driving in order that full
attention may be given to the driving
operation.
AIC0509
CIGARETTE LIGHTER
(ACCESSORY) AND ASH TRAY
1-15
ZX
Page 35 of 203

The interior light can be turned off without
waiting 30 seconds by inserting the key into
the ignition or locking the doors with the
multi-remote controller or pushing the
interior light button to OFF.
Using the panic alarm
If you are near your vehicle and feel threat-
ened, you may activate the alarm to call
attention as follows:
1. Push the
button on the remote con-
troller forlonger than 1.5 seconds.
2. The theft warning alarm and headlights
will stay on for 30 seconds.
3. The panic alarm stops when:
cit has run for 30 seconds, or
cthe
or thebutton is pressed, or
cthe
button is pushed for longer than
1.5 seconds on the multi-remote control-
ler.
Replace the battery in the multi-remote con-
troller as follows:
1. Open the lid using a coin.
2. Replace the battery with a new one.
Insert the battery as illustrated above.Recommended battery: Sanyo CR2025
or equivalent.
3. Close the lid securely.
4. Press the
button, then thebutton
two or three times to check the multi-
remote controller operation.
APD0535
BATTERY REPLACEMENT
2-6
ZX