1997 NISSAN ALTIMA air condition
[x] Cancel search: air conditionPage 6 of 203
ContentsInstruments and controls
Pre-driving checks and adjustments
Heater, air conditioner and audio system
Starting and driving
In case of emergency
Appearance and interior care
Do-it-yourself operations
Maintenance schedule
Technical and consumer information
Index
1
2
3
4
5
6
7
8
9
10
Page 13 of 203
broken, or missing, or if the light remains on,
see your NISSAN dealer immediately.
CAUTION
Do not continue driving if the belt is
loose, broken or missing.
Door open warning light
This light comes on when any of the doors
are not closed securely while the ignition
key is ON.
Seat belt warning light and
chime
The light and chime remind you to fasten
seat belts. The light illuminates whenever
the ignition key is turned to ON, and re-
mains illuminated until the driver's seat belt
is fastened. At the same time, the chime
sounds for about seven seconds unless the
driver's seat belt is securely fastened.
Refer to ``Seat belts'' in the ``Pre-driving
checks and adjustments'' section for pre-
cautions on seat belt usage.
Supplemental air bag warn-
ing light
When the ignition key is in the ON or START
position, the supplemental air bag warning
light illuminates for about 7 seconds and
then turns off. This means the system is
operational.
If any of the following conditions occur, the
supplemental air bag system needs servicing
and your vehicle must be taken to your near-
est authorized NISSAN dealer:
1. The supplemental air bag warning light
does not come on and remain on for 7
seconds and then go off as described
above.
2. The supplemental air bag warning light
flashes intermittently or remains on.
3. The supplemental air bag warning light
does not come on at all.
Unless checked and repaired, the Supple-
mental Restraint System (Supplemental air
bag system) may not function properly. For
additional details, see ``Supplemental Re-
straint System'' in the ``Pre-driving checks
and adjustments'' section.
WARNING
cIf the supplemental airbag warning
light is on, it could mean that the
supplemental airbag will not operate
in an accident.
Low washer fluid warning
light (Canada only)
This light comes on when the washer fluid is
at a low level. Add washer fluid as neces-
sary. See the ``Do-it-yourself operations''
section.
orBrake warning light
This light functions for both the parking
brake and the foot brake systems.
The light comes on when the parking brake
is applied, and also warns of a low brake
fluid level. If the light comes on while the
engine is running with the parking brake not
applied, stop the vehicle and perform the
following:
1. Check the brake fluid level. Add brake
fluid as necessary. See ``Brake and
clutch fluid'' in the ``Do-it-yourself opera-
tions'' section.
1-6
ZX
Page 15 of 203
tem checked by your NISSAN dealer.
Theft warning light (If so
equipped)
This light is used to verify theft warning
system activation. For further information,
see ``Theft Warning'' later in this chapter.
Key reminder chime
A chime sounds if the driver side door is
opened while the key is left in the ignition
switch. Remove the key and take it with you
when leaving the vehicle.
Light reminder chime
A chime sounds when the driver side door is
opened if the headlight switch is turned on
(ignition switch is turned OFF).
Turn the light switch OFF when you leave
the vehicle.
orMalfunction indi-
cator light (MIL)
If the malfunction indicator light comes on
steady or blinks while the engine is running,
it may indicate a potential emission control
problem.The malfunction indicator light will come on
in one of two ways:
1. Malfunction indicator light on steady - An
emission control system malfunction has
been detected. Have the vehicle in-
spected by an authorized NISSAN
dealer. You do not need to have your
vehicle towed to the dealer.
2. Malfunction indicator light blinking - An
engine misfire has been detected which
may damage the emission control sys-
tem. To reduce or avoid emission control
system damage:
cdo not drive at speeds above 45 MPH
(72 km/h).
cavoid hard acceleration or decelera-
tion.
cavoid steep uphill grades.
cif possible, reduce the amount of cargo
behind hauled or towed.
The malfunction indicator light may stop
blinking and come on steady. Have the
vehicle inspected by an authorized NISSAN
dealer. You do not need to have your ve-
hicle towed to the dealer.
CAUTION
Continued vehicle operation without
having the emission control system
checked and repaired as necessary
could lead to poor driveability, reduced
fuel economy, and possible damage to
the emission control system, which
may affect your warranty coverage.
Some conditions may cause the malfunc-
tion indicator light to come on steady or
blink. For example, running the vehicle out
of fuel, which causes the engine to misfire,
may cause the malfunction indicator light to
come on steady or blink.
If you suspect that you experienced this
condition, drive the vehicle to an authorized
NISSAN dealer and have the vehicle in-
spected. Avoid any unnecessary diagnosis
during the service by informing the dealer of
the condition that may have occurred.
1-8
ZX
Page 51 of 203
If any of the following conditions occur, the
supplemental air bag needs servicing:
1. The supplemental air bag light does not
come on and remain on for 7 seconds
and then go off as described above.
2. The supplemental air bag light flashes
intermittently or remains on.
3. The supplemental air bag light does not
come on at all.
Under these conditions, the Supplemental
Restraint System Air Bag may not operate
properly. It must be checked and repaired.
Take your vehicle to the nearest authorized
NISSAN dealer.
WARNING
If the supplemental air bag warning
light is on, it could mean that the air
bag will not operate in an accident.
Repair and replacement procedure
The supplemental air bag system is de-
signed to inflate on a one-time-only basis.
As a reminder, unless it is damaged, the
supplemental air bag light remains illumi-
nated after inflation has occurred. Repairand replacement of the supplemental air
bag system should be done only by an
authorized NISSAN dealer.
To ensure long-term functioning, the
system must be inspected 10 years after
the date of manufacture as noted on the
certification label located on the driver
side front pillar.
When maintenance work is required on the
vehicle, the supplemental air bag system
and related parts should be pointed out to
the person conducting the maintenance.
The ignition key should always be in the
LOCK position when working under the
hood or inside the vehicle.
WARNING
cOnce the supplemental air bag in-
flates, the supplemental air bag
module will not function again and
should be replaced by an authorized
NISSAN dealer. The supplemental air
bag module cannot be repaired.cThe supplemental air bag system
should be inspected by an autho-
rized NISSAN dealer if there is any
damage to the front end portion of
the vehicle.
cIf you need to dispose of a supple-
mental air bag or scrap the vehicle,
contact an authorized NISSAN
dealer. Correct supplemental air bag
disposal procedures are set forth in
the appropriate NISSAN Service
Manual. Incorrect disposal proce-
dures could cause personal injury.
2-22
ZX
Page 69 of 203

3Heater, air conditioner and audio system
Ventilators ..............................................................3-2
Heater and air conditioner (manual) ......................3-2
Controls ..................................................................3-3
Heater operation ....................................................3-3
Air conditioner operation (if so equipped) ..............3-4
Air flow charts.........................................................3-5
Heater and air conditioner (automatic) (if so
equipped) ...............................................................3-8
Radio ....................................................................3-11
Clock-radio (if so equipped) .................................3-11AM-FM radio with cassette player .......................3-12
Radio operation ....................................................3-12
Cassette tape operation .......................................3-14
AM-FM radio with cassette player and
compact disc player .............................................3-17
Radio operation ....................................................3-17
Cassette tape operation .......................................3-19
Compact disc (CD) player operation....................3-21
Antenna ................................................................3-22
CB radio or car phone..........................................3-23
ZX
Page 70 of 203
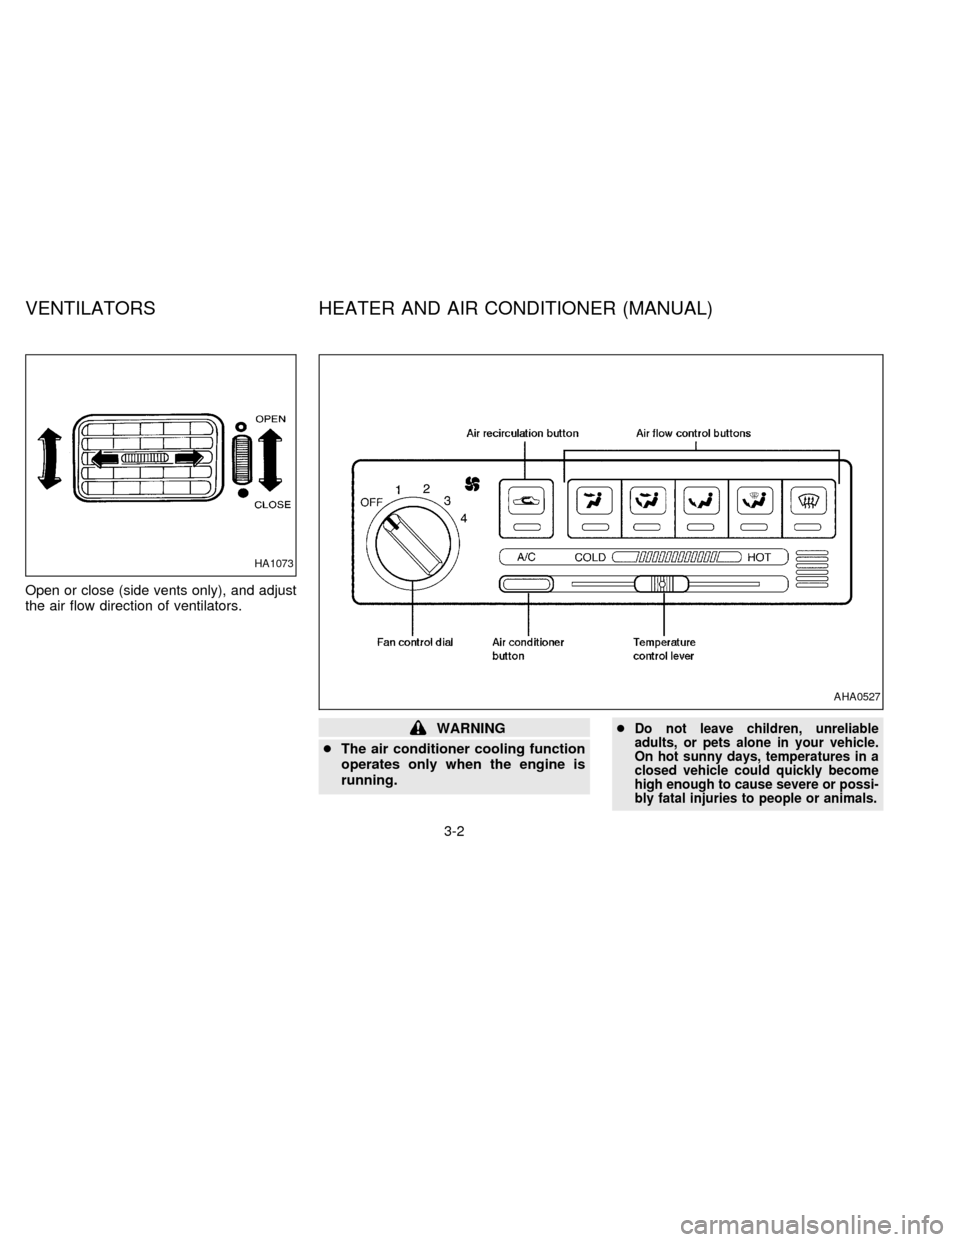
Open or close (side vents only), and adjust
the air flow direction of ventilators.
WARNING
cThe air conditioner cooling function
operates only when the engine is
running.cDo not leave children, unreliable
adults, or pets alone in your vehicle.
On hot sunny days, temperatures in a
closed vehicle could quickly become
high enough to cause severe or possi-
bly fatal injuries to people or animals.
HA1073
AHA0527
VENTILATORS HEATER AND AIR CONDITIONER (MANUAL)
3-2
ZX
Page 71 of 203
cDo not use the recirculation mode for
long periods as it may cause the inte-
rior air to become stale and the win-
dows to fog up.
cPositioning of the heating or air con-
ditioning controls should not be
done while driving, in order that full
attention may be given to the driving
operation.
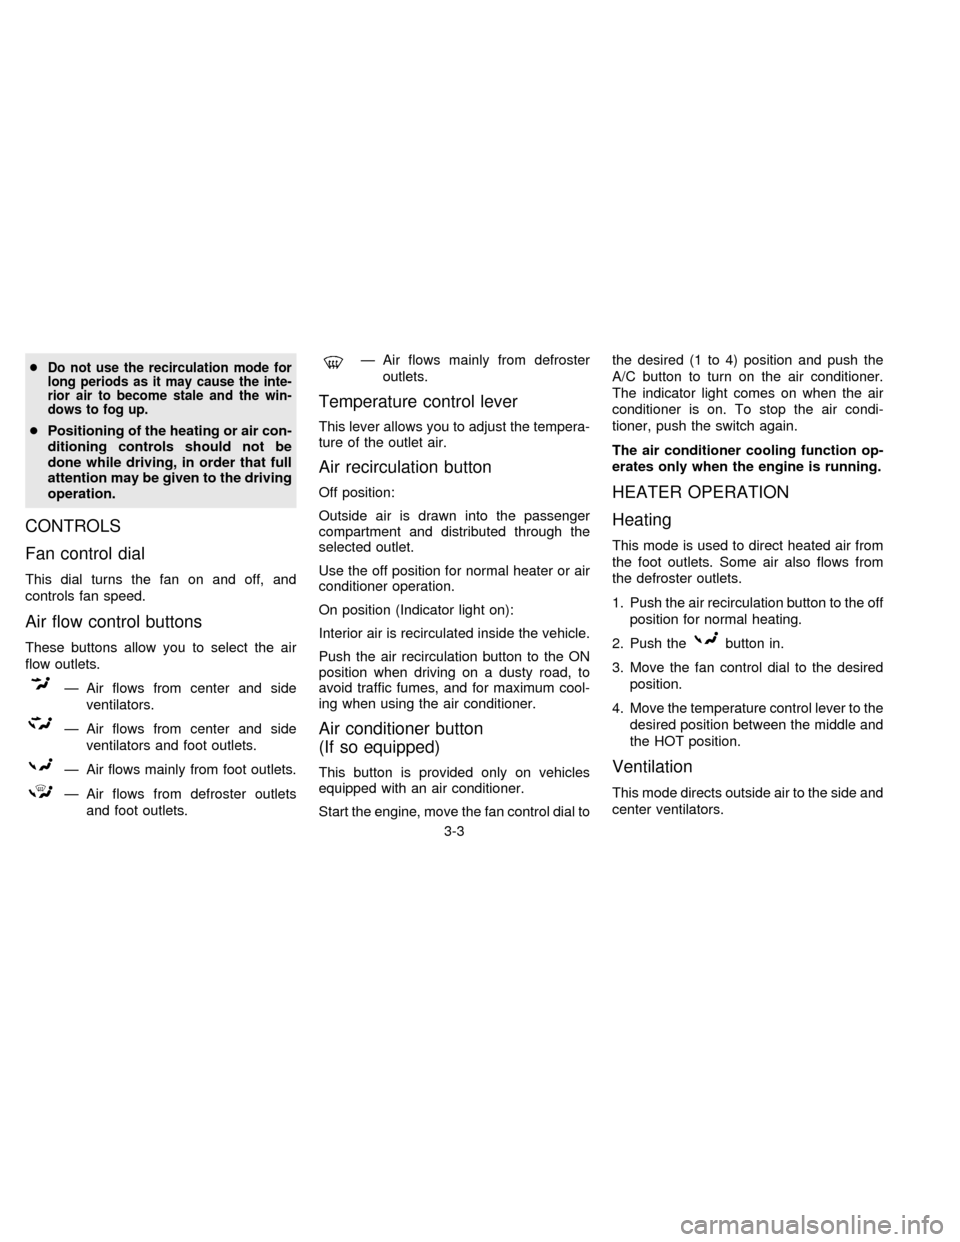
CONTROLS
Fan control dial
This dial turns the fan on and off, and
controls fan speed.
Air flow control buttons
These buttons allow you to select the air
flow outlets.
Ð Air flows from center and side
ventilators.
Ð Air flows from center and side
ventilators and foot outlets.
Ð Air flows mainly from foot outlets.
Ð Air flows from defroster outlets
and foot outlets.
Ð Air flows mainly from defroster
outlets.
Temperature control lever
This lever allows you to adjust the tempera-
ture of the outlet air.
Air recirculation button
Off position:
Outside air is drawn into the passenger
compartment and distributed through the
selected outlet.
Use the off position for normal heater or air
conditioner operation.
On position (Indicator light on):
Interior air is recirculated inside the vehicle.
Push the air recirculation button to the ON
position when driving on a dusty road, to
avoid traffic fumes, and for maximum cool-
ing when using the air conditioner.
Air conditioner button
(If so equipped)
This button is provided only on vehicles
equipped with an air conditioner.
Start the engine, move the fan control dial tothe desired (1 to 4) position and push the
A/C button to turn on the air conditioner.
The indicator light comes on when the air
conditioner is on. To stop the air condi-
tioner, push the switch again.
The air conditioner cooling function op-
erates only when the engine is running.
HEATER OPERATION
Heating
This mode is used to direct heated air from
the foot outlets. Some air also flows from
the defroster outlets.
1. Push the air recirculation button to the off
position for normal heating.
2. Push the
button in.
3. Move the fan control dial to the desired
position.
4. Move the temperature control lever to the
desired position between the middle and
the HOT position.
Ventilation
This mode directs outside air to the side and
center ventilators.
3-3
ZX
Page 72 of 203

1. Push the air recirculation button to the off
position.
2. Push the
button in.
3. Move the fan control dial to the desired
position.
4. Move the temperature control lever to the
desired position.
Defrosting or defogging
This mode is used to defrost/defog the
windows.
1. Push the
button in.
2. Move the fan control dial to the desired
position.
3. Move the temperature control lever to the
desired position between the middle and
the HOT position.
cTo quickly remove ice or fog from the
windows, turn on the fan control dial to 4
and the temperature control lever to the
full HOT position.
cWhen the
switch is pushed, the air
conditioner automatically turns on to de-
fog the windshield, and the air recircula-
tion mode automatically turns off.Outside air is drawn into the passenger
compartment to improve the defogging
performance.
Bi-level heating/cooling
This mode directs air from the side, center
and foot outlets.
1. Push the air recirculation button to the off
position.
2. Push the
button in.
3. Move the fan control dial to the desired
position.
4. Move the temperature control lever to the
desired position.
Heating and defogging
This mode heats the interior and defogs the
windshield.
1. Push the
button in.
2. Move the fan control dial to the desired
position.
3. Move the temperature control lever to the
desired position between the middle and
the HOT position.
Operating tips
cClear snow and ice from the wiper
blades and air inlet in front of the
windshield. This improves heater op-
eration.
cWhen the
orswitch is se-
lected, the air recirculation mode auto-
matically turns off.
Outside air is drawn into the passenger
compartment to improve the defogging
performance.
AIR CONDITIONER OPERATION
(If so equipped)
Start the engine, move the fan control dial to
the desired (1 to 4) position and push in the
A/C button to activate the air conditioner.
When the air conditioner is on, cooling and
dehumidifying functions are added to the
heater operation.
The air conditioner cooling function op-
erates only when the engine is running.
3-4
ZX