Page 2037 of 4133

Fig. 1: Drive Belt Routing
Courtesy of MERCEDES-BENZ OF NORTH AMERICA.
TROUBLE SHOOTING
PRELIMINARY INSPECTION
Verify customer complaint by operating system. Visually inspect for obvious signs of mechanical and electrical
damage. Check generator belt tension and condition. Ensure that battery voltage is within specifications. Inspect
for blown fuses and damaged relays.
Verify ground connection integrity between engine, body, battery and generator. Check for damaged wiring
harnesses and/or switches. Check for a broken or partially broken wire inside insulation, which could cause
system malfunction but prove good in a continuity/voltage check with system disconnected. Ensure any
aftermarket electronic equipment is properly installed. If fault is found, repair as necessary. If no fault is found,
check for conditions that might cause an intermittent situation.
SERVICE PRECAUTIONS
BATTERY DISCONNECT/CONNECT
Disconnect Procedures
1. On vehicles not equipped with TELE AID, go to step 5 . Vehicles equipped with TELE AID, switch
TELE AID into service mode by turning ignition ON.
2. Turn ON telephone and enter code "*#4610#" on handset.
3. Confirm that "No Telematics Service" appears on handset with okay.
4. Turn OFF handset.
5. Turn OFF ignition.
6. Open hood and open snap fasteners (1) on dust filter housing. See Fig. 2
.
7. Remove dust filter housing (2) exposing battery.
8. If not using quiescent current retention unit, go to step 14 . If using quiescent current retention unit, go to
next step.
9. Connect quiescent current retention unit by switching on quiescent current retention unit (7) and then first
connecting positive terminal (8) and negative terminal (9) of retention unit to positive cable and battery
ground (W10). See Fig. 3
.
10. On vehicles equipped with TELE AID, remove luggage compartment cargo anchoring lugs and remove
floor paneling.
11. Remove screws (1). See Fig. 4
.
12. Dismantle cover from TELE AID control module (A35/8).
13. Disconnect connection coupling for back up battery and remove back up battery.
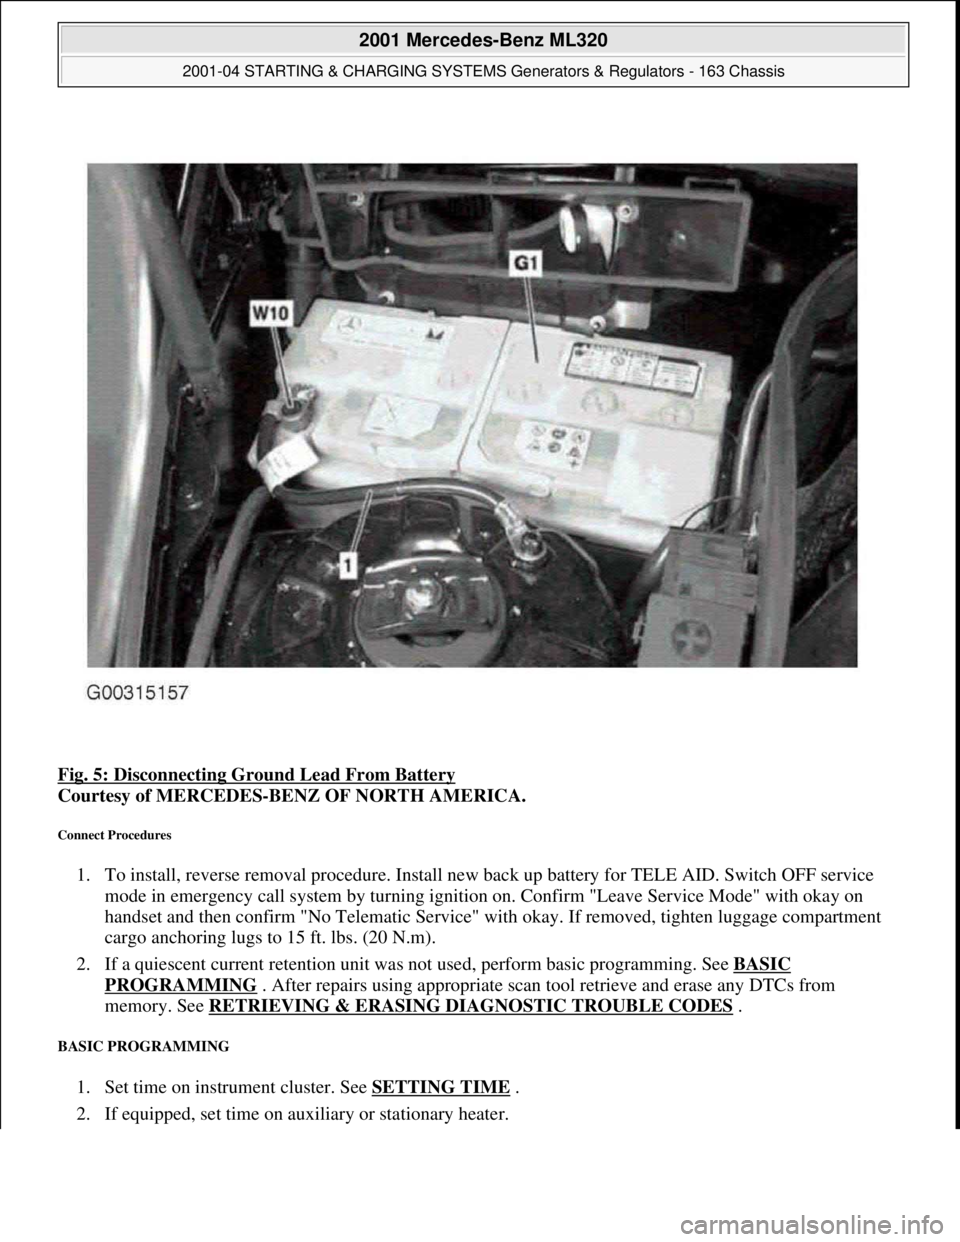
14. Disconnect ne
gative battery cable (1) and insulate terminal. See Fig. 5. NOTE: Numbers and letters in text refer to numbers and letters in figures.
2001 Mercedes-Benz ML320
2001-04 STARTING & CHARGING SYSTEMS Generators & Regulators - 163 Chassis
me
Saturday, October 02, 2010 3:20:31 PMPage 3 © 2006 Mitchell Repair Information Company, LLC.
Page 2038 of 4133
Fig. 2: Removing Dust Filter Housing
Courtesy of MERCEDES-BENZ OF NORTH AMERICA.
2001 Mercedes-Benz ML320
2001-04 STARTING & CHARGING SYSTEMS Generators & Regulators - 163 Chassis
me
Saturday, October 02, 2010 3:20:31 PMPage 4 © 2006 Mitchell Repair Information Company, LLC.
Page 2039 of 4133
Fig. 3: Connecting Quiescent Current Retention Unit
Courtesy of MERCEDES-BENZ OF NORTH AMERICA.
2001 Mercedes-Benz ML320
2001-04 STARTING & CHARGING SYSTEMS Generators & Regulators - 163 Chassis
me
Saturday, October 02, 2010 3:20:32 PMPage 5 © 2006 Mitchell Repair Information Company, LLC.
Page 2040 of 4133
Fig. 4: Removing Emergency Call System Battery
Courtesy of MERCEDES-BENZ OF NORTH AMERICA.
2001 Mercedes-Benz ML320
2001-04 STARTING & CHARGING SYSTEMS Generators & Regulators - 163 Chassis
me
Saturday, October 02, 2010 3:20:32 PMPage 6 © 2006 Mitchell Repair Information Company, LLC.
Page 2041 of 4133

Fig. 5: Disconnecting Ground Lead From Battery
Courtesy of MERCEDES-BENZ OF NORTH AMERICA.
Connect Procedures
1. To install, reverse removal procedure. Install new back up battery for TELE AID. Switch OFF service
mode in emergency call system by turning ignition on. Confirm "Leave Service Mode" with okay on
handset and then confirm "No Telematic Service" with okay. If removed, tighten luggage compartment
cargo anchoring lugs to 15 ft. lbs. (20 N.m).
2. If a quiescent current retention unit was not used, perform basic programming. See BASIC
PROGRAMMING . After repairs using appropriate scan tool retrieve and erase any DTCs from
memory. See RETRIEVING & ERASING DIAGNOSTIC TROUBLE CODES
.
BASIC PROGRAMMING
1. Set time on instrument cluster. See SETTING TIME .
2. If equipped, set time on auxiliary or stationary heater.
2001 Mercedes-Benz ML320
2001-04 STARTING & CHARGING SYSTEMS Generators & Regulators - 163 Chassis
me
Saturday, October 02, 2010 3:20:32 PMPage 7 © 2006 Mitchell Repair Information Company, LLC.
Page 2042 of 4133

3. Normalize side power windows. See NORMALIZING POWER WINDOWS .
4. Start engine and run at idle. Turn steering wheel from one lock position to the other to activate steering
angle sensor. Center steering wheel. Message "EI. STAB. PROGRAM GO TO GARAGE" should erase
from multifunction display panel.
5. If equipped, normalize tilting/sliding roof. See NORMALIZING TILTING/SLIDING ROOF
.
6. If equipped, normalize memory power seats, steering column and outside mirror if components are
installed. See NORMALIZING MEMORY POWER SEATS, STEERING COLUMN & OUTSIDE
MIRROR .
Normalizing Power Windows
1. Completely close each window with manual switch. Hold switch in closed position for .3 second.
2. Repeat procedure for each power window.
Normalizing Memory Power Seats, Steering Column & Outside Mirror
1. Using manual switch, move seat to each end position and hold for .3 second. Repeat procedure for each
switch except rear stop of backrest.
2. Repeat procedure for end positions of steering wheel and outside mirrors.
Normalizing Tilting/Sliding Roof
Open roof with SR switch until mechanical stop is reached. Continue to press switch for .5 seconds.
Setting Time
1. Use bottom left button on steering wheel to scroll through menus on instrument cluster to "Settings"
menu.
2. Move selection marker with + or - button to "Time" submenu.
3. Press up or down arrows to "Clock, hours" setting. Confirm selection marker is on the hour setting.
4. Press + or - to set hour. Press reset knob in instrument cluster to confirm.
5. Move selection marker with + or - button to "Time" submenu.
6. Press up or down arrows to "Clock, minutes" setting. Confirm selection marker is on the minutes setting.
7. Press + or - to set minute. Press reset knob in instrument cluster to confirm.
TESTING
If generator malfunctions, check for Diagnostic Trouble Codes (DTCs) in Motor Electronics Sequential Fuel
Injection (ME-SFI) system. See appropriate SELF-DIAGNOSTICS article in ENGINE PERFORMANCE. If
cause of generator malfunction is not engine performance related, replace generator.
RETRIEVING & ERASING DIAGNOSTIC TROUBLE CODES
NOTE: Before replacing any component that scan tool suggests are faulty, ensure that
all wiring connections and harness connectors are okay. Ensure that power and
2001 Mercedes-Benz ML320
2001-04 STARTING & CHARGING SYSTEMS Generators & Regulators - 163 Chassis
me
Saturday, October 02, 2010 3:20:32 PMPage 8 © 2006 Mitchell Repair Information Company, LLC.
Page 2043 of 4133
RETRIEVING DIAGNOSTIC TROUBLE CODES
To retrieve codes using hand held tester, see Fig. 6 .
Fig. 6: Retrieving Codes Using Hand Held Tester
Courtesy of MERCEDES-BENZ OF NORTH AMERICA.
CLEARING DIAGNOSTIC TROUBLE CODES
Disconnecting vehicle battery will not erase codes. Follow scan tool equipment manufacturers instructions to
erase fault codes.
FAULT CODE DIAGNOSIS EQUIPMENT CONNECTION
To connect hand held tester scan tool to Mercedes-Benz data link connector, see Fig. 7 . To connect hand held
ground circuits are functioning properl
y. For circuit identification, see
appropriate WIRING DIAGRAM unde r ENGINE PERFORMANCE in SYSTEM
WIRING DIAGRAMS for vehicle being tested.
NOTE: For diagnostic equipment conn ections, see FAULT CODE DIAGNOSIS
EQUIPMENT CONNECTION .
2001 Mercedes-Benz ML320
2001-04 STARTING & CHARGING SYSTEMS Gene rators & Regulators - 163 Chassis
me
Saturday, October 02, 2010 3:20:32 PMPage 9 © 2006 Mitchell Repair Information Company, LLC.
Page 2044 of 4133
tester scan tool to OBD-II data link connector, see Fig. 8.
2001 Mercedes-Benz ML320
2001-04 STARTING & CHARGING SYSTEMS Generators & Regulators - 163 Chassis
me
Saturday, October 02, 2010 3:20:32 PMPage 10 © 2006 Mitchell Repair Information Company, LLC.