Page 827 of 4133
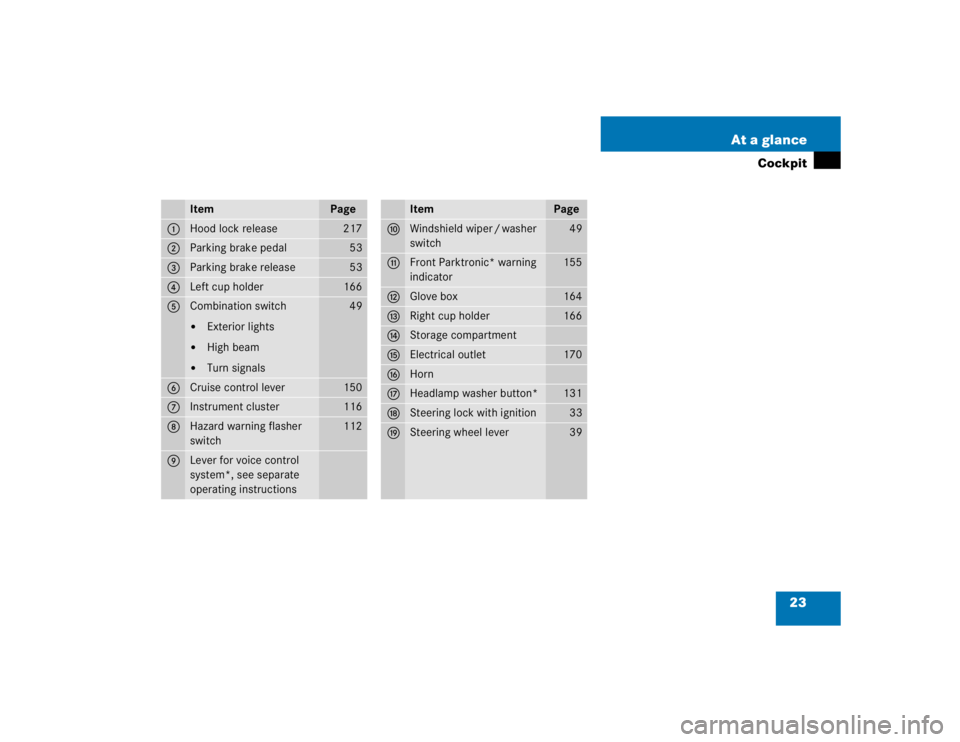
23 At a glance
Cockpit
Item
Page
1
Hood lock release
217
2
Parking brake pedal
53
3
Parking brake release
53
4
Left cup holder
166
5
Combination switch�
Exterior lights
�
High beam
�
Turn signals
49
6
Cruise control lever
150
7
Instrument cluster
116
8
Hazard warning flasher
switch
112
9
Lever for voice control
system*, see separate
operating instructions
Item
Page
a
Windshield wiper / washer
switch
49
b
Front Parktronic* warning
indicator
155
c
Glove box
164
d
Right cup holder
166
e
Storage compartment
f
Electrical outlet
170
g
Horn
h
Headlamp washer button*
131
j
Steering lock with ignition
33
k
Steering wheel lever
39
Page 912 of 4133
.
Automat")
108 Controls in detailLightingManual headlamp mode
The low beam headlamps and parking
lamps can be switched on and off with the
combination switch. For combination
switch, see (
�page 107).
Automatic headlamp mode
The parking lamps, low beam headlamps
and license plate lamps switch on and off
automatically depending on the brightness
of the ambient light.
�
Turn the combination switch toU.iIf you remove the key and open the
driver’s door while the parking lamps or
low beam headlamps are switched on,
then a warning sounds.
Warning!
G
If the combination switch is set toU,�
the headlamps may switch off unexpect-
edly when the system senses bright am-
bient light, for example light from
oncoming traffic.
�
the headlamps will not be automatically
switched on under foggy conditions.
To minimize risk to you and to others, acti-
vate headlamps by turning combination
switch toõ when driving or when traffic
and / or ambient lighting conditions require
you to do so.
In low ambient lighting conditions, only
switch from positionU toõ with the
vehicle at a standstill. Switching fromU
toõ will briefly switch off the head-
lamps. Doing so while driving in low ambient
lighting conditions may result in an acci-
dent.
The automatic headlamp feature is only an
aid to the driver. The driver is responsible for
the operation of the vehicle's lights at all
times.iIf the automatic headlamp mode is ac-
tivated, the fog lamps can also be
switched on (
�page 111). The low
beam headlamp and parking lamps are
activated simultaneously.
Page 1057 of 4133

253 Practical hints
What to do if …
Problem
Possible cause
Suggested solution
:
The yellow warning lamp flashes
after starting the engine or while
driving.
The engine oil level has sunk to the minimum
level. If the engine oil level continues to sink,
the warning lamp will light up.
�
Add approved oil at the next gas
station (
�page 302).
�
If oil loss is visible on the engine, have
the malfunction corrected as soon as
possible at a Mercedes-Benz Light
Truck Center.
_
The red indicator lamp does not
go out after starting the engine.
The adjustable telescoping steering column
is not properly locked.
�
Lock the adjustable steering column
(�page 39).
‡
The green front fog lamp indica-
tor lamp lights up when ignition
is turned on.
The front fog lamps are switched on.
�
Fog lamps (
�page 111).
<
The red seat belt warning lamp
illuminates for a brief period
after starting the engine.
The warning lamp reminds you to fasten seat
belts.
�
Fasten your seat belt (
�page 64).
W
The yellow low washer system
fluid level lamp comes on after
starting the engine or while driv-
ing.
There is approximately 1.3 US qt. (1.25 l) of
washer fluid remaining in the reservoir.
�
Add washer fluid (
�page 224).
The washer fluid may have frozen.
�
Move the vehicle to a warmer environ-
ment so that the washer fluid will
thaw.
�
Correct the concentration level after
the washer fluid in the reservoir
thaws.
Page 1059 of 4133
255 Practical hints
What to do if …
Problem
Possible cause
Suggested solution
1
The red SRS indicator lamp lights
up while driving.
There is a malfunction in the restraint sys-
tems. The airbags or emergency tensioning
device (ETDs) could deploy unexpectedly or
fail to activate in an accident.
�
Drive with added caution to the near-
est authorized Mercedes-Benz Light
Truck Center.
Warning!
G
In the event a malfunction of the SRS is indi-
cated as outlined above, the SRS may not be
operational. For your safety, we strongly
recommend that you visit an authorized
Mercedes-Benz Light Truck Center immedi-
ately to have the system checked, otherwise
the SRS may not be activated when needed
in an accident, which could result in serious
or fatal injury, or it might deploy unexpect-
edly and unnecessarily which could result in
an accident / or injury to you or to others.
Page 1071 of 4133

267 Practical hints
Replacing bulbs
Rear lamps Notes on bulb replacement
�
Use only 12-volt bulbs of the same type
and with the specified watt rating.
�
Switch lights off before changing a bulb
to prevent short circuits.
�
Always use a clean lint-free cloth when
handling bulbs.
�
Your hands should be dry and free of oil
and grease.
�
If the newly installed bulb does not light
up, visit an authorized Mercedes-Benz
Light Truck Center.
�
Have the LEDs and bulbs for the follow-
ing lamps replaced by an authorized
Mercedes-Benz Light Truck Center:�
Additional turn signals in the exteri-
or rear view mirrors
�
Bi-Xenon lamps*
�
Front fog lamps (vehicles with sport
package)*
Lamp
Type
6
Brake lamp
1073
(32 cp bulb)
7
Backup lamp
1073
(32 cp bulb)
8
Turn signal lamp
PY 21 W
9
Tail, parking and
standing lamp
Rear fog lamp, driv-
er’s side
P 21 / 4 W
a
Side marker lamp
W5W
b
High mounted brake
lamp
1073
(32 cp bulb)
c
License plate lamps
C 5 W
Warning!
G
Keep bulbs out of reach of children.
Bulbs and bulb sockets can be very hot. Al-
low the lamp to cool down before changing
a bulb.
Halogen lamps contain pressurized gas. A
bulb can explode if you:�
touch or move it when hot
�
drop the bulb
�
scratch the bulb
Wear eye and hand protection.
Because of high voltage in xenon lamps, it is
dangerous to replace the bulb or repair the
lamp and its components. We recommend
that you have such work done by a qualified
technician.
Page 1072 of 4133
268 Practical hintsReplacing bulbsReplacing bulbs for front lamps
Replacing low beam bulbs
1Low beam halogen or Bi-Xenon* head-
lamp cover with locking tab2Electrical connector
Bi-Xenon* headlampHalogen headlamp
�
Switch off the lights.
�
Open the hood (
�page 217).
�
Push down tab at top end of cover1
and remove.
�
Pull electrical connector2 off.
�
Unclip the retainer springs and take out
the bulb.
�
Insert the new bulb so that the base lo-
cates in the recess on the holder.
�
Clip the retainer springs.
�
Plug the connector2 onto the bulb.
�
Align headlamp cover and click into
place.
Warning!
G
Do not remove the cover
1
for the
Bi-Xenon headlamp. Because of high voltage
in xenon lamps, it is dangerous to replace
the bulb or repair the lamp and its compo-
nents. We recommend that you have such
work done by a qualified technician.
Page 1086 of 4133

282 Practical hintsJump startingThe battery is located on the right side of
the engine compartment.�
Make sure the two vehicles do not
touch.
�
Turn off all electrical consumers.
�
Apply parking brake.
�
Shift gear selector lever to positionP.
�
Open the hood.
�
Connect positive terminals1 and4
of the batteries with the jumper cable.
Clamp cable to positive terminal4 of
charged battery first.1Positive terminal of discharged battery
2Negative terminal of discharged
battery
3Negative terminal of charged battery
4Positive terminal of charged battery
�
Start engine of the vehicle with the
charged battery and run at idle speed.
�
Connect negative terminals2 and3
of the batteries with the jumper cable.
Clamp cable to negative terminal3 of
charged battery first.
�
Start the engine of the disabled vehi-
cle.
Now you can turn on the electrical
consumers. Do not turn on the lights under
any circumstances.
�
Remove the jumper cables first from
the negative terminals2 and3 and
then from positive terminals1
and4.
You can now turn on the lights.
�
Have the battery checked at the
nearest authorized Mercedes-Benz
Light Truck Center.
Warning!
G
Keep flames or sparks away from battery.
Do not smoke.
Observe all safety instructions and precau-
tions when handling automotive batteries
(�page 223).
!Never invert the terminal connections.
!Do not tow-start the vehicle.
Page 1115 of 4133

Prevents the wheels from locking up
during braking so that the vehicle can
continue to be steered.
BabySmart
TM airbag deactivation
system
This sy")
311 Technical terms
ABS
(A
ntilock B
rake S
ystem)
Prevents the wheels from locking up
during braking so that the vehicle can
continue to be steered.
BabySmart
TM airbag deactivation
system
This system detects if a special system
compatible child restraint seat is in-
stalled on the front passenger seat. The
system will automatically deactivate
the passenger front airbag when such a
seat is properly installed (indicator
lamp7 in the instrument cluster
lights up). See your authorized
Mercedes-Benz Light Truck Center for
availability.
BabySmartTM compatible child seats
Special restraint system for children.
The sensor system for the passenger
seat prevents deployment of the pas-
senger front airbag if a BabySmart
TM
compatible child seat is installed.BAS
(B
rake A
ssist S
ystem)
System for potentially reducing braking
distances in emergency braking situa-
tions. The system is activated when it
senses an emergency based on how
fast the brake is applied.
Bi-Xenon headlamps*
Headlamps which use an electric arc as
the light source and produce a more in-
tense light than filament headlamps.
Bi-Xenon headlamps produce low
beam and high beam.
CAC
(C
ustomer A
ssistance C
enter)
Mercedes-Benz customer service cen-
ter, which can help you with any ques-
tions about your vehicle and provide
assistance in the event of a break-
down.CAN system
(C
ontroller A
rea N
etwork)
Data bus network serving to control ve-
hicle functions such as door locking or
windshield wiping.
Cockpit
All instruments, switches, buttons and
indicator / warning lamps in the pas-
senger compartment needed for vehi-
cle operation and monitoring.
Cruise control
Driving convenience system for auto-
matically maintaining the vehicle speed
set by the driver.
Engine number
The number set by the manufacturer
and placed on the cylinder block to
uniquely identify each engine pro-
duced.